MIT Missing Semester (2020)
1 - Course overview + the shell
Introduction to the shell
The shell is going to be one of the primary ways that you interact with your computer once you want to do more things than what the visual interfaces you might be used to allow you to do. The visual interfaces are sort of limited in what they allow you to do because you can only do the things that there are buttons for, sliders for, input fields for, etc.
Often these textual tools are built to be both composable with one another but also to have tons of different ways to combine them or ways to program or automate them. The shell is the place you will do most of this work.
Terminals are windows that allow you to display shells. And there are quite a few different types of shells but the most common of which is bash. (See "The Terminal" note following this note for more on what terminals are and what the Terminal application on a Macintosh is specifically.)
When you open your terminal, you will be greeted with a single line: the shell prompt (of whichever shell you have chosen to be your default shell). This is where you will tell the shell what you want it to do. You can customize this prompt a lot and will likely look different from one developer to the next. This article goes over how to customize your macOS terminal and has some ideas. We're not going to go over how to customize your shell right now but how to get your shell to do useful things.
The shell is really the main textual interface you have with your computer. To use your shell, first launch your terminal. You will then see a prompt that often looks something like
DWF-MBP:~$
This is the main textual interface to the shell. At this prompt, you can type a command, which will then be interpreted by the shell. As noted in [3], Mac OS X comes with over 1,000 commands for file manipulation,
text editing, printing, mathematics, computer programming,
typesetting, networking...you name it. A typical command is
run in a shell by typing its program name, followed by options
and arguments, like wc -l myfile. Commands are often relatively straightforward things by themselves. Usually a command will be used to execute a program with options and arguments as illustrated above with the wc program.
For example, one program you can execute without any arguments at all is the date program:
date
# Fri Dec 11 06:52:09 CST 2020
Unsurprisingly, it gives you the date and time. You can also execute programs with arguments to modify the behavior of the program. For example, there's a program called echo that just prints out the arguments that you give it where arguments are just whitespace-separated strings that follow the program name. So we can have something like the following:
echo hello
# hello
Probably not all that surprising but this is the very basics of arguments with programs. Since arguments are whitespace-separated, it makes sense we would need some way of representing a single argument we want to use but that has more than one word. You can do this with single or double quotes as well as escaping the space:
echo 'Two Words'
echo "Two Words"
echo Two\ Words

# Two Words
The difference between single quotes and double quotes will come up when we start talking aboutbash scripting.
The terminal
The discussion that follows is largely adapted from [2].
What exactly is "The Terminal"? In terms of Macintosh computers, the Terminal is an application that runs commands. Inside each Terminal window is a special program running called a shell, and the shell does four simple things:
- It displays a prompt in the Terminal window, waiting for you to type a command and press Enter.
- It reads your command and interprets any special symbols you typed.
- It runs or executes the command, automatically locating any necessary programs.
- It prints the output, if any, in the Terminal window.
The Terminal's job is merely to open windows and manage shells. Using the Terminal, you can resize the windows, change their colors and fonts, and perform copy and paste operations. But it's the shell that is doing the real work of reading and running commands. The following figure illustrates how the Terminal and shell work together:
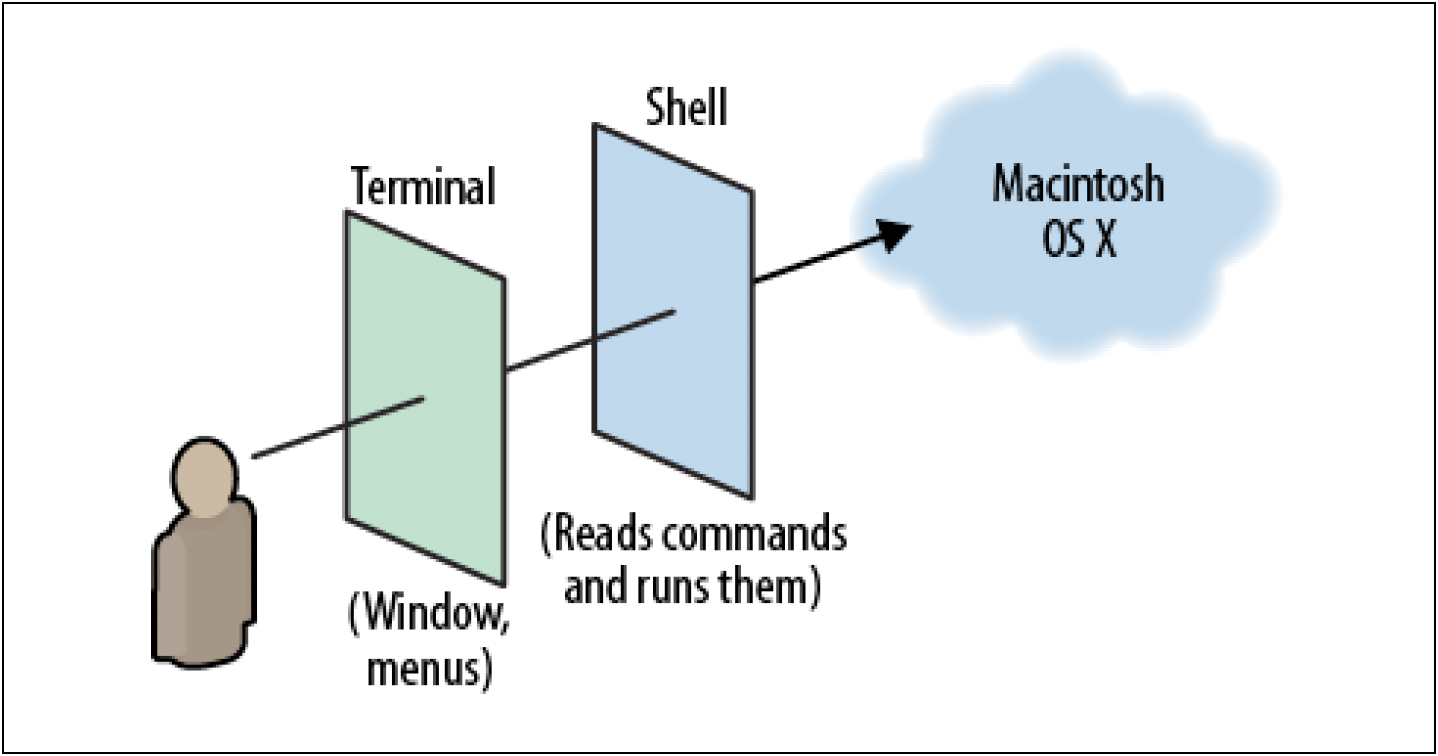
When you peer into a Terminal window, you are viewing a shell, which in turn interacts with your Macintosh.
In a sense, the Terminal is almost a GUI for your shell. And it is nice to note that, at least on a Macintosh, Terminal.app and bash is only the default "Terminal-Shell" pairing even though there are several alternatives for both. For example, as noted on Slant, there are several terminal emulators for the Mac such as
- Terminal.app (comes preinstalled with your Mac)
- iTerm2: iTerm2 is a replacement for Terminal and the successor to iTerm. It works on Macs with macOS 10.14 or newer. iTerm2 brings the terminal into the modern age with features you never knew you always wanted (e.g., split panes, hotkey window, search, autocomplete, copy mode, etc.). [...]
- Alacritty: Alacritty is a modern terminal emulator that comes with sensible defaults, but allows for extensive configuration. By integrating with other applications, rather than reimplementing their functionality, it manages to provide a flexible set of features with high performance (e.g., Vi mode, hints, etc.). The supported platforms currently consist of BSD, Linux, macOS and Windows. [...]
- kitty: The fast, featureful, GPU based terminal emulator. Offloads rendering to the GPU for lower system load and buttery smooth scrolling. Uses threaded rendering to minimize input latency. Supports all modern terminal features: graphics (images), unicode, true-color, OpenType ligatures, mouse protocol, hyperlinks, focus tracking, bracketed paste and several new terminal protocol extensions. [...]
- Hyper: Hyper is an Electron-based terminal. Built on HTML/CSS/JS. Fully extensible. Install themes and plugins from the command line. [...]
- ... and many many more ...
while there are also several UNIX shell options such as
-bash (default shell on virtually every UNIX system)
- zsh: Zsh is a shell designed for interactive use, although it is also a powerful scripting language. Many of the useful features ofbash, ksh, and tcsh were incorporated into zsh; many original features were added. [...]
- fish: fish is a smart and user-friendly command line shell for Linux, macOS, and the rest of the family. Some highlights: autosuggestions (fish suggests commands as you type based on history and completions, just like a web browser), glorious VGA color (fish supports 24 bit true color, the state of the art in terminal technology), sane scripting (fish is fully scriptable, and its syntax is simple, clean, and consistent), web-based configuration (for those lucky few with a graphical computer, you can set your colors and view functions, variables, and history all from a web page), man page completions (other shells support programmable completions, but only fish generates them automatically by parsing your installed man pages), and works out of the box (fish will delight you with features like tab completions and syntax highlighting that just work, with nothing new to learn or configure). [...]
- dash: DASH is a POSIX-compliant implementation of /bin/sh that aims to be as small as possible. It does this without sacrificing speed where possible. In fact, it is significantly faster thanbash (the GNU Bourne-Again SHell) for most tasks. [...]
- xonsh: Xonsh is a Python-powered, cross-platform, Unix-gazing shell language and command prompt. The language is a superset of Python 3.5+ with additional shell primitives that you are used to frombash and IPython. It works on all major systems including Linux, OSX, and Windows. Xonsh is meant for the daily use of experts and novices. [...]
- ... and many many more ...
With a Mac, Terminal.app andbash are just the defaults that get shipped to you. But you have numerous options to choose from out there for your own use on a day-to-day basis, butbash is a good choice regardless given its very wide usage (i.e., it is very portable).
Note: If you run bash --version and you get something like
GNUbash, version 3.2.57(1)-release (x86_64-apple-darwin18)
Copyright (C) 2007 Free Software Foundation, Inc.
then you should consider updating your version ofbash since v3.2 dates back to 2007 whilebash is currently (at time of writing) v5.1.4. This article can help with the update process.
The PATH
One thing you may wonder is how the shell knows what program you want it to execute. For example, when we execute the date program, how does the shell know where to find the date program? If we execute echo hello, then how does the shell know where the echo program is to feed hello as an argument to? How does the shell find these programs and know what these programs are supposed to do?
The answer is that your computer has a bunch of built in programs that come with the machine. So your computer will typically ship with some kind of terminal application (e.g., Terminal.app) and some kind of shell (e.g.,bash), but it will also ship with a bunch of terminal-centric applications ready to go. And these applications are stored on your file system. And your shell has a way to determine where a program is located. It basically has a way to search for programs. It does this through a so-called environment variable. An environment variable is a variable like you might be used to for programming languages. It turns out that the shell, and the bourne again shell in particular, is really a programming language. The shell prompt you are given when you open a terminal window is not just able to run a program with arguments--you can also do things like while loops, for loops, conditionals, define functions, etc. All these things you can do in the shell. This is the kind of thing you do when shell scripting.
For now though, let's just look at this particular environment variable: In the context of the shell, environment variables are variables that are set whenever you start your shell. They're not variables you have to set everytime you run your shell. There are a bunch of these environment variables that are set to things like: where is your home directory, what is your username, etc. There's also one that is absolutely critical for all of this: the $PATH variable (you can see all of your shell's environment variables by running printenv):
$ echo $PATH

/Users/danielfarlow/.pyenv/shims:/Users/danielfarlow/.nvm/versions/node/v14.15.0/bin:/Users/danielfarlow/opt/anaconda3/bin:/Users/danielfarlow/opt/anaconda3/condabin:/Users/danielfarlow/.local/bin:/Library/Frameworks/Python.framework/Versions/3.7/bin:/usr/local/bin:/usr/bin:/bin:/usr/sbin:/sbin:/Library/TeX/texbin:/Users/danielfarlow/.pyenv/shims:/Users/danielfarlow/.nvm/versions/node/v14.15.0/bin:/usr/local/mysql/bin:.:/Applications/Visual Studio Code.app/Contents/Resources/app/bin
The above shows that echo $PATH inbash will show us all the paths on our machine that the shell will search for programs. Worth noting is that the output is essentially a colon-separated list, which may be kind of long and hard to read. But the essential point is that whenver you type the name of a program inbash, your shell will search the list of paths in the $PATH variable. It will look through each directory for a program or file whose name matches the command you tried to run. So if you run date or echo in thebash shell, then your shell will search every directory in $PATH until it finds a program named date or echo. And then it's going to run it if it finds a match. If we want to know which one it actually runs (e.g., maybe you have two echo programs), then you can run the which program. For example:
$ which echo

/bin/echo
This tells us that if we were to try to run a program named echo, then our shell would run the echo program from the /bin/echo directory. It's worth pausing for a moment to talk about what paths are. Paths are a way to name the location of a file on your computer. On Linux and macOS, these paths are separated by forward slashes: /. When you see something like /bin/echo, the first / indicates that we are at the root; that is, we are at the top of the file system. On Windows, paths like this are typically separated by backslashes instead. And while on Linux and macOS everything lives under the root namespace (so all absolute paths start with a slash) in Windows there is one root for every partition. So you may see things like C:\ or D:\. So Windows has sort of separate file system hierarchies for each drive that you have. But in Linux and macOS everything is mounted under one namespace (i.e., the root namespace).
On the topic of paths, what might one mean by the term absolute path? Absolute paths are paths that fully determine the location of a file. So something like /bin/echo is talking about a specific echo file and we are getting the full path to this file since the path begins with only a slash. But there are also things known as relative paths. A relative path, as its name implies, is relative to where you are. And the way you find out where you currently are is by typing pwd.
pwd

/Volumes/DEVFARLOW/development-and-engineering/webdev-courses/mit/missing-semester
This will print out the current path you are in. Notice that the path printed out by pwd is itself an absolute path. But we can change the current working directory to something else in relation to the directory we are presently working in. That is, something like cd .. will take us up one level in relation to whatever directory was printed out with pwd.
There are also a couple of "special directories" that exist, namely . and .., where . means the current directory (the directory printed out by pwd) while .. means the parent directory of the current directory. So this is a way you can easily navigate around the system. We can use . to navigate into folders relative to where we currently are: cd ./somesubfolder.
In general, when you run a program, that program will run on the current working directory. At least by default. This is really handy because this means we do not have to give full paths for things. We can just use the names for the files that are in the directory we are currently in. One thing useful for finding out which files exist in the directory you are in is the ls command--this will list the files in the current directory.
It is useful to know that ~ always expands to your home directory. So doing something like cd ~ will take you to your home directory. And you can easily change into directories relative to your home directory like so: cd ~/Desktop. Another useful thing to know is cd -. This effectively lets you toggle between two directories--it takes you to the directory you were previously in.
In the case of many programs, such as ls or cd, there may be arguments you do not know about. So far we have not done much other than provide paths. But how do you even discover that you can give a path to ls in the first place? Well, most programs take what are known as "arguments" like flags and options. These are things that usually start with a dash. One of the handiest of these is --help (see this link for why ls --help results in an error on macOS; short version: try man ls for something similar).
Something helpful is the -l flag when using ls (to "use a long listing format") which is maybe not helpful in and of itself. But let's see what the output might look like:
ls -l

-rw-r--r--   1 danielfarlow  staff       15 Nov 22 22:09 README.md
-rwxrwxrwx@  1 danielfarlow  staff  9478242 Nov 14 10:38 Structure and Interpretation of Computer Programs - Abelson and Sussman (1996) [2nd Ed.].pdf
drwxr-xr-x  11 danielfarlow  staff      374 Nov 27 17:05 book-work
drwxr-xr-x  23 danielfarlow  staff      782 Nov  5 11:45 code-from-book
drwxr-xr-x   5 danielfarlow  staff      170 Nov 17 13:14 official-course-archive
drwxr-xr-x   6 danielfarlow  staff      204 Nov 17 13:07 official-exams
drwxr-xr-x@ 33 danielfarlow  staff     1122 Nov 14 11:17 official-lecture-notes
drwxr-xr-x   9 danielfarlow  staff      306 Nov 17 13:12 official-projects
drwxr-xr-x   3 danielfarlow  staff      102 Nov 16 10:42 official-video-recordings
drwxr-xr-x  20 danielfarlow  staff      680 Nov  5 11:25 programming-assignments
-rw-r--r--   1 danielfarlow  staff       19 Dec  3 22:56 scheme-sandbox.scm
drwxr-xr-x   4 danielfarlow  staff      136 Nov  5 11:47 sicp-js
-rw-r--r--   1 danielfarlow  staff     2267 Dec 10 17:34 temp.html
drwxr-xr-x   3 danielfarlow  staff      102 Nov 29 10:22 uc-berkeley-resources
You can see the beginning d in the leftmost column indicates the item is a directory while those with - are not. The following letters after that indicate the permissions that are set for that file. So in some cases you may not be able to change into a directory or read a file or any other number of permission-related tasks. This all has to do with permissions!
The way to read this information is to note that the first group of three character indicates the permissions that are set for the owner of the file (i.e., danielfarlow as shown above). The second group of three characters displays the permissions for the group that owns the file or directory--above, we see all the files are owned by the staff group. The final group of three characters displays the list of permissions for everyone else. So anyone who is not a user owner or a group owner. You will get a different list of permissions and the like if, for example, you visit the root directory:
ls -l

drwxrwxr-x+ 115 root  admin  3680 Nov 29 15:24 Applications
drwxr-xr-x+  67 root  wheel  2144 Oct 29 17:05 Library
drwxr-xr-x    2 root  wheel    64 Aug 17  2018 Network
drwxr-xr-x@   5 root  wheel   160 Jan 15  2019 System
drwxr-xr-x    5 root  admin   160 Oct  7  2019 Users
drwxr-xr-x+   6 root  wheel   192 Dec 11 11:41 Volumes
drwxr-xr-x@  37 root  wheel  1184 Nov 12 15:40 bin
drwxrwxr-t    2 root  admin    64 Aug 17  2018 cores
dr-xr-xr-x    3 root  wheel  4614 Dec 11 05:34 dev
lrwxr-xr-x@   1 root  wheel    11 Jan 15  2019 etc -> private/etc
dr-xr-xr-x    2 root  wheel     1 Dec 11 09:20 home
-rw-r--r--    1 root  wheel   313 Aug 17  2018 installer.failurerequests
dr-xr-xr-x    2 root  wheel     1 Dec 11 09:20 net
drwxr-xr-x    6 root  wheel   192 Jan 15  2019 private
drwxr-xr-x@  64 root  wheel  2048 Nov 12 15:40 sbin
lrwxr-xr-x@   1 root  wheel    11 Jan 15  2019 tmp -> private/tmp
drwxr-xr-x@   9 root  wheel   288 Jan 15  2019 usr
lrwxr-xr-x@   1 root  wheel    11 Jan 15  2019 var -> private/var
The permissions here are a bit more interesting. You'll first notice everything is owned by the user root. We'll get back to what the root user is before long, but everything is a bit more interesting here. You'll notice groups like admin and wheel.
The character group rwx means (r)ead, (w)rite, and e(x)ecute; that is, directory and file access rights for user, group, and everyone else are indicated by groups of three characters each where something like rwx means the accessor has read, write, and execute permissions, whereas something like r-x means the accessor has read and execute permission but not write permission.
It's worth noting that what these things really mean differs for files and for directories. For files it's pretty straightforward:
r: If you have read permissions on a file, then you can read its contents.w: If you have write permissions on a file, then you can save the file, add more to it, replace it entirely, etc.x: If you have execute permissons on a file, then you are allowed to execute that file.
For directories, these permissions are a bit different.
r: Are you allowed to see which files are inside the directory? So think ofrfor a directory as "list"; that is, you will not be able to list off the contents of a directory unless you have the read permission.w: Are you allowed to rename, create, or remove files within a directory? If so, then you must have the write permission. So this is kind of intuitive but notice that this means that if you have write permissions on a file but you do not have write permissions on its directory, then you cannot delete the file. You can empty it. But you cannot delete it. Because that would require writing to the directory itself.x: Execute on directories is something that trips people up a lot. Execute on a directory is what's known as "search". While this is not a terribly useful name, what this means is: Are you allowed to enter this directory? If you want to get to a file, whether to open it or read it or write it or whatever you want to do (basically tocdinto a directory), then you must have the execute permission on all parent directories of the directory as well as the directory itself. For example, for me to access a file inside/usr/bin, such as/usr/bin/echo, then we must have the execute permission on/,usr, andbin. If we do not have all those execute permissions, then we will not be allowed access to theechofile in/usr/binbecause we won't be able to enter the directories along the way.
There are other bits you might come across such as s, t, l, @, etc.
Another command that is helpful to know about is the mv command which takes two arguments, the path to the file you want to move and the path to where you want the file to be moved. There's also the cp command which is very similar to the mv command except with cp you copy a file.
You can also remove files with rm. By default, removal is not recursive; hence, you cannot remove all files from a directory just using rm. You can pass the -r flag which lets you do a recursive remove and then pass a path where the effect will be the removal of everything below the specified path. There's also the rmdir command which lets you remove a directory but only if the directory is empty. Finally, there's mkdir which lets you make a directory.
If you ever want more information about how any of these commands work, then there's a really handy command for that as well: man. This stands for "manual pages". This program takes as an argument the name of another program and gives you its manual page. So we can do something like man ls to see more about the ls program and its usage. We can quit the manual page program by simply entering q.
Combining programs
So far we have largely talked about programs in isolation. But where much of the power of the shell really comes through is when you start combining different programs. So instead of just running cd or running ls, we may want to chain multiple programs together. The way we can do this is by means of the notion of streams that the shell gives us.
Every program by default has essentially two primary streams, the input stream (i.e., stdin) and the output stream (i.e., stdout). By default, the input stream is your keyboard (essentially the window you type into opened by your terminal). Whatever you type into your terminal is going to end up in your program. And it has a default output stream which is, whenever the program prints something, it is going to print to that stream. And by default the standard output stream is your terminal. This is why when we type echo hello it gets printed back to our terminal.
But the shell gives you a way to rewire these streams (i.e., to change where the input and output of a program are pointed). The most straightforward way you do this is using the angle bracket signs (i.e. < and >). An example will clearly demonstrate their uses.
echo hello > hello.txt
The above will effectively take the output of echo hello and store the content in the file hello.txt. And because we implicitly gave a relative path, this will construct the file hello.txt in the current directory called hello.txt. In theory, the contents of the hello.txt file after invoking this command should just be the string hello. If you execute this, then notice that nothing gets printed to the output. Previously, when we just ran echo hello, we saw hello printed to the terminal. Now, that hello has gone into a file called hello.txt. And we can verify this using the cat program (which prints the contents of a file) like so:
cat hello.txt

hello
But cat is also a program that supports this kind of rewiring. So cat, whose default behavior is to duplicate its input to its output, can be used like so:
cat < hello.txt

hello
We are communicating that we want the cat program to take its input from hello.txt. What will happen in this case is that the shell will open hello.txt, take its contents and set those contents to be the input of cat, and then cat is just going to print those contents to its output, which, since we haven't rewired it, is just going to be the terminal.
And we can use both angle brackets at the same time if we so desire. For example, if we want to copy a file without using the cp command for some reason, then we can run the following:
cat < hello.txt > hello2.txt
In this case, we're telling the cat program to just do its normal thing--it knows nothing about the redirection. But we are telling the shell to use hello.txt as the input for cat and write anything that cat prints to hello2.txt.
It's important to be aware of >> instead of just >. The default behavior of > is to overwrite whereas >> is used to append content to a file.
These commands are pretty straightforward--they're usually just ways to interact with files, but where it gets really interesting is when you use another operator the shell gives you: the pipe character |. What "pipe" means is "take the output of the program to the left and make it the input to the program on the right." What does this look like?
Let's consider ls -l /. This prints, in long listing format, the contents of the root directory /. Let's say we only wanted the last line of the output. Well, there's a command called tail where tail prints the last n lines of its input. So we can do something like tail -n1 which tells us to print the last line. And we can wire the ls program and the tail program together by means of |:
ls -l / | tail -n1

lrwxr-xr-x@   1 root  wheel    11 Jan 15  2019 var -> private/var
Notice here that ls does not know about tail at all. And tail does not know about ls either. They're completely different programs and have never been programmed to be compatible with one another. All they know how to do is read from input and write to output. But the pipe | is what wires them together. In this particular case, what we're saying is that we want the output of ls -l / to be the input to tail -n1 and we want the output of tail -n1 to go to our terminal because we haven't rewired the output of tail -n1. We could, on the other hand, rewire the output of tail -n1 to go to something like ls.txt:
ls -l / | tail -n1 > ls.txt
This will result in
lrwxr-xr-x@ 1 root wheel 11 Jan 15 2019 var -> private/var
being written to ls.txt instead of the terminal window. It turns out you can do some really neat things with this, namely building robust pipelines to accomplish all sorts of work. To give you one example of something not all that practical but mildly interesting nonetheless:
curl --head --silent google.com | grep -i content-length | cut -d " " -f 2

219
The curl --head --silent google.com gives us all the HTTP headers for accessing google.com:
HTTP/1.1 301 Moved Permanently
Location: http://www.google.com/
Content-Type: text/html; charset=UTF-8
Date: Sat, 12 Dec 2020 01:54:15 GMT
Expires: Mon, 11 Jan 2021 01:54:15 GMT
Cache-Control: public, max-age=2592000
Server: gws
Content-Length: 219
X-XSS-Protection: 0
X-Frame-Options: SAMEORIGIN
The cool thing is that we are taking the output stream of curl --head --silent google.com, which usually goes to the Terminal window, and we are redirecting it to be the input stream to grep -i content-length, where this command uses a case-insensitive regular expression to give us Content-Length: 219. We can yet again pipe this to cut with cut -d " " -f 2 to give us the second field where we are using a space " " as the delimiter. The net result is 219.
This example is not the most useful of examples but you can already see by the composability how we could do some really cool things (maybe piping things to different functions, etc.). Furthermore, it turns out that pipes are not just for textual data. You can do this for things like images as well. You can have a program that manipulates a binary image on its input and writes a binary image to its output.
The root user
We need to discuss the notion of a "root user". The root user is sort of like the administrator user on Windows and has user ID 0. The root user is special because it is allowed to do whatever it wants on your system. Even if a file is not readable by anyone or not writable by anyone, etc. Root can still do all this stuff. Root is sort of a "super user" that can do whatever it wants. Most of the time you will not be operating as the super user--you will not be root but someone like danielfarlow or whatever your default username is. This is the user you will typically act with. This is because if you were operating your computer as the root user at all times then if you ran the wrong program by accident you could completely destroy your computer. This is to protect you in most cases. But sometimes you explicitly want to do something that you would otherwise often be protected against. Usually for these cases you would use a program called sudo or "do as su" where su in this case is "super user". So sudo effectively means "do the following as the super user". Usually, the way sudo works is you write sudo and then a command like you would normally appear on your terminal like sudo echo bob, and then the shell would run that command is if you were the root user instead of your normal user.
Where might you need something like this? There are many special file systems on your computer and often modifying them in any way requires you do so as the root user. On some systems, for example, we might be able to do something like the following:
$ cd /sys/class/backlight/intel_backlight
$ cat brightness

1060
You might think you could do something like echo 500 > brightness to change the brightness, but we get an error: bash: brightness: Permission denied. The fix seems simple: sudo echo 500 > brightness. But we get the same error. Why? This is because redirections of input and output do not know about each other. This is not something the programs themselves know about. When we piped ls into tail, tail did not know about ls and ls did not know about tail. The pipe and redirection was set up by the shell. So in this case what we are doing is telling the shell to run the echo program as the super user and to send the output to the brightness file. But the shell is what is opening the brightness file--it is not the sudo program. So in this case, the shell tries to open the brightness file for writing as the default user (i.e., not the root/super user). But it's not allowed to do that and therefore we get a permission denied error.
How do we get around this? We could switch into a "root terminal"--one way to do this is to run sudo su which effectively says, "Run the following command as root and su is a complicated command that effectively gets you a shell as the super user." Then everything you execute is done so as the super user. With most shell setups, the shown username will change from your default to root and the $ will change to #. If we run sudo su, drop into a root shell, and execute echo 500 > brightness, then we do not get any permission denied errors, but can we accomplish this same thing without resorting to dropping into the root shell? Yes. Here is one way:
echo 1060 | sudo tee brightness
How is this different? Here we are telling the shell to run the echo 1060 command and then to run the sudo tee brightness command, where the standard output of echo 1060 is redirected to be the standard input of sudo tee brightness. In order to understand this, we must know what the tee command does. The tee command takes its input and writes it to a file but also to standard output. So tee is a convenient way if, say, you have a log file and you want to send to a file to store for later but you also want to see it yourself. So you can pipe your content through tee to the name of a file but also see the redirected output show up as standard output as well (i.e., printed to the Terminal window). We are taking advantage of that program here: We are telling the shell to run tee as the super user with input 1060 coming from echo--this will effectively write 1060 to the brightness file as well as show 1060 as standard output.
All shells are roughly the same at their core
While they may vary in the details, at their core they are all roughly the same: they allow you to run programs, give them input, and inspect their output in a semi-structured way.
Standard input and output streams for programs are both the terminal
Normally, a program's input and output are both your terminal (i.e., your keyboard as input and your screen as output). You can gain a great deal of power by effectively rewiring these streams (typically in the form of using | to pipe the output stream of one command/program as the input stream of another command/program).
The simplest form of redirection is < file and > file, where < and > let you rewire the input and output streams of a program to a file, respectively.
Operations like |, >, and < are done by the shell, not the individual program
On a Linux system, sysfs exposes a number of kernel parameters as files (so you can easily reconfigure the kernel on the fly without specialized tools), and you need to be root when writing to the sysfs file system mounted under/sys.
For example, the brightness of your laptop's screen is exposed through a file called brightness under /sys/class/backlight. By writing a value into that file, we can change the screen brightness. Your first instinct might be to do something like:
$ sudo find -L /sys/class/backlight -maxdepth 2 -name '*brightness*'
/sys/class/backlight/thinkpad_screen/brightness
$ cd /sys/class/backlight/thinkpad_screen
$ sudo echo 3 > brightness
An error occurred while redirecting file 'brightness'
open: Permission denied
This error may come as a surprise. After all, we ran the command with sudo! This is an important thing to know about the shell. Operations like |, >, and < are done by the shell, not by the individual program (hence you cannot "run" something like |, <, or > with sudo--these symbols aren't programs; these are operations managed by the shell so your use of sudo should always apply to the program you really need to be using as a super user). echo and friends do not "know" about |. They just read from their input and write to their output, whatever it may be. In the case above, the shell (which is authenticated just as your user) tries to open the brightness file for writing, before setting that as sudo echo's output, but is prevented from doing so since the shell does not run as root. Using this knowledge, we can work around this:
echo 3 | sudo tee brightness
Since the tee program is the one to open the /sys file for writing, and it is running as root, the permissions all work out.
Exercises
1.1
- Question
- Answer
- Additional Details
For this course, you need to be using a Unix shell likebash or ZSH. If you are on Linux or macOS, you don't have to do anything special. If you are on Windows, you need to make sure you are not running cmd.exe or PowerShell; you can use Windows Subsystem for Linux or a Linux virtual machine to use Unix-style command-line tools. To make sure you're running an appropriate shell, you can try the command echo $SHELL. If it says something like /bin/bash or /usr/bin/zsh, that means you're running the right program.
echo $SHELL
# /usr/local/bin/fish
Daily using Mac OS X with a Unix-style shell in the totally awesome fish shell!
But running everything in this course using the upgradedbash shell in v5.1.4.
1.2
- Question
- Answer
- Additional Details
Create a new directory called missing under /tmp.
mkdir /tmp/missing
Now we can simply cd into this new directory since we will be working inside of it for a bit:
cd /tmp/missing
1.3
- Question
- Answer
- Additional Details
Look up the touch program. The man program is your friend.
man touch
The command above gives us the following (any stylings such as underlining and the like have been removed):
TOUCH(1)          BSD General Commands Manual             TOUCH(1)

NAME
     touch -- change file access and modification times

SYNOPSIS
     touch [-A [-][[hh]mm]SS] [-acfhm] [-r file] [-t [[CC]YY]MMDDhhmm[.SS]] file ...

DESCRIPTION
     The touch utility sets the modification and access times of files.  If any file does not exist, it is created with default
     permissions.

     By default, touch changes both modification and access times.  The -a and -m flags may be used to select the access time or
     the modification time individually.  Selecting both is equivalent to the default.  By default, the timestamps are set to the
     current time.  The -t flag explicitly specifies a different time, and the -r flag specifies to set the times those of the
     specified file.  The -A flag adjusts the values by a specified amount.

     The following options are available:

     -A      Adjust the access and modification time stamps for the file by the specified value.  This flag is intended for use
         in modifying files with incorrectly set time stamps.

         The argument is of the form ``[-][[hh]mm]SS'' where each pair of letters represents the following:

           -       Make the adjustment negative: the new time stamp is set to be before the old one.
           hh      The number of hours, from 00 to 99.
           mm      The number of minutes, from 00 to 59.
           SS      The number of seconds, from 00 to 59.

         The -A flag implies the -c flag: if any file specified does not exist, it will be silently ignored.

     -a      Change the access time of the file.  The modification time of the file is not changed unless the -m flag is also
         specified.

     -c      Do not create the file if it does not exist.  The touch utility does not treat this as an error.  No error messages
         are displayed and the exit value is not affected.

     -f      Attempt to force the update, even if the file permissions do not currently permit it.

     -h      If the file is a symbolic link, change the times of the link itself rather than the file that the link points to.
         Note that -h implies -c and thus will not create any new files.

     -m      Change the modification time of the file.  The access time of the file is not changed unless the -a flag is also
         specified.

     -r      Use the access and modifications times from the specified file instead of the current time of day.

     -t      Change the access and modification times to the specified time instead of the current time of day.  The argument is
         of the form ``[[CC]YY]MMDDhhmm[.SS]'' where each pair of letters represents the following:

           CC      The first two digits of the year (the century).
           YY      The second two digits of the year.  If ``YY'' is specified, but ``CC'' is not, a value for ``YY''
               between 69 and 99 results in a ``CC'' value of 19.  Otherwise, a ``CC'' value of 20 is used.
           MM      The month of the year, from 01 to 12.
           DD      the day of the month, from 01 to 31.
           hh      The hour of the day, from 00 to 23.
           mm      The minute of the hour, from 00 to 59.
           SS      The second of the minute, from 00 to 61.

         If the ``CC'' and ``YY'' letter pairs are not specified, the values default to the current year.  If the ``SS'' let-
         ter pair is not specified, the value defaults to 0.

EXIT STATUS
     The touch utility exits 0 on success, and >0 if an error occurs.

COMPATIBILITY
     The obsolescent form of touch, where a time format is specified as the first argument, is supported.  When no -r or -t
     option is specified, there are at least two arguments, and the first argument is a string of digits either eight or ten
     characters in length, the first argument is interpreted as a time specification of the form ``MMDDhhmm[YY]''.

     The ``MM'', ``DD'', ``hh'' and ``mm'' letter pairs are treated as their counterparts specified to the -t option.  If the
     ``YY'' letter pair is in the range 39 to 99, the year is set to 1939 to 1999, otherwise, the year is set in the 21st cen-
     tury.

SEE ALSO
     utimes(2)

STANDARDS
     The touch utility is expected to be a superset of the IEEE Std 1003.2 (``POSIX.2'') specification.

HISTORY
     A touch utility appeared in Version 7 AT&T UNIX.

BSD             April 28, 1995                 BSD
1.4
- Question
- Answer
- Additional Details
Use touch to create a new file called semester in missing.
touch semester
None
1.5
- Question
- Answer
- Additional Details
Write the following into that file, one line at a time:
#!/bin/sh
curl --head --silent https://missing.csail.mit.edu
The first line might be tricky to get working. It's helpful to know that
# starts a comment in Bash, and ! has a special meaning even within
double-quoted (") strings. Bash treats single-quoted strings (')
differently: they will do the trick in this case. See the Bash
quoting
manual page for more information.
echo '#!/bin/sh' > semester
echo 'curl --head --silent https://missing.csail.mit.edu' >> semester
The linked manual page's entries on the escape character, single quotes, and double quotes are all very helpful in general and thus reproduced below for ease of reference (even though the entry on single quotes is the only relevant one presently)
- Escape Character (how to remove the special meaning from a single character): A non-quoted backslash
\is the Bash escape character. It preserves the literal value of the next character that follows, with the exception ofnewline. If a\newlinepair appears, and the backslash itself is not quoted, the\newlineis treated as a line continuation (that is, it is removed from the input stream and effectively ignored). - Single Quotes (how to inhibit all interpretation of a sequence of characters): Enclosing characters in single quotes (
') preserves the literal value of each character within the quotes. A single quote may not occur between single quotes, even when preceded by a backslash. - Double Quotes (how to suppress most of the interpretation of a sequence of characters): Enclosing characters in double quotes (
") preserves the literal value of all characters within the quotes, with the exception of$,`,/, and, when history expansion is enabled,!. When the shell is in POSIX mode (see Bash POSIX Mode), the!has no special meaning within double quotes, even when history expansion is enabled. The characters$and`retain their special meaning within double quotes (see Shell Expansions). The backslash retains its special meaning only when followed by one of the following characters:$,`,",/, ornewline. Within double quotes, backslashes that are followed by one of these characters are removed. Backslashes preceding characters without a special meaning are left unmodified. A double quote may be quoted within double quotes by preceding it with a backslash. If enabled, history expansion will be performed unless an!appearing in double quotes is escaped using a backslash. The backslash preceding the!is not removed. The special parameters*and@have special meaning when in double quotes (see Shell Parameter Expansion).
The upshot of all of this in the context of the current exercise is that we should use single quotes as indicated in the provided answer:
echo '#!/bin/sh' > semester
echo 'curl --head --silent https://missing.csail.mit.edu' >> semester
Note: Use of > in the first line above would overwrite anything that might exist in the semester file while >> used in the second line appends to the semester file. It's not a bad idea to generally use >> to avoid accidentally overwriting things.
1.6
- Question
- Answer
- Additional Details
Try to execute the file; that is, type the path to the script (./semester)
into your shell and press enter. Understand why it doesn't work by
consulting the output of ls (hint: look at the permission bits of the
file).
./semester
# bash: ./semester: Permission denied
ls -l
# -rw-r--r--  1 danielfarlow  wheel  61 Apr 25 18:26 semester
The execution bit x is not set for the owner (only the read and write bits are set).
From the code sample above and the hint given in the exercise statement, it seems clear that the problem lies in not having x (i.e., ability to execute) for the "owner", "group", or "world" permission sets.
It is interesting to note that
./semesterrequires execution and readable bits (right now we only have the readable bit for the group and world permission sets and readable and writable for the owner set), butbash semesterorsh semesteronly requires the readable bit (which means we can runbash semesterorsh semesterjust fine since each accessor set has the readable bit set).
The short of it is that ./semester results in making your shell run the file as if it were a regular executable (this is obviously a problem if you do not have the execution bit x on the file set for the appropriate accessing group) while sh semester makes your shell run sh and passes semester as the command-line argument (semester is only read and interpreted by sh as a regular file and thus the execution bit x is not required).
A more detailed explanation behind the behavior described above can be found in this answer and this answer. The first linked answer is reproduced below:
For your specific script
#!/bin/bash
echo "Hello World!"
either way will work, except that
./script.shrequires execution and readable bits, whilebash script.shonly requires readable bit.The reason of the permissions requirement difference lies in how the program that interprets your script is loaded:
./script.shmakes your shell run the file as if it was a regular executable.The shell forks itself and uses a system call (e.g.
execve) to make the operating system execute the file in the forked process. The operating system will check the file's permissions (hence the execution bit needs to be set) and forward the request to the program loader, which looks at the file and determines how to execute it. In Linux compiled executables start with an ELF magic number, while scripts start with a#!(hashbang). A hashbang header means that the file is a script and needs to be interpreted by the program that is specified after the hashbang. This allows a script itself to tell the system how to interpret the script.With your script, the program loader will execute
/bin/bashand pass./script.shas the command-line argument.
bash script.shmakes your shell runbashand passscript.shas the command-line argumentSo the operating system will load
bash(not even looking atscript.sh, because it's just a command-line argument). The createdbashprocess will then interpret thescript.shbecause it's passed as the command-line argument. Becausescript.shis only read bybashas a regular file, the execution bit is not required.I recommend using
./script.shthough, because you might not know which interpreter the script is requiring. So let the program loader determine that for you.
1.7
- Question
- Answer
- Additional Details
Run the command by explicitly starting the sh interpreter, and giving it
the file semester as the first argument (i.e. sh semester). Why does
this work, while ./semester didn't?
Running
sh semester
The command above results in the following output (at the time of running this command):
HTTP/2 200
server: GitHub.com
content-type: text/html; charset=utf-8
last-modified: Tue, 20 Apr 2021 14:15:31 GMT
access-control-allow-origin: *
etag: "607ee203-1f31"
expires: Mon, 26 Apr 2021 04:11:01 GMT
cache-control: max-age=600
x-proxy-cache: MISS
x-github-request-id: C174:0523:8C4CFF:E81E50:60863AFD
accept-ranges: bytes
date: Mon, 26 Apr 2021 04:01:01 GMT
via: 1.1 varnish
age: 0
x-served-by: cache-fty21340-FTY
x-cache: MISS
x-cache-hits: 0
x-timer: S1619409661.254991,VS0,VE22
vary: Accept-Encoding
x-fastly-request-id: a01a72609209bd71a49fbeac08956529a4e7ff14
content-length: 7985
The reason sh semester worked while ./semester did not is because with sh semester we only need the read bit for permissions while ./semester requires the execution bit. (This is described more thoroughly in the response for the previous exercise.)
None
1.8
- Question
- Answer
- Additional Details
Look up the chmod program (e.g., use man chmod).
man chmod
The command above results in the following (stylings such as underlining and the like have been removed):
CHMOD(1)          BSD General Commands Manual             CHMOD(1)

NAME
     chmod -- change file modes or Access Control Lists

SYNOPSIS
     chmod [-fv] [-R [-H | -L | -P]] mode file ...
     chmod [-fv] [-R [-H | -L | -P]] [-a | +a | =a] ACE file ...
     chmod [-fhv] [-R [-H | -L | -P]] [-E] file ...
     chmod [-fhv] [-R [-H | -L | -P]] [-C] file ...
     chmod [-fhv] [-R [-H | -L | -P]] [-N] file ...

DESCRIPTION
     The chmod utility modifies the file mode bits of the listed files as
     specified by the mode operand. It may also be used to modify the Access
     Control Lists (ACLs) associated with the listed files.

     The generic options are as follows:

     -f      Do not display a diagnostic message if chmod could not modify the
         mode for file.

     -H      If the -R option is specified, symbolic links on the command line
         are followed.  (Symbolic links encountered in the tree traversal
         are not followed by default.)

     -h      If the file is a symbolic link, change the mode of the link
         itself rather than the file that the link points to.

     -L      If the -R option is specified, all symbolic links are followed.

     -P      If the -R option is specified, no symbolic links are followed.
         This is the default.

     -R      Change the modes of the file hierarchies rooted in the files
         instead of just the files themselves.

     -v      Cause chmod to be verbose, showing filenames as the mode is modi-
         fied.  If the -v flag is specified more than once, the old and
         new modes of the file will also be printed, in both octal and
         symbolic notation.

     The -H, -L and -P options are ignored unless the -R option is specified.
     In addition, these options override each other and the command's actions
     are determined by the last one specified.

     Only the owner of a file or the super-user is permitted to change the
     mode of a file.

DIAGNOSTICS
     The chmod utility exits 0 on success, and >0 if an error occurs.

MODES
     Modes may be absolute or symbolic.  An absolute mode is an octal number
     constructed from the sum of one or more of the following values:

       4000    (the set-user-ID-on-execution bit) Executable files with
           this bit set will run with effective uid set to the uid of
           the file owner.  Directories with the set-user-id bit set
           will force all files and sub-directories created in them to
           be owned by the directory owner and not by the uid of the
           creating process, if the underlying file system supports
           this feature: see chmod(2) and the suiddir option to
           mount(8).
       2000    (the set-group-ID-on-execution bit) Executable files with
           this bit set will run with effective gid set to the gid of
           the file owner.
       1000    (the sticky bit) See chmod(2) and sticky(8).
       0400    Allow read by owner.
       0200    Allow write by owner.
       0100    For files, allow execution by owner.  For directories,
           allow the owner to search in the directory.
       0040    Allow read by group members.
       0020    Allow write by group members.
       0010    For files, allow execution by group members.  For directo-
           ries, allow group members to search in the directory.
       0004    Allow read by others.
       0002    Allow write by others.
       0001    For files, allow execution by others.  For directories
           allow others to search in the directory.

     For example, the absolute mode that permits read, write and execute by
     the owner, read and execute by group members, read and execute by others,
     and no set-uid or set-gid behaviour is 755 (400+200+100+040+010+004+001).

     The symbolic mode is described by the following grammar:

       mode     ::= clause [, clause ...]
       clause   ::= [who ...] [action ...] action
       action   ::= op [perm ...]
       who      ::= a | u | g | o
       op       ::= + | - | =
       perm     ::= r | s | t | w | x | X | u | g | o

     The who symbols ``u'', ``g'', and ``o'' specify the user, group, and
     other parts of the mode bits, respectively.  The who symbol ``a'' is
     equivalent to ``ugo''.

     The perm symbols represent the portions of the mode bits as follows:

       r       The read bits.
       s       The set-user-ID-on-execution and set-group-ID-on-execution
           bits.
       t       The sticky bit.
       w       The write bits.
       x       The execute/search bits.
       X       The execute/search bits if the file is a directory or any
           of the execute/search bits are set in the original (unmodi-
           fied) mode.  Operations with the perm symbol ``X'' are only
           meaningful in conjunction with the op symbol ``+'', and are
           ignored in all other cases.
       u       The user permission bits in the original mode of the file.
       g       The group permission bits in the original mode of the file.
       o       The other permission bits in the original mode of the file.

     The op symbols represent the operation performed, as follows:

     +     If no value is supplied for perm, the ``+'' operation has no
       effect.  If no value is supplied for who, each permission bit spec-
       ified in perm, for which the corresponding bit in the file mode
       creation mask is clear, is set.  Otherwise, the mode bits repre-
       sented by the specified who and perm values are set.

     -     If no value is supplied for perm, the ``-'' operation has no
       effect.  If no value is supplied for who, each permission bit spec-
       ified in perm, for which the corresponding bit in the file mode
       creation mask is clear, is cleared.  Otherwise, the mode bits rep-
       resented by the specified who and perm values are cleared.

     =     The mode bits specified by the who value are cleared, or, if no who
       value is specified, the owner, group and other mode bits are
       cleared.  Then, if no value is supplied for who, each permission
       bit specified in perm, for which the corresponding bit in the file
       mode creation mask is clear, is set.  Otherwise, the mode bits rep-
       resented by the specified who and perm values are set.

     Each clause specifies one or more operations to be performed on the mode
     bits, and each operation is applied to the mode bits in the order speci-
     fied.

     Operations upon the other permissions only (specified by the symbol ``o''
     by itself), in combination with the perm symbols ``s'' or ``t'', are
     ignored.

EXAMPLES OF VALID MODES
     644       make a file readable by anyone and writable by the owner
           only.

     go-w      deny write permission to group and others.

     =rw,+X    set the read and write permissions to the usual defaults,
           but retain any execute permissions that are currently set.

     +X        make a directory or file searchable/executable by everyone
           if it is already searchable/executable by anyone.

     755
     u=rwx,go=rx
     u=rwx,go=u-w  make a file readable/executable by everyone and writable by
           the owner only.

     go=       clear all mode bits for group and others.

     g=u-w     set the group bits equal to the user bits, but clear the
           group write bit.

ACL MANIPULATION OPTIONS
     ACLs are manipulated using extensions to the symbolic mode grammar.  Each
     file has one ACL, containing an ordered list of entries.  Each entry
     refers to a user or group, and grants or denies a set of permissions.  In
     cases where a user and a group exist with the same name, the user/group
     name can be prefixed with "user:" or "group:" in order to specify the
     type of name.

     If the user or group name contains spaces you can use ':' as the delim-
     iter between name and permission.

     The following permissions are applicable to all filesystem objects:
       delete  Delete the item.  Deletion may be granted by either this
           permission on an object or the delete_child right on the
           containing directory.
       readattr
           Read an objects basic attributes.  This is implicitly
           granted if the object can be looked up and not explicitly
           denied.
       writeattr
           Write an object's basic attributes.
       readextattr
           Read extended attributes.
       writeextattr
           Write extended attributes.
       readsecurity
           Read an object's extended security information (ACL).
       writesecurity
           Write an object's security information (ownership, mode,
           ACL).
       chown   Change an object's ownership.

     The following permissions are applicable to directories:
       list    List entries.
       search  Look up files by name.
       add_file
           Add a file.
       add_subdirectory
           Add a subdirectory.
       delete_child
           Delete a contained object.  See the file delete permission
           above.

     The following permissions are applicable to non-directory filesystem
     objects:
       read    Open for reading.
       write   Open for writing.
       append  Open for writing, but in a fashion that only allows writes
           into areas of the file not previously written.
       execute
           Execute the file as a script or program.

     ACL inheritance is controlled with the following permissions words, which
     may only be applied to directories:
       file_inherit
           Inherit to files.
       directory_inherit
           Inherit to directories.
       limit_inherit
           This flag is only relevant to entries inherited by subdi-
           rectories; it causes the directory_inherit flag to be
           cleared in the entry that is inherited, preventing further
           nested subdirectories from also inheriting the entry.
       only_inherit
           The entry is inherited by created items but not considered
           when processing the ACL.

     The ACL manipulation options are as follows:

     +a      The +a mode parses a new ACL entry from the next argument on the
         commandline and inserts it into the canonical location in the
         ACL. If the supplied entry refers to an identity already listed,
         the two entries are combined.

         Examples
          # ls -le
          -rw-r--r--+ 1 juser  wheel  0 Apr 28 14:06 file1
          # chmod +a "admin allow write" file1
          # ls -le
          -rw-r--r--+ 1 juser  wheel  0 Apr 28 14:06 file1
        owner: juser
        1: admin allow write
          # chmod +a "guest deny read" file1
          # ls -le
          -rw-r--r--+ 1 juser  wheel  0 Apr 28 14:06 file1
        owner: juser
        1: guest deny read
        2: admin allow write
          # chmod +a "admin allow delete" file1
          # ls -le
          -rw-r--r--+ 1 juser  wheel  0 Apr 28 14:06 file1
        owner: juser
        1: guest deny read
        2: admin allow write,delete
          # chmod +a "User 1:allow:read" file
          # ls -le
          -rw-r--r--+ 1 juser  wheel  0 Apr 28 14:06 file1
        owner: juser
        1: guest deny read
        2: User 1 allow read
        3: admin allow write,delete

         The +a mode strives to maintain correct canonical form for the
         ACL.
                  local deny
                  local allow
                  inherited deny
                  inherited allow

         By default, chmod adds entries to the top of the local deny and
         local allow lists. Inherited entries are added by using the +ai
         mode.

         Examples
          # ls -le
          -rw-r--r--+ 1 juser  wheel  0 Apr 28 14:06 file1
        owner: juser
        1: guest deny read
        2: admin allow write,delete
        3: juser inherited deny delete
        4: admin inherited allow delete
        5: backup inherited deny read
        6: admin inherited allow write-security
          # chmod +ai "others allow read" file1
          # ls -le
          -rw-r--r--+ 1 juser  wheel  0 Apr 28 14:06 file1
        owner: juser
        1: guest deny read
        2: admin allow write,delete
        3: juser inherited deny delete
        4: others inherited allow read
        5: admin inherited allow delete
        6: backup inherited deny read
        7: admin inherited allow write-security

     +a#     When a specific ordering is required, the exact location at which
         an entry will be inserted is specified with the +a# mode.

         Examples
          # ls -le
          -rw-r--r--+ 1 juser  wheel  0 Apr 28 14:06 file1
        owner: juser
        1: guest deny read
        2: admin allow write
          # chmod +a# 2 "others deny read" file1
          # ls -le
          -rw-r--r--+ 1 juser  wheel  0 Apr 28 14:06 file1
        owner: juser
        1: guest deny read
        2: others deny read
        3: admin allow write

         The +ai# mode may be used to insert inherited entries at a spe-
         cific location. Note that these modes allow non-canonical ACL
         ordering to be constructed.

     -a      The -a mode is used to delete ACL entries. All entries exactly
         matching the supplied entry will be deleted. If the entry lists a
         subset of rights granted by an entry, only the rights listed are
         removed. Entries may also be deleted by index using the -a# mode.

         Examples
          # ls -le
          -rw-r--r--+ 1 juser  wheel  0 Apr 28 14:06 file1
        owner: juser
        1: guest deny read
        2: admin allow write,delete
          # chmod -a# 1 file1
          # ls -le
          -rw-r--r--+ 1 juser  wheel  0 Apr 28 14:06 file1
        owner: juser
        1: admin allow write,delete
          # chmod -a "admin allow write" file1
          # ls -le
          -rw-r--r--+ 1 juser  wheel  0 Apr 28 14:06 file1
        owner: juser
        1: admin allow delete

         Inheritance is not considered when processing the -a mode; rights
         and entries will be removed regardless of their inherited state.

         If the user or group name contains spaces you can use ':' as the
         delimiter

         Example
          # chmod +a "User 1:allow:read" file

     =a#     Individual entries are rewritten using the =a# mode.

         Examples
          # ls -le
          -rw-r--r--+ 1 juser  wheel  0 Apr 28 14:06 file1
        owner: juser
        1: admin allow delete
          # chmod =a# 1 "admin allow write,chown"
          # ls -le
          -rw-r--r--+ 1 juser  wheel  0 Apr 28 14:06 file1
        owner: juser
        1: admin allow write,chown

         This mode may not be used to add new entries.

     -E      Reads the ACL information from stdin, as a sequential list of
         ACEs, separated by newlines.  If the information parses cor-
         rectly, the existing information is replaced.

     -C      Returns false if any of the named files have ACLs in non-canoni-
         cal order.

     -i      Removes the 'inherited' bit from all entries in the named file(s)
         ACLs.

     -I      Removes all inherited entries from the named file(s) ACL(s).

     -N      Removes the ACL from the named file(s).

COMPATIBILITY
     The -v option is non-standard and its use in scripts is not recommended.

SEE ALSO
     chflags(1), fsaclctl(1), install(1), chmod(2), stat(2), umask(2), fts(3),
     setmode(3), symlink(7), chown(8), mount(8), sticky(8)

STANDARDS
     The chmod utility is expected to be IEEE Std 1003.2 (``POSIX.2'') compat-
     ible with the exception of the perm symbol ``t'' which is not included in
     that standard.

HISTORY
     A chmod command appeared in Version 1 AT&T UNIX.

BSD              July 08, 2004                 BSD
1.9
- Question
- Answer
- Additional Details
Use chmod to make it possible to run the command ./semester rather than
having to type sh semester. How does your shell know that the file is
supposed to be interpreted using sh? See this page on the
shebang line for more
information.
ls -l
# -rw-r--r--  1 danielfarlow  wheel  61 Apr 25 18:26 semester
chmod u+x semester
ls -l
# -rwxr--r--  1 danielfarlow  wheel  61 Apr 25 18:26 semester
The hashbang link tells us (in the second paragraph) why the semester file with its contents as
#!/bin/sh
curl --head --silent https://missing.csail.mit.edu
is supposed to be interpreted using sh:
When a text file with a shebang is used as if it is an executable in a Unix-like operating system, the program loader mechanism parses the rest of the file's initial line as an interpreter directive. The loader executes the specified interpreter program, passing to it as an argument the path that was initially used when attempting to run the script, so that the program may use the file as input data. For example, if a script is named with the path
path/to/script, and it starts with the following line,#!/bin/sh, then the program loader is instructed to run the program/bin/sh, passingpath/to/scriptas the first argument.
Hence, we have the following if we use our exercise as the context for the last sentence reproduced above: If a script is named with the path ./semester, and it starts with #!/bin/sh (which it does), then the program loader is instructed to run the program /bin/sh (i.e., the Bourne shell or sh instead of the Bourne-Again shell or bash), passing ./semester as the first argument.
Running chmod u+x semester allows us to execute the semester file by running ./semester from the command line, whereupon the program loader recognizes from #!/bin/sh that the Bourse shell (sh) is to be used in interpreting the contents of semester.
Relevant/useful portions from the linked articles in the reproduced section from the article on the hashbang above (i.e., Unix-like, program loader, interpreter directive, and interpreter) are provided below:
Unix-like operating systems
A Unix-like (sometimes referred to as UNX or nix) operating system is one that behaves in a manner similar to a Unix system, while not necessarily conforming to or being certified to any version of the Single UNIX Specification. A Unix-like application is one that behaves like the corresponding Unix command or shell. There is no standard for defining the term, and some difference of opinion is possible as to the degree to which a given operating system or application is "Unix-like".
[...]
Various free, low-cost, and unrestricted substitutes for UNIX emerged in the 1980s and 1990s, including 4.4BSD, Linux, and Minix. Some of these have in turn been the basis for commercial "Unix-like" systems, such as BSD/OS and macOS. Several versions of (Mac) OS X/macOS running on Intel-based Mac computers have been certified under the Single UNIX Specification. The BSD variants are descendants of UNIX developed by the University of California at Berkeley with UNIX source code from Bell Labs. However, the BSD code base has evolved since then, replacing all of the AT&T code. Since the BSD variants are not certified as compliant with the Single UNIX Specification, they are referred to as "UNIX-like" rather than "UNIX".
Simplified history of Unix-like operating systems:
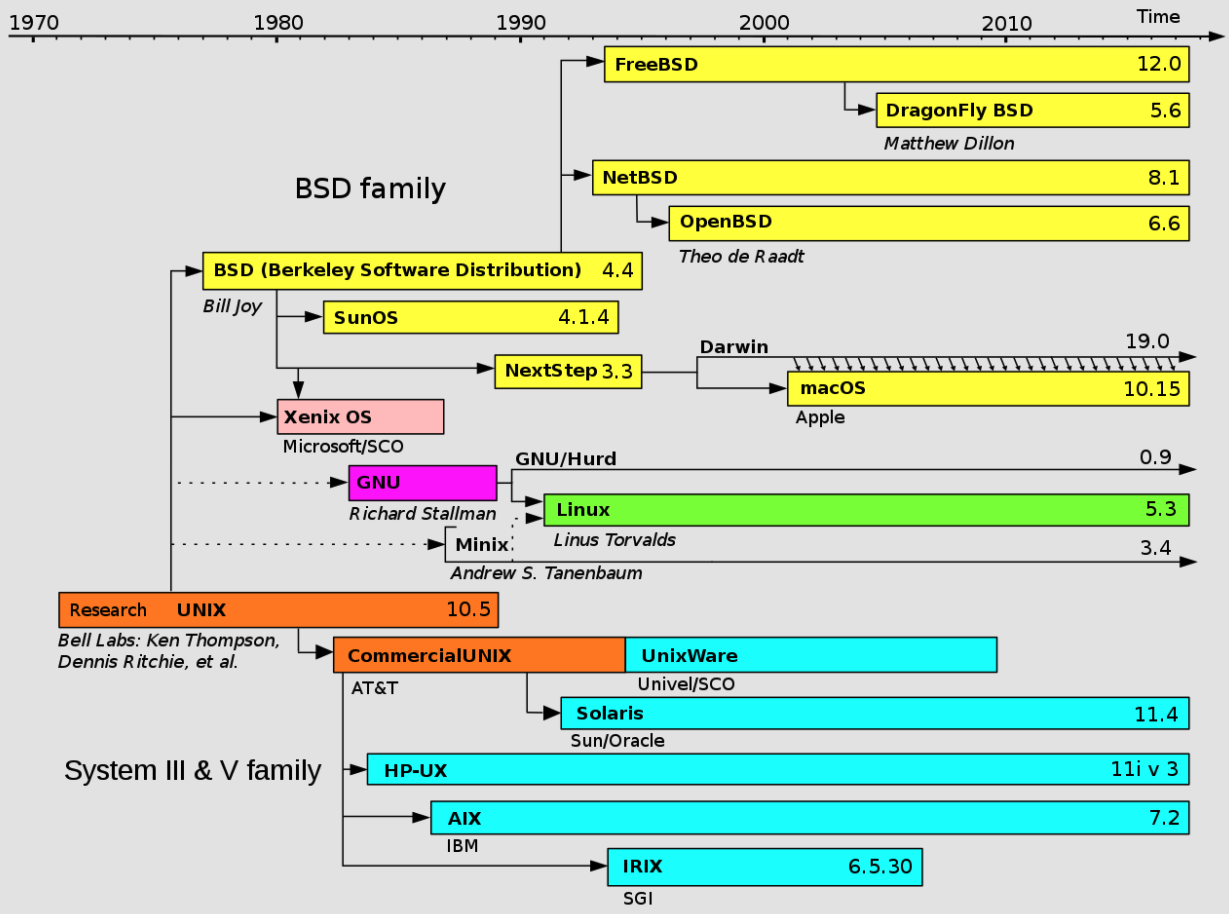
As can be seen from above, macOS appears on the scene shortly after 2000 in implementing a Unix-like OS.
Program loader
In computer systems a loader is the part of an operating system that is responsible for loading programs and libraries. It is one of the essential stages in the process of starting a program, as it places programs into memory and prepares them for execution. Loading a program involves reading the contents of the executable file containing the program instructions into memory, and then carrying out other required preparatory tasks to prepare the executable for running. Once loading is complete, the operating system starts the program by passing control to the loaded program code.
[...]
In Unix, the loader is the handler for the system call execve(). The Unix loader's tasks include:
- validation (permissions, memory requirements etc.);
- copying the program image from the disk into main memory;
- copying the command-line arguments on the stack;
- initializing registers (e.g., the stack pointer);
- jumping to the program entry point (
_start).
Interpreter directive
In Unix, Linux and other Unix-like operating systems (e.g., macOS), the first two bytes in a file can be the characters # and !, which constitute a magic number (hexadecimal 23 and 21, the ASCII values of # and !, respectively) often referred to as shebang, prefix the first line in a script, with the remainder of the line being a command usually limited to a max of 14 (when introduced) up to usually about 80 characters in 2016.
If the file system permissions on the script (a file) include an execute permission bit for the user invoking it by its filename (often found through the command search path), it is used to tell the operating system what interpreter (usually a program that implements a scripting language) to use to execute the script's contents, which may be batch commands or might be intended for interactive use. An example would be #!/bin/bash, meaning run this script with the bash shell found in the /bin directory.
Interpreter
In computer science, an interpreter is a computer program that directly executes instructions written in a programming or scripting language, without requiring them previously to have been compiled into a machine language program.
Notes on chmod: As noted in [1], chmod recognizes numeric format as well as symbolic format, but symbolic format will likely be your best bet in making changes easily. The file permissions as denoted by -rw-r--r-- have 644 as its numeric format:

Since we want the x bit set for the owner, we could issue the command chmod 744 semester to update the semester file accordingly. Or we could go the easier-to-remember symbolic route: chmod u+x semester. This effectively adds (+) the execution bit (x) for the user (u) while retaining all other permissions--this symbolic reasoning is explained in more detail below.
Observations worth noting when using chmod symbolically instead of numerically: You can set a file's permissions using a string of letters (like r for read permission) and symbols (like = to set permissions), where the so-called permission string has three parts:
- Whose permission?
ufor usergfor groupofor other users not in the groupafor all users. The default isa.
- Add, remove, or set?
+to add permissions-to remove permissions=to set absolute permissions, overwriting existing ones
- Which permissions?
rfor readwfor write/modifyxfor execute (for directories, this is permission tocdinto the directory)
You can use the shorthand u to duplicate the owner permissions, g to duplicate the group permissions, or o to duplicate the (world) permissions. You can also combine permission strings by separating them with commas, such as ug+rw,a-x (this will add read and write permissions for the user and group while also removing the execution permission for all users).
Here are some minor examples:
# add read and write permissions for the user and the group
chmod ug+rw myfile

# remove execute permissions for all users (they're equivalent)
chmod a-x myfile
chmod -x myfile

# create entirely new permissions (deleting the old ones) and
# make a file readable only by its owner
chmod u=r myfile

# add read and write permissions to user and group
# and remove execution permission for everyone
chmod ug+rw,a-x myfile
1.10
- Question
- Answer
- Additional Details
Use | and > to write the "last modified" date output by semester into a file called last-modified.txt in your home directory.
./semester | grep last-modified | cut -d " " -f 2- > $HOME/last-modified.txt
See this link for some helpful examples concerning the cut program.
1.11
- Question
- Answer
- Additional Details
Write a command that reads out your laptop battery's power level or your desktop machine's CPU temperature from /sys. Note: if you're a macOS user, your OS doesn't have sysfs, so you can skip this exercise.
Not relevant since I'm a macOS user, but here's one response from another user:
cat /sys/class/power_supply/BAT0/capacity
None
2 - Shell tools and scripting
Shell scripting vs. scripting in another programming language
Most shells have their own scripting language with variables, control flow, and their own programming syntax. What makes shell scripting different from other scripting programming languages is that shell scripting is optimized for performing shell-related tasks (i.e., as opposed to importing file system modules and things like that). Thus, creating command pipelines, saving results into files, and reading from standard input are primitives in shell scripting, which makes it easier to use than general purpose scripting languages.
Everything we will cover is centric to the bash shell, but many of the concepts (and features) extend to other Unix-like shells such as fish, zsh, etc.
Defining and assigning variables and observing the differences between single and double quotes
Suppose you drop into a shell and you want to define a variable. This is typically one of the first things you learn how to do when learning a new programming language (i.e., you learn how to declare variables). With bash this is pretty simple:
foo=bar
echo $foo

bar
One quirk you have to be aware of is that spaces are very imporant when dealing with bash (mainly because whitespace is typically reserved for splitting or separating arguments provided to different programs, functions, etc.):
foo = bar

bash: foo: command not found
Why did we get an error? The reason for this is because we are not actually assigning foo to be bar in the above code snippet. What we are actually doing is instructing bash to execute the program foo with first argument = and second argument bar.
Another thing to be aware of is how bash treats strings when you use single or double quotes. When using literal strings, single and double quotes are treated the same. For example:
echo "Hello"
# prints Hello

echo 'Hello'
# prints Hello
As can be seen above, it does not matter whether or not we use single or double quotes when dealing with literal strings. But that is basically the only time it doesn't matter! Otherwise, as noted here, enclosing characters in single quotes preserves the literal value of each character within the quotes while enclosing characters within double quotes preserves the literal value of all characters within the quotes with the exception of $, `, /, and ! when history expansion is enabled.
Simply put, strings in bash can be defined with ' and " delimiters, but they are not equivalent--strings delimited with ' are literal strings and will not substitute variable values whereas " delimited strings will.
The following small example illustrates these important differences:
foo=bar
echo "Value is $foo"
# Value is bar

echo 'Value is $foo'
# Value is $foo
As can be seen above, there is variable replacement when using double quote strings in bash ($foo is basically expanded to be its variable assignment of bar) but not when using single quotes.
Going beyond piping and into functions
Previously, we discussed how piping can be used in bash with the | character. But sometimes you want to create a function with a series of discrete, sequential steps, and sometimes what you really want is not so much to be piping things around but to have a dedicated function assigned to your chosen task(s). As with most programming languages, bash supports control flow techniques including if, case, while and for. Similarly, bash has functions that take arguments and can operate with them. For example, the following function lets you create a directory and then change into it (a pretty common navigation pattern):
# make a directory and then cd into it
mcd () {
  mkdir -p "$1"
  cd "$1"
}
Hence, instead of doing something like
mkdir myFolder
cd myFolder
we can simply use mcd, as defined above, to accomplish the same task:
mcd myFolder
In the definition of mcd, $1 is the first argument to the script/function. Unlike other scripting languages, bash uses a variety of special variables to refer to arguments, error codes, and other relevant variables. Below is a list of some of them:
| Variable | Description |
|---|---|
$0 | Name of the script |
$1 to $9 | Arguments to the script. $1 is the first argument and so on. |
$@ | All the arguments |
$# | Number of arguments |
$? | Return code of the previous command |
$$ | Process identification number (PID) for the current script |
!! | Entire last command, including arguments. A common pattern is to execute a command only for it to fail due to missing permissions; you can quickly re-execute the command with sudo by doing sudo !! |
$_ | Last argument from the last command. If you are in an interactive shell, you can also quickly get this value by typing Esc followed by . |
A more comprehensive list of these kinds of variables can be found in the advanced bash-scripting guide.
To recap, implicit in the description of mcd function above was the use of $1 as the "first" argument. As [1] notes, arguments are assigned to the positional parameters $1, $2, etc. If the first argument is a script, commands are read from it, and the remaining arguments are assigned to $1, $2, and so on. The name of the script is available as $0. The script file itself need not be executable, but it must be readable.
Exit status codes (the details)
Previously we've seen operators like <, >, and | to redirect standard input or standard output (i.e., stdin or stdout, respectively). We can also interact with the standard error or stderr (e.g., maybe you want to log errors when running programs and do not want to pollute the standard output). There's also the error code or exit status in general.
Many programming languages make it possible for you to see "how a process(es) or command" finished. Was it successful? Any errors? In bash, this is communicated by the command exit status. As [1] notes, when any command exits, it provides a numeric exit status or return value. External commands, such as ls, provide this value to the operating system. Internal commands, such as cd, provide this value directly to the shell. The shell automatically retrieves the return value when the command exits. An exit status of zero is defined, by convention, to mean true or success. Any other status means false or failure. This is how the shell makes use of commands in its control flow statements such as if, while, and until. (Worth noting is that true and false always result in 0 and 1 as exit status codes, respectively.)
Additionally, the shell makes the return value of the last executed command available in $? where your shell script may access it. Usually you should save it in another variable, since subsequent commands that are part of your script will overwrite it. Exit values may range from 0 to 255. The shell uses specific numeric values to indicate certain conditions (the following list is from an advanced bash-scripting guide and not [1]):
| Exit Status | Meaning | Example | Comments |
|---|---|---|---|
0 | Success | echo "Hello" | Some variability exists with other exit codes but 0 is always used for success |
1 | Catchall for general errors | let "var1 = 1/0" | Miscellaneous errors, such as "divide by zero" and other impermissible operations |
2 | Misuse of shell builtins (according to Bash documentation) | empty_function() {} | Missing keyword or command, or permission problem (and diff return code on a failed binary file comparison). |
126 | Command found and invoked but could not execute | /dev/null | Permission problem or command is not an executable |
127 | "command not found" | illegal_command | Possible problem with $PATH or a typo |
128 | Invalid argument to exit | exit 3.14159 | exit takes only integer args in the range 0 - 255 (out of range exit values can result in unexpected exit codes; for example, an exit value greater than 255 returns an exit code modulo 256. For example, exit 3809 gives an exit code of 225 (since 3809 % 256 = 225).) |
128+n | Fatal error signal "n" | kill -9 $PPID of script | $? returns 137 (since 128 + 9 = 137) |
130 | Script terminated by Control-C | Ctl-C | Control-C is fatal error signal 2, (130 = 128 + 2, see above) |
255* | Exit status out of range | exit -1 | exit takes only integer args in the range 0 - 255 |
We can revist a few of the exercises from the previous lecture involving the semester file in the missing directory located in /tmp to generate some of the exit codes above (instead of settling for the provided examples in the table).
Execute the following commands in sequence (first remove /tmp/missing and /tmp/missing/semester if they still exist from the previous lecture):
mkdir /tmp/missing
cd /tmp/missing
touch semester
echo '#!/bin/sh' > semester
echo 'curl --head --silent https://missing.csail.mit.edu' >> semester
Let's try generating some of the exit status codes provided above in a more or less organic way:
0: Unless something bizarre happened, this should be the most recent exit status (arising fromecho 'curl --head --silent https://missing.csail.mit.edu' >> semester):echo $?
01: As this post notes, the only general convention surrounding exit status codes is that0signifies success while any non-zero exit status indicates failure. Many (but certainly not all) command-line tools return exit code1for a syntax error (e.g., too few arguments, invalid option, etc.). Many (but, unfortunately, not all) command-line tools have a manual page or "man page". By convention, the man page should document the exit codes of the program, but many do not. Here's a snippet from the man page for thegrepprogram:
Hence, we could use
grepto search for the stringawesome sauce!in thesemesterfile even though we know this string does not exist (hence, we should get an exit status of1per the man page forgrep):grep 'awesome sauce!' semester
echo $?
12: Let's purposely misuse one of the builtins in bash to generate2as an exit status. From the link above and by executingtype cd, we see "cd is a shell builtin" (you can also runman builtinto see more info about Bash builtins directly in your terminal; see this post for whyman cdsimply maps toman builtinand how you can instead usehelp cdto open a help page). Inspecting the output ofhelp cdshows us that valid options to use withcdare-L,-P,-e, and-@. Hence, use an option not listed to generate an exit status of2. Per the table of codes above, we could also generate an exit status of1by trying to makecdexecute an impermissable operation such as trying tocdinto a file instead of a directory (e.g., thesemesterfile):cd semester
bash: cd: semester: Not a directory
echo $?
1
cd -a semester
bash: cd: -a: invalid option
cd: usage: cd [-L|[-P [-e]] [-@]] [dir]
echo $?
2126: Do we know anything from the previous exercises where we had a command that was found and invoked but could not be executed due to permission issues? How about when we tried running./semester?./semester
bash: ./semester: Permission denied
echo $?
126Recall that this issue was due to permission problems with
semesterand how we were trying to execute the file instead of simply pass the file contents via a read operation to the file/program/bin/shfor which we do have the execution bit set:ls -l
-rw-r--r-- 1 danielfarlow wheel 61 Apr 28 02:37 semester
chmod u+x semester
ls -l
-rwxr--r-- 1 danielfarlow wheel 61 Apr 28 02:37 semesterWe could then run
./semesterwithout any issues and get0as an exit status.127: This is as simple as trying to use a command that does not exist:magical semester
bash: magical: command not found
echo $?
127130: Simply run Ctrl-C as described:^C
echo $?
130
Exit status codes (basic examples)
As observed in the previous note, true and false always result in 0 and 1 as exit status codes, respectively. Hence, we can create some trivial examples of using conditional logic involving such exit status codes:
false && "This will never print"
As expected, "This will never print" does not print since bash evaluates false to be false, returing 1 as the exit status code, thus resulting in bash never evaluating what comes after && (the first part would have to have an exit status of 0 for success in order for bash to continue). Let's try something different:
false || "Oops fail"
bash: Oops fail: command not found
The output above may be unexpected. It is clear that false, when evaluated, returns 1 as its exit status, but || is an OR conditional; hence, we might expect "Oops fail" to be printed to the terminal. But bash tried to execute "Oops fail" as a command. Hence, previously, even if we had true && "This will never print", we would still end up with a command not found error, resulting in "This will never print" not being printed despite there being an attempt at its evaluation.
Of course, the fix for the problem described above probably suggests itself:
false || echo "Oops fail"
Oops fail

true && echo "This will always print"
This will always print
Note, however, that there can be a short-circuiting effect:
true || echo "This will never print"
Nothing will be printed to the screen because bash evaluates true, receives 0 as the exit status, and thus does not bother to evaluate whatever might be beyond || for the OR conditional since the OR conditional is clearly true.
Command forms (e.g., cmd1 && cmd2, cmd1 || cmd2, etc.) and examples
In the previous note we made use of the handy notation && and || to specify how commands should or should not be executed. More broadly, these are examples of command forms. The following notes on command forms appear in [3].
| Command form | Description |
|---|---|
cmd & | Execute cmd in background. |
cmd1 ; cmd2 | Command sequence; execute multiple cmds on the same line. |
{ cmd1 ; cmd2 ; } | Execute commands as a group in the current shell. |
(cmd1 ; cmd2) | Execute commands as a group in a subshell. |
cmd1 | cmd2 | Pipe; use output from cmd1 as input to cmd2. |
cmd1 `cmd2` | Command substitution; use cmd2 output as arguments to cmd1. |
cmd1 $(cmd2) | POSIX shell command substitution; nesting is allowed. |
cmd $((expression)) | POSIX shell arithmetic substitution. Use the numeric result of expression as a command-line argument to cmd. |
cmd1 && cmd2 | AND; execute cmd1 and then (if cmd1 succeeds) cmd2. This is a "short circuit" operation: cmd2 is never executed if cmd1 fails. |
cmd1 || cmd2 | OR; execute either cmd1 or (if cmd1 fails) cmd2. This is a "short circuit" operation; cmd2 is never executed if cmd1 succeeds. |
! cmd | NOT; execute cmd, and produce a zero exit status if cmd exits with a nonzero status. Otherwise, produce a nonzero status when cmd exits with a zero status. |
Here are some examples to illustrate the above command forms:
# form: cmd &
# usage: Format in the background
nroff file > file.txt &

# form: cmd1 ; cmd2
# usage: Execute sequentially (cd to home directory and list contents)
cd; ls

# form: { cmd1 ; cmd2 ; }
# usage: All output is redirected to logfile
{ date; who; pwd; } > logfile

# form: (cmd1 ; cmd2)
# usage: All output is redirected to logfile
(date; who; pwd) > logfile

# form: cmd1 | cmd2
# usage: Sort file, page output, then print
sort file | pr -3 | lpr

# form: cmd1 `cmd2`
# usage: Edit files found by grep; specify a list of files to search
gvim `grep -l ifdef *.cpp`
egrep '(yes|no)' `cat list`

# form: cmd1 $(cmd2)
# usage: POSIX version of specifying a list of files to search; faster non-POSIX version
egrep '(yes|no)' $(cat list)
egrep '(yes|no)' $(< list)

# form: cmd $((expression))
# usage: Silly way to use cal -3 (see previous, current, and next months using cal program)
cal $((2-5))

# form: cmd1 && cmd2
# usage: Print file if it contains the pattern and do so silently by sending output and errors to /dev/null
grep XX file > /dev/null 2>&1 && lpr file

# form: cmd1 || cmd2
# usage: Echo an error message if pattern not found in file using grep
grep XX file || echo "XX not found"

# form: ! cmd
# usage: tbd
! echo "Hello"
echo $? # 1

echo "Hello"
echo $? # 0
Storing the output of a command as a variable, variable substitution, and command substitution
How would you go about getting the output of a command into a variable? We can do this in the following manner:
foo=$(pwd)
echo $foo
/Users/danielfarlow/Desktop

bar=$(echo 'Cool deal my dudes!')
echo $bar
Cool deal my dudes!
Above, we are getting the output of the commands pwd and echo and placing this output into variables foo and bar, respectively. We can perform simple variable substitution by using double quotes (remember that single quotes inhibit any special use of characters within the single quotes) in the following manner:
echo "It is Wednesday. $bar"
It is Wednesday. Cool deal my dudes!
More importantly, we can also perform command substitution. For example, instead of storing the output of the pwd command into the variable foo, we could simply use the command directly and have its expansion or output seamlessly substituted in our command:
echo "The path $(pwd) is where I currently reside"
The path /Users/danielfarlow is where I currently reside
Process substitution
A lesser known tool or ability compared to variable or command substitution is one called process substitution, which is, sensibly, quite similar to the concepts of variable and command substitution. As described in the online lecture notes for this lecture, something like <( CMD ) will result in executing CMD and placing the output in a temporary file and substitute the <() with that file's name; as an aside, it is worth noting there is no space between < and ( in the syntax <( CMD )--if you include a space, then you will likely get a bash: syntax error near unexpected token `(' error.
This can be very useful when commands expect values to be passed by file instead of by stdin. For example, diff <(ls foo) <(ls bar) will show differences between files in directories foo and bar. Another useful example would be using grep on a manpage for information you're interested in; for example, grep -C 3 "time" <(man ls) will result in using grep to search the ls manpage for "time" while printing 3 lines of context for any matches.
In [4] we see the following about process substitution:
cmd <(command): Runcommandwith its output connected to a named pipe or an open file in/dev/fd, and place the file's name in the argument list ofcmd.cmdmay read the file to see the output ofcommand.cmd >(command): Runcommandwith its input connected to a named pipe or an open file in/dev/fd, and place the file's name in the argument list ofcmd. Output written bycmdto the file is input tocommand.
Process substitution is available on systems that support either named pipes (FIFOs) or accessing open files via filenames in /dev/fd. (This is true of all modern Unix systems.) It provides a way to create non-linear pipelines. Process substitution is not available in POSIX mode shells.
Bash Hackers Wiki
More details about process substitution are available via the bash hackers wiki on this topic. Some of the key parts/excerpts are highlighted below.
Simple description of process substitution
Process substitution is a form of redirection where the input or output of a process (some sequence of commands) appears as a temporary file.
<( <LIST> )

>( <LIST> )
Process substitution is performed simultaneously with parameter expansion, command substitution and arithmetic expansion.
The command list <LIST> is executed and its
- standard output filedescriptor in the
<( … )form or - standard input filedescriptor in the
>( … )form
is connected to a FIFO or a file in /dev/fd/. The filename (where the filedescriptor is connected) is then used as a substitution for the <(…)-construct.
That, for example, allows to give data to a command that can't be reached by pipelining (that doesn't expect its data from stdin but from a file).
Basic examples
The following code is useless, but it demonstrates how process substitution works:
echo <(ls)
/dev/fd/63
The output of the ls-program can then be accessed by reading the file /dev/fd/63.
Consider the following:
diff <(ls "$first_directory") <(ls "$second_directory")
This will compare the contents of each directory. In this command, each process (i.e., ls "$first_directory" and ls "$second_directory") is substituted for a file, and diff doesn't see <(bla), it sees two files, so the effective command is something like
diff /dev/fd/63 /dev/fd/64
where those files are written to and destroyed automatically.
Example script highlighting control flow structures, built-in shell variables, redirection forms, and concepts illustrated so far
Example script
Below is a sample shell script, example.sh, that illustrates some useful control flow structues and other things in bash:
#!/bin/bash

echo "Starting program at $(date)" # Date will be substituted

echo "Running program $0 with $# arguments with pid $$"

for file in "$@"; do
  grep foobar "$file" > /dev/null 2> /dev/null
  # When pattern is not found, grep has exit status 1
  # We redirect STDOUT and STDERR to a null register since we do not care about them
  if [[ "$?" -ne 0 ]]; then
    echo "File $file does not have any foobar, adding one"
    echo "# foobar" >> "$file"
  fi
done
Explanation of example script
Things worth noting about the script above:
$(date): This lets the output of thedateprogram be substituted in our starting string where we declare when our program is starting.$0: This refers to the filename of the script being run. In this case,$0should beexample.sh. This (i.e.,$0) is what is referred to as a built-in shell variable. A more comprehensive list of built-in shell variables follows this bulleted list describing the script above.$#: This is the number of arguments that we are giving to the command.$$: This is the process id of the script that is being executed.$@: This expands to all the arguments. If we do not know how many arguments have been provided, then$@lets us capture them all. In this case,$@lets us use a variable number of files as input (i.e., we can provide a variable number of directories which have a variable number of files in them).grep foobar "$file": We are using thegrepprogram to search afile(whichever one theforloop is on in our given directory) for the stringfoobar. We should note here that$?in bash stands for the return code of the previous command where by "return code" refers to whether the command was successful (return code0) or unsuccessful (return code1). If you run thegrepprogram and it finds what you are looking for, then the return code will be0and whatgrepfound will be directed to standard output (the terminal window), but ifgrepdoes not find what you were looking for, then nothing will be printed to standard output but to standard error. These are separate streams.grep foobar "$file" /dev/null 2> /dev/null: As we noted before in terms of redirecting output, sometimes we want to redirect the output to a file (where we often use>) or to another program (where we often use|). For the example script above, however, we do not care about the output of runninggrepbut the success or failure ofgrep; that is, we care about the return code aftergrepis run. Since the standard output and the standard error are separate streams, we have 2 streams to consider in terms of what happens--for both of these streams, we simply want to redirect them to a so-called "null register" or/dev/nullsince we do not care about either stream (whatever is written to/dev/nullwill be discarded) but simply the return code (i.e.,0or1) which we may access inside theforloop with$?. In any case, what is the2>about? It is for redirecting the standard error. Usually, you are only interested in the standard output and that we can handle with>. But for the standard error we need2>.As usual, reality is somewhat more complicated than that described above--see the end of this note for more details on "redirection forms" in general of which
2>is just one small example (i.e., see different ways of changing the usual input source or output destination forstdin,stdout, andstderr).Notably, the redirection form used in the script above is
cmd > fileA 2> fileBwherefileAandfileBare both/dev/null(fileAwould normally be where you would redirect the standard output whilefileBwould be where you would direct the standard error); hence, we could actually simplify the script a bit by using the redirection formcmd > file 2>&1which sends both the standard output and the standard error tofile; so our new command would look likegrep foobar "$file" /dev/null 2>&1.[[ "$?" -ne 0 ]]: It is best to understand how thetestprogram works before trying to understand the[[ ]]syntax. Thetestprogram, with primary formtest condition, is meant to evaluate the providedconditionand is for use in loops and conditionals. Essentially,testwill evaluate the providedconditionand, if its value is true, thentestreturns a zero exit status indicating success; otherwise,testwill return a nonzero exit status indicating failure. An alternate form of the command uses[ ]rathen than the wordtest. An additional alternate form uses[[ ]], in which case word splitting and pathname expansion are not done. Theconditionprovided to one oftest condition,[ condition ], or[[ condition ]]is constructed using a variety of expressions, all of which are outlined in the man page fortest.If we take a look at the man page for
test, then one thing worth noting right away is that "All operators and flags are separate arguments to thetestutility." Hence,-neis not the same as using both-nand-eas we might normally expect when using flags for most programs. Specifically, the man page details that-neis meant to be used with the syntaxn1 -ne n2, where this evaluates to true if the integersn1andn2are not algebraically equal.In the context of our script, with
[[ "$?" -ne 0 ]], we are testing whether or not the return code from runninggrep(recall$?provides the exit status of the most recently issued command, which isgrepin our case) was successful or not (i.e., the exit code indicating success or a positive match will be0while failure or no match will have have a non-zero exit status). Since we only care about the cases wherefoobardoes not show up in files, we use-neto test for whether or not the return code was0. If it was, then we will not do anything. If it wasn't, then we will append the string# foobarto the file.
Built-in Shell Variables
As noted in [2], the shell automatically sets built-in variables; they are typically used inside shell scripts. Built-in variables can use the variable substitution patterns shown previously. Note that the $ is not actually part of the variable name, although the variable is always referenced this way. The following are available in any Bourne-compatible shell:
| Variable | Description |
|---|---|
$# | Number of command-line arguments. |
$- | Options currently in effect (supplied on command line or to set). The shell sets some options automatically. |
$? | Exit value of last executed command. |
$$ | Process number of the shell. |
$! | Process number of last background command. |
$0 | First word; that is, the command name. This will have the full pathname if the command was found via a PATH search. |
$n | Individual arguments on the command line (positional parameters). The Bourne shell allows only nine parameters to be referenced directly (n = 1–9); Bash allows n to be greater than 9 if specified as ${n}. |
$*, $@ | All arguments on the command line ($1 $2 …). |
"$*" | All arguments on the command line as one string ("$1 $2 …"). The values are separated by the first character in $IFS. |
"$@" | All arguments on the command line, individually quoted ("$1" "$2" …). |
See [2] for a more comprehensive listing of variables defined that are not mentioned above.
Redirection forms
As noted in [5], the typical default for the input source or output destination (i.e., keyboard for stdin and screen for stdout and stderr) can be changed. This can be done in a variety of ways with a variety of results. It is helpful to know that stdin, stdout, and stderr have file descriptors 0, 1, and 2, respectively:
| File descriptor | Name | Common abbreviation | Typical default |
|---|---|---|---|
0 | Standard input | stdin | Keyboard |
1 | Standard output | stdout | Screen |
2 | Standard error | stderr | Screen |
We can use file descriptors to effect redirection. A variety of different redirection forms are highlight/illustrated below.
Simple redirection
| Redirection form | Description |
|---|---|
cmd > file | Send output of cmd to file (overwrite). |
cmd >> file | Send output of cmd to file (append). |
cmd < file | Take input for cmd from file. |
cmd << text | The contents of the shell script up to a line identical to text become the standard input for cmd (text can be stored in a shell variable). This command form is sometimes called a here document. Input is typed at the keyboard or in the shell program. Commands that typically use this syntax include cat, ex, and sed. (If <<- is used, leading tabs are stripped from the contents of the here document, and the tabs are ignored when comparing input with the end-of-input text marker.) If any part of text is quoted, the input is passed through verbatim. Otherwise, the contents are processed for variable, command, and arithmetic substitutions. |
cmd <<< word | Supply text of word, with trailing newline, as input to cmd. (This is known as a here string, from the free version of the rc shell.) |
cmd <> file | Open file for reading and writing on the standard input. The contents are not destroyed. With <, the file is opened read-only, and writes on the file descriptor will fail. With <>, the file is opened read-write; it is up to the application to actually take advantage of this. |
cmd >| file | Send output of cmd to file (overwrite), even if the shell's noclobber option is set. |
Redirection using file descriptors
| Redirection form | Description |
|---|---|
cmd >&n | Send cmd output to file descriptor n. |
cmd m>&n | Same as previous, except that output that would normally go to file descriptor m is sent to file descriptor n instead. |
cmd >&- | Close standard output. |
cmd <&n | Take input for cmd from file descriptor n. |
cmd m<&n | Same as previous, except that input that would normally come from file descriptor m comes from file descriptor n instead. |
cmd <&- | Close standard input. |
cmd <&n- | Move file descriptor n to standard input by duplicating it and then closing the original. |
cmd >&n- | Move file descriptor n to standard output by duplicating it and then closing the original. |
Multiple redirection
| Redirection form | Description |
|---|---|
cmd 2> file | Send standard error to file; standard output remains the same (e.g., the screen). |
cmd > file 2>&1 | Send both standard output and standard error to file. |
cmd >& file | Same as previous. |
cmd &> file | Same as previous. Preferred form. |
cmd &>> file | Append both standard output and standard error to file. |
cmd > fileA 2> fileB | Send standard output to file fileA and standard error to file fileB. |
cmd | tee files | Send output of cmd to standard output (usually the terminal) and to files. |
cmd 2>&1 | tee files | Send standard output and error output of cmd through a pipe to tee to standard output (usually the terminal) and to files. |
cmd |& tee files | Same as previous. |
It is worth noting that bash allows multidigit file descriptor numbers without any special syntax while most other shells either require a special syntax or do not offer the feature at all. Also, no space is allowed between file descriptors and a redirection symbol; spacing is optional in the other cases.
Filename and brace expansion (shell globbing)
When launching scripts or executing commands or programs, you will often want to provide arguments that are similar in some way (e.g., files that have the same file extension or are named similarly). Bash has different ways of making this easier, namely by carrying out filename expansion (via filename metacharacters) and brace expansion.
Filename metacharacters
Whenever you want to perform some sort of wildcard matching, you can use ? and * to match one or any amount of characters, respectively. For instance, given files foo, foo1, foo2, foo10 and bar, the command rm foo? will delete foo1 and foo2 whereas rm foo* will delete all but bar.
The following table from [6] illustrates some of the possibilities using filename metacharacters.
| Metacharacter(s) | Description |
|---|---|
* | Match any string of zero or more characters. |
? | Match any single character. |
[abc...] | Match any one of the enclosed characters; a hyphen can specify a range (e.g., a-z, A-Z, 0-9). |
[!abc...] | Match any character not enclosed as above. |
~ | Home directory of the current user. |
~name | Home directory of user name. |
~+ | Current working directory ($PWD). |
~- | Previous working directory ($OLDPWD). |
More options are possible when the extglob option is turned on.
Brace expansion
Whenever you have a common substring in a series of commands, you can use curly braces for bash to expand this automatically. This comes in very handy when moving or converting files.
As noted in [7], bash has long supported brace expansion, based on a similar feature from the C shell. Unlike filename metacharacters, brace expansion is purely textual; the words created by brace expansion do not have to match existing files. There are two forms:
pre{X,Y[,Z…]}post: Expands topreXpost,preYpost, and so on.pre{start..end[..incr]}post:startandendare either integers or single letters.incris an integer. The shell expands this construct to the full range betweenstartandend, increasing byincrif supplied.
The prefix and postfix texts are not required for either form. For numeric expansion, start or end or both may be prefixed with one or more leading zeros. The results of expansion are padded with zeros to the maximum of the widths of start and end. Bash ignores leading zeros on incr, always treating it as a decimal value.
Brace expansions may be nested, and the results are not sorted. Brace expansion is performed before other expansions, and the opening and closing braces must not be quoted for Bash to recognize them. Bash skips over command substitutions within brace expansions. To avoid conflict with parameter expansion, ${ cannot start a brace expansion.
Brace expansion examples
# Expand textually; no sorting
$ echo hi{DDD,BBB,CCC,AAA}there
hiDDDthere hiBBBthere hiCCCthere hiAAAthere

# Expand, then match ch1, ch2, app1, app2
$ ls {ch,app}?

# Expands to mv info info.old
$ mv info{,.old}

# Simple numeric expansion
$ echo 1 to 10 is {1..10}
1 to 10 is 1 2 3 4 5 6 7 8 9 10

# Numeric expansion with increment
$ echo 1 to 10 by 2 is {1..10..2}
1 to 10 by 2 is 1 3 5 7 9

# Numeric expansion with zero padding
$ echo 1 to 10 with zeros is {01..10}
1 to 10 with zeros is 01 02 03 04 05 06 07 08 09 10
Additional examples
convert image.{png,jpg}
# Will expand to
convert image.png image.jpg

cp /path/to/project/{foo,bar,baz}.sh /newpath
# Will expand to
cp /path/to/project/foo.sh /path/to/project/bar.sh /path/to/project/baz.sh /newpath

# Globbing techniques can also be combined
mv *{.py,.sh} folder
# Will move all *.py and *.sh files


mkdir foo bar
# This creates files foo/a, foo/b, ... foo/h, bar/a, bar/b, ... bar/h
touch {foo,bar}/{a..h}
touch foo/x bar/y
# Show differences between files in foo and bar
diff <(ls foo) <(ls bar)
# Outputs
# < x
# ---
# > y
Executing scripts from the command-line that have nothing to do with the shell (e.g., executing Python scripts)
Writing bash scripts can be tricky and unintuitive. There are tools like shellcheck that will help you find errors in your sh/bash scripts. But you can do so much more from the command-line than just execute bash scripts--your scripts need not necessarily be written in bash to be called from the terminal. For instance, here's a simple Python script that outputs its arguments in reversed order:
#!/usr/local/bin/python
import sys
for arg in reversed(sys.argv[1:]):
  print(arg)
The kernel knows to execute this script with a python interpreter instead of a shell command because we included a shebang line at the top of the script. It is good practice to write shebang lines using the env command that will resolve to wherever the command lives in the system, increasing the portability of your scripts. To resolve the location, env will make use of the PATH environment variable we introduced in the first lecture. For this example the shebang line would look like #!/usr/bin/env python. Hence, you can explicitly provide the path to what program you want to execute your script or you can use env to make your scripts more portable.
Differences between shell functions and scripts to keep in mind
Some differences between shell functions and scripts to keep in mind are as follows:
- Functions have to be in the same language as the shell, while scripts can be written in any language. This is why including a shebang for scripts is important.
- Functions are loaded once their definition is read. Scripts are loaded every time they are executed. This makes functions slightly faster to load, but whenever you change them you will have to reload their definition.
- Functions are executed in the current shell environment whereas scripts execute in their own process. Thus, functions can modify environment variables (e.g., change your current directory), whereas scripts can't. Scripts will be passed by value environment variables that have been exported using
export. - As with any programming language, functions are a powerful construct to achieve modularity, code reuse, and clarity of shell code. Often shell scripts will include their own function definitions.
Finding out how to use commands (manpages and tldr)
Sometimes it can be confusing when you see different commands and the myriad flags and options that can be used (e.g., ls -l, mv -i, mkdir -p, etc.). How do you find out more? Is your only option to go googling or searching Stack Overflow? No.
The first-order approach is to call your command with the -h or --help flags. A more detailed approach is to use the man command. Short for manual, man provides a manual page (called manpage) for a command you specify. For example, man rm will output the behavior of the rm command along with the flags that it takes, including the -i flag showed earlier.
Even non-native commands that you install will have manpage entries if the developer wrote them and included them as part of the installation process. For interactive tools such as the ones based on ncurses, help for the commands can often be accessed within the program using the :help command or typing ?.
Sometimes manpages can provide overly detailed descriptions of the commands, making it hard to decipher what flags/syntax to use for common use cases. TLDR pages is a nifty complementary solution that focuses on giving example use cases of a command so you can quickly figure out which options to use. For instance, it is not uncommon to find yourself referring back to the tldr pages for tar and ffmpeg way more often than the manpages.
Finding files (primarily using find or fd)
One of the most common repetitive tasks that every programmer faces is finding files or directories. All UNIX-like systems come packaged with find, a great shell tool to find files. find will recursively search for files matching some criteria. Some examples:
# Find all directories named src
find . -name src -type d
# Find all python files that have a folder named test in their path
find . -path '*/test/*.py' -type f
# Find all files modified in the last day
find . -mtime -1
# Find all zip files with size in range 500k to 10M
find . -size +500k -size -10M -name '*.tar.gz'
Beyond listing files, find can also perform actions over files that match your query. This property can be incredibly helpful to simplify what could be fairly monotonous tasks.
# Delete all files with .tmp extension
find . -name '*.tmp' -exec rm {} \;
# Find all PNG files and convert them to JPG
find . -name '*.png' -exec convert {} {}.jpg \;
Despite find's ubiquitousness, its syntax can sometimes be tricky to remember. For instance, to simply find files that match some pattern PATTERN you have to execute find -name '*PATTERN*' (or -iname if you want the pattern matching to be case insensitive). You could start building aliases for those scenarios, but part of the shell philosophy is that it is good to explore alternatives. Remember, one of the best properties of the shell is that you are just calling programs, so you can find (or even write yourself) replacements for some. For instance, fd is a simple, fast, and user-friendly alternative to find. It offers some nice defaults like colorized output, default regex matching, and Unicode support. It also has, one might argue, a more intuitive syntax. For example, the syntax to find a pattern PATTERN is fd PATTERN.
Most would agree that find and fd are good, but some of you might be wondering about the efficiency of looking for files every time versus compiling some sort of index or database for quickly searching. That is what locate is for. locate uses a database that is updated using updatedb. In most systems, updatedb is updated daily via cron. Therefore one trade-off between the two is speed vs freshness. Moreover find and similar tools can also find files using attributes such as file size, modification time, or file permissions, while locate just uses the file name. A more in-depth comparison can be found on a Stack Overflow thread about the differences between locate and find.
Finding code (often by means of grep)
Finding files by name is useful, but quite often you want to search based on file content. A common scenario is wanting to search for all files that contain some pattern, along with where in those files said pattern occurs. To achieve this, most UNIX-like systems provide grep, a generic tool for matching patterns from the input text. grep is an incredibly valuable shell tool that will be covered in greater detail during the data wrangling lecture.
For now, know that grep has many flags that make it a very versatile tool. Some flags you may find yourself frequently using are -C for getting Context around the matching line and -v for inverting the match (i.e., print all lines that do not match the pattern). For example, grep -C 5 will print 5 lines before and after the match. When it comes to quickly searching through many files, you want to use -R since it will Recursively go into directories and look for files for the matching string.
But grep -R can be improved in many ways, such as ignoring .git folders, using multi CPU support, &c. Many grep alternatives have been developed, including ack, ag and rg. All of them are fantastic and pretty much provide the same functionality. ripgrep (i.e., rg) is especially fantastic given how fast and intuitive it is. Some examples:
# Find all python files where I used the requests library
rg -t py 'import requests'
# Find all files (including hidden files) without a shebang line
rg -u --files-without-match "^#!"
# Find all matches of foo and print the following 5 lines
rg foo -A 5
# Print statistics of matches (# of matched lines and files )
rg --stats PATTERN
Note that as with find/fd, it is important that you know that these problems can be quickly solved using one of these tools, while the specific tools you use are not as important.
Finding shell commands
So far we have seen how to find files and code, but as you start spending more time in the shell, you may want to find specific commands you typed at some point. The first thing to know is that typing the up arrow will give you back your last command, and if you keep pressing it you will slowly go through your shell history.
The history command will let you access your shell history programmatically. It will print your shell history to the standard output. If we want to search there we can pipe that output to grep and search for patterns. history | grep find will print commands that contain the substring "find".
In most shells, you can make use of Ctrl+R to perform backwards search through your history. After pressing Ctrl+R, you can type a substring you want to match for commands in your history. As you keep pressing it, you will cycle through the matches in your history. This can also be enabled with the UP/DOWN arrows in zsh. A nice addition on top of Ctrl+R comes with using fzf bindings. fzf is a general-purpose fuzzy finder that can be used with many commands. Here it is used to fuzzily match through your history and present results in a convenient and visually pleasing manner.
Another cool history-related trick to be aware of is history-based autosuggestions. First introduced by the fish shell, this feature dynamically autocompletes your current shell command with the most recent command that you typed that shares a common prefix with it. It can be enabled in zsh and it is a great quality of life trick for your shell.
You can modify your shell's history behavior, like preventing commands with a leading space from being included. This comes in handy when you are typing commands with passwords or other bits of sensitive information. To do this, add HISTCONTROL=ignorespace to your .bashrc or setopt HIST_IGNORE_SPACE to your .zshrc. If you make the mistake of not adding the leading space, you can always manually remove the entry by editing your .bash_history or .zhistory.
Directory navigation
How do you go about quickly navigating directories? There are many simple ways that you could do this, such as writing shell aliases or creating symlinks with ln -s, but the truth is that developers have figured out quite clever and sophisticated solutions by now.
You often want to optimize for the common case. Finding frequent and/or recent files and directories can be done through tools like fasd and autojump. fasd ranks files and directories by frecency, that is, by both frequency and recency. By default, fasd adds a z command that you can use to quickly cd using a substring of a frecent directory. For example, if you often go to /home/user/files/cool_project you can simply use z cool to jump there. Using autojump, this same change of directory could be accomplished using j cool.
More complex tools exist to quickly get an overview of a directory structure: tree, broot or even full fledged file managers like nnn or ranger.
You may find this list of CLI tools to be helpful to look through for many more of your needs.
Exercises
2.1 (fine-tuning usage of ls)
- Question
- Answer
- Additional Details
Read man ls write an ls command that lists files in the following manner:
- Includes all files, including hidden files
- Sizes are listed in human readable format (e.g.,
454Minstead of454279954) - Files are ordered by recency
- Output is colorized
A sample output would look like this
-rw-r--r--   1 user group 1.1M Jan 14 09:53 baz
drwxr-xr-x   5 user group  160 Jan 14 09:53 .
-rw-r--r--   1 user group  514 Jan 14 06:42 bar
-rw-r--r--   1 user group 106M Jan 13 12:12 foo
drwx------+ 47 user group 1.5K Jan 12 18:08 ..
ls -lhtG
The manpage for ls provides the details for each flag or option used to satisfy the specifications provided in the exercise:
-l: (The lowercase letter "ell".) List in long format. If the output is to a terminal, a total sum for all the file sizes is output on a line before the long listing.-h: When used with the-loption, use unit suffixes: Byte, Kilobyte, Megabyte, Gigabyte, Terabyte and Petabyte in order to reduce the number of digits to three or less using base 2 for sizes.-t: Sort by time modified (most recently modified first) before sorting the operands by lexicographical order.-G: Enable colorized output. This option is equivalent to definingCLICOLORin the environment.
Combining all of the options above gives us ls -lhtG as the desired command for the exercise. The last option, -G, is worth looking into more in terms of customizing what you see when you list contents. The entry on LSCOLORS in the manpage for ls is enlightening, but there are some other helpful resources to consult as well:
Implementing color for
ls: As this answer notes, on FreeBSD and Mac OS X,lsshows colors if theCLICOLORenvironment variable is set or if-Gis passed on the command line, but the actual colors are configured through theLSCOLORSenvironment variable (built-in defaults are used if this variable is not set). To show directories in light blue [as the person who asked the question requested], useexport LSCOLORS=Exfxcxdxbxegedabagacad.Default
LSCOLORS: You can see what your defaultLSCOLORSvalue is by runningecho $LSCOLORS, and this gives meExFxBxDxCxegedabagacad. What does this mean though?Previewing your
LSCOLORS: You can use this previewing tool to customize how file types will appear in your terminal when usinglswith colors enabled. You can either specify everything yourself and preview the providedBSD LSCOLORSvalue that results from your specifications or you can copy and paste a value into that field yourself (e.g.,ExFxBxDxCxegedabagacad) and preview what that looks like.General configuration: This answer details how to configure your Mac Terminal to have color in its
lsoutput. Specifically, addexport CLICOLOR=1to your~/.bash_profileto enable color output vials. Then optionally customize the coloring shown bylsby adding theLSCOLORSvariable to your~/.bash_profileas well.- Default:
export LSCOLORS=ExFxCxDxBxegedabagacad - With a black background:
LSCOLORS=gxBxhxDxfxhxhxhxhxcxcx - Mimic colors of a typical Linux terminal:
export LSCOLORS=ExGxBxDxCxEgEdxbxgxcxd
Once you have added what you want to
~/.bash_profileyou can either logout/login or source the file in your shell (e.g.,. ~/.bash_profile).- Default:
2.2 (pseudo-implementation of pushd and popd using functions marco and polo, resp.)
- Question
- Answer
- Additional Details
Write bash functions marco and polo that do the following. Whenever you execute marco the current working directory should be saved in some manner, then when you execute polo, no matter what directory you are in, polo should cd you back to the directory where you executed marco. For ease of debugging you can write the code in a file marco.sh and (re)load the definitions to your shell by executing source marco.sh.
Note how the usage of marco and polo mildly mimic the usage of pushd and popd: The pushd command saves the current working directory in memory so it can be returned to at any time, pushd moves to the parent directory. The popd command returns to the path at the top of the directory stack. This directory stack is accessed by the command dirs in Unix or Get-Location -stack in Windows PowerShell.
The script below makes it possible to invoke the marco function whenever we want to append the absolute file path of the current working directory to the saved_marcos file on the desktop. The polo function, when invoked, will cd us to the directory from which we last executed marco and then remove that absolute file path from the saved marcos file. Note that we can execute polo however many times we want to trace our way back through all the directories from which we called marco. If we try to use polo when no file paths are present in saved_marcos, then we will get an error message: "No more marcos left to cd back to!".
saved_marcos=~/Desktop/saved_marcos

marco () {
  echo $(pwd) >> $saved_marcos
}

polo () {
  if [[ -s "$saved_marcos" ]]; then
    last_marco=$(tail -n 1 "$saved_marcos")
    cd $last_marco
    dd if=/dev/null \
       of="$saved_marcos" \
       bs=1 \
       seek=$(echo $(stat -f=%z "$saved_marcos" | cut -c 2- ) - $( echo "$last_marco" | wc -c) | bc )
  else
    echo "No more marcos left to cd back to!"
  fi
}
The marco function defined above is straightforward: we use command substitution in $(pwd) to get the current working directory of wherever we are in our filesystem and then we append the absolute file path given to us to the saved_macros file, which is on the desktop: saved_marcos=~/Desktop/saved_marcos. We are essentially building a stack of all directories that get placed into the saved_marcos file by means of marco so we can get back to them with polo which will take us to whatever directory was most recently added to saved_marcos by the marco function.
The polo function is not so straightforward. It's probably easiest if we break things down mostly line by line like we did with the example.sh script earlier from this lecture:
[[ -s "$saved_marcos" ]]
Here use the alternative form of the test utility by using the [[ ]] syntax. The manpage for test describes -s file as it appears in the script: "True if file exists and has a size greater than zero." This is what we want--we will keep adding directories to the saved_marcos file and we will get back to them with polo, but we will remove the directory we are being "polo'd back to" from the saved_marcos file once the polo function has been invoked. Once nothing is in the file (i.e., its size should be zero bytes) but the file still exists, then we will want to signal to the user that no directories exist in the file to go back to.
last_marco=$(tail -n 1 "$saved_marcos")
We are using the tail command to access the last part of the saved_marcos file; specifically, we want the very last line (i.e., the last current working directory placed there by a call to the marco function).
dd if=/dev/null of="$saved_marcos" bs=1 seek=$(echo $(stat -f=%z "$saved_marcos" | cut -c 2- ) - $( echo "$last_marco" | wc -c) | bc )
This is the hard part (which comes almost entirely from this answer or, more specifically, this comment on that answer). Lots of stuff going on here.
Strictly speaking, this one line is really broken into several lines by means of the \ character. As noted in [8] and the bash manual, this is a valid construct to keep scripts more readable even if you do not see such syntax used in many places. The \ is known as a line-continuation character--if you type one of these slashes, it must be the very last character on its line (there cannot be a space after the \ if you use it as a line-continuation character).
In total, we use five programs to make dd behave as desired (i.e., allowing us to effectively remove the last line or absolute file path from the saved_marcos file on the desktop): echo, stat, cut, wc, and bc. The use of echo is straightforward, but let's see how we're using all of the other programs--we'll start with dd since that is the context in which the other programs are being used.
dd
The best way to start understanding how dd works is probably by means of a simple example. So before we fully explore how dd functions in the context of our own script, let's consider the following example (largely motivated by this answer on Stack Overflow). Then we will consider what dd is, how it works in general, how it works with our script in particular, etc.
Example: We'll write a script where we'll first prepare an input file and an output file, and then we'll copy a portion of the input into a portion of the output by using dd:
#!/bin/bash

# prepare input file (infile) and output file (outfile)
echo "IGNORE:My Dear Friend:IGNORE" > infile
echo "Keep this, OVERWRITE THIS, keep this." > outfile

# observe contents of infile and outfile before usage of dd
cat infile
cat outfile

# use dd to copy data from input file to output file
dd if=infile \
   of=outfile \
   bs=1 \
   skip=7 \
   count=14 \
   seek=11 \
   conv=notrunc

# observe contents of infile (unchanged) and outfile (changed) after usage of dd
cat infile
cat outfile
Executing the script above produces the following output:
IGNORE:My Dear Friend:IGNORE
Keep this, OVERWRITE THIS, keep this.
14+0 records in
14+0 records out
14 bytes transferred in 0.000033 secs (425509 bytes/sec)
IGNORE:My Dear Friend:IGNORE
Keep this, My Dear Friend, keep this.
The output above can be more easily understood if we examine the option=value combinations provided to dd in our example script:
if=infile    The input file (i.e., what file to read from)
of=outfile   The output file (i.e., what file to write to)
bs=1         Set input and output block size to 1 byte
skip=7       Ignore (i.e., don't read) the first 7 blocks of input: "IGNORE:"
count=14     Transfer 14 blocks from input to output (start the transfer after
             skipping the first 7 blocks of input): "My Dear Friend"
seek=11      Ignore (i.e., don't overwrite) the first 11 blocks of output (i.e., leave
             them in place and start writing after them): "Keep this, "
conv=notrunc Do not truncate the output file. This will preserve any blocks in
             the output file not explicitly written by dd. Blocks in output not
             explicitly written by dd: ", keep this."
Especially worth noting above is how the bs option works, namely as shorthand for setting the input block size (ibs) and the output block size (obs) to the same value at the same time. Without this shorthand, we could explicitly specify the input and output block size by means of ibs and obs, respectively, as noted in the manpage for dd:
ibs=n: Set the input block size tonbytes instead of the default512.obs=n: Set the output block size tonbytes instead of the default512.
How do ibs and obs impact all other options depending on input or output block size? As you might expect, in our example, ibs would impact skip and count since both are measured in terms of how many blocks to skip or transfer from the input; similarly, obs would impact seek since the seek option determines how many blocks to "seek" or pass over from the beginning of the output before copying. The bs option simply gives us a way to set both input and output block size to the same value at the same time, superseding the ibs and obs operands.
With bs=1, we set both input and output block size to 1 byte. This is the same as specifying ibs=1 and obs=1. What does this mean in the context of our example? We can find out by looking at all options that depend on ibs and obs, namely skip, count, and seek (input and output reproduced below for ease of reference--note the new line in each case is not for presentation but as a result of using echo which adds a newline):
input   IGNORE:My Dear Friend:IGNORE

output  Keep this, OVERWRITE THIS, keep this.
skip=7: Ignore the first7blocks of input. Sincebs=1, the input block size is set to1byte which means "7blocks of input" really means "7bytes of input". In terms of the characters being used to createinfileandoutfile, 1 byte corresponds to one letter, one space, one newline, one punctuation mark, and so on (see the Wiki page on the more general topic of character encoding for how you can have multibyte characters and the like). If, however, we had, say,bs=2, thenskip=7would still mean "7blocks of input" but, in terms of bytes, this would really mean "14bytes of input":skip = 7 blocks of input = 7 blocks * 2 bytes/block = 14 bytes of inputWitb
bs=1, what are the first7blocks of the input? Simple:IGNORE:count=14: Copy14input blocks from the input source,infile, to the output source,outfile. Sincebs=1, the input block size is set to1byte which means the14blocks of input being copied over equate to copying over14bytes. If we hadbs=2, thencount=14would still mean copying over14blocks but we would then be copying over2 * 14 = 28bytes of data.With
bs=1, what14blocks (i.e., bytes) do we copy from the inputIGNORE:My Dear Friend:IGNOREto the output? Skipping the first
7blocks (i.e.,IGNORE:, as noted above), we copy the following14blocks:My Dear Friend. Each character (including the two spaces) represents 1 block or byte.seek=11: We need to "seek" or pass over11blocks of data from the beginning of the output before copying:Keep this, OVERWRITE THIS, keep this.With
bs=1, the first11blocks (i.e., bytes) of the output areKeep this,(i.e.,8letters,2spaces, and1punctuation mark to gives8 + 2 + 1 = 11bytes). The output to be overwritten by copying from input is what all remains of the output after having seeked over the first11blocks of data:OVERWRITE THIS, keep this.Specifically, we are to copy over
14blocks from the input:My Dear Friend. This will overwrite the first14blocks of what remains from the seeked over output above:OVERWRITE THIS(i.e.,13letters and1space). Hence,My Dear Friendis copied over from input and overwritesOVERWRITE THISfrom output. What happens to the rest of the non-seeked-over output:, keep this.Specifying
conv=notruncis important. Thenotruncconversion option means do not truncate the output file; that is, if the output file already exists, simply replace the specified bytes and leave the rest of the output file alone. Without this option, our use ofddwould result in an output file11 + 14 = 25bytes long (i.e., the number of bytes seeked over in the output file plus the number of bytes copied over from the input file, and the rest would be truncated or wiped away):Keep this, My Dear FriendNote the absence of a new line as well (a newline would would result in
26bytes). By providing theconv=notruncoption, we ensure the blocks of the output file not explicitly written bydd, namely, keep this.are preserved. Hence, the result is the output file
Keep this, My Dear Friend, keep this.which has
28letters,6spaces,3punctuation marks, and1newline or simply28 + 6 + 3 + 1 = 38bytes.
This concludes the example for a simple use case of dd.
With a detailed simple example of dd in action, we are now prepared to more effectively explore and understand the use of dd in the polo function of the script for the solution of this exercise:
saved_marcos=~/Desktop/saved_marcos

marco () {
  echo $(pwd) >> $saved_marcos
}

polo () {
  if [[ -s "$saved_marcos" ]]; then
    last_marco=$(tail -n 1 "$saved_marcos")
    cd $last_marco
    dd if=/dev/null \
       of="$saved_marcos" \
       bs=1 \
       seek=$(echo $(stat -f=%z "$saved_marcos" | cut -c 2- ) - $( echo "$last_marco" | wc -c) | bc )
  else
    echo "No more marcos left to cd back to!"
  fi
}
What is dd and what makes it a tool suitable for use in removing text from a file instead of copying text from one file to another like we did in our example usage of dd? We want to remove the last line (i.e., the absolute path placed there by invoking the marco function) from the saved_marcos file.
As noted on its Wiki page, the dd command can be used for a variety of purposes. For plain-copying commands it tends to be slower than the domain-specific alternatives, but it excels at its unique ability to "overwrite or truncate a file at any point or seek in a file", a fairly low-level interface to the Unix file API. In the context of our problem, we are especially interested in dd's truncation abilities.
dd can modify data in place (i.e., no copy is made of the data being modified). In the context of our script, essentially we would like to modify the saved_marcos file whenever polo is called so that the last line of the saved_marcos file is effectively erased or "overwritten with nothing". The manpage for dd gives dd [operands ...] as its synopsis, but here is its basic usage (note that the syntactical usage of option=value is somewhat different than most Unix-like commands with syntax -option value or --option=value):
dd if=<source> of=<destination> <options>
Many other operands are available to use, but if and of are used very frequently. By default, dd reads from stdin and writes to stdout, but this can be changed by using the if (input file) and of (output file) options. Here are the manpage excerpts for each of the options used in our script (i.e., if, of, bs, and seek):
if=file: Read input fromfileinstead of the standard input.of=file: Write output tofileinstead of the standard output. Any regular output file is truncated unless thenotruncconversion value is specified. If an initial portion of the output file is seeked past (see theseekoperand), the output file is truncated at that point.bs=n: Set both input and output block size tonbytes, superseding theibsandobsoperands. If no conversion values other thannoerror,notruncorsyncare specified, then each input block is copied to the output as a single block without any aggregation of short blocks.seek=n: Seeknblocks from the beginning of the output before copying. On non-tape devices, an lseek(2) operation is used. Otherwise, existing blocks are read and the data discarded. If the user does not have read permission for the tape, it is positioned using the tape ioctl(2) function calls. If the seek operation is past the end of file, space from the current end of file to the specified offset is filled with blocks of NUL bytes.
In our case, we do not want dd to use its default settings and copy from stdin to stdout; we want dd to copy from /dev/null to saved_marcos. But what exactly is /dev/null? In [9], we see that, in general, /dev is a directory that houses device files for interfacing with disks and other hardware. So what is the null file in the dev folder used for (note that the absolute file path for the null file in the dev folder is /dev/null)? This article provides a helpful starting point:
Linux is an interesting operating system that hosts some virtual devices for numerous purposes. As far as programs running in the system are concerned, these virtual devices act as if they are real files. Tools can request and feed data from these sources. The data is generated by the OS instead of reading them from a disk.
One such example is
/dev/null. It's a special file that's present in every single Linux system. However, unlike most other virtual files, instead of reading, it's used to write. Whatever you write to/dev/nullwill be discarded, forgotten into the void. It's known as the null device in a UNIX system.
Some terminology worth referencing key points from:
Null device: In some operating systems, the null device is a device file that discards all data written to it but reports that the write operation succeeded. This device is called
/dev/nullon Unix and Unix-like systems and different names in other systems. It provides no data to any process that reads from it (this is important for our use case as we are going to use/dev/nullas the input file from which we read in order to copy over no data to the output file, effectively erasing that part of the output file), yielding EOF or end-of-file immediately--this is a condition in a computer operating system where no more data can be read from a data source where the data source is usually called a file or stream.The null device is typically used for disposing of unwanted output streams of a process, or as a convenient empty file for input streams (this is how we are using
/dev/nullin our script). This is usually done by redirection. The/dev/nulldevice is a device file or "special file", not a directory, so one cannot move a whole file or directory into it with the Unixmvcommand.Device file or "special file": In Unix-like operating systems, a device file or special file is an interface to a device driver that appears in a file system as if it were an ordinary file. These special files allow an application program to interact with a device by using its device driver via standard input/output system calls. Using standard system calls simplifies many programming tasks, and leads to consistent user-space I/O mechanisms regardless of device features and functions.
In some Unix-like systems, most device files are managed as part of a virtual file system traditionally mounted at
/dev, possibly associated with a controlling daemon, which monitors hardware addition and removal at run time, making corresponding changes to the device file system if that's not automatically done by the kernel, and possibly invoking scripts in system or user space to handle special device needs.Device driver: A device driver is a computer program that operates or controls a particular type of device that is attached to a computer or automaton. A driver provides a software interface to hardware devices, enabling operating systems and other computer programs to access hardware functions without needing to know precise details about the hardware being used.
If we look back at the use of dd in our script, its usage starts to become much clearer:
dd if=/dev/null \
   of="$saved_marcos" \
   bs=1 \
   seek=$(echo $(stat -f=%z "$saved_marcos" | cut -c 2- ) - $( echo "$last_marco" | wc -c) | bc )
Let's break down the option-value pairs we have provided:
if=/dev/null: This means we will read input from/dev/nullinstead of the standard input. Tthis effectively means we will read no data from the input file (i.e., zero bytes).of="$saved_marcos": Thesaved_marcosfile referenced by the$saved_marcosvariable serves as our output file.bs=1: This means our input and output block size is set to1byte.seek=...: Whatever value...resolves to is how many1-byte blocks (1byte sincebs=1) of output will be passed or "seeked" over before copying from/dev/nullbegins.
The net effect of these options is that the value of seek tells us how many blocks of data we want to keep of the output file. Why?
When bs=1 is used, as it is in our case, "blocks of data" really means "bytes of data" since bs=1 specifies that each block of data should be of size 1 byte. Hence, the value of seek resolves to some number of bytes in the output file that we should "seek" or pass over before copying over 1 byte from /dev/null. Because /dev/null provides no data to any process that reads from it, using /dev/null as the input file effectively results in copying over nothing to the output file. Since copying from /dev/null results in not actually copying or overwriting anything in the output file, what happens to the rest of the output file that has not been seeked over? The answer is actually rather simple: Because conv=notrunc is not specified, the result is that everything in the output file beyond whatever is seeked over is truncated or effectively erased. Hence, whatever value seek resolved to is exactly how many bytes our modified output file will be.
The explanation above may still be somewhat abstract so the following examples may help:
Example 1 (using /dev/null along with conv=notrunc)
Start by executing the following:
echo "Never say never!" > ddExample
What's the size of the file in bytes? You should see 17 bytes: 13 letters, 2 spaces, 1 exclamation point, and 1 new line for 13 + 2 + 1 + 1 = 17 bytes in total (echo inserts a 1-byte newline character \n as an end-of-line marker; the option -n can be passed to echo in order to suppress this trailing newline character that is inserted by default).
If you then run
dd if=/dev/null \
   of=ddExample \
   bs=1 \
   count=4 \
   seek=5 \
   conv=notrunc
what do you expect the output to be? What will be the byte size of the output file ddExample after using dd in this manner? Note what our usage of dd communicates: Copy over 4 blocks of data (i.e., count=4) from the input file /dev/null to the output file ddExample while using a block size of 1 byte (i.e., bs=1), and make sure to not start copying until you have seeked by 5 blocks of data in the output file (i.e., seek=5) and finish by not truncating any of the data in the output file.
This use of dd effectively does nothing to our output file. No content is changed and the byte size remains the same (i.e., 17). It may be worth noting that specifying count=4 or count=n for any n is not worth the hassle when /dev/null is being used as your input file (since no data blocks can be read from it).
Example 2 (using /dev/null without conv=notrunc)
With the ddExample file as in the previous example (you can run echo "Never say never!" > ddExample again if you like), execute the same dd command but this time without the unnecessary count=4 option and without the rather important conv=notrunc option:
dd if=/dev/null \
   of=ddExample \
   bs=1 \
   seek=5
What do you expect the output to be? What are the first five bytes of the output file? They are Never. Hence, again, we start copying over from /dev/null after Never, but this does not result in actually copying anything over. Does the output file have the same contents and size as in the previous example? No! We did not specify the conv=notrunc option. Since copying over from /dev/null resulted in not copying over any data at all, the result is that everything after what was seeked over in the output file (i.e., Never) was truncated or effectively erased, leaving us with the value provided for the seek option: 5.
Example 3 (using /dev/null without conv=notrunc and with seek=0)
With the ddExample file as in the previous example, execute the same dd command but this time with seek=0 instead of seek=5:
dd if=/dev/null \
   of=ddExample \
   bs=1 \
   seek=0
What do you expect the output to be? If we do not seek past any of the output file whatsoever, copy over nothing from /dev/null, and then truncate the rest of the output file, then what do we end up with? Nothing. Zero bytes.
With the descriptions and examples above in mind, we should now be able to understand why we specified seek in the way we did (usage of the other programs is explained below):
seek=$(echo $(stat -f=%z "$saved_marcos" | cut -c 2- ) - $(echo "$last_marco" | wc -c) | bc )
We effectively want to subtract however many bytes make up the last line of the saved_marcos file
tail -n 1 "$saved_marcos" | wc -c
from the number of bytes making up the entire saved_marcos file
stat -f=%z "$saved_marcos" | cut -c 2-
in order to get the number of bytes that should make up the new saved_marcos file:
$(echo $(stat -f=%z "$saved_marcos" | cut -c 2- ) - $(echo "$last_marco" | wc -c) | bc )
If we use if=/dev/null, of=saved_marcos, bs=1, and do not specify the conv=notrunc option, then the value above for the seek option will effectively result in skipping over that many bytes and truncating the rest (i.e., effectively erasing the last line by erasing however many bytes make up that line from the output file).
Contextual information is provided below, largely from the manpages, on the different programs utilized to obtain the seek value used in our script referred to above.
stat
The stat utility displays information about the file pointed to by file. The -f option stands for "format" and displays information using the specified format, where format strings start with % and are then followed by a formatting character, namely z in our case which stands for the size of the file in bytes.
As a simple example, running echo "Never say never!" > ddExample and then
stat -f=%z ddExample
results in the following output:
=17
This confirms our manual count of the byte size of the ddExample file from the previous examples.
cut
As noted in [10], the cut command, with syntax cut -(b|c|f) range [options] [files], extracts columns of text from files. A "column" is defined by character offsets (e.g., the nineteenth character of each line):
cut -c 19 myfile
or by byte offsets (which are often the same as characters, unless you have multibyte characters in your language):
cut -b 19 myfile
or by delimited fields (e.g., the fifth field in each line of a comma-delimited file):
cut -f 5 -d, myfile
You aren't limited to printing a single column: you can provide a range (3-16), a comma-separated sequence (3,4,5,6,8,16), or both (3,4,8-16). For ranges, if you omit the first number (-16), a 1 is assumed (1-16); if you omit the last number (5-), the end of line is used.
In our case, since stat outputs a string with the number of bytes of our original output file prepended by the single character =, we can simply use cut -c 2- to get everything after from the second character onward (i.e., everything after the = character).
At this point, we have the number of bytes that make up our original output file (i.e., before anything is removed) by means of the stat and cut commands:
stat -f=%z "$saved_marcos" | cut -c 2-
We take the output from stat command, and we pipe it to the cut command to give us the total number of bytes of our original output file.
wc
In order to understand how wc is used in the context of the command echo "$last_marco" | wc -c, we must first recall how the variable $last_marco was defined: last_marco=$(tail -n 1 "$saved_marcos"). The tail utility starts reading from the end of the provided file, and specifying tail -n 1 "$saved_marcos" means tail will obtain the contents of the last line from the saved_marcos file and print these contents to standard output. Hence, $last_marco is holding the contents of the last line from the saved_marcos file.
The wc utility displays the number of lines, words, and bytes contained in each input file to the standard output. Specifically, the c option will result in wc writing the number of bytes in each input file to standard output. Thus, echo "$last_marco" | wc -c results in passing the last line from the saved_marcos file to wc with the c option set. This will give us the number of bytes making up the last line of the saved_marcos file.
bc
As this article notes, BC, which stands for Basic Calculator, is a command in bash that is used to provide the functionality of a scientific calculator within a bash script (this can be useful for scripting with various arithmentic use cases and scenarios). Trying to execute something like 3 - 2 by itself in bash will fail: bash: 3: command not found. This is where the bc utility comes in.
The way to use bc is almost always by means of piping an arithmetic expression to it. As an example:
echo "3 - 2" | bc
# 1
That's all there is to it, and that's how we're using it in our script too. Once we have the size of our original output file in bytes, we'll subtract the number of bytes from this using the number of bytes that make up the last line of the saved_marcos file. But unless we pipe the arithmetic expression to bc, we'll just be left with a string representing an arithmetic expression we would really like to compute (like "3 - 2").
2.3
- Question
- Answer
- Additional Details
Say you have a command that fails rarely. In order to debug it you need to capture its output but it can be time consuming to get a failure run. Write a bash script that runs the following script until it fails and captures its standard output and error streams to files and prints everything at the end. Bonus points if you can also report how many runs it took for the script to fail.
 #!/usr/bin/env bash

 n=$(( RANDOM % 100 ))

 if [[ n -eq 42 ]]; then
    echo "Something went wrong"
    >&2 echo "The error was using magic numbers"
    exit 1
 fi

 echo "Everything went according to plan"
answer
None
2.4
- Question
- Answer
- Additional Details
As we covered in the lecture find's -exec can be very powerful for performing operations over the files we are searching for. However, what if we want to do something with all the files, like creating a zip file? As you have seen so far commands will take input from both arguments and stdin. When piping commands, we are connecting stdout to stdin, but some commands like tar take inputs from arguments. To bridge this disconnect there's the xargs command which will execute a command using stdin as arguments. For example ls | xargs rm will delete the files in the current directory.
Your task is to write a command that recursively finds all HTML files in the folder and makes a zip with them. Note that your command should work even if the files have spaces (hint: check -d flag for xargs).
If you're on macOS, note that the default BSD find is different from the one included in GNU coreutils. You can use -print0 on find and the -0 flag on xargs. As a macOS user, you should be aware that command-line utilities shipped with macOS may differ from the GNU counterparts; you can install the GNU versions if you like by using brew.
answer
None
2.5
- Question
- Answer
- Additional Details
Write a command or script to recursively find the most recently modified file in a directory. More generally, can you list all files by recency?
answer
None
3 - Editors (Vim)
Popular editors and goals in learning Vim
The way you learn a text editor and become really good at it is you start with a tutorial and then you need to stick with the editor for all your editing tasks. When you're learning a sophisticated tool (e.g., LaTeX, VSCode, Vim, Emacs, etc.), it may be the case initially that switching to the tool slows you down a little bit when you're programming. But stick with it. Because in about 20 hours of using a new editor you'll be back to the same speed at which you used your old tool, but your efficiency will be off the charts. The benefits will really start to become evident. With sophisticated programs like the ones mentioned above, it takes not way too long to learn the basics but a lifetime to master. So throughout the time you're using the tool, make sure you look things up as you go. Make sure to look things up as you're learning.
According to the course, Stack Overflow's developer survey concluded that VSCode was the most popular graphical code editor (Sublime, Atom, etc., are other popular ones) while the most popular command-line editor is Vim, andso Vim will be used for this class. The other major command-line editor is Emacs.
A lot of tools have been excited about the ideas in Vim and so they support a Vim emulation mode. For example, VSCode supports Vim bindings. The goal here will not be to learn all of Vim but to learn the core philosophy or ideas in using Vim and some of the basics (opening, closing, editing, etc.).
Vim as a modal editor (i.e., multiple operating modes) and notational note
One of the really cool ideas behind Vim is that it is a modal editor. What does this mean? This means that Vim has multiple operating modes. And this is kind of developed from the idea that when you're programming there are oftentimes where you are doing different types of things (e.g., reading, editing, writing, etc.). So Vim has different operating modes for doing these different kinds of tasks.
When you start Vim up you start out in what is called "normal" mode. And in this mode all the key combinations behave in one way. And then there are key combinations that switch you between normal mode and other modes, which change the meaning of different keys. For the most part, you'll spend your time in Vim in normal mode or insert mode (you press the i key to go to insert mode from normal mode and the Esc key to go to normal mode from insert mode).
One thing to keep in mind in terms of notation is how "Control plus <key>" is communicated. For example, hitting the "Control" key followed by the "V" key can be represented in roughly 3 different ways:
^VCtrl-V<C-V>
Now, normal mode is designed for navigating around a file, reading things, going from file to file, and things like that. Insert mode is where you will type in text. So most keys you press when you are in insert mode will go into your text buffer whereas keys pressed in normal mode are not being put in the buffer and are instead being used for things like navigation or making edits. We can, for right now, simply make a list of the different modes ([S-V] stands for "Shift then V" below):
- normal (navigating a file, reading things, switching from file to file) [default mode; to go back to this mode from another mode: Esc]
- insert (inserting text and writing content)
[i] - replace (overwrite text instead of pushing forward and inserting into other text)
[r] - select (bunch of different modes for this):
- visual
[v]- visual line
[S-V] - visual block
[C-V]
- visual line
- visual
- command-line [
:]
Now, to go back from any of these modes to normal mode, where you will spend most of your time, you will need to press the Esc key which can become rather cumbersome. For this reason, since you end up pressing the Esc key a lot, many programmers rebind one of the keys on their keyboard to be Escape because it's really inconvenient to reach up with your pinky to press that tiny escape key in the corner. Many people use the "caps lock" key instead.
The basics
The way to start this program is to simply run vim from the command line. Vim comes preinstalled on most systems--if it's not installed on your system, then you can install it with your package manager (e.g., homebrew or something else).
As you might expect, entering vim in the command-line by itself simply causes us to open the Vim program by itself, but you can also pass vim an argument to open a file with Vim.
When you open a file with Vim, if you just start typing right away, then you might encounter some unexpected behavior. This is likely because you are in normal mode where most other editors you've used would be considered to be in "insert" mode. As noted previously, press i to enter insert mode. To get out of insert mode and back to normal mode, press the escape key or another key that you have rebound for this purpose.
Vim has this idea that using the mouse is inefficient. Your hands are on the keyboard and moving your hand over to your mouse takes a lot of time. You don't want to waste those precious seconds! So all Vim functionality can be accessed directly through the keyboard. So everything you might be used to doing in an editor (e.g., opening a file by double clicking on it) can be done strictly by using the keyboard with Vim. So how is this done? This is done by using one of the other Vim modes mentioned previously, particularly through command-line mode.
To enter command-line mode, we use the : character. This is much like entering a shell of sorts, but it's Vim's shell. So we enter Vim commands not other shell commands. And there are a bunch of commands built in that do the kinds of things you're used to. So, for example, one of the commands you might want to know is one for how to quit the Vim program. You can do this by entering the shell mode and entering quit. A short-hand in command-line mode is simply q.
Another handy command you might want to know is how to save a file after having made some edits to it. This is accomplished with w for "write".
There are tons of other commands that will be useful when learning Vim. We can't go in to all of them but a few may be highlighted for your own use and reference. The help command will be nice! Using help in command-line mode and giving it an argument of a key or a command will give you some clarifying information about that key or command. For example, :help :w will tell you more about the w[rite] command. You can enter :q again to take you back to normal mode.
Multiple tabs or files open
At a high level, Vim's model of buffers versus windows versus tabs ... it's probably the case that whatever program you were using before (e.g., Sublime or VSCode), you could open multiple files in it. And you could probably have multiple tabs open and have multiple windows open of your editor. So Vim also has a notion of those different things, but its model is somewhat different than most other programs.
Vim maintains a set of open buffers (this is the word Vim uses for open files) and kind of separately from that you can have a number of tabs and tabs can have windows. The odd thing at first compared to other programs is that there's not a 1-1 correspondence between buffers and windows.
It's helpful to keep in mind that Vim has this idea of tabs and each tab has some number of windows and each window corresponds to some buffer. But a particular buffer can be open in 0 or more windows at a time. Another thing to keep in mind is that :q is not so much "quit" as "close the current window". When there are no more open windows, Vim will actually quit. If you have multiple windows open and you do not want to just press :q multiple times, then :qa for "quit all" will quit all windows.
What normal mode is actually for and some basic movement commands
This is a really cool idea in Vim. The basic idea is that Vim's interface is a programming language. This is a fundamentally interesting idea so let's repeat it: Vim's interface is a programming language. What does this mean? It means that different key combinations have different effects and once you learn the different effects you can actually combine them together (just like you can combine functions in a programming language) to make an interesting program. In the same way, once you learn Vim's different movement and editing commands and things like that, you can talk to Vim by programming Vim through its interface. Once this becomes muscle memory, you can basically edit files at the speed of how you think. So let's dig into how exactly normal mode works.
One basic thing you might want to do is navigate around a buffer (i.e., move your cursor up, down, left, or right).
h: Leftj: Downk: Upl: Right
Although the arrow keys do work by default, try to avoid them because you don't want to have to move your hand over all the way to the arrow keys. Tons of time being wasted! But it may also seem like tons of time is being wasted by having to press those keys multiple times to move to where you want to be. This is true--this is why there are many other key combinations to help you move to where you want to be in Vim.
Pressing the w key moves the cursor forward one word (much like using the option key and the arrows when navigating in a normal editor). Similarly, the b key moves the cursor back one word. Pressing the e key moves the cursor to the end of the word. You can also move across whole lines. So 0 moves to the beginning of a line while $ moves to the end of a line. ^ moves to the first non-empty character on a line. There are ways to scroll up and down in a buffer. So Ctrl-U goes up while Ctrl-D scrolls down. This is better than holding down the k or j keys. There are also ways to move by the entire buffer. For example, G will move all the way down while gg will move all the way up. The L key will move the cursor to the lowest line shown on your screen. M for middle. And H for highest.
And there a whole bunch of other interesting movements like this. Like how to "find" something on the line on which your cursors is. You can use f followed by a character to find the first occurrence of that character after the cursor. Or you can use F to jump backwards and find a character. There's also a variant for f/F, namely t/T that jumps to a charachter but does not include it (t will result in the character before the found one being highlighted while T will result in the one after being highlighted).
Editing commands
Just like there are many movement or navigational commands, there are also many editing commands.
Exercises
3.1
- Question
- Answer
- Additional Details
Complete vimtutor. Note: it looks best in a 80x24 (80 columns by 24 lines) terminal window.
answer
None
3.2
- Question
- Answer
- Additional Details
Download our basic vimrc and save it to ~/.vimrc. Read through the well-commented file (using Vim!), and observe how Vim looks and behaves slightly differently with the new config.
answer
None
3.3
- Question
- Answer
- Additional Details
Install and configure a plugin: ctrlp.vim.
- Create the plugins directory with
mkdir -p ~/.vim/pack/vendor/start - Download the plugin:
cd ~/.vim/pack/vendor/start; git clone https://github.com/ctrlpvim/ctrlp.vim - Read the documentation for the plugin. Try using CtrlP to locate a file by navigating to a project directory, opening Vim, and using the Vim command-line to start
:CtrlP. - Customize CtrlP by adding configuration to your
~/.vimrcto open CtrlP by pressing Ctrl-P.
answer
None
3.4
- Question
- Answer
- Additional Details
3.5
- Question
- Answer
- Additional Details
Use Vim for all your text editing for the next month. Whenever something seems inefficient, or when you think "there must be a better way", try Googling it, there probably is. If you get stuck, come to office hours or send us an email.
answer
None
3.6
- Question
- Answer
- Additional Details
Configure your other tools to use Vim bindings (see instructions above).
answer
None
3.7
- Question
- Answer
- Additional Details
Further customize your ~/.vimrc and install more plugins.
answer
None
3.8
- Question
- Answer
- Additional Details
Convert XML to JSON (example file) using Vim macros. Try to do this on your own, but you can look at the macros section above if you get stuck.
answer
None
4 - Data wrangling
Exercises
4.1
- Question
- Answer
- Additional Details
4.2
- Question
- Answer
- Additional Details
Find the number of words (in /usr/share/dict/words) that contain at least three as and don't have a 's ending. What are the three most common last two letters of those words? sed's y command, or the tr program, may help you with case insensitivity. How many of those two-letter combinations are there? And for a challenge: which combinations do not occur?
answer
None
4.3
- Question
- Answer
- Additional Details
To do in-place substitution it is quite tempting to do something like sed s/REGEX/SUBSTITUTION/ input.txt > input.txt. However this is a bad idea, why? Is this particular to sed? Use man sed to find out how to accomplish this.
answer
None
4.4
- Question
- Answer
- Additional Details
Find your average, median, and max system boot time over the last ten boots. Use journalctl on Linux and log show on macOS, and look for log timestamps near the beginning and end of each boot. On Linux, they may look something like:
Logs begin at ...
and
systemd[577]: Startup finished in ...
On macOS, look for:
=== system boot:
and
Previous shutdown cause: 5
answer
None
4.5
- Question
- Answer
- Additional Details
Look for boot messages that are not shared between your past three reboots (see journalctl's -b flag). Break this task down into multiple steps. First, find a way to get just the logs from the past three boots. There may be an applicable flag on the tool you use to extract the boot logs, or you can use sed '0,/STRING/d' to remove all lines previous to one that matches STRING. Next, remove any parts of the line that always varies (like the timestamp). Then, de-duplicate the input lines and keep a count of each one (uniq is your friend). And finally, eliminate any line whose count is 3 (since it was shared among all the boots).
answer
None
4.6
- Question
- Answer
- Additional Details
Find an online data set like this one, this one, or maybe one from here. Fetch it using curl and extract out just two columns of numerical data. If you're fetching HTML data, pup might be helpful. For JSON data, try jq. Find the min and max of one column in a single command, and the difference of the sum of each column in another.
answer
None
5 - Command line environment
Exercises
Job control
5a.1
- Question
- Answer
- Additional Details
From what we have seen, we can use some ps aux | grep commands to get our jobs' pids and then kill them, but there are better ways to do it. Start a sleep 10000 job in a terminal, background it with Ctrl-Z and continue its execution with bg. Now use pgrep to find its pid and pkill to kill it without ever typing the pid itself. (Hint: use the -af flags).
answer
None
5a.2
- Question
- Answer
- Additional Details
Say you don't want to start a process until another completes, how would you go about it? In this exercise our limiting process will always be sleep 60 &. One way to achieve this is to use the wait command. Try launching the sleep command and having an ls wait until the background process finishes.
However, this strategy will fail if we start in a different bash session, since wait only works for child processes. One feature we did not discuss in the notes is that the kill command's exit status will be zero on success and nonzero otherwise. kill -0 does not send a signal but will give a nonzero exit status if the process does not exist. Write a bash function called pidwait that takes a pid and waits until the given process completes. You should use sleep to avoid wasting CPU unnecessarily.
answer
None
Terminal multiplexer
5b.1
- Question
- Answer
- Additional Details
Follow this tmux tutorial and then learn how to do some basic customizations following these steps.
answer
None
Aliases
5c.1
- Question
- Answer
- Additional Details
Create an alias dc that resolves to cd for when you type it wrongly.
answer
None
5c.2
- Question
- Answer
- Additional Details
Run
history | awk '{$1="";print substr($0,2)}' | sort | uniq -c | sort -n | tail -n 10
to get your top 10 most used commands and consider writing shorter aliases for them. Note: this works for Bash; if you're using ZSH, use history 1 instead of just history.
answer
None
Dotfiles
Let's get you up to speed with dotfiles.
5d.1
- Question
- Answer
- Additional Details
Create a folder for your dotfiles and set up version control.
answer
None
5d.2
- Question
- Answer
- Additional Details
Add a configuration for at least one program (e.g., your shell) with some customization (to start off, it can be something as simple as customizing your shell prompt by setting $PS1).
answer
None
5d.3
- Question
- Answer
- Additional Details
Set up a method to install your dotfiles quickly (and without manual effort) on a new machine. This can be as simple as a shell script that calls ln -s for each file, or you could use a specialized utility.
answer
None
5d.4
- Question
- Answer
- Additional Details
Test your installation script on a fresh virtual machine.
answer
None
5d.5
- Question
- Answer
- Additional Details
Migrate all of your current tool configurations to your dotfiles repository.
answer
None
5d.6
- Question
- Answer
- Additional Details
Publish your dotfiles on GitHub.
answer
None
Remote machines
Install a Linux virtual machine (or use an already existing one) for this exercise. If you are not familiar with virtual machines check out this tutorial for installing one.
5e.1
- Question
- Answer
- Additional Details
Go to ~/.ssh/ and check if you have a pair of SSH keys there. If not, generate them with ssh-keygen -o -a 100 -t ed25519. It is recommended that you use a password and use ssh-agent, more info here.
answer
None
5e.2
- Question
- Answer
- Additional Details
Edit .ssh/config to have an entry as follows:
Host vm
    User username_goes_here
    HostName ip_goes_here
    IdentityFile ~/.ssh/id_ed25519
    LocalForward 9999 localhost:8888
answer
None
5e.3
- Question
- Answer
- Additional Details
Use ssh-copy-id vm to copy your ssh key to the server.
answer
None
5e.4
- Question
- Answer
- Additional Details
Start a webserver in your VM by executing python -m http.server 8888. Access the VM webserver by navigating to http://localhost:9999 in your machine.
answer
None
5e.5
- Question
- Answer
- Additional Details
Edit your SSH server config by doing sudo vim /etc/ssh/sshd_config and disable password authentication by editing the value of PasswordAuthentication. Disable root login by editing the value of PermitRootLogin. Restart the ssh service with sudo service sshd restart. Try sshing in again.
answer
None
5e.6
- Question
- Answer
- Additional Details
Install mosh in the VM and establish a connection. Then disconnect the network adapter of the server/VM. Can mosh properly recover from it?
answer
None
5e.7
- Question
- Answer
- Additional Details
Look into what the -N and -f flags do in ssh and figure out a command to achieve background port forwarding.
answer
None
6 - Version control (Git)
Version control systems in general
As a quick summary, version control systems are tools that are used to keep track of changes to source code or other collections of files or folders. And, as the name implies, these tools help track the history of changes to some set of documents and, in addition to doing that, they facilitate collaboration. So they're really useful for working with a group of people on a software project.
Version control systems track changes to a folder and its contents in a series of snapshots so you capture the entire state of a folder and everything inside. Each snapshot encapsulates the entire set of files and folders contained within some top-level directory. VCSs also contain a bunch of metadata (authors, commit timestamps, messages, etc.) along with the actual changes to the content, which makes it possible to figure out things like who authored a particular change to a particular file or when was a particular change made.
One awesome thing is you can track down introductions of bugs more easily. For example, if you have a unit test that is consistently passing but is broken at some point but goes undetected, then Git can conduct a binary search through all your snapshots to find out when the breaking change was introduced.
The poor Git interface but beautiful data model
It's not a secret that Git's interface is poorly designed and a leaky abstraction. As a well-known XKCD comic points out, one often finds themself in a position of basically just copying their project somewhere else for fear of deleting things or screwing stuff up. But one often simply learns a few shell commands first and then goes with those commands as magical incantations when the real need is to understand the underlying data model for Git because that's the whole idea of Git: track data more effectively where the data exists in files and folders. But if you do not understand how the data is tracked, then there's little hope of actually using Git effectively.
Git terminology (trees, blobs, etc.)
In Git terminology, a directory is referred to as a "tree" and a file is referred to as a "blob." The top-level directory is a recursive data structure in the sense that the top-level tree can contain other tree (i.e., a folder can contain other folders).
The top-level directory is what is being tracked in Git; that is, the root directory is what will be referred to as a "Git repository."
Modelling history in Git
Git uses a directed acyclic graph (DAG) to model history (see the Wiki article for more). In Git, each snapshot has some number of parents.
Data model in Git using pseudocode
First, we have files or "blobs" where each "blob" is just a bunch of bytes.
type blob = array<byte>
Then we have directories or folders (recall the top-level directory/folder is the Git repository where changes are being tracked) known as "trees":
type tree = map<string, tree | blob >
And trees are really nothing more than mappings from the file/directory name (string) to the actual contents and the contents are either another tree like a sub-tree or a file (i.e., a blob).
Finally, we have so-called "snapshots" of everything we are working with. In Git terminology, these snapshots are called "commits":
type commit = struct {
  parents: array<commit>,
  author: string,
  message: string,
  snapshot: tree
}
In the above, note that by "parents" we are referring to what precedes a commit which is often a single parent/commit but may also be multiple parents/commits as in the case of merge commits. And finally by "snapshot" we are referring to the actual contents.
How Git addresses data
We need to now think about how Git actually stores and addresses the actual data (i.e., blobs, trees, and commits); that is, at some point all of this has to actually turn into data on disk. So Git defines an object as any one of the three things discussed previously:
type object = blob | tree | commit
In Git, all objects are content-addressed. So what Git maintains on disk is a set of objects maintained as a contents-addressed store:
objects = map<string, object>
So if you have any one of these objects (i.e., blob, tree, commit) then the way you put it into the store is its key is the hash of the object. For example, we might have something like the following to store a particular object:
def store(object):
  id = sha1(object)
  objects[id] = object
Verbally, what we do is we compute the SHA-1 hash of our object and then put it into our objects map and store it to disk. Essentially, a hashing function (we are using the SHA-1 hashing function in this case) gives us a way to name a thing (i.e., a big piece of data) in a way that's kind of deterministic based on the contents of the thing. It takes in the thing as input and gives you a "short" name for it (i.e., a 40 digit hexadecimal number).
We saw above how we can store data, but we can conversely load data in something like the following manner:
def load(id):
  return objects[id]
That is, to load objects (i.e., blobs, trees, and commits) from the store, we can look these objects up by their id. So we retrieve the object from the objects store by id and Git gives us back the contents.
Pointers/references in Git
Given the way we have described objects (i.e., blobs, trees, and commits) so far, particularly commits
type commit = struct {
  parents: array<commit>,
  author: string,
  message: string,
  snapshot: tree
}
it may be tempting to think that a commit "contains" a whole bunch of other commits, snapshots, or other things like that. But, in practice, it doesn't actually work that way. Instead, all of the things mentioned in a commit are pointers. So a commit will be able to reference a bunch of parents by their ids. So the parents: array<commit> mentioned as part of a commit is not an array of commits themselves but ids. Similarly, the snapshot inside a commit, snapshot: tree, is not the actual tree object--it's the id of the tree. So all of these objects are kind of stored on their own in this objects store and then all the references to the different objects are just by their ids (i.e., by their SHA-1 hashes).
Everything described above is Git's on-disc data store: it's a content-addressed store where objects are addressed by their SHA-1 hash.
The SHA-1 hash for each object is a 40-character string of hexadecimal numbers, and this is great for computers, but this is, of course, not very human-friendly. To see how Git goes about trying to address this problem, we need to be aware that Git essentially maintains a set of objects and a set of references (data that Git maintains internally). What are references?
references = map<string, string>
You can think of this as mapping human-readable names (e.g., "fix encoding bug", "master", etc.) to the not-so-human-readable SHA-1 hashes. Furthermore, as with most references, references can be updated (i.e., changed, removed, etc.). The immediate power of this is that we can now refer to commits in our commit graph by name (i.e., we can refer to specific snapshots of our history by name) instead of by the long 40-digit hex strings.
Another thing to note here is that, given Git's design for history, our entire commit graph is actually immutable. We can add new stuff to it, but you cannot actually manipulate anything inside of it (simply put, the hash for something would need to change in order to mutate it and that doesn't really make sense because the hash is content-dependent); however, references are mutable, and that's the upshot of a lot of this. You often will not care about the graph's immutability so much as being able to mutate and refer to what you actually want to refer to, and that will be done most often by named references (which can be changed).
So that's basically all there is to a Git repository: objects (i.e., blobs, trees, commits) and references (names we can use to refer to the SHA-1 hashes of these objects). At a high level, all of Git command-line commands are just manipulations of either the references data or the objects data.
A simple demo with Git
We can cd into a demo directory that will serve as the top-level directory for this demo. Once inside of the demo directory, we can use git init to initialize an empty Git repository. Furthermore, we can list out the contents of this Git repository by using ls .git, and we will see a few things listed, namely the objects and refs (all of the repository data will be stored underneath these two directories):
HEAD
config
description
hooks
info
objects
refs
Since our demo repository is currently empty, doing something like git status will simply show something like the following:
On branch master

No commits yet

nothing to commit (create/copy files and use "git add" to track)
So we can create a minimal text file like so: echo "hello world" > hello.txt.
Now that we have added a new file to our demo directory, what we would like to do is take the current contents of the demo directory and turn it into a new snapshot to repreent the first state the project was in. And you might imagine an interface for doing this would be something like git snapshot which would take a snapshot of the entire state of the current directory, but Git does not have a command like this for a number of reasons. Mostly because Git wants to actually give you some flexibility as to what changes to include in the next snapshot you take.
To explain how this works, it's necessary that we delve into the Git concept of a "staging area."
The concept of a "staging area" in Git
Git has the concept of what is called the "staging area" and, at a high level, it's a way you tell Git what changes should be included in the next snapshot (i.e., commit) you take. As of right now, we have a Git repository but we have not taken any snapshots just yet. In fact, we can look at the status of our Git repository by running git status:
On branch master

No commits yet

Untracked files:
  (use "git add <file>..." to include in what will be committed)
    hello.txt

nothing added to commit but untracked files present (use "git add" to track)
What this is saying is that Git notices that there is a new file in the current directory, but it is not going to be included in the next snapshot--Git is kind of ignoring it for now. But if we run git add hello.txt and then git status again, then what we will get back is different from before:
On branch master

No commits yet

Changes to be committed:
  (use "git rm --cached <file>..." to unstage)
    new file:   hello.txt
Now if we do the "git snapshot" command, which is git commit, then we will effectively create a new snapshot in our Git repository. The above code tells us that the new file hello.txt will be included in the snapshot we are about to take. You will need to add a message to go along with your commit. Something like the following will work (even though you should aim to write effective commit messages):
/V/D/d/s/g/c/demo (master →) git commit -m "add hello.txt"
[master (root-commit) e2785f2] add hello.txt
 1 file changed, 1 insertion(+)
 create mode 100644 hello.txt
The e2785f2 seen above is the hash of the commit we have just created. So right now in our history we will have a single node with an abbreviated hash of e2785f2 that has in it a tree that has a single blob (i.e., hello.txt) with the contents hello world. So e2785f2 is the hash of the commit and the commit contains inside of it the hash of the tree along with what other information there may be. We can actually use git cat-file -p e2785f2, a Git internal command, that will print out the contents of the commit with abbreviated hash e2785f2:
tree 68aba62e560c0ebc3396e8ae9335232cd93a3f60
author Daniel Farlow <dan.farlow@gmail.com> 1593962400 -0500
committer Daniel Farlow <dan.farlow@gmail.com> 1593962400 -0500

add hello.txt
So the commit with hash e2785f2 has inside of it the tree with hash 68aba62e560c0ebc3396e8ae9335232cd93a3f60 where Daniel Farlow is the author and we have the commit message at the bottom. And we can continue digging by running git cat-file -p 68aba62e560c0ebc3396e8ae9335232cd93a3f60:
100644 blob 3b18e512dba79e4c8300dd08aeb37f8e728b8dad hello.txt
This tells us that the tree with hash 3b18e512dba79e4c8300dd08aeb37f8e728b8dad has inside of it a single file/blob with name hello.txt and hash 3b18e512dba79e4c8300dd08aeb37f8e728b8dad. Finally, we can do git cat-file -p 3b18e512dba79e4c8300dd08aeb37f8e728b8dad to see the actual file/blob contents in a human-readable form:
hello world
A somewhat unrelated question is why do we have to use git add when seeking to commit files instead of something that would allow us to commit all changes/files at once? Git does let you do this in different ways, but the overall idea is that Git wants to give you some flexibility in what you choose to commit and so on and so forth. Something like git add -a commits all of the changes that were made to files that are already being tracked by Git (so anything that was included in the previous snapshot but has been modified since then). It does not include new things (e.g., new files and the like).
At a higher level, the reason why we have the separation between git add and git commit is because there will often be situations where you do not want to include everything in the current snapshot.
Visualizing version history (git log)
We can use git log to help us visualize the history or commit graph. Be default, git log shows us a flattened version of the version history so even though the version history is a directed acyclic graph, git log will linearize this graph and show things in chronological order with the most recent commit being placed at the top. To visualize the history as a DAG, we can use git log with a number of available arguments: git log --all --graph --decorate.
Running this right now will not do much for us since we only have 1 commit to look at! So we can modify our hello.txt file ever so slightly so Git will recognize that a file has been changed: echo "another line" >> hello.txt. Now look what happens when we blindly run git commit:
On branch master
Changes not staged for commit:
    modified:   hello.txt

no changes added to commit
We are politely being told that we have changes that have not been staged for commit; thus, if we want these changes to show up in a new snapshot, we will need to stage those changes. So if we run git add hello.txt, then our changes will now be added to the staging area and we can go through with committing these changes: git commit -m "add another line to the file":
[master dcd8adb] add another line to the file
 1 file changed, 1 insertion(+)
Notice how that named reference master points to a different hash now, namely the abbreviated hash dcd8adb. If we run git cat-file -p dcd8adb, then we can inspect this most recent snapshot:
tree 8466e1fa129daffb4b5e594c0b9822cf84b29664
parent e2785f2223aeac2008825a03c68b53c881c06855
author Daniel Farlow <dan.farlow@gmail.com> 1593963828 -0500
committer Daniel Farlow <dan.farlow@gmail.com> 1593963828 -0500

add another line to the file
Now we can see that the parent snapshot refers back to the previous snapshot we were working with before our most recent change was committed. Now we can run git log --all --graph --decorate and get what looks more like a graph now:
* commit dcd8adb7a7de4de79376c4b5bcca0f61373e2db8 (HEAD -> master)
| Author: Daniel Farlow <dan.farlow@gmail.com>
| Date:   Sun Jul 5 10:43:48 2020 -0500
|
|     add another line to the file
|
* commit e2785f2223aeac2008825a03c68b53c881c06855
  Author: Daniel Farlow <dan.farlow@gmail.com>
  Date:   Sun Jul 5 10:20:00 2020 -0500

      add hello.txt
One thing above we will want to talk more about is the curious (HEAD -> master) in the graph above. So remember how we talked about objects or the actual contents of your repository (blobs, trees, and commits) and then we talked about references (i.e., ways of naming things in the repository with human-readable names). So master is one reference that is created by default when you initialize a Git repository, and by convention it generally refers to the main branch of development. So master will typically represent the most up-to-date version of your project.
So basically you can think of master as a pointer to the commit with hash dcd8adb7a7de4de79376c4b5bcca0f61373e2db8, and, as we add more commits throughout our project, this pointer will be mutated to point to later commits. Now, HEAD is a special reference in Git. It's a reference like master but it is special in some way. Essentially, HEAD represents where you are currently looking right now (and HEAD is typically linked with master unless you are poking around through different snapshots).
A variety of Git commands (e.g., git checkout)
git checkout
The command git checkout allows you to move around in your version history. So, for example, we can give git checkout the hash of a previous commit (you can give it an abbreviated hash, say the first 6-8 characters), and Git will change the state of your working directory to how it was at that commit. For example, from before when we used git log, we can run something like git checkout e2785f and you will be greeted by something like the following:
Note: switching to 'e2785f'.

You are in 'detached HEAD' state. You can look around, make experimental
changes and commit them, and you can discard any commits you make in this
state without impacting any branches by switching back to a branch.

If you want to create a new branch to retain commits you create, you may
do so (now or later) by using -c with the switch command. Example:

  git switch -c <new-branch-name>

Or undo this operation with:

  git switch -

Turn off this advice by setting config variable advice.detachedHead to false

HEAD is now at e2785f2 add hello.txt
Recall what the contents of hello.txt were most recently:
hello world
another line
But since we have moved back in time in our snapshot history, running cat hello.txt will result in printing out whatever the contents of hello.txt were at that time in history:
hello world
We can now run git log --all --graph --decorate to see how, if anything, has changed:
* commit dcd8adb7a7de4de79376c4b5bcca0f61373e2db8 (master)
| Author: Daniel Farlow <dan.farlow@gmail.com>
| Date:   Sun Jul 5 10:43:48 2020 -0500
|
|     add another line to the file
|
* commit e2785f2223aeac2008825a03c68b53c881c06855 (HEAD)
  Author: Daniel Farlow <dan.farlow@gmail.com>
  Date:   Sun Jul 5 10:20:00 2020 -0500

      add hello.txt
Notice that this output looks slightly different from what we had before. The actual history contents (i.e., the commits themselves and the way they relate to each other) have not changed, but the references have changed. Specifically, the most recent commit, the one with hash dcd8adb7a7de4de79376c4b5bcca0f61373e2db8, previously had reference (HEAD -> master), but now we see the most recent commit has reference master while the one we just checked out has HEAD as its reference. At a high level, what this is telling us is that * commit e2785f2223aeac2008825a03c68b53c881c06855 (HEAD) is what we are looking at right now. If we want to go back to * commit dcd8adb7a7de4de79376c4b5bcca0f61373e2db8 (master), then we can type out git checkout dcd8adb7a7de4de79376c4b5bcca0f61373e2db8 or we can simply type out git checkout master (yay for named references instead of having to type out the full hash!).
So git checkout actually changes the contents of your working directory and so, in that way, it can be a somewhat dangerous command if you misuse it. Essentially, you should think of it as git checkout moves where the HEAD is, and HEAD refers to the current working directory. So basically git checkout moves the HEAD pointer and this will result in the contents of your working directory being updated to reflect what those contents where at that point in history.
On another note, suppose you have made changes to hello.txt that you do not care to keep. One way to effectively delete these changes and to restore hello.txt to what it was with wherever the HEAD currently points, you can simply do git checkout hello.txt. So this basically throws away the changes to hello.txt that have been made in the working directory and sets the contents of hello.txt back to the way it was in the snapshot that HEAD points to.
git diff
The git diff command can basically show what has changed since the last snapshot. Suppose, for example, that we are diligently working on hello.txt while we have (HEAD -> master) [note that this will often be the case ... you will be working on your project, stages changes for commit, create another snapshot, and go on]. If we want to see how our current version of hello.txt (i.e., our working version of hello.txt) differs from the hello.txt that HEAD points to (the most recent version of hello.txt stored in our history as opposed to our current working version), then we can run git diff HEAD hello.txt or git diff hello.txt; that is, by default, git diff <file> acts as though we want to see the differences in hello.txt as they are from our current working version to the version that the HEAD points to. What this means is that we can also do something like git diff e2785f22 hello.txt to see how the current working version of hello.txt differs from the hello.txt that existed in history for the commit with abbreviated hash e2785f22. We can also try to see what changed between two explicit commits of a file as opposed to just thinking about the current working version: git diff e2785f22 HEAD hello.txt. This will show us what changed in hello.txt between commit with hash e2785f22 and where HEAD currently points.
Branching and merging
To start, we will add something to our demo repo more significant than hello.txt but still very basic, a program animal.py:
import sys

def default():
  print('Hello')

def main():
  default()

if __name__ == '__main__':
  main()
Right now git status will show that animal.py is untracked:
On branch master
Untracked files:
  (use "git add <file>..." to include in what will be committed)
    animal.py

nothing added to commit but untracked files present (use "git add" to track)
So we will use git add animal.py to add this file to the staging area. Then we will run git commit -m "Add animal.py":
[master a059ed3] Add animal.py
 1 file changed, 10 insertions(+)
 create mode 100644 animal.py
We will now illustrate how to use Git branches to have parallel lines of development. The git branch command (or sub-command) is used to access functionality related to branching. Just running git branch by itself lists all of the branches in the local repository. We can also use -vv like git branch -vv to be extra verbose to print extra information (e.g., the abbreviated hashes for each branch).
If we do something like git branch cat, then Git will create a new branch cat (which, remember, is just a reference) that points to the same place where we are currently looking. So now there is a new reference/branch called cat that points to wherever HEAD was pointing:
* commit a059ed3189796e9300a631777516d0610b256acd (HEAD -> master, cat)
| Author: Daniel Farlow <dan.farlow@gmail.com>
| Date:   Sun Jul 5 11:55:50 2020 -0500
|
|     Add animal.py
|
* commit dcd8adb7a7de4de79376c4b5bcca0f61373e2db8
| Author: Daniel Farlow <dan.farlow@gmail.com>
| Date:   Sun Jul 5 10:43:48 2020 -0500
|
|     add another line to the file
|
* commit e2785f2223aeac2008825a03c68b53c881c06855
  Author: Daniel Farlow <dan.farlow@gmail.com>
  Date:   Sun Jul 5 10:20:00 2020 -0500

      add hello.txt
At the top, we can see that HEAD points to master, and this is also where the cat branch is. So now we have two branches (i.e., two references) that resolve to the same commit, the one with hash a059ed3189796e9300a631777516d0610b256acd. Git is actually aware of not only which snapshot in the history you are currently looking at, but it's also aware of HEAD kind of being associated with a branch (so above HEAD is associated with master, and it is the case that if we create a new snapshot (e.g., git commit ... ) then the next snapshot will be created and then master will point to that new snapshot. master will be updated along with HEAD)
If we do git checkout cat, then what this does is it switches us to the branch cat, and it replaces the contents of the working directory with whatever cat's pointing to, which in this case is the same as the contents before. But if we look at git log --all --graph --decorate again, then we will see that HEAD no longer points to master but to cat:
* commit a059ed3189796e9300a631777516d0610b256acd (HEAD -> cat, master)
| Author: Daniel Farlow <dan.farlow@gmail.com>
| Date:   Sun Jul 5 11:55:50 2020 -0500
|
|     Add animal.py
|
* commit dcd8adb7a7de4de79376c4b5bcca0f61373e2db8
| Author: Daniel Farlow <dan.farlow@gmail.com>
| Date:   Sun Jul 5 10:43:48 2020 -0500
|
|     add another line to the file
|
* commit e2785f2223aeac2008825a03c68b53c881c06855
  Author: Daniel Farlow <dan.farlow@gmail.com>
  Date:   Sun Jul 5 10:20:00 2020 -0500

      add hello.txt
Of course, right now, since no changes have been made, master also points to the same underlying commit as cat. At this point, if we make changes to our current working directory and make a new commit, then the cat branch, pointer, or reference will be updated to point to the new commit whereas master will continue to pointing to wherever it pointed before.
We can now make a small change to our animal.py file:
import sys

def cat():
  print('Meow!')

def default():
  print('Hello')

def main():
  if sys.argv[1] == 'cat':
    cat()
  else:
    default()

if __name__ == '__main__':
  main()
So running something like python3 animal.py cat will result in Meow! while something like python3 animal.py anythingelse will result in Hello. If we run git status, then we will see something like the following:
On branch cat
Changes not staged for commit:
  (use "git add <file>..." to update what will be committed)
  (use "git restore <file>..." to discard changes in working directory)
    modified:   animal.py

no changes added to commit (use "git add" and/or "git commit -a")
Furthermore, if we run git diff, then we will see something like the following:
diff --git a/animal.py b/animal.py
index 92d28e5..0aa029c 100644
--- a/animal.py
+++ b/animal.py
@@ -1,10 +1,16 @@
 import sys

+def cat():
+  print('Meow!')
+
 def default():
   print('Hello')

 def main():
-  default()
+  if sys.argv[1] == 'cat':
+    cat()
+  else:
+    default()

 if __name__ == '__main__':
   main()
\ No newline at end of file
And we can note lines prepended with + were added while those prepended with - were removed. We will now git add animal.py and git commit -m "Add cat functionality":
[cat 8b91d08] Add cat functionality
 1 file changed, 7 insertions(+), 1 deletion(-)
To see the more concise visual history, use git log --all --graph --decorate --oneline:
* 8b91d08 (HEAD -> cat) Add cat functionality
* a059ed3 (master) Add animal.py
* dcd8adb add another line to the file
* e2785f2 add hello.txt
As can be seen above, this can be quite useful just to get a very quick glimpse of what the commit history looks like. From the above, we can tell that we are currently checked out on the cat branch and we just added cat functionality. But we could do something like git checkout master and then cat animal.py and we would end up with something like the following that did not reflect the changes we just made to animal.py while on the cat branch:
import sys

def default():
  print('Hello')

def main():
  default()

if __name__ == '__main__':
  main()⏎
And now running our git log will give us the following:
* 8b91d08 (cat) Add cat functionality
* a059ed3 (HEAD -> master) Add animal.py
* dcd8adb add another line to the file
* e2785f2 add hello.txt
So we can jump back and forth between parallel lines of development. Now that we have some cat functionality, suppose we wanted to add some dog functionality in parallel. And suppose that, in this case, the cat functionality is under development or maybe someone else is working on it--so we just want to start from the base or the master commit and build the dog functionality starting from there. So now we want to create a new branch dog for adding the dog-related functionality and we'll eventually merge it in later. We can simultaneously create and checkout the dog branch by running git checkout -b dog.
Looking at our git log again shows us some helpful information:
* 8b91d08 (cat) Add cat functionality
* a059ed3 (HEAD -> dog, master) Add animal.py
* dcd8adb add another line to the file
* e2785f2 add hello.txt
Good. Right now dog and master reference the same commit; furthermore, HEAD points to dog instead of master. This is what we want. Now we can add our dog functionality to animal.py:
import sys

def default():
  print('Hello')

def dog():
  print('Woof!')

def main():
  if sys.argv[1] == 'dog':
    dog()
  else:
    default()

if __name__ == '__main__':
  main()
Running git diff will show us something similar to what we saw before when we added the cat functionality on the cat branch:
diff --git a/animal.py b/animal.py
index 92d28e5..292af3d 100644
--- a/animal.py
+++ b/animal.py
@@ -3,8 +3,14 @@ import sys
 def default():
   print('Hello')

+def dog():
+  print('Woof!')
+
 def main():
-  default()
+  if sys.argv[1] == 'dog':
+    dog()
+  else:
+    default()

 if __name__ == '__main__':
   main()
\ No newline at end of file
If we look at git status we will see our changes have not yet been staged for commit:
On branch dog
Changes not staged for commit:
  (use "git add <file>..." to update what will be committed)
  (use "git restore <file>..." to discard changes in working directory)
    modified:   animal.py

no changes added to commit (use "git add" and/or "git commit -a")
Now when we do git add animal.py and git commit -m "Add dog functionality", we will see something else in our git log:
* 5e6a0dc (HEAD -> dog) Add dog functionality
| * 8b91d08 (cat) Add cat functionality
|/
* a059ed3 (master) Add animal.py
* dcd8adb add another line to the file
* e2785f2 add hello.txt
Now the Git history graph looks kind of interesting compared to the ones we've looked at before. The bottom three commits show that they are in common with the commits that come after it, but then the history is actually forked after the third commit, where we have one commit that adds cat functionality * 8b91d08 (cat) Add cat functionality and another commit that adds dog functionality * 5e6a0dc (HEAD -> dog) Add dog functionality. Now, using git checkout, we can switch back and forth between dog, cat, and master. So this is great that we can do development in parallel on different features, but this is only really useful if we can eventually combine those things back into our original line of development (i.e., have both cat and dog features in a single version of our source code).
The command to merge these separate features into a single version is git merge. Essentially, git branch and git merge can kind of be thought of as opposites. Right now we will switch back to master with git checkout master and our git log will reflect this by showing the HEAD as pointed to the master branch:
* 5e6a0dc (dog) Add dog functionality
| * 8b91d08 (cat) Add cat functionality
|/
* a059ed3 (HEAD -> master) Add animal.py
* dcd8adb add another line to the file
* e2785f2 add hello.txt
/V/D/d/s/g/c/demo (master
Right now the goal is to merge the cat functionality and the dog functionality into master. To do that we can use the git merge command (we can merge more than one thing at a time but for right now we will just do one). Suppose we want to merge the cat functionality first. We will use git merge cat:
Updating a059ed3..8b91d08
Fast-forward
 animal.py | 8 +++++++-
 1 file changed, 7 insertions(+), 1 deletion(-)
Git gives us some information here. What is meant by "Fast-forward"? This is an interesting thing Git can do. When you're at a particular commit and you merge some other branch (i.e., cat) in where that other branch (i.e., cat) has the current commit as a predecessor (i.e., * a059ed3 (HEAD -> master) Add animal.py), then it's not necessary to create any new snapshots or do any other fancy stuff. Basically, in this context, the master pointer can simply be moved to the * 8b91d08 (cat) Add cat functionality commit where the cat functionality was added. In fact, this is exactly what we see when we look at the git log now:
* 5e6a0dc (dog) Add dog functionality
| * 8b91d08 (HEAD -> master, cat) Add cat functionality
|/
* a059ed3 Add animal.py
* dcd8adb add another line to the file
* e2785f2 add hello.txt
We now see that master is basically pointing to the same place that cat was pointing, namely the commit with abbreviated hash 8b91d08. So now we are on the master branch which has the cat functionality. Great. We're halfway there. Now let's try git merge dog to get the dog functionality:
Auto-merging animal.py
CONFLICT (content): Merge conflict in animal.py
Automatic merge failed; fix conflicts and then commit the result.
Something a little more interesting happens this time. This time the branch can't be fast-forwarded like it was before. It's not that one thing was just strictly older than the other thing--there's been parallel development that may be kind of incompatible with the current set of changes. And so Git does its best job to automatically merge the changes from this other branch (i.e., dog) by auto-merging the animal.py file from dog with that in master, but in this particular case we get what is called a merge conflict. So Git was not able to resolve the conflicts that apparently exist with the parallel development that occurred between merging the cat functionality from the cat branch into master and then subsequently the dog functionality from the dog branch.
At this point, it is left up to the developer to fix the issue. And Git offers some functionality to help resolve merge conflicts. There's a program called git mergetool that can help with this. If we open up animal.py with our editor, then we will see something like the following:
<<<<<< HEAD
  if sys.argv[1] == 'cat':
    cat()
======
  if sys.argv[1] == 'dog':
    dog()
>>>>>> dog
  else:
    default()
What this tells us is that the branch we were on, designated by HEAD, has
if sys.argv[1] == 'cat':
  cat()
whereas the branch we were trying to merge (i.e., dog) has
if sys.argv[1] == 'dog':
  dog()
Which changes do we want? It is left up to us to decide. Once you've made the necessary changes and resolved the conflicts, then you can do git merge --continue to continue the merge process:
U   animal.py
error: Committing is not possible because you have unmerged files.
hint: Fix them up in the work tree, and then use 'git add/rm <file>'
hint: as appropriate to mark resolution and make a commit.
fatal: Exiting because of an unresolved conflict.
But as we can see from the above, we actually need to add the animal.py file to the staging area to tell Git we have actually fixed the issues encountered in the merge conflict: git add animal.py. The error message actually tells us as much: "Fix them (i.e., unmerged files) up in the work tree, and then use 'git add/rm <file>' as appropriate to mark resolution and make a commit." Hence, the git merge commnd attempts to commit changes for us. As such, we can simply pass the -m argument to specify the commit message as well; for example, we could have git merge -m "Merge branch 'cat'" which would be the default message.
If everything we have done is correct, then hopefully everything should be unified right now; that is, HEAD should be pointing to the master branch, and the master branch should include the functionality that was built in parallel in on the dog and cat branches. Examining our git log confirms this:
*   4a8b1af (HEAD -> master) Merge branch 'dog'
|\
| * 5e6a0dc (dog) Add dog functionality
* | 8b91d08 (cat) Add cat functionality
|/
* a059ed3 Add animal.py
* dcd8adb add another line to the file
* e2785f2 add hello.txt
We now have the single commit * 4a8b1af (HEAD -> master) Merge branch 'dog' that represents our merge commit that we just made which merges in the dog functionality, and note that this commit has as parents both the 'dog commit' * 5e6a0dc (dog) Add dog functionality and the 'cat commit' * | 8b91d08 (cat) Add cat functionality. We can see this more clearly by running the git cat-file -p 4a8b1af command:
tree 8230786124d8ba55b95d7acf53868b2b26d8a0ea
parent 8b91d0845285825800474bb21576b4482220ef50
parent 5e6a0dc77b6e3e5ab77f815614f825c9bf90f1c9
author Daniel Farlow <dan.farlow@gmail.com> 1593973242 -0500
committer Daniel Farlow <dan.farlow@gmail.com> 1593973242 -0500

Merge branch 'dog'
As we suspected, the master branch the HEAD is pointed at has the dog and cat commits as its parents. So this is a basic demonstration of how you branch in Git and do development on different things in parallel and how you can use the merge command in Git to resolve those different branches and combine them together into a single snapshot that includes all the functionality that was developed in parallel with each other.
Git remotes (adding remotes, pushing, fetching, merging, pulling, cloning)
We will now talk about Git remotes. So this is basically how you collaborate with other people using Git. A Git repository (i.e., everything contained in the .git folder) represents kind of an entire copy of the history. It has the objects and the references and contains all the previous snapshots. And the way you collaborate with other people using Git is that other people can also have entire copies of the Git repository. And then your local Git copy can be aware of the existence of other clones of the same repository. And this is a concept known as "remotes."
The git remote command will list all the remotes that Git is aware of for the current repository. Of course, right now we do not have any remotes so git remote will simply print nothing for right now in our case. In practice, if you're collaborating with other people, then your Git repository might be aware of the copy of the code that is on GitHub, and then there's a set of commands to send changes from your local copy of the repository to a remote that you're Git is aware of. So sending stuff from your computer to GitHub, for instance, and then there's another set of commands for fetching changes made in a local repository to get changes from GitHub to your own local copy.
Right now we can add a fake remote by cding out of our demo directory and creating a remote-fake directory at the same level and, inside of remote-fake, run git init --bare. If we cd back into demo now, we can make a remote by running git remote add <name> <url>, where name is the name of the remote (this is often called origin if you are only using one) and then for the url normally this will be like a GitHub url or something like that (BitBucket, GitLab, etc., if you are using an online repository-hosting service). But in this case we will just use a path to a folder: git remote add origin ../remote-fake. Once we have done this, there is a set of commands for interacting with this remote. One command that is quite useful is the git push command. This command can send the changes from your computer to the remote. The format for this command is as follows: git push <remote-name> <local-branch-name>:<remote-branch-name>. And what this does is it creates a new branch or updates a branch on the remote with the name specified as remote-branch-name and sets it to the contents of the branch specified in local-branch-name.
To illustrate the above, we might do something like git push origin master:master. So we want to create a branch master on the remote that is going to be the same as the master branch in our local Git repository:
Enumerating objects: 18, done.
Counting objects: 100% (18/18), done.
Delta compression using up to 12 threads
Compressing objects: 100% (14/14), done.
Writing objects: 100% (18/18), 1.68 KiB | 1.68 MiB/s, done.
Total 18 (delta 3), reused 0 (delta 0)
To ../remote-fake/
 * [new branch]      master -> master
The last part, To ../remote-fake/ * [new branch] master -> master indicates that on the remote we created a new branch where master -> master indicates that the remote master (the leftmost one) points to the master on the local machine. Now look what happens when we run git log:
*   4a8b1af (HEAD -> master, origin/master) Merge branch 'dog'
|\
| * 5e6a0dc (dog) Add dog functionality
* | 8b91d08 (cat) Add cat functionality
|/
* a059ed3 Add animal.py
* dcd8adb add another line to the file
* e2785f2 add hello.txt
We see (when we have colors enabled) that HEAD is in blue which is where we currently are, green represents all the branches in our local Git repository, and now we see a new color, red, that we haven't seen before, and that shows references that are present on the remotes that our local copy is aware of. So, on the remote called 'origin', there is also a branch that happens to have the name master that points to the same place as our local branch master points, namely the commit with abbreviated hash 4a8b1af.
So now if we, say, changed the capitalization of what is said in our animal.py program and run git add animal.py and git commit -m "lower case animal expressions", then we get
[master 16b26f1] lower case animal expressions
 1 file changed, 3 insertions(+), 3 deletions(-)
and our git log then looks as follows:
* 16b26f1 (HEAD -> master) lower case animal expressions
*   4a8b1af (origin/master) Merge branch 'dog'
|\
| * 5e6a0dc (dog) Add dog functionality
* | 8b91d08 (cat) Add cat functionality
|/
* a059ed3 Add animal.py
* dcd8adb add another line to the file
* e2785f2 add hello.txt
So now if someone looks at the remote, then they will only see the changes up to * 4a8b1af (origin/master) Merge branch 'dog'. The git clone command is what someone can use to start from some copy of a repository somewhere and make their own local copy. So this is a command often used when starting off with a Git repo (e.g., starting with something on GitHub and wanting to look at it on your own machine). The format for git clone is as follows: git clone <url> <folder-name> where url stands for where something is being cloned from while folder-name indicates where we want the clone to go to (if nothing is specified, then the cloned directory is cloned to the current working directory). So somthing like git clone ./remote-fake/ demo2:
Cloning into 'demo2'...
done.
/V/D/d/s
Let's now consider what our git log will look like as if we are on two different machines, demo and demo2. That is, we can think of demo and demo2 as two people on two different machines with their own copy of the repository and they're both interacting with the single remote, remote-fake.
So if we do the git log on machine one (i.e., in demo), then we get the following:
* 16b26f1 (HEAD -> master) lower case animal expressions
*   4a8b1af (origin/master) Merge branch 'dog'
|\
| * 5e6a0dc (dog) Add dog functionality
* | 8b91d08 (cat) Add cat functionality
|/
* a059ed3 Add animal.py
* dcd8adb add another line to the file
* e2785f2 add hello.txt
If, however, we do git log on machine two (i.e., in demo2), then we get the following:
*   4a8b1af (HEAD -> master, origin/master, origin/HEAD) Merge branch 'dog'
|\
| * 5e6a0dc Add dog functionality
* | 8b91d08 Add cat functionality
|/
* a059ed3 Add animal.py
* dcd8adb add another line to the file
* e2785f2 add hello.txt
So master on machine two is pointing to the same place as origin/master, and the message we have is Merge branch 'dog' so if we look at animal.py by using cat animal.py, then we will see that the capitalization changes made on machine one have not been reflected yet:
import sys

def cat():
  print('Meow!')

def default():
  print('Hello')

def dog():
  print('Woof!')

def main():
  if sys.argv[1] == 'cat':
    cat()
  elif sys.argv[1] == 'dog':
    dog()
  else:
    default()

if __name__ == '__main__':
  main()⏎
So, on machine one, if we want to send the changes on up to the remote (think of it as sending the changes up to GitHub or the machine that is hosting or maintaining the source code), then we can use the git push command again on machine one: git push origin master:master. And this will work, but this is kind of annoying and cumbersome to type out each time because this is a very common operation. So Git has a way of making this a bit simpler. It has a way of maintaining relationships between branches on your own local machine and branches on remote machines. It has a way of knowing what branch on a remote machine a local branch corresponds to so that you can type in a shortened version of git push and Git will know what all the arguments to the expanded form would have been. And there are a couple different syntaxes for doing this.
- One way is to use
git branch --set-upstream-to=origin/masterand what this does is for the branch that is currently checked out (e.g.,master) it will set the upstream to:Branch 'master' set up to track remote branch 'master' from 'origin'.Now if we typegit branch -vv(i.e., we want Git to tell us about all the branches we know about in a very verbose form) then we will get something like the following:
  cat    8b91d08 Add cat functionality
  dog    5e6a0dc Add dog functionality
* master 16b26f1 [origin/master: ahead 1] lower case animal expressions
So we have 3 branches on our local machine: cat, dog, and master. And that last line tells us that master on our local machine corresponds to origin/master. So now we can just type in git push without all the extra arguments:
Enumerating objects: 5, done.
Counting objects: 100% (5/5), done.
Delta compression using up to 12 threads
Compressing objects: 100% (3/3), done.
Writing objects: 100% (3/3), 356 bytes | 356.00 KiB/s, done.
Total 3 (delta 1), reused 0 (delta 0)
To ../remote-fake/
   4a8b1af..16b26f1  master -> master
Since we are checked out on the master branch on our local machine and our local master branch corresponds to origin/master, by executing git push Git knows that we will want to push changes from our local master branch to origin/master. So now these changes are present on the remote.
If we now go over to machine two and do git log, then we will see what we saw before:
*   4a8b1af (HEAD -> master, origin/master, origin/HEAD) Merge branch 'dog'
|\
| * 5e6a0dc Add dog functionality
* | 8b91d08 Add cat functionality
|/
* a059ed3 Add animal.py
* dcd8adb add another line to the file
* e2785f2 add hello.txt
Nothing has changed. What's going on here? It's necessary now to run a separate command in order to have the most recent changes present here. By default, all the Git commands don't talk to the internet. It all works locally which means it works very fast but there are special commands to indicate that you want to retrieve changes that have been made somewhere else. And the command for doing that is called git fetch. And here is the syntax: git fetch <remote-name>. If there's only one remote, then that remote's name will be used by default. [Note: git fetch is different from git pull; see this article for a little bit more about this.] So running git fetch on machine two will give us something like the following:
remote: Enumerating objects: 5, done.
remote: Counting objects: 100% (5/5), done.
remote: Compressing objects: 100% (3/3), done.
remote: Total 3 (delta 1), reused 0 (delta 0)
Unpacking objects: 100% (3/3), done.
From /Volumes/DEVFARLOW/development-and-engineering/sandbox/git-sandbox/cs-mit/./remote-fake
   4a8b1af..16b26f1  master     -> origin/master
It looks like there's been some update on the remote and we can visualize this by runing git log:
* 16b26f1 (origin/master, origin/HEAD) lower case animal expressions
*   4a8b1af (HEAD -> master) Merge branch 'dog'
|\
| * 5e6a0dc Add dog functionality
* | 8b91d08 Add cat functionality
|/
* a059ed3 Add animal.py
* dcd8adb add another line to the file
* e2785f2 add hello.txt
We end up with something we haven't really seen before, namely we have master on our local machine (git fetch doesn't change any of our local history or local references or anything like that--it just loads metadata from the remote(s)), and now Git is aware that origin/master has been updated to point to the new commit with hash 16b26f1. We could then do git merge after doing git fetch to move HEAD -> master up or we could do git pull to pull in the latest changes (i.e., git pull is equivalent to doing both git fetch and git merge). Before pulling in the latest changes, however, we could see what those changes actually are by running git diff origin:
diff --git a/animal.py b/animal.py
index 24f9d37..f986650 100644
--- a/animal.py
+++ b/animal.py
@@ -1,13 +1,13 @@
 import sys

 def cat():
-  print('meow!')
+  print('Meow!')

 def default():
-  print('hello')
+  print('Hello')

 def dog():
-  print('woof!')
+  print('Woof!')

 def main():
   if sys.argv[1] == 'cat':
We can see that it looks like the only changes made were cosmetic capitalization ones. Now, running git pull now gives us the following:
Updating 4a8b1af..16b26f1
Fast-forward
 animal.py | 6 +++---
 1 file changed, 3 insertions(+), 3 deletions(-)
So we can see that Git is "Fast-forwarding" or merging in origin/master into our master. Now we can look at our git log to see the new history:
* 16b26f1 (HEAD -> master, origin/master, origin/HEAD) lower case animal expressions
*   4a8b1af Merge branch 'dog'
|\
| * 5e6a0dc Add dog functionality
* | 8b91d08 Add cat functionality
|/
* a059ed3 Add animal.py
* dcd8adb add another line to the file
* e2785f2 add hello.txt
We can see that we are no longer behind origin/master but have been fast-forwarded to be up to date with the most recent changes reflected in the remote. Hence, oftentimes, when working on a team, you will want to run git fetch with some consistency to see what changes, if any, have been made while you are working on your branch. If the changes won't be problematic, then it is likely a good idea to git pull those changes so you are working with the most up to date copy of the origin/master branch.
Other things to know about Git (surface-level overview)
git config: This allows us to configure Git in a number of ways. This is helpful because Git is highly configurable, and it's configured using a plaintext file. Sogit configcan be given different flags that will modify that plaintext file or you can edit the~/.gitconfigfile in the Home folder with plaintext configuration. It's not a bad idea to poke around and see how others have set up their.gitconfigfile.git clone: Something useful to know aboutgit clonearises when you want to clone a repository that is really gigantic. By default,git clonecopies the entire version history from the remote it's downloading the repository from. But there's an argument you can pass it which will avoid doing that:git clone --shallow. This will give you the latest snapshot of the repository you are cloning from. So if you are cloning a massive repository with a billion commits, then using--shallowwill make things go much faster (but you will miss out on the version history).git blame: This can be used to figure out who edited what line of a file, and you can also find the corresponding commit that was responsible for modifying that particular line of that file. And then you can look up commit messages associated with that and whatnot. Basically, the lines will be printed to the right and metadata (including commit hashes) to the left. So you can pinpoint where something was introduced and find out what commit introduced it. You can then take the hash and usegit showto explore that commit.git show: You can do something likegit show a88b4eacto get information specific to this commit.git bisect: This tool has a rather complicated interface, but this tool can be used to solve a bunch of problems where you would need to manually search your history for something. For example, suppose you are in a scenario where you've been working on a project for a long time, and you have lots and lots of snapshots. You're 1000 commits in, and now you notice that some unit test doesn't pass anymore. But you know this was passing one year ago, and you're trying to figure out at what point did the unit test break (i.e., when was a regression in your codebase introduced). You could checkout commits in reverse order and try to keep seeing when it was passing until you see when it fails. And eventually you'll find the first commit where the unit test stopped working, but that is rather annoying and cumbersome to do manually. This is wheregit bisectcomes in. It can automate that process, and it actually binary searches your history. So it does this in as efficient a manner as possible. Also,git bisectcan take in a script that is uses to try to figure out whether a commit it is looking at is good or bad so it can be a fully automated process. So you can givegit bisecta unit test and say something along the lines of, "Find the first commit where this unit test stopped passing." So it's a really powerful tool..gitignore: You can specify filenames or patterns of filenames that you want your Git repository to essentially not care about or track the changes of.git stash: Suppose we change ourhello.txtfile from
hello world
another line
to
hello world
another line
changes here
If we run git diff, then we will see this change reflected here:
diff --git a/hello.txt b/hello.txt
index fdff486..2ee45ef 100644
--- a/hello.txt
+++ b/hello.txt
@@ -1,2 +1,3 @@
 hello world
 another line
+changes here
\ No newline at end of file
But suppose we want to temporarily put these changes away. Then if we do git stash, it will revert our working directory to the state it was in at the last commit:
Saved working directory and index state WIP on master: 2b045ad fix bug for woof to be Woof
If we now run git diff or cat hello.txt, then that change is gone. But it's not just deleted. It's saved somewhere. And if we do git stash pop, then Git will undo the stash and the change will appear again.
git add -p: Suppose now that we wanted to fix a bug in ouranimal.pyfile on machine one and this bug relates to capitalization of one animal expression and we use a debugging print statement somewhere to help us:
import sys

def cat():
  print('meow!')

def default():
  print('hello')

def dog():
  print('Woof!')

def main():
  print('debug print')
  if sys.argv[1] == 'cat':
    cat()
  elif sys.argv[1] == 'dog':
    dog()
  else:
    default()

if __name__ == '__main__':
  main()
Running git diff on machine one shows us the changes:
diff --git a/animal.py b/animal.py
index 24f9d37..ac4fe19 100644
--- a/animal.py
+++ b/animal.py
@@ -7,9 +7,10 @@ def default():
   print('hello')

 def dog():
-  print('woof!')
+  print('Woof!')

 def main():
+  print('debug print')
   if sys.argv[1] == 'cat':
     cat()
   elif sys.argv[1] == 'dog':
If we do git add animal.py, then Git will stage both of the changes above for commit. But that's not what we want. And we could manually remove all our print statements and then do git add animal.py, but there's an easier way to do this. We can do git add -p animal.py to add some interactivity to how we stage changes to be committe; that is, we can interactively stage pieces of files for commit. We get the digg and now a prompt: Stage this hunk [y,n,q,a,d,s,e,?]? . We can choose s to split the change into two smaller changes. Then we can select y for the first change and n for the second one. Now, if we run git diff --cached, this will show us what changes are staged for commit:
diff --git a/animal.py b/animal.py
index 24f9d37..bbf1e38 100644
--- a/animal.py
+++ b/animal.py
@@ -7,7 +7,7 @@ def default():
   print('hello')

 def dog():
-  print('woof!')
+  print('Woof!')

 def main():
   if sys.argv[1] == 'cat':
So now we can see we have only the change we want to keep. If we just run git diff, then we will still see the change that we do not want to add to the next commit. Now we can git commit -m "fix bug for woof to be Woof":
[master 2b045ad] fix bug for woof to be Woof
 1 file changed, 1 insertion(+), 1 deletion(-)
Now if we run git diff we will see only the change we don't want:
diff --git a/animal.py b/animal.py
index bbf1e38..ac4fe19 100644
--- a/animal.py
+++ b/animal.py
@@ -10,6 +10,7 @@ def dog():
   print('Woof!')

 def main():
+  print('debug print')
   if sys.argv[1] == 'cat':
     cat()
   elif sys.argv[1] == 'dog':
To get rid of this undesired change we can do git checkout animal.py to throw away that change. So use git add -p for interactive staging.
- Some other things to know about:
- There are several graphical clients for Git if that's more your flavor.
- Shell integration: basically, have your shell set up so you can see what is going on in your Git repository without having to always use Git command-line commands. So you might see what branch is currently checked out, how far behind you are, etc.
- Text editor integration (Vim, etc.)
- The Pro Git book is what you want to really become proficient at using Git.
Exercises
6.1
- Question
- Answer
- Additional Details
6.2
- Question
- Answer
- Additional Details
Clone the repository for the class website.
- Explore the version history by visualizing it as a graph.
- Who was the last person to modify
README.md? (Hint: usegit logwith an argument). - What was the commit message associated with the last modification to the
collections: line of_config.yml? (Hint: usegit blameandgit show).
answer
None
6.3
- Question
- Answer
- Additional Details
One common mistake when learning Git is to commit large files that should not be managed by Git or adding sensitive information. Try adding a file to a repository, making some commits and then deleting that file from history (you may want to look at this).
answer
None
6.4
- Question
- Answer
- Additional Details
Clone some repository from GitHub, and modify one of its existing files. What happens when you do git stash? What do you see when running git log --all --oneline? Run git stash pop to undo what you did with git stash. In what scenario might this be useful?
answer
None
6.5
- Question
- Answer
- Additional Details
Like many command line tools, Git provides a configuration file (or dotfile) called ~/.gitconfig. Create an alias in ~/.gitconfig so that when you run git graph, you get the output of git log --all --graph --decorate --oneline.
answer
None
6.6
- Question
- Answer
- Additional Details
You can define global ignore patterns in ~/.gitignore_global after running git config --global core.excludesfile ~/.gitignore_global. Do this, and set up your global gitignore file to ignore OS-specific or editor-specific temporary files, like .DS_Store.
answer
None
6.7
- Question
- Answer
- Additional Details
Fork the repository for the class website, find a typo or some other improvement you can make, and submit a pull request on GitHub.
answer
None
7 - Debugging and profiling
Exercises
7.1
- Question
- Answer
- Additional Details
Use journalctl on Linux or log show on macOS to get the super user accesses and commands in the last day. If there aren't any you can execute some harmless commands such as sudo ls and check again.
answer
None
7.2
- Question
- Answer
- Additional Details
7.3
- Question
- Answer
- Additional Details
Install shellcheck and try checking the following script. What is wrong with the code? Fix it. Install a linter plugin in your editor so you can get your warnings automatically.
#!/bin/sh
## Example: a typical script with several problems
for f in $(ls *.m3u)
do
  grep -qi hq.*mp3 $f \
    && echo -e 'Playlist $f contains a HQ file in mp3 format'
done
answer
None
7.4
- Question
- Answer
- Additional Details
7.5
- Question
- Answer
- Additional Details
Here are some sorting algorithm implementations. Use cProfile and line_profiler to compare the runtime of insertion sort and quicksort. What is the bottleneck of each algorithm? Use then memory_profiler to check the memory consumption, why is insertion sort better? Check now the inplace version of quicksort. Challenge: Use perf to look at the cycle counts and cache hits and misses of each algorithm.
answer
None
7.6
- Question
- Answer
- Additional Details
Here's some (arguably convoluted) Python code for computing Fibonacci numbers using a function for each number.
#!/usr/bin/env python
def fib0(): return 0

def fib1(): return 1

s = """def fib{}(): return fib{}() + fib{}()"""

if __name__ == '__main__':

    for n in range(2, 10):
        exec(s.format(n, n-1, n-2))
    # from functools import lru_cache
    # for n in range(10):
    #     exec("fib{} = lru_cache(1)(fib{})".format(n, n))
    print(eval("fib9()"))
Put the code into a file and make it executable. Install prerequisites: pycallgraph and graphviz. (If you can run dot, you already have GraphViz.) Run the code as is with pycallgraph graphviz -- ./fib.py and check the pycallgraph.png file. How many times is fib0 called? We can do better than that by memoizing the functions. Uncomment the commented lines and regenerate the images. How many times are we calling each fibN function now?
answer
None
7.7
- Question
- Answer
- Additional Details
A common issue is that a port you want to listen on is already taken by another process. Let's learn how to discover that process pid. First execute python -m http.server 4444 to start a minimal web server listening on port 4444. On a separate terminal run lsof | grep LISTEN to print all listening processes and ports. Find that process pid and terminate it by running kill <PID>.
answer
None
7.8
- Question
- Answer
- Additional Details
Limiting processes resources can be another handy tool in your toolbox. Try running stress -c 3 and visualize the CPU consumption with htop. Now, execute taskset --cpu-list 0,2 stress -c 3 and visualize it. Is stress taking three CPUs? Why not? Read man taskset. Challenge: achieve the same using cgroups. Try limiting the memory consumption of stress -m.
answer
None
7.9
- Question
- Answer
- Additional Details
The command curl ipinfo.io performs a HTTP request and fetches information about your public IP. Open Wireshark and try to sniff the request and reply packets that curl sent and received. (Hint: Use the http filter to just watch HTTP packets).
answer
None
8 - Metaprogramming
Exercises
8.1
- Question
- Answer
- Additional Details
Most makefiles provide a target called clean. This isn't intended to produce a file called clean, but instead to clean up any files that can be re-built by make. Think of it as a way to "undo" all of the build steps. Implement a clean target for the paper.pdf Makefile above. You will have to make the target phony. You may find the git ls-files subcommand useful. A number of other very common make targets are listed here.
answer
None
8.2
- Question
- Answer
- Additional Details
Take a look at the various ways to specify version requirements for dependencies in Rust's build system. Most package repositories support similar syntax. For each one (caret, tilde, wildcard, comparison, and multiple), try to come up with a use-case in which that particular kind of requirement makes sense.
answer
None
8.3
- Question
- Answer
- Additional Details
Git can act as a simple CI system all by itself. In .git/hooks inside any git repository, you will find (currently inactive) files that are run as scripts when a particular action happens. Write a pre-commit hook that runs make paper.pdf and refuses the commit if the make command fails. This should prevent any commit from having an unbuildable version of the paper.
answer
None
8.4
- Question
- Answer
- Additional Details
Set up a simple auto-published page using GitHub Pages. Add a GitHub Action to the repository to run shellcheck on any shell files in that repository (here is one way to do it). Check that it works!
answer
None
8.5
- Question
- Answer
- Additional Details
Build your own GitHub action to run proselint or write-good on all the .md files in the repository. Enable it in your repository, and check that it works by filing a pull request with a typo in it.
answer
None
9 - Security and cryptography
Exercises
9.1a
- Question
- Answer
- Additional Details
Suppose a password is chosen as a concatenation of four lower-case dictionary words, where each word is selected uniformly at random from a dictionary of size 100,000. An example of such a password is correcthorsebatterystaple. How many bits of entropy does this have?
answer
None
9.1b
- Question
- Answer
- Additional Details
Consider an alternative scheme where a password is chosen as a sequence of 8 random alphanumeric characters (including both lower-case and upper-case letters). An example is rg8Ql34g. How many bits of entropy does this have?
answer
None
9.1c
- Question
- Answer
- Additional Details
Which is the stronger password?
answer
None
9.1d
- Question
- Answer
- Additional Details
Suppose an attacker can try guessing 10,000 passwords per second. On average, how long will it take to break each of the passwords?
answer
None
9.2
- Question
- Answer
- Additional Details
Download a Debian image from a mirror (e.g. from this Argentinean mirror. Cross-check the hash (e.g. using the sha256sum command) with the hash retrieved from the official Debian site (e.g. this file hosted at debian.org, if you've downloaded the linked file from the Argentinean mirror).
answer
None
9.3
- Question
- Answer
- Additional Details
Encrypt a file with AES encryption, using OpenSSL:
openssl aes-256-cbc -salt -in {input filename} -out {output filename}
Look at the contents using cat or hexdump. Decrypt it with
openssl aes-256-cbc -d -in {input filename} -out {output filename}
and confirm that the contents match the original using cmp.
answer
None
9.4a
- Question
- Answer
- Additional Details
Set up SSH keys on a computer you have access to (not Athena, because Kerberos interacts weirdly with SSH keys). Rather than using RSA keys as in the linked tutorial, use more secure ED25519 keys. Make sure your private key is encrypted with a passphrase, so it is protected at rest.
answer
None
9.4b
- Question
- Answer
- Additional Details
9.4c
- Question
- Answer
- Additional Details
9.4d
- Question
- Answer
- Additional Details
Sign a Git commit with git commit -S or create a signed Git tag with git tag -s. Verify the signature on the commit with git show --show-signature or on the tag with git tag -v.
answer
None