JSNAD Course Notes
- 0 - Highlighted learnings
- 1 - Introduction
- 2 - Setting up
- 3 - The Node Binary
- 4 - Debugging and diagnostics
- 5 - Key JavaScript concepts
- 6 - Packages and dependencies
- 7 - Node's module systems
- 8 - Asynchronous control flow
- 9 - Node's event system
- 10 - Handling errors
- 11 - Using buffers
- 12 - Working with streams
- 13 - Interacting with the file system
- 14 - Process and operating system
- 15 - Creating child processes
- 16 - Writing unit tests
- Quizzes
0 - Highlighted learnings
Use nvm to install Node (not the direct download or a package manager)
The recommended way to install Node.js on macOS and Linux is by using a Node version manager, in particular nvm. See https://github.com/nvm-sh/nvm for full details.
The quick version: if curl is installed (which it usually is), then use the install script (update version accordingly):
curl -o- https://raw.githubusercontent.com/nvm-sh/nvm/v0.39.1/install.sh | bash
Then run command -v nvm to check that the installation was successful (output should be nvm). Install the desired Node version:
nvm install 16
Helpful command line flags for the Node binary
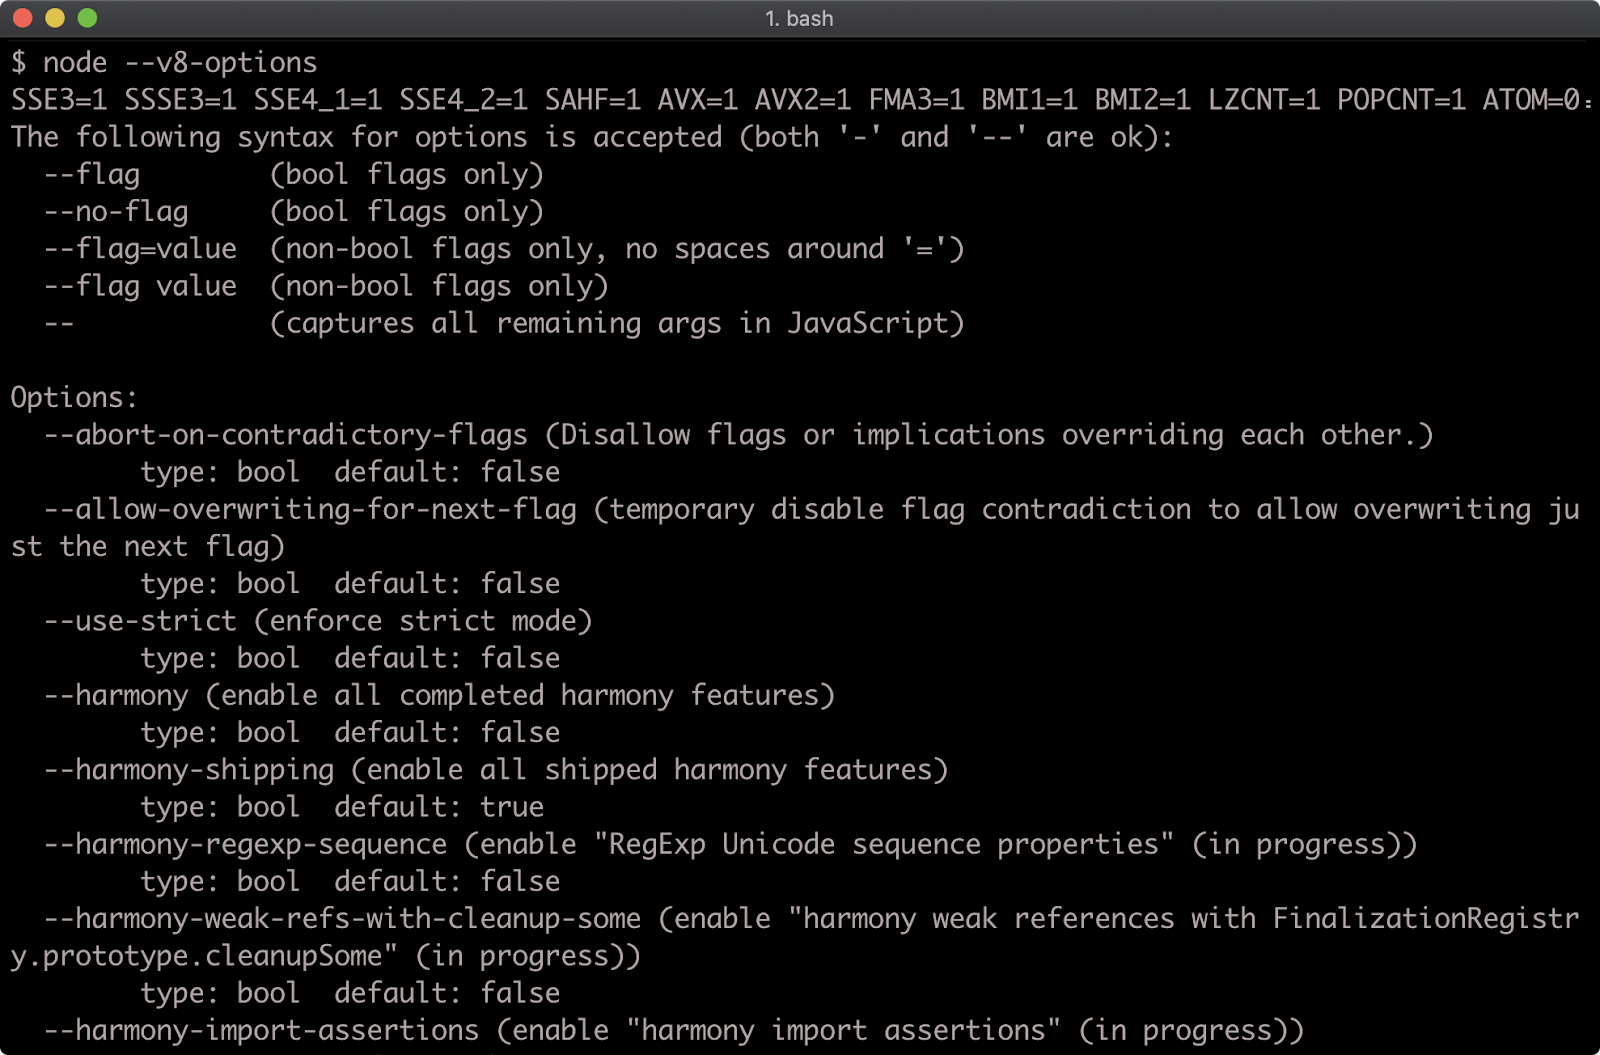
node --helpwill provide you with a very comprehensive listing of all command line flags.node --v8-optionsprovides additional flags for modifying V8, the JavaScript runtime engine.node -c <file-name>parse a JavaScript application without running it in order to simply check syntax (helps when there are big setup/teardown tasks). No output indicates success; otherwise, error output will be shown.node -p <expression>evaluates an expression and prints the result; for example:node -p "1+1"node -e <expression>evaluates an expression and does not print the result; for example:node -e "1+1"Usually a module would be required, like so:
require('fs'), however all Node core modules can be accessed by their namespaces within the code evaluation context. For example, the following would print all the files with a.jsextension in the current working directory in which the command is run:node -p "fs.readdirSync('.').filter((f) => /.js$/.test(f))"node -r <path-to-module>can be used to preload a module before anything else loads. This can be useful when using or consuming modules that instrument or configure the process in some way. One example would be thedotenvmodule.
Modifying the stack trace limit via the command line when debugging
Stack traces are generated for any Error that occurs, so they're usually the first point of call when debugging a failure scenario. By default, a stack trace will contain the last ten stack frames (function call sites) at the point where the trace occurred. This is often fine, because the part of the stack you are interested in is often the last 3 or 4 call frames. However there are scenarios where seeing more call frames in a stack trace makes sense, like checking that the application flow through various functions is as expected.
The stack trace limit can be modified with the --stack-trace-limit flag. This flag is part of the JavaScript runtime engine, V8, and can be found in the output of the --v8-options flag.
Consider a program named app.js containing the following code:
function f (n = 99) {
  if (n === 0) throw Error()
  f(n - 1)
}
f()
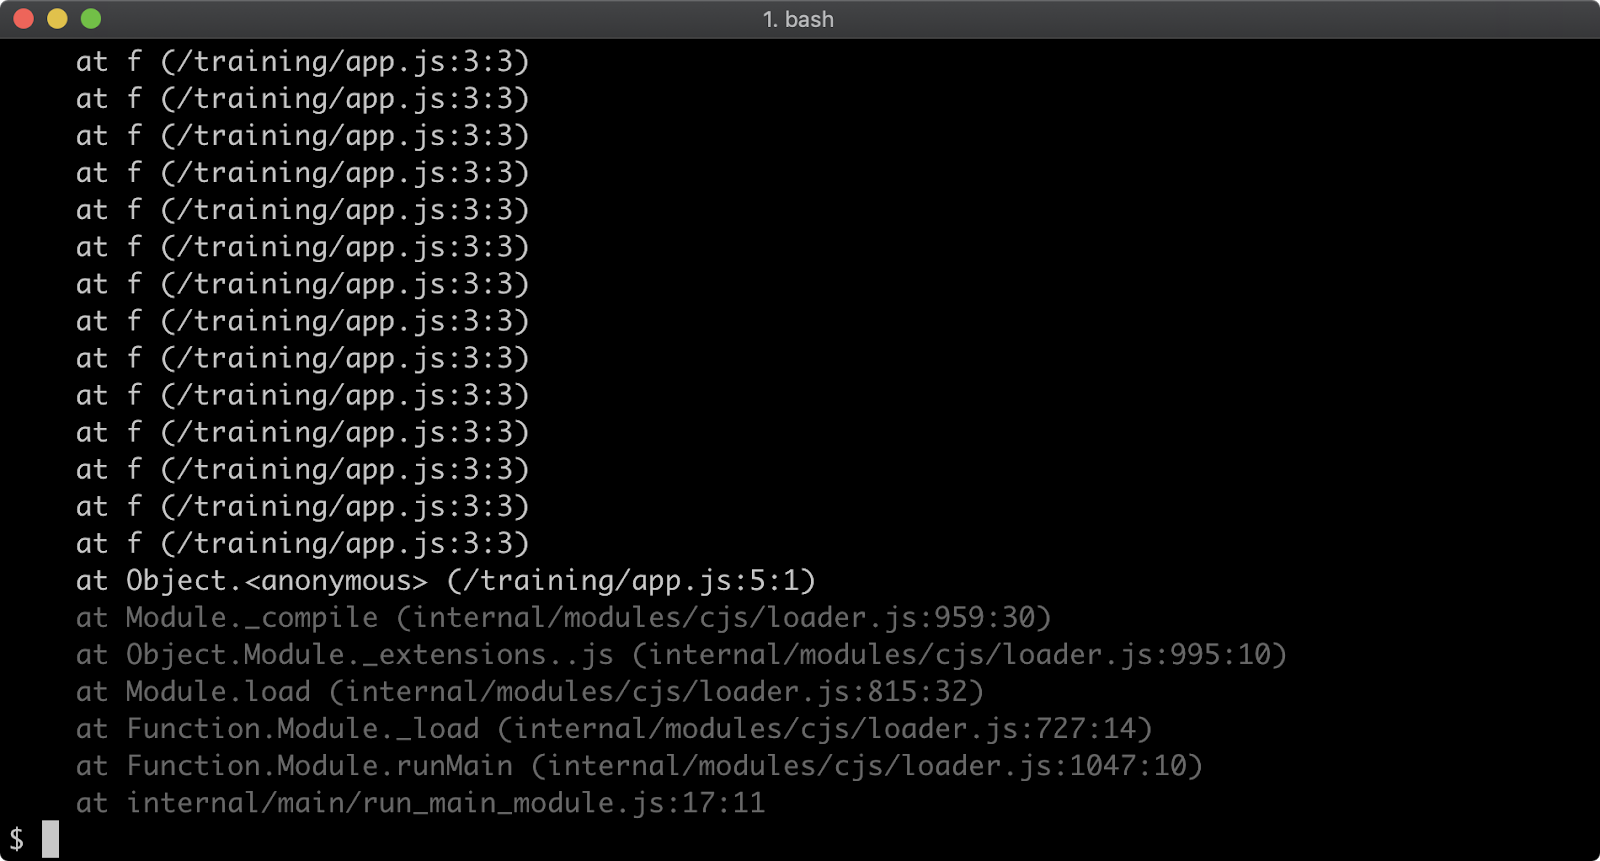
When executed, the function f will be called 100 times. On the 100th time, an Error is thrown and stack for the error will be output to the console.
The stack trace output only shows the call to the f function, in order to see the very first call to f the stack trace limit must be set to 101. This can be achieved with the following:
node --stack-trace-limit=101 app.js
Setting stack trace limit to a number higher than the amount of call frames in the stack guarantees that the entire stack will be output:
node --stack-trace-limit=99999 app.js
Generally, the stack trace limit should stay at the default in production scenarios due to the overhead involved with retaining long stacks. It can nevertheless be useful for development purposes.
Starting a node program with an active breakpoint and adding debugger statements
It is often best to cause the Node process to start with an active breakpoint at the very beginning of the program using the --inspect-brk flag (e.g., node --inspect-brk app.js); otherwise, the application will have fully initialised and be performing asynchronous tasks before any breakpoints can be set. Also, trying to use the --inspect flag by itself seems to be somewhat unreliable.
Important to remember: In order to begin debugging the process, the next step is to set a Chrome browser tab's address bar to chrome://inspect.
You can manually add breakpoints in code using the debugger statement. Still use the --inspect-brk flag.
1 - Introduction
- Go to the Linux Foundation training website to obtain Course Resources
- The user ID is LFtraining and the password is Penguin2014.
- One great way to interact with peers taking this course is via the Class Forum. The forum can be used in the following ways:
- To introduce yourself to other peers taking this course.
- To discuss concepts, tools and technologies presented in this course, or related to the topics discussed in the course materials.
- To ask questions or report issues with labs or course content.
- To share resources and ideas related to open source development, Git and Linux.
2 - Setting up
How not to install Node
Often Node.js can be installed with a particular Operating System's official or unofficial package manager. For instance apt-get on Debian/Ubuntu, Brew on macOs, Chocolatey on Windows. It is strongly recommended against using this approach to install Node. Package managers tend to lag behind the faster Node.js release cycle. Additionally the placement of binary and config files and folders isn't standardized across OS package managers and can cause compatibility issues.
Another significant issue with installing Node.js via an OS package manager is that installing global modules with Node's module installer (npm) tends to require the use of sudo (a command which grants root privileges) on non-Windows systems. This is not an ideal setup for a developer machine and granting root privileges to the install process of third-party libraries is not a good security practice.
Node can also be installed directly from the Node.js website. Again on macOS and Linux it predicates the use of sudo for installing global libraries. Whether Windows, macOS or Linux, in the following sections we'll present a better way to install Node using a version manager.
It's strongly recommended that if Node is installed via an Operating System package manager or directly via the website, that it be completely uninstalled before proceeding to the following sections.
Installing Node.js on macOS and Linux
The recommended way to install Node.js on macOS and Linux is by using a Node version manager, in particular nvm. See https://github.com/nvm-sh/nvm for full details. The current nvm version is v0.39.1 (as of January 2022), so the install process will contain this version in the URL, if a greater version is out at time of reading, replace v0.39.1 with the current nvm version. For this installation process we assume that Bash, Sh, or Zsh is the shell being used, Fish is not supported but see the nvm readme for alternatives. The way to install nvm is via the install script at https://github.com/nvm-sh/nvm/blob/v0.39.1/install.sh. If curl is installed (it usually is) a single command can be used to install and setup nvm:
curl -o- https://raw.githubusercontent.com/nvm-sh/nvm/v0.39.1/install.sh | bash
If using zsh (e.g., on newer macOS releases) the bash part of the command can be replaced with zsh. Alternatively the file can be downloaded and saved, and then easily executed like so: cat install.sh | bash. Again bash can be replaced with zsh. To check that the installation was successful execute the following in the terminal: command -v nvm. It should output nvm. If this fails on Linux, close and reopen the terminal (or SSH session) and try running the command again. On macOS see https://github.com/nvm-sh/nvm#troubleshooting-on-macos for in depth troubleshooting. Now that we have a version manager, let's install the Node version we'll be using on this course: nvm install 16. This will install the latest version of Node 16. We can verify that Node is installed, and which version, with the following command: node -v.
3 - The Node Binary
Introduction
Chapter Overview
The Node.js platform is almost entirely represented by the node binary executable. In order to execute a JavaScript program we use: node app.js, where app.js is the program we wish to run. However, before we start running programs, let’s explore some of the command line flags offered by the Node binary.
Learning Objectives
By the end of this chapter, you should be able to:
- Explore all possible Node and V8 command line flags.
- Use key utility mode command line flags.
- Understand an essential selection of operational command line flags.
The Node Binary
Printing Command Options
To see all Node command line flags for any version of Node, execute node --help and view the output.

Beyond the Node command line flags there are additional flags for modifying the JavaScript runtime engine: V8. To view these flags run node --v8-options.
Checking Syntax
It’s possible to parse a JavaScript application without running it in order to just check the syntax.
This can be useful on occasions where running code has a setup/teardown cost, for instance, needing to clear a database, but there’s still a need to check that the code parses. It can also be used in more advanced cases where code has been generated and a syntax check is required.
To check the syntax of a program (which will be called app.js), use --check or -c flag:
node --check app.js

node -c app.js
If the code parses successfully, there will be no output. If the code does not parse and there is a syntax error, the error will be printed to the terminal.
Dynamic Evaluation
Node can directly evaluate code from the shell. This is useful for quickly checking a code snippet or for creating very small cross-platform commands that use JavaScript and Node core API’s.
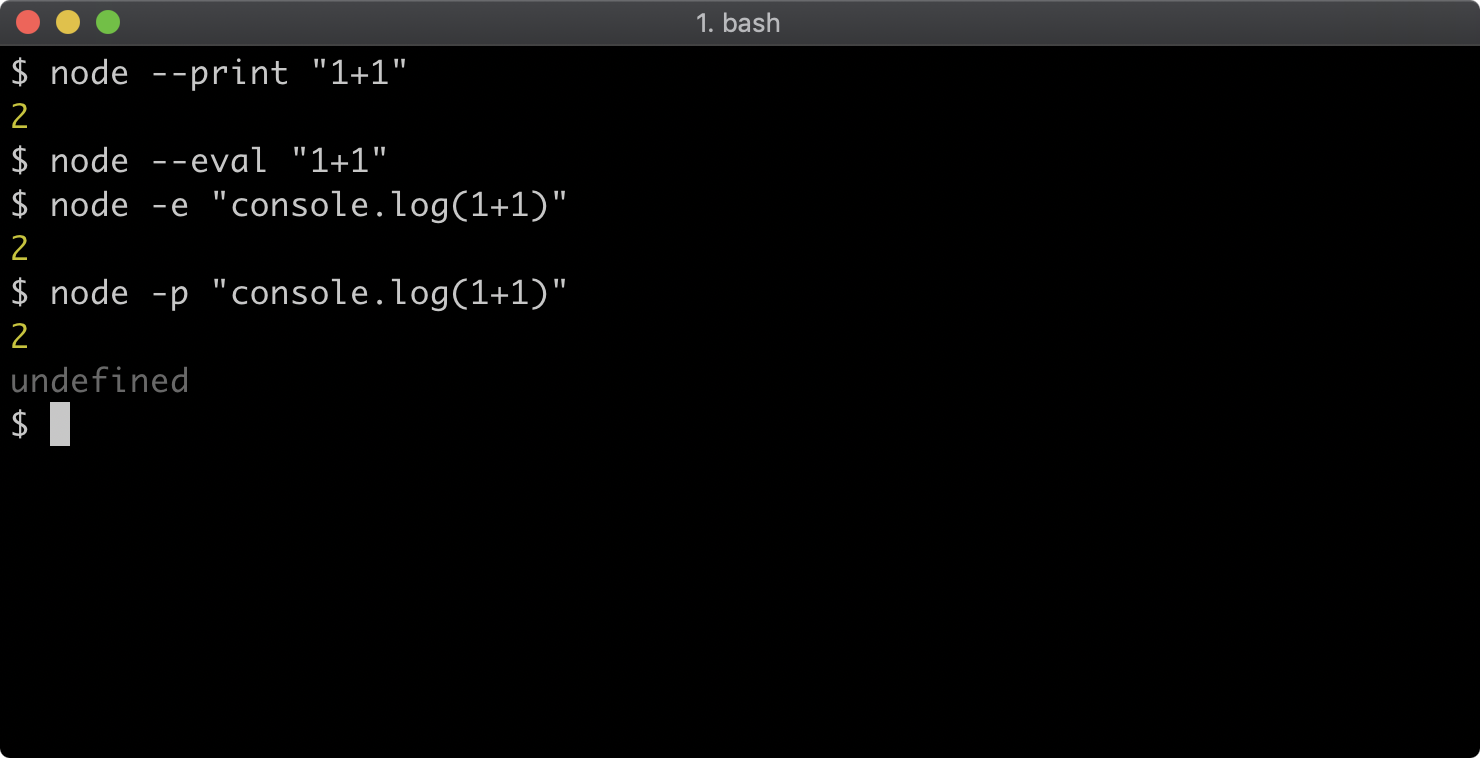
There are two flags that can evaluate code. The -p or --print flag evaluates an expression and prints the result, the -e or --eval flag evaluates without printing the result of the expression.
The following will print 2:
node --print "1+1"
The following will not print anything because the expression is evaluated but not printed.
node --eval "1+1"
The following will print 2 because console.log is used to explicitly write the result of 1+1 to the terminal:
node -e "console.log(1+1)"
When used with print flag the same will print 2 and then print undefined because console.log returns undefined; so the result of the expression is undefined:
node -p "console.log(1+1)"
Usually a module would be required, like so: require('fs'), however all Node core modules can be accessed by their namespaces within the code evaluation context.
For example, the following would print all the files with a .js extension in the current working directory in which the command is run:
node -p "fs.readdirSync('.').filter((f) => /.js$/.test(f))"
Due to the fact that Node is cross-platform, this is a consistent command that can be used on Linux, MacOS or Windows. To achieve the same effect natively on each OS a different approach would be required for Windows vs Linux and Mac OS.
Preloading CommonJS Modules
The command line flag -r or --require can be used to preload a CommonJS module before anything else loads.
Given a file named preload.js with the following content:
console.log('preload.js: this is preloaded')
And a file called app.js containing the following:
console.log('app.js: this is the main file')
The following command would print preload.js: this is preloaded followed by app.js: this is the main file:
node -r ./preload.js app.js

Preloading modules is useful when using consuming modules that instrument or configure the process in some way. One example would be the dotenv module.
In Chapter 7, "Node's Module Systems", we'll be covering the two module systems that Node uses, CommonJS and ESM, but it's important to note here that the --require flag can only preload a CommonJS module, not an ESM module. ESM modules have a vaguely related flag, called --loader, a currently experimental flag which should not be confused with the --require preloader flag. For more information on the --loader flag click here.
Stack Trace Limit
Stack traces are generated for any Error that occurs, so they're usually the first point of call when debugging a failure scenario. By default, a stack trace will contain the last ten stack frames (function call sites) at the point where the trace occurred. This is often fine, because the part of the stack you are interested in is often the last 3 or 4 call frames. However there are scenarios where seeing more call frames in a stack trace makes sense, like checking that the application flow through various functions is as expected.
The stack trace limit can be modified with the --stack-trace-limit flag. This flag is part of the JavaScript runtime engine, V8, and can be found in the output of the --v8-options flag.
Consider a program named app.js containing the following code:
function f (n = 99) {
  if (n === 0) throw Error()
  f(n - 1)
}
f()
When executed, the function f will be called 100 times. On the 100th time, an Error is thrown and stack for the error will be output to the console.
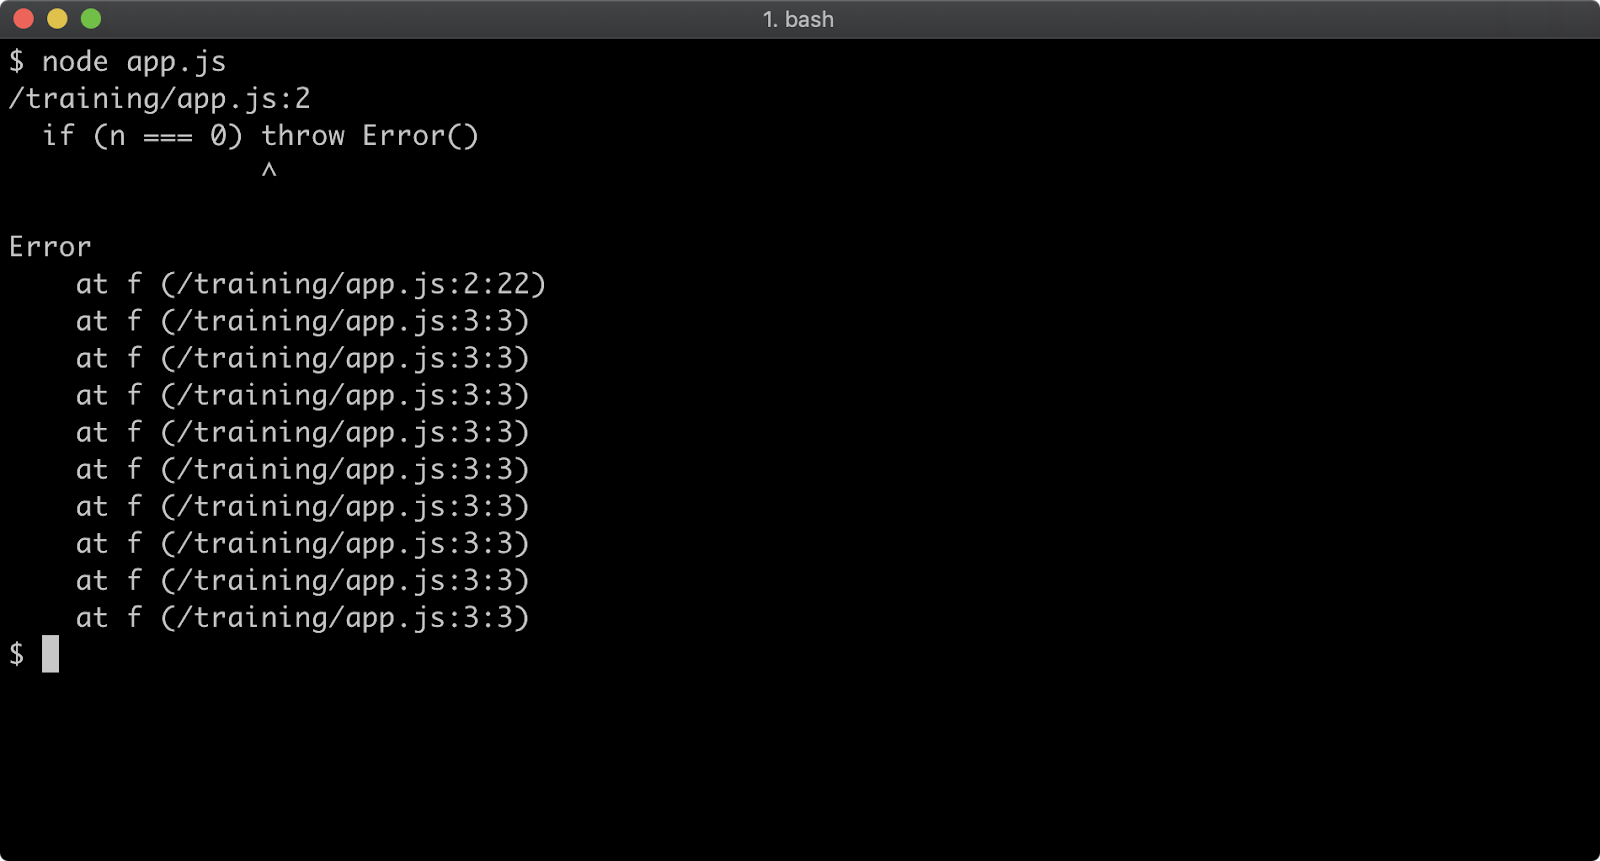
The stack trace output only shows the call to the f function, in order to see the very first call to f the stack trace limit must be set to 101. This can be achieved with the following:
node --stack-trace-limit=101 app.js
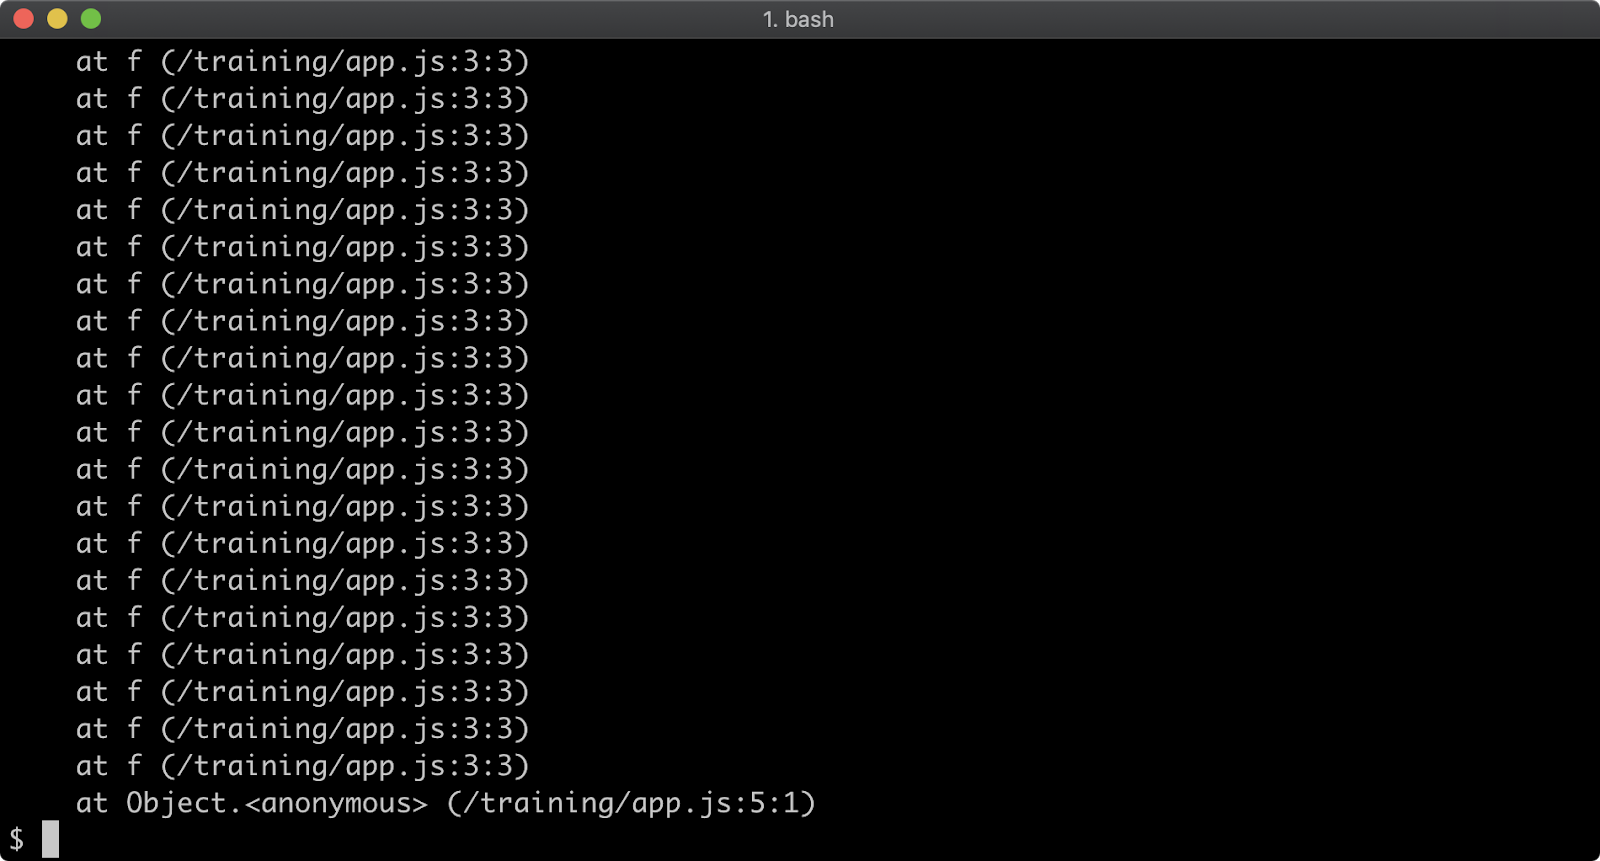
Setting stack trace limit to a number higher than the amount of call frames in the stack guarantees that the entire stack will be output:
node --stack-trace-limit=99999 app.js
Generally, the stack trace limit should stay at the default in production scenarios due to the overhead involved with retaining long stacks. It can nevertheless be useful for development purposes.
Lab Exercises
Lab 3.1 - Stack Size
In the labs-1 folder there is a file called will-throw.js. Run the file without any flags, andthen run the file with --stack-trace-limit set to 200.
In the first case, there should only be ten stack frames in the error output.
In the second case, there should be more than ten frames in the error in output.
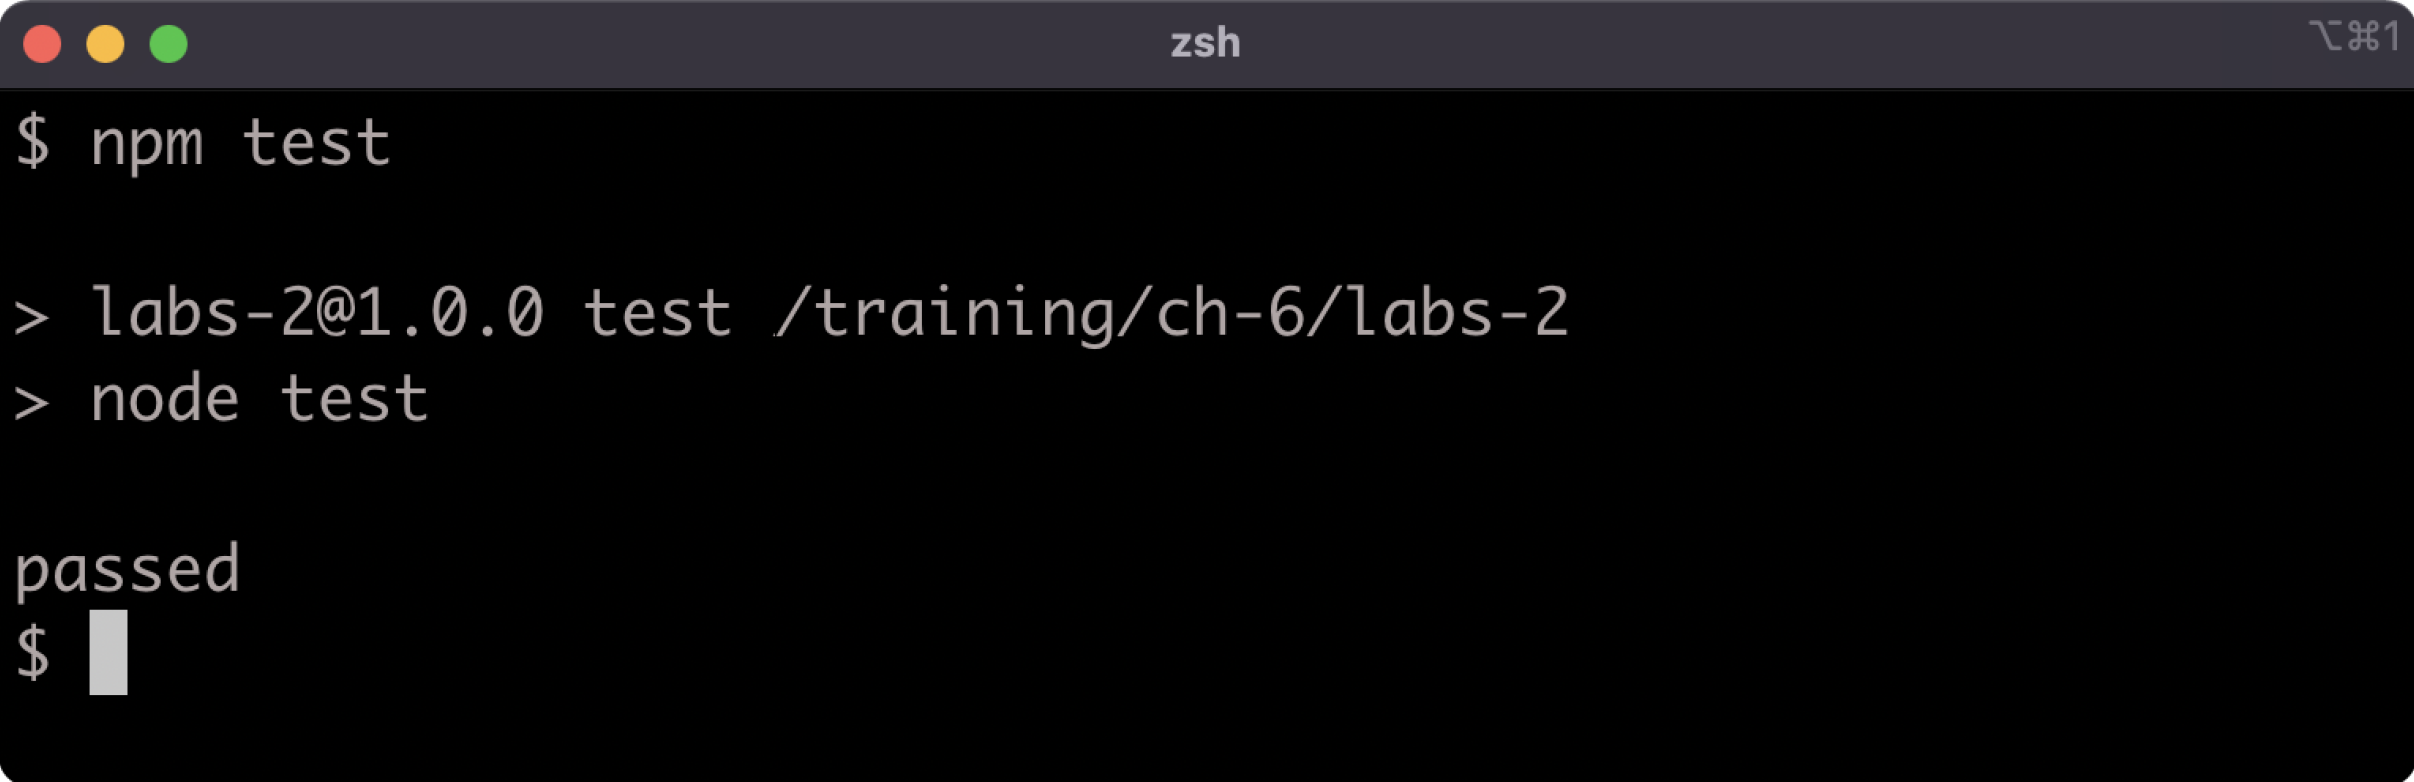
Lab 3.2 - Checking Syntax
In the labs-2 folder there are two files, bad-syntax.js and correct-syntax.js, use the
appropriate flag to check the syntax of each file.
There should be no output when checking the syntax of correct-syntax.js.
There should be a Syntax Error when checking the syntax of bad-syntax.js.
4 - Debugging and diagnostics
In order to debug an application, the Node.js process must be started in Inspect mode. Inspect puts the process into a debuggable state and exposes a remote protocol, which can be connected to via debugger such as Chrome Devtools. In addition to debugging capabilities, Inspect Mode also grants the ability to run other diagnostic checks on a Node.js process. In this section, we'll explore how to debug and profile a Node.js process.
Starting in inspect mode
Consider a program named app.js containing the following code:
function f (n = 99) {
  if (n === 0) throw Error()
  f(n - 1)
}
f()
Node.js supports the Chrome Devtools remote debugging protocol. In order to use this debugging protocol a client that supports the protocol is required. In this example Chrome browser will be used. Inspect mode can be enabled with the --inspect flag: node --inspect app.js. For most cases however, it is better to cause the process to start with an active breakpoint at the very beginning of the program using the --inspect-brk flag:
node --inspect-brk app.js
Otherwise the application will have fully initialised and be performing asynchronous tasks before any breakpoints can be set. When using the --inspect or --inspect-brk flags Node will output some details to the terminal. The remote debugging protocol uses WebSockets which is why a ws:// protocol address is printed. There is no need to pay attention to this URI, as the Chrome browser will detect that the debugger is listening automatically. In order to begin debugging the process, the next step is to set a Chrome browser tab's address bar to chrome://inspect.
This will load a page that looks like the following:
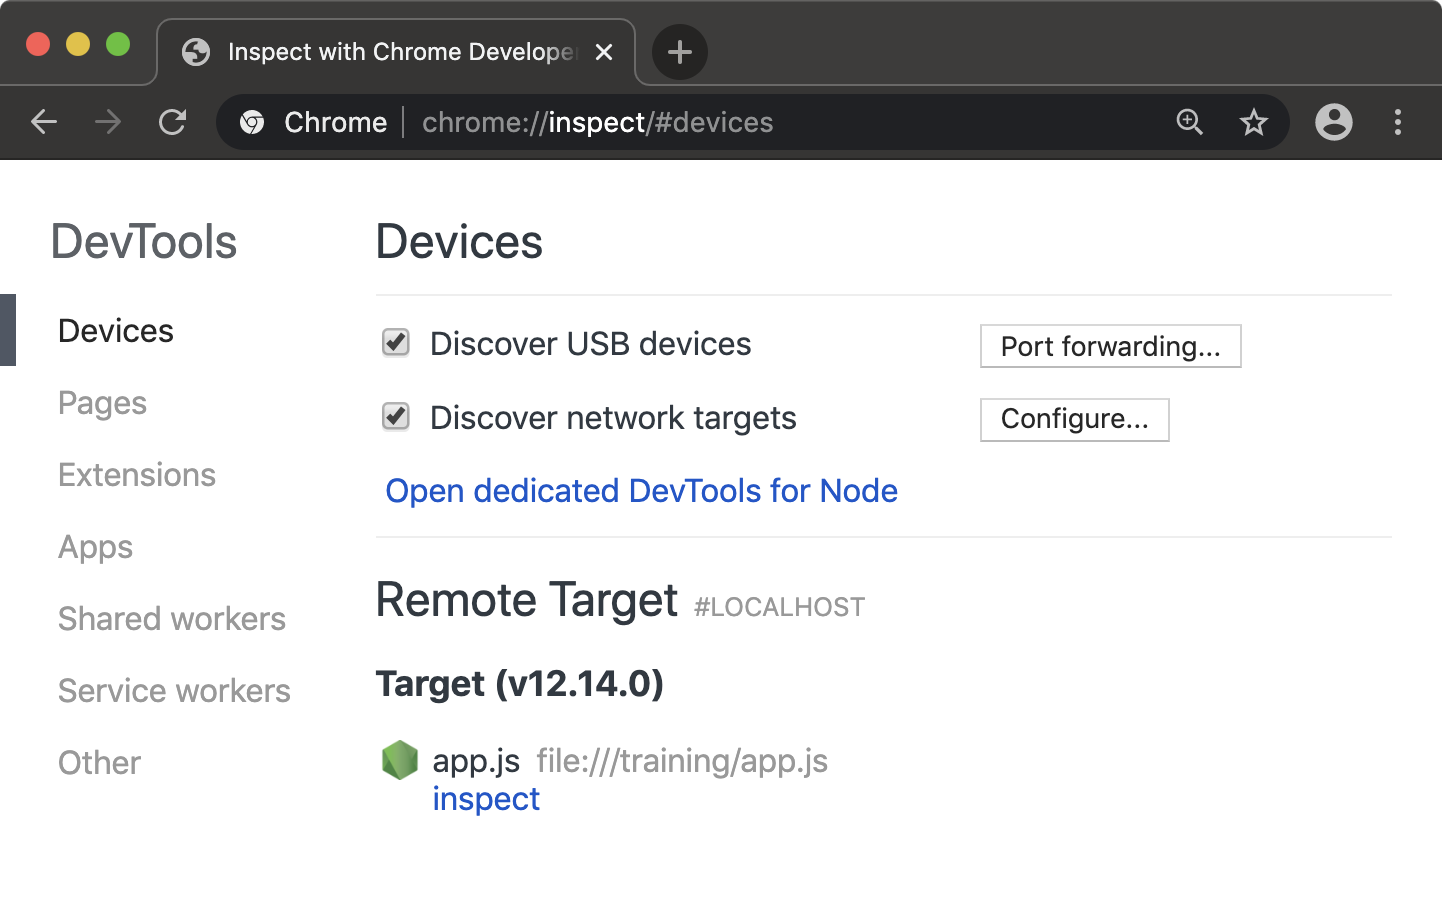
Under the "Remote Target" heading the program being inspected should be visible with an "inspect" link underneath it. Clicking the "inspect" link will open an instance of Chrome Devtools that is connected to the Node process.
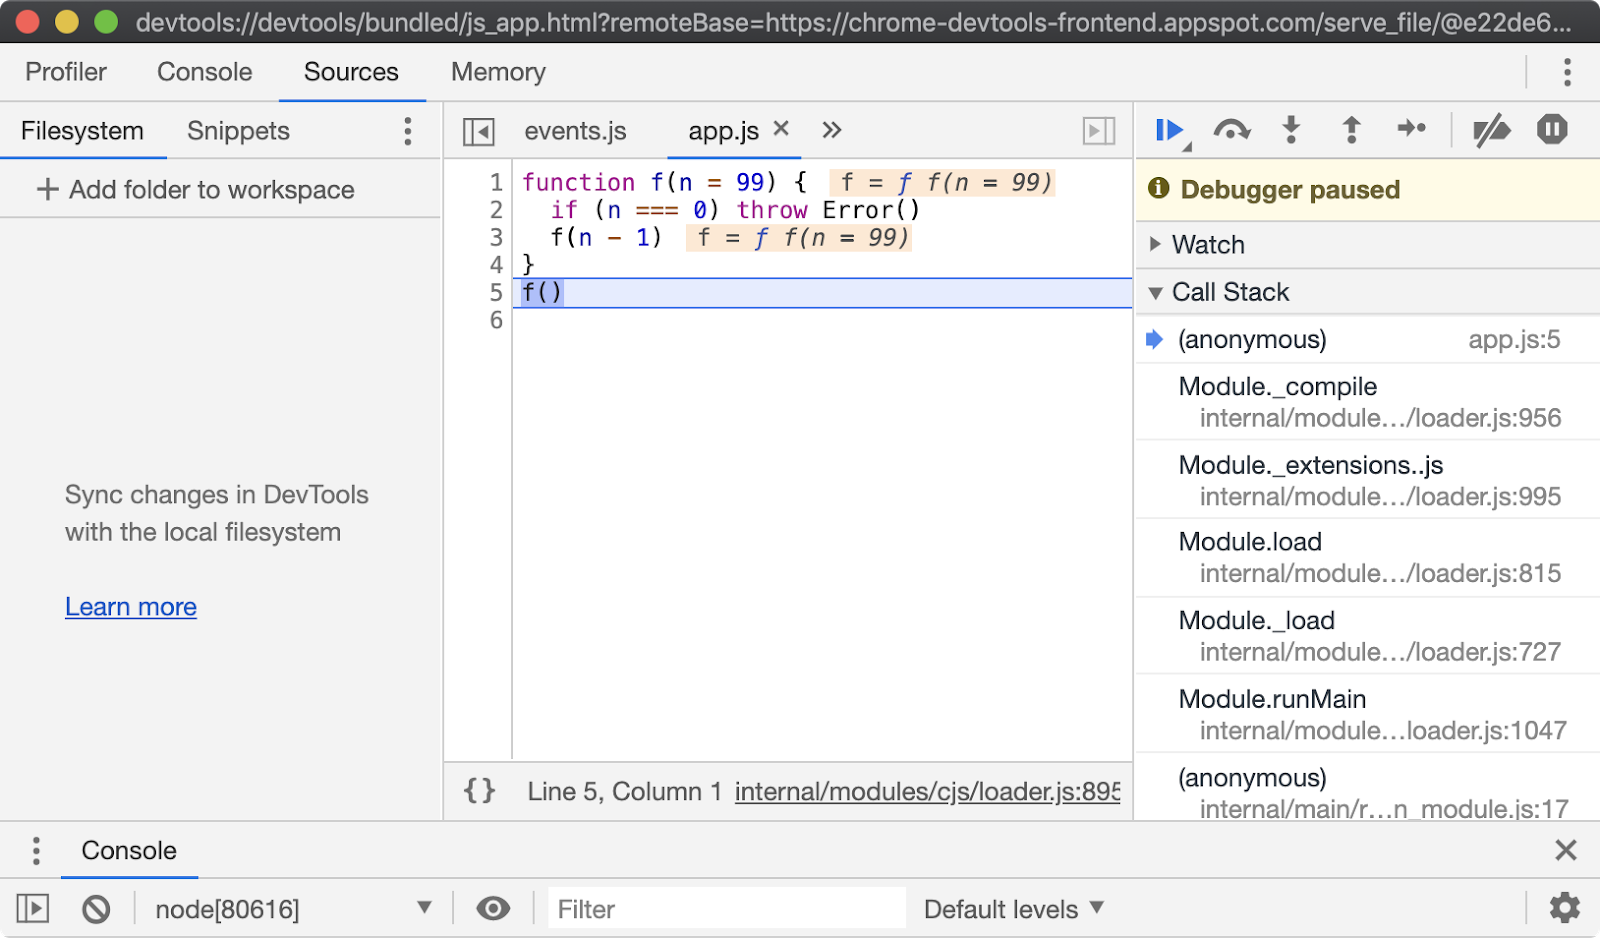
Note that execution is paused at the first line of executable code, in this case line 5, which is the first function call. From here all the usual Chrome Devtools functionality can be used to debug the process. For more information on using Chrome Devtools, see Google Developer's Documentation. There are a range of other tools that can be used to debug a Node.js process using Chrome Devtools remote debugging protocol. To learn more, read "Debugging Guide" by nodejs.org.
Breaking on error in devtools
Once a Node.js process has been started in inspect mode and connected to from a debugging client, in this case Chrome Devtools, we can start to try out the debugger features. The app.js file will throw when n is equal to 0. The "Pause on exceptions" feature can be used to automatically set a breakpoint at the line where an error is thrown.
To activate this behaviour, start app.js in Inspect Break mode (--inspect-brk), connect Chrome Devtools, ensure that the "Sources" tab is selected and then click the pause button in the top right. The pause button should turn from gray to blue:
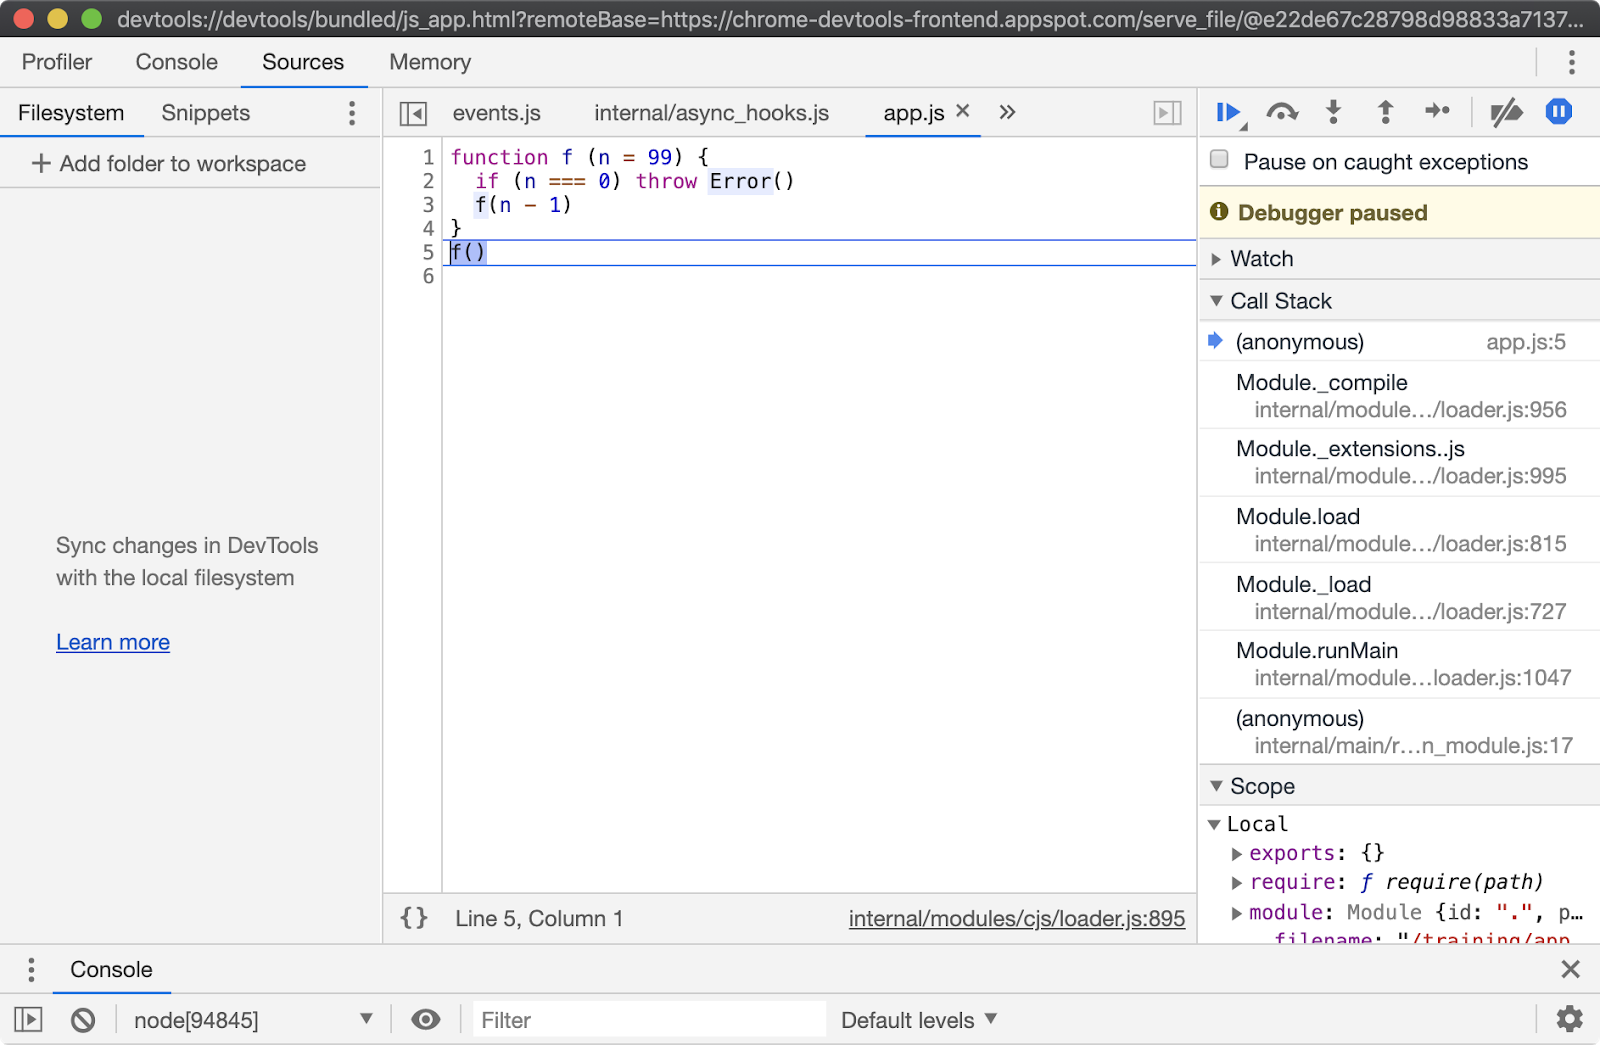
Ensure that the "Pause on caught exceptions" checkbox is unchecked and then press the play button. The process should then pause on line 2, where the error is thrown:
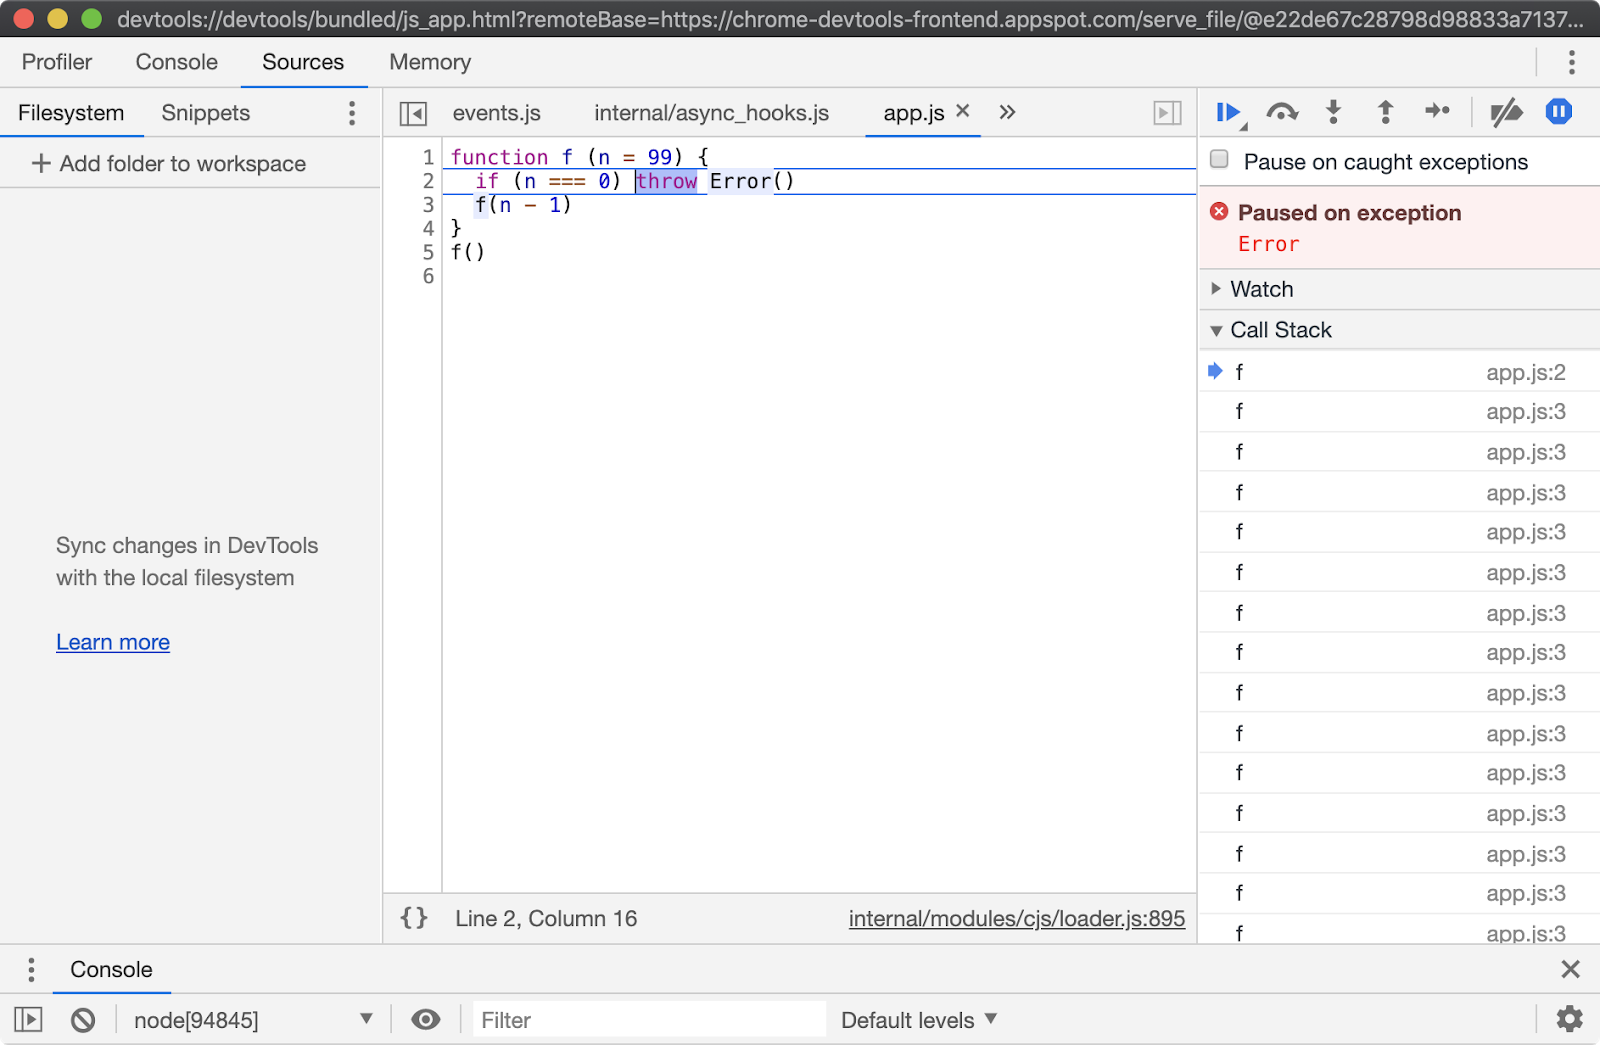
From here the Call Stack can be explored over in the right hand column and state can be analyzed by hovering over any local variables and looking in the Scope panel of the right hand column, located beneath the Call Stack panel. Sometimes a program will throw in far less obvious ways. In these scenarios the "Pause on exceptions" feature can be a useful tool for locating the source of an exception.
Adding a breakpoint in devtools and/or code
To add a breakpoint in devtools, you can click on the line number of the program where you want a breakpoint to be added. This is fine for some use cases, but it may be easier in some scenarios to set a breakpoint directly in the code via the debugger statement.
The debugger statement can be used to explicitly pause on the line that the statement appears when debugging. Let's edit app.js to include a debugger statement on line 3:
function f (n = 99) {
  if (n === 0) throw Error()
  debugger
  f(n - 1)
}
f()
You should still use the --inspect-brk flag when using the debugger statement for consistent behavior in the devtools panel. Using the debugger statement is particularly useful when the line we wish to break at is buried somewhere in a dependency tree: in a function that exists in a required module of a required module of a required module and so on. When not debugging, these debugger statements are ignored; however, due to noise and potential performance impact it is not good practice to leave debugger statements in code.
5 - Key JavaScript concepts
Introduction
Chapter Overview
Among contemporary popular languages, JavaScript has some unusual characteristics. Whether it's frontend development or backend engineering, understanding and wielding these characteristics is essential to harnessing the power of the language and being productive at an intermediate to upper-intermediate level. This section does not set out to cover the entire JavaScript language, for that a separate course would be necessary. With the exception of asynchronous execution which is covered in Section 8, this section focuses on understanding key fundamentals of the language.
Learning Objectives
By the end of this chapter, you should be able to:
- Understand data types in JavaScript.
- Explain functions as first class citizens.
- Explain the role of closure scope in state management.
- Describe the prototypal nature of all JavaScript-based inheritance.
Key JavaScript Concepts
Data Types
JavaScript is a loosely typed dynamic language. In JavaScript there are seven primitive types. Everything else, including functions and arrays, is an object.
JavaScript primitives are as follows:
- Null:
null - Undefined:
undefined - Number:
1,1.5,-1e4,NaN - BigInt:
1n,9007199254740993n - String:
'str',"str",`str ${var}` - Boolean:
true,false - Symbol:
Symbol('description'),Symbol.for('namespace')
The null primitive is typically used to describe the absence of an object, whereas undefined is the absence of a defined value. Any variable initialized without a value will be undefined. Any expression that attempts access of a non-existent property on an object will result in undefined. A function without a return statement will return undefined.
The Number type is double-precision floating-point format. It allows both integers and decimals but has an integer range of -253-1 to 253-1. The BigInt type has no upper/lower limit on integers.
Strings can be created with single or double quotes, or backticks. Strings created with backticks are template strings, these can be multiline and support interpolation whereas normal strings can only be concatenated together using the plus (+) operator.
Symbols can be used as unique identifier keys in objects. The Symbol.for method creates/gets a global symbol.
Other than that, absolutely everything else in JavaScript is an object. An object is a set of key value pairs, where values can be any primitive type or an object (including functions, since functions are objects). Object keys are called properties. An object with a key holding a value that is another object allows for nested data structures:
const obj = { myKey: { thisIs: 'a nested object' } }
console.log(obj.myKey)
All JavaScript objects have prototypes. A prototype is an implicit reference to another object that is queried in property lookups. If an object doesn't have a particular property, the object's prototype is checked for that property. If the object's prototype does not have that property, the object's prototype's prototype is checked and so on. This is how inheritance in JavaScript works, JavaScript is a prototypal language. This will be explored in more detail later in this section.
Functions
Functions are first class citizens in JavaScript. A function is an object, and therefore a value that can be used like any other value.
For instance a function can be returned from a function:
function factory () {
  return function doSomething () {}
}
A function can be passed to another function as an argument:
setTimeout(function () { console.log('hello from the future') }, 100)
A function can be assigned to an object:
const obj = { id: 999, fn: function () { console.log(this.id) } }
obj.fn() // prints 999
When a function is assigned to an object, when the implicit this keyword is accessed within that function it will refer to the object on which the function was called. This is why obj.fn() outputs 999.
It's crucial to understand that this refers to the object on which the function was called, not the object which the function was assigned to:
const obj = { id: 999, fn: function () { console.log(this.id) } }
const obj2 = { id: 2, fn: obj.fn }
obj2.fn() // prints 2
obj.fn() // prints 999
Both obj and obj2 reference the same function but on each invocation the this context changes to the object on which that function was called.
Functions have a call method that can be used to set their this context:
function fn() { console.log(this.id) }
const obj = { id: 999 }
const obj2 = { id: 2 }
fn.call(obj2) // prints 2
fn.call(obj) // prints 999
fn.call({id: ':)'}) // prints :)
In this case the fn function wasn't assigned to any of the objects, this was set dynamically via the call function.
There are also fat arrow functions, also known as lambda functions:
const add = (a, b) => a + 1
const cube = (n) => {
  return Math.pow(n, 3)
}
When defined without curly braces, the expression following the fat arrow (=>) is the return value of the function. Lambda functions do not have their own this context, when this is referenced inside a function, it refers to the this of the nearest parent non-lambda function.
function fn() {
  return (offset) => {
   console.log(this.id + offset)
  }
}
const obj = { id: 999 }
const offsetter = fn.call(obj)
offsetter(1) // prints 1000 (999 + 1)
While normal functions have a prototype property (which will be discussed in detail shortly), fat arrow functions do not:
function normalFunction () { }
const fatArrowFunction = () => {}
console.log(typeof normalFunction.prototype) // prints 'object'
console.log(typeof fatArrowFunction.prototype) // prints 'undefined'
Prototypal Inheritance (Functional)
At a fundamental level, inheritance in JavaScript is achieved with a chain of prototypes. The approaches around creating prototype chains have evolved significantly over time as updates to the language have brought new features and syntax.
There are many approaches and variations to creating a prototype chain in JavaScript but we will explore three common approaches:
- functional
- constructor functions
- class-syntax constructors.
For the purposes of these examples, we will be using a Wolf and Dog taxonomy, where a Wolf is a prototype of a Dog.
The functional approach to creating prototype chains is to use Object.create:
const wolf = {
  howl: function () { console.log(this.name + ': awoooooooo') }
}

const dog = Object.create(wolf, {
  woof: { value: function() { console.log(this.name + ': woof') } }
})

const rufus = Object.create(dog, {
  name: {value: 'Rufus the dog'}
})

rufus.woof() // prints "Rufus the dog: woof"
rufus.howl() // prints "Rufus the dog: awoooooooo"
The wolf object is a plain JavaScript object, created with the object literal syntax (i.e. using curly braces). The prototype of plain JavaScript objects is Object.prototype.
The Object.create function can take two arguments. The first argument is the desired prototype of the object being created.
When the dog object is instantiated, the first argument passed to Object.create is the wolf object. So wolf is the prototype of dog. When rufus is instantiated, the first argument to Object.create is dog.
To describe the full prototype chain:
- the prototype of
rufusisdog - the prototype of
dogiswolf - the prototype of
wolfisObject.prototype
The second argument of Object.create is an optional Properties Descriptor object.
A Properties Descriptor object contains keys that will become the key name on the object being created. The values of these keys are Property Descriptor objects.
The Property Descriptor is a JavaScript object that describes the characteristics of the properties on another object.
The Object.getOwnPropertyDescriptor can be used to get a property descriptor on any object:

To describe the value of a property, the descriptor can either use value for a normal property value or get and set to create a property getter/setter. The other properties are associated meta-data for the property. The writable property determines whether the property can be reassigned, enumerable determines whether the property will be enumerated, in property iterator abstractions like Object.keys and configurable sets whether the property descriptor itself can be altered. All of these meta-data keys default to false.
In the case of dog and rufus the property descriptor only sets value, which adds a non-enumerable, non-writable, non-configurable property.
Property descriptors are not directly relevant to prototypal inheritance, but are part of the Object.create interface so understanding them is necessary. To learn more, read "Description" section at the MDN web docs Mozilla website.
When the dog prototype object is created, the property descriptor is an object with a woof key. The woof key references an object with the value property set to a function. This will result in the creation of an object with a woof method.
So when rufus.woof() is called, the rufus object does not have a woof property itself. The runtime will then check if the prototype object of rufus has a woof property. The prototype of rufus is dog and it does have a woof property. The dog.woof function contains a reference to this. Typically, the this keyword refers to the object on which the method was called. Since woof was called on rufus and rufus has the name property which is "Rufus the dog", the this.name property in the woof method has the value "Rufus the dog" so console.log is passed the string: "Rufus the dog: woof".
Similarly when rufus.howl is called the JavaScript runtime performs the following steps:
- Check if
rufushas ahowlproperty; it does not - Check if the prototype of
rufus(which isdog) has ahowlproperty; it does not - Check if the prototype of
dog(which iswolf) has ahowlproperty; it does - Execute the
howlfunction settingthistorufus, sothis.namewill be"Rufus the dog".
To complete the functional paradigm as it applies to prototypal inheritance, the creation of an instance of a dog can be genericized with a function:
const wolf = {
  howl: function () { console.log(this.name + ': awoooooooo') }
}

const dog = Object.create(wolf, {
  woof: { value: function() { console.log(this.name + ': woof') } }
})

function createDog (name) {
  return Object.create(dog, {
    name: {value: name + ' the dog'}
  })
}

const rufus = createDog('Rufus')

rufus.woof() // prints "Rufus the dog: woof"
rufus.howl() // prints "Rufus the dog: awoooooooo"
The prototype of an object can be inspected with Object.getPrototypeOf:
console.log(Object.getPrototypeOf(rufus) === dog) //true
console.log(Object.getPrototypeOf(dog) === wolf) //true
Prototypal Inheritance (Constructor Functions)
Creating an object with a specific prototype object can also be achieved by calling a function with the new keyword. In legacy code bases this is a very common pattern, so it's worth understanding.
All functions have a prototype property. The Constructor approach to creating a prototype chain is to define properties on a function's prototype object and then call that function with new:
function Wolf (name) {
  this.name = name
}

Wolf.prototype.howl = function () {
  console.log(this.name + ': awoooooooo')
}

function Dog (name) {
  Wolf.call(this, name + ' the dog')
}

function inherit (proto) {
  function ChainLink(){}
  ChainLink.prototype = proto
  return new ChainLink()
}

Dog.prototype = inherit(Wolf.prototype)

Dog.prototype.woof = function () {
  console.log(this.name + ': woof')
}

const rufus = new Dog('Rufus')

rufus.woof() // prints "Rufus the dog: woof"
rufus.howl() // prints "Rufus the dog: awoooooooo"
This will setup the same prototype chain as in the functional Prototypal Inheritance example:
console.log(Object.getPrototypeOf(rufus) === Dog.prototype) //true
console.log(Object.getPrototypeOf(Dog.prototype) === Wolf.prototype) //true
The Wolf and Dog functions have capitalized first letters. Using PascaleCase for functions that are intended to be called with new is convention and recommended.
Note that a howl method was added to Wolf.prototype without ever instantiating an object and assigning it to Wolf.prototype. This is because it already existed, as every function always has a preexisting prototype object. However Dog.prototype was explicitly assigned, overwriting the previous Dog.prototype object.
To describe the full prototype chain:
- the prototype of
rufusisDog.prototype - the prototype of
Dog.prototypeisWolf.prototype - the prototype of W
olf.prototypeisObject.prototype
When new Dog('Rufus') is called a new object is created (rufus). That new object is also the this object within the Dog constructor function. The Dog constructor function passes this to Wolf.call.
Using the call method on a function allows the this object of the function being called to be set via the first argument passed to call. So when this is passed to Wolf.call, the newly created object (which is ultimately assigned to rufus) is also referenced via the this object inside the Wolf constructor function. All subsequent arguments passed to call become the function arguments, so the name argument passed to Wolf is "Rufus the dog". The Wolf constructor sets this.name to "Rufus the dog", which means that ultimately rufus.name is set to "Rufus the dog".
In legacy code bases, creating a prototype chain between Dog and Wolf for the purposes of inheritance may be performed many different ways. There was no standard or native approach to this before EcmaScript 5.
In the example code an inherit utility function is created, which uses an empty constructor function to create a new object with a prototype pointing, in this case, to Wolf.prototype.
In JavaScript runtimes that support EcmaScript 5+ the Object.create function could be used to the same effect:
function Dog (name) {
  Wolf.call(this, name + ' the dog')
}

Dog.prototype = Object.create(Wolf.prototype)

Dog.prototype.woof = function () {
  console.log(this.name + ': woof')
}
Node.js has a utility function: util.inherits that is often used in code bases using constructor functions:
const util = require('util')

function Dog (name) {
  Wolf.call(this, name + ' the dog')
}

Dog.prototype.woof = function () {
  console.log(this.name + ': woof')
}

util.inherits(Dog, Wolf)
In contemporary Node.js, util.inherits uses the EcmaScript 2015 (ES6) method Object.setPrototypeOf under the hood. It's essentially executing the following:
Object.setPrototypeOf(Dog.prototype, Wolf.prototype)
This explicitly sets the prototype of Dog.prototype to Wolf.prototype, discarding whatever previous prototype it had.
Prototypal Inheritance (Class-Syntax Constructors)
Modern JavaScript (EcmaScript 2015+) has a class keyword. It's important that this isn't confused with the class keyword in other Classical OOP languages.
The class keyword is syntactic sugar that actually creates a function. Specifically it creates a function that should be called with new. It creates a Constructor Function, the very same Constructor Function discussed in the previous section.

This is why it's deliberately referred to here as "Class-syntax Constructors", because the EcmaScript 2015 (ES6) class syntax does not in fact facilitate the creation of classes as they are traditionally understood in most other languages. It actually creates prototype chains to provide Prototypal Inheritance as opposed to Classical Inheritance.
The class syntax sugar does reduce boilerplate when creating a prototype chain:
class Wolf {
  constructor (name) {
    this.name = name
  }
  howl () { console.log(this.name + ': awoooooooo') }
}

class Dog extends Wolf {
  constructor(name) {
    super(name + ' the dog')
  }
  woof () { console.log(this.name + ': woof') }
}

const rufus = new Dog('Rufus')

rufus.woof() // prints "Rufus the dog: woof"
rufus.howl() // prints "Rufus the dog: awoooooooo"
This will setup the same prototype chain as in the Functional Prototypal Inheritance and the Function Constructors Prototypal Inheritance examples:
console.log(Object.getPrototypeOf(rufus) === Dog.prototype) //true
console.log(Object.getPrototypeOf(Dog.prototype) === Wolf.prototype) //true
To describe the full prototype chain:
- the prototype of
rufusisDog.prototype - the prototype of
Dog.prototypeisWolf.prototype - the prototype of
Wolf.prototypeisObject.prototype.
The extends keyword makes prototypal inheritance a lot simpler. In the example code, class Dog extends Wolf will ensure that the prototype of Dog.prototype will be Wolf.prototype.
The constructor method in each class is the equivalent to the function body of a Constructor Function. So for instance, function Wolf (name) { this.name = name } is the same as class Wolf { constructor (name) { this.name = name } }.
The super keyword in the Dog class constructor method is a generic way to call the parent class constructor while setting the this keyword to the current instance. In the Constructor Function example Wolf.call(this, name + ' the dog') is equivalent to super(name + ' the dog') here.
Any methods other than constructor that are defined in the class are added to the prototype object of the function that the class syntax creates.
Let's take a look at the Wolf class again:
class Wolf {
  constructor (name) {
    this.name = name
  }
  howl () { console.log(this.name + ': awoooooooo') }
}
This is desugared to:
function Wolf (name) {
  this.name = name
}

Wolf.prototype.howl = function () {
 console.log(this.name + ': awoooooooo')
}
The class syntax based approach is the most recent addition to JavaScript when it comes to creating prototype chains, but is already widely used.
Closure Scope
When a function is created, an invisible object is also created, this is known as the closure scope. Parameters and variables created in the function are stored on this invisible object.
When a function is inside another function, it can access both its own closure scope, and the parent closure scope of the outer function:
function outerFn () {
  var foo = true
  function print() { console.log(foo) }
  print() // prints true
  foo = false
  print() // prints false
}
outerFn()
The outer variable is accessed when the inner function is invoked, this is why the second print call outputs false after foo is updated to false.
If there is a naming collision then the reference to the nearest closure scope takes precedence:
function outerFn () {
  var foo = true
  function print(foo) { console.log(foo) }
  print(1) // prints 1
  foo = false
  print(2) // prints 2
}
outerFn()
In this case the foo parameter of print overrides the foo variable in the outerFn function.
Closure scope cannot be accessed outside of a function:
function outerFn () {
  var foo = true
}
outerFn()
console.log(foo) // will throw a ReferenceError
Since the invisible closure scope object cannot be accessed outside of a function, if a function returns a function, the returned function can provide controlled access to the parent closure scope. In essence, this provides encapsulation of private state:
function init (type) {
  var id = 0
  return (name) => {
    id += 1
    return { id: id, type: type, name: name }
  }
}
const createUser = init('user')
const createBook = init('book')
const dave = createUser('Dave')
const annie = createUser('Annie')
const ncb = createBook('Node Cookbook')
console.log(dave) //prints {id: 1, type: 'user', name: 'Dave'}
console.log(annie) //prints {id: 2, type: 'user', name: 'Annie'}
console.log(ncb) //prints {id: 1, type: 'book', name: 'Node Cookbook'}
The init function sets an id variable in its scope, takes an argument called type, and then returns a function. The returned function has access to type and id because it has access to the parent closure scope. Note that the returned function in this case is a fat arrow function. Closure scope rules apply in exactly the same way to fat arrow functions.
The init function is called twice, and the resulting function is assigned to createUser and createBook. These two functions have access to two separate instances of the init functions closure scope. The dave and annie objects are instantiated by calling createUser.
The first call to createUser returns an object with an id of 1. The id variable is initialized as 0 and it is incremented by 1 before the object is created and returned. The second call to createUser returns an object with id of 2. This is because the first call of createUser already incremented id from 0 to 1, so on the next invocation of createUser the id is increased from 1 to 2. The only call to the createBook function however, returns an id of 1 (as opposed to 3), because createBook function is a different instance of the function returned from init and therefore accesses a separate instance of the init function's scope.
In the example all the state is returned from the returned function, but this pattern can be used for much more than that. For instance, the init function could provide validation on type, return different functions depending on what type is.
Another example of encapsulating state using closure scope would be to enclose a secret:
function createSigner (secret) {
  const keypair = createKeypair(secret)
  return function (content) {
     return {
        signed: cryptoSign(content, keypair.privateKey),
        publicKey: keypair.publicKey
     }
  }
}
const sign = createSigner('super secret thing')
const signedContent = sign('sign me')
const moreSignedContent = sign('sign me as well')
Note, in this code createKeypair and cryptoSign are imaginary functions, these are purely for outlining the concept of the encapsulation of secrets.
Closure scope can also be used as an alternative to prototypal inheritance. The following example provides equivalent functionality and the same level of composability as the three prototypal inheritance examples but it doesn't use a prototype chain, nor does it rely the implicit this keyword:
function wolf (name) {
  const howl = () => {
    console.log(name + ': awoooooooo')
  }
  return { howl: howl }
}

function dog (name) {
  name = name + ' the dog'
  const woof = () => { console.log(name + ': woof') }
  return {
    ...wolf(name),
    woof: woof
  }
}
const rufus = dog('Rufus')

rufus.woof() // prints "Rufus the dog: woof"
rufus.howl() // prints "Rufus the dog: awoooooooo"
The three dots (...) in the return statement of dog is called the spread operator. The spread operator copies the properties from the object it proceeds into the object being created.
The wolf function returns an object with a howl function assigned to it. That object is then spread (using ...) into the object returned from the dog function, so howl is copied into the object. The object returned from the dog function also has a woof function assigned.
There is no prototype chain being set up here, the prototype of rufus is Object.prototype and that's it. The state (name) is contained in closure scope and not exposed on the instantiated object, it's encapsulated as private state.
The dog function takes a name parameter, and immediately reassigns it to name + ' the dog'. Inside dog a woof function is created, where it references name. The woof function is returned from the dog function inside of an object, as the woof property. So when rufus.woof() is called the woof accesses name from its parent scope, that is, the closure scope of dog. The exact same thing happens in the wolf function. When rufus.howl() is called, the howl function accesses the name parameter in the scope of the wolf function.
The advantage of using closure scope to compose objects is it eliminates the complexity of prototypes, context (this) and the need to call a function with new – which when omitted can have unintended consequences. The downside is that where a prototype method is shared between multiple instances, an approach using closure scope requires that internal functions are created per instance. However, JavaScript engines use increasingly sophisticated optimization techniques internally, it's only important to be fast enough for any given use case and ergonomics and maintainability should take precedence over every changing performance characteristics in JavaScript engines. Therefore it's recommended to use function composition over prototypal inheritance and optimize at a later point if required.
Lab Exercises
Lab 5.1 - Closure Scope
In the labs-1 folder an app.js file contains the following:
'use strict'
const sayHiTo = prefixer('Hello ')
const sayByeTo = prefixer('Goodbye ')
console.log(sayHiTo('Dave')) // prints 'Hello Dave'
console.log(sayHiTo('Annie')) // prints 'Hello Annie'
console.log(sayByeTo('Dave')) // prints 'Goodbye Dave'
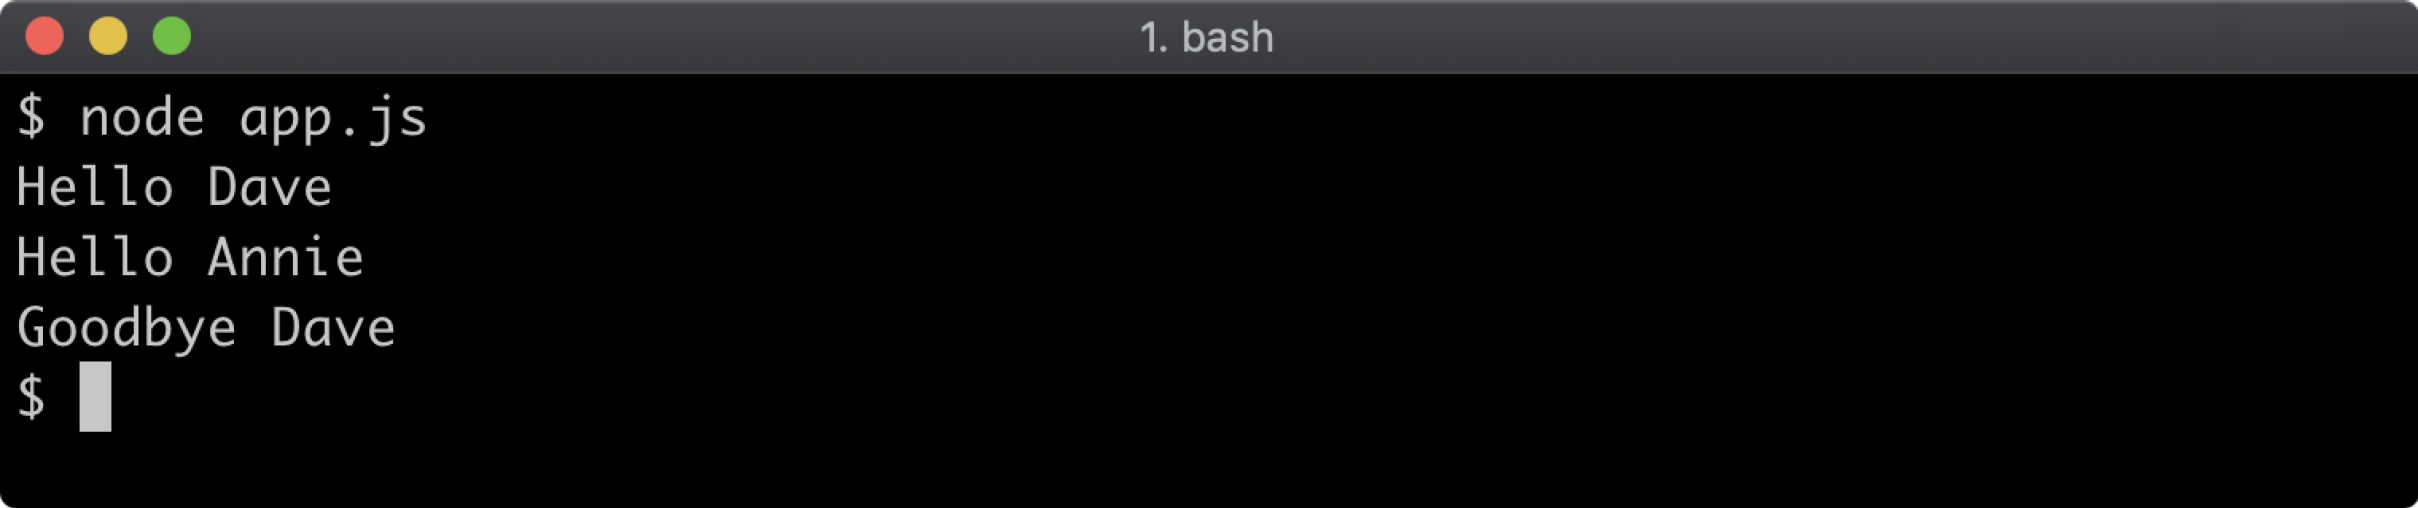
Implement the prefixer function. When ready, open a terminal, navigate to the labs-1 folder and run your program with node app.js. This program will not run correctly until the implementation is complete. When successfully implemented the output should be as follows:
Lab 5.2 - Prototypal Inheritance
The labs-2 folder contains an app.js file with the following:
const assert = require('assert')
// TODO:
// implement a way to create a prototype chain
// of leopard -> lynx -> cat
// leopard prototype must have ONLY a hiss method
// lynx prototype must have ONLY a purr method
// cat prototype must have ONLY a meow method
const felix = null //TODO replace null with instantiation of a cat
felix.meow() // prints Felix the cat: meow
felix.purr() // prints Felix the cat: prrr
felix.hiss() // prints Felix the cat: hsss
// prototype checks, do not remove
const felixProto = Object.getPrototypeOf(felix)
const felixProtoProto = Object.getPrototypeOf(felixProto)
const felixProtoProtoProto = Object.getPrototypeOf(felixProtoProto)
assert(Object.getOwnPropertyNames(felixProto).length, 1)
assert(Object.getOwnPropertyNames(felixProtoProto).length, 1)
assert(Object.getOwnPropertyNames(felixProtoProto).length, 1)
assert(typeof felixProto.meow, 'function')
assert(typeof felixProtoProto.purr, 'function')
assert(typeof felixProtoProtoProto.hiss, 'function')
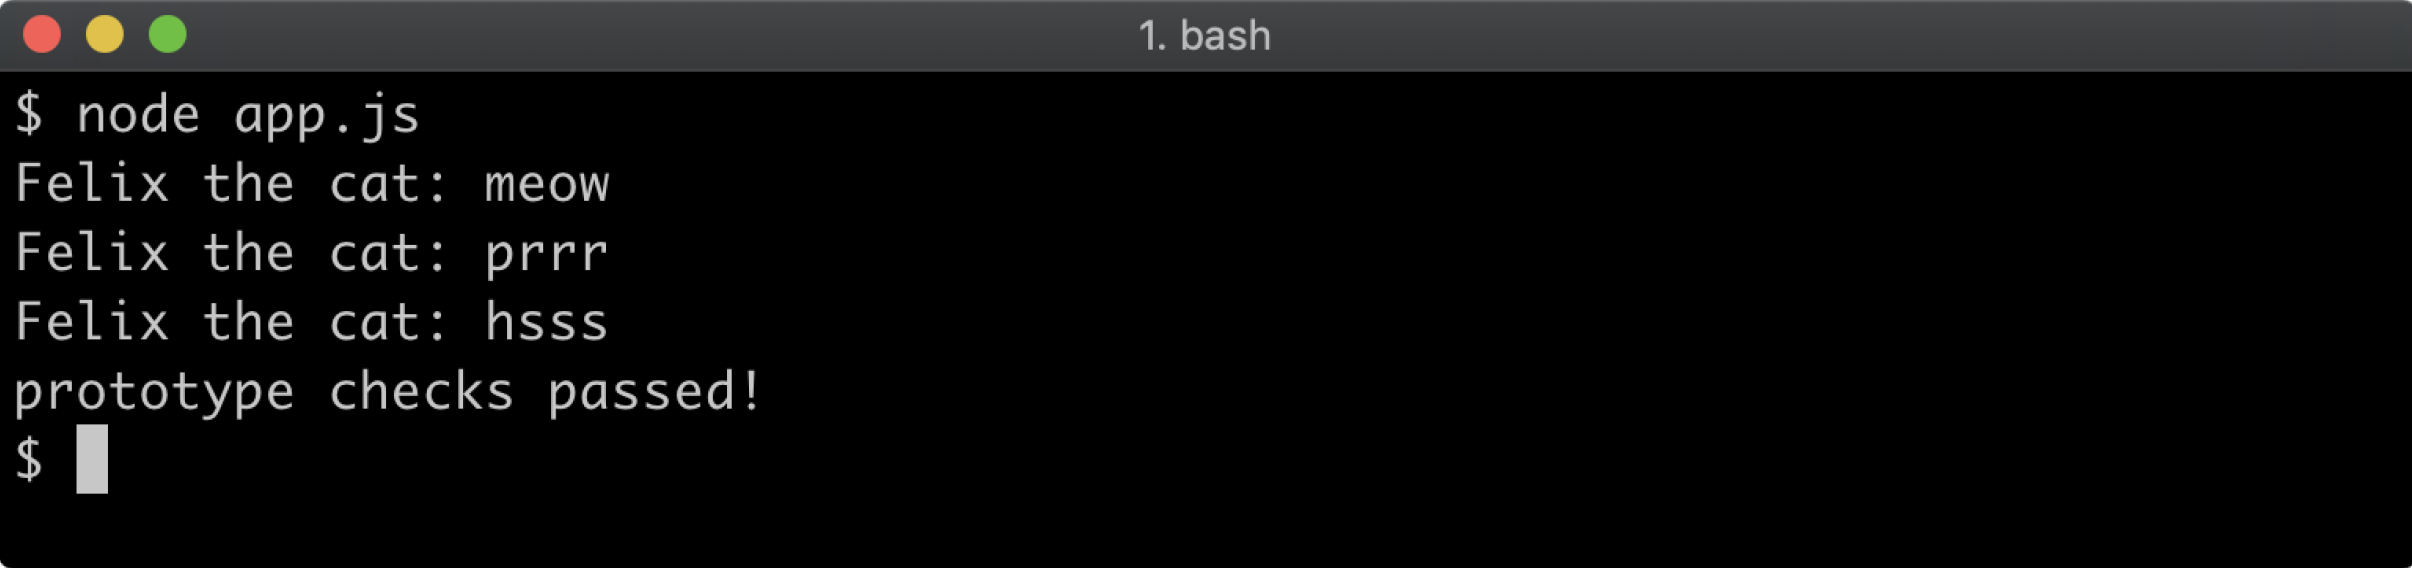
console.log('prototype checks passed!')
Using any of the approaches described create a prototypal inheritance chain and then create an
instance from that chain, and assign it to felix such that:
- The prototype of
felixshould be an object with ameowmethod - The prototype of that object should be an object with a
purrmethod - The prototype of that object should be an object with a
hissmethod
When ready, open a terminal, navigate to the labs-2 folder and run your implementation with node app.js. This program will not run correctly, it will throw exceptions, until the implementation is complete. If correctly implemented app.js should output: prototype checks passed!:
It's not necessary for meow, purr and hiss methods console.log exactly the same output, or even to output anything at all. Making Felix meow, purr and hiss is a nice-to-have. The most important thing is that the prototype chain is correctly set up.
6 - Packages and dependencies
Introduction
Chapter Overview
The Node.js ecosystem of packages is very large. There are more than 1.8 million packages on the npm Registry. While many of these packages are frontend JavaScript libraries, whether a package is for Node or the frontend or both, the npm client and its associated manifest file format have been fundamental to enabling this growth. In this section we will explore how to create and manage packages with the npm client, the package manager which comes bundled with Node.js.
Learning Objectives
By the end of this chapter, you should be able to:
- Find out how to quickly generate a
package.jsonfile. - Understand the difference between production and development dependencies.
- Grasp the Semver versioning format.
- Learn about Package Scripts.
Packages & Dependencies
The npm Command
When Node.js is installed, the node binary and the npm executable are both made available to the Operating System that Node.js has been installed into. The npm command is a CLI tool that acts as a package manager for Node.js. By default it points to the npmjs.com registry, which is the default module registry.
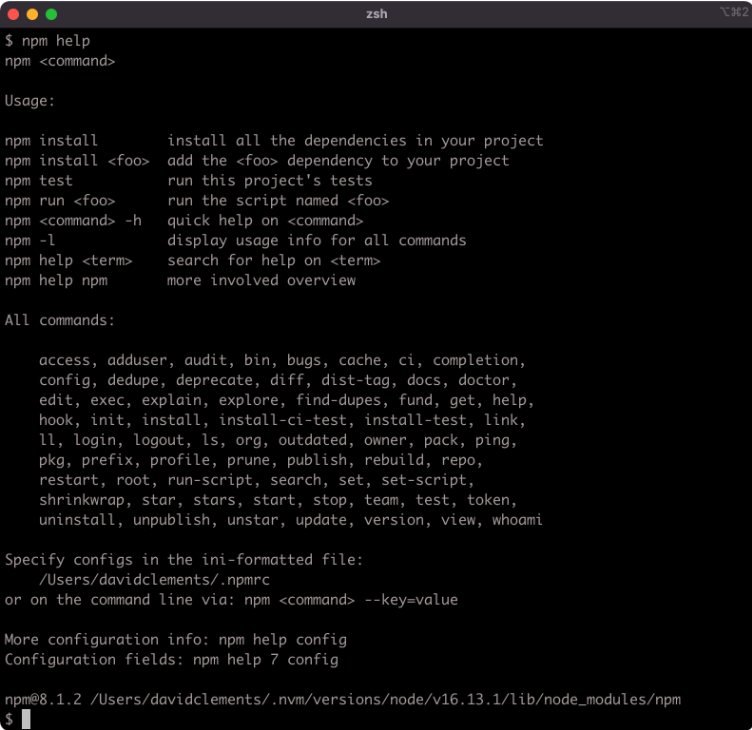
The npm help command will print out a list of available commands:
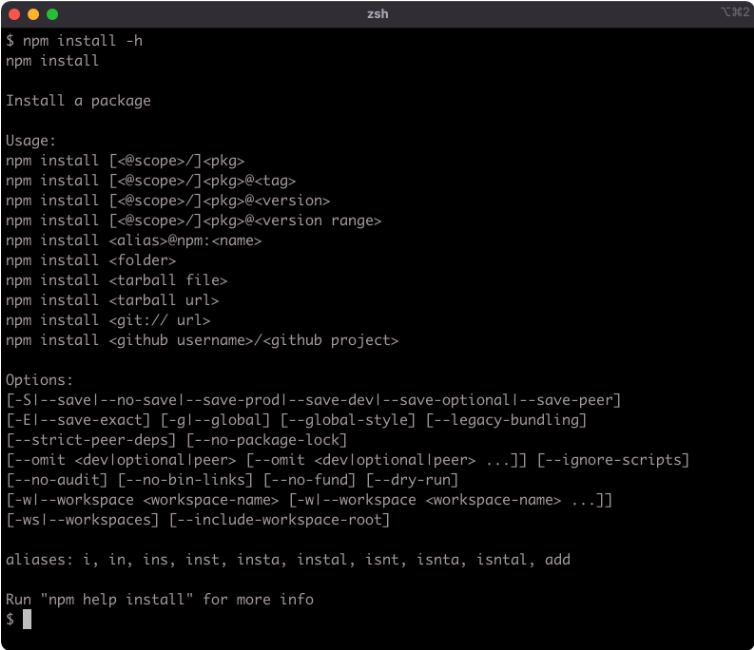
A quick help output for a particular command can be viewed using the -h flag with that command:
npm install -h
Initializing a Package
A package is a folder with a package.json file in it (and then some code). A Node.js application or service is also a package, so this could equally be titled "Initializing an App" or "Initializing a Service" or generically, "Initializing a Node.js Project".
The npm init command can be used to quickly create a package.json in whatever directory it's called in.
For this example a new folder called my-package is used, every command in this section is executed with the my-package folder as the current working directory.
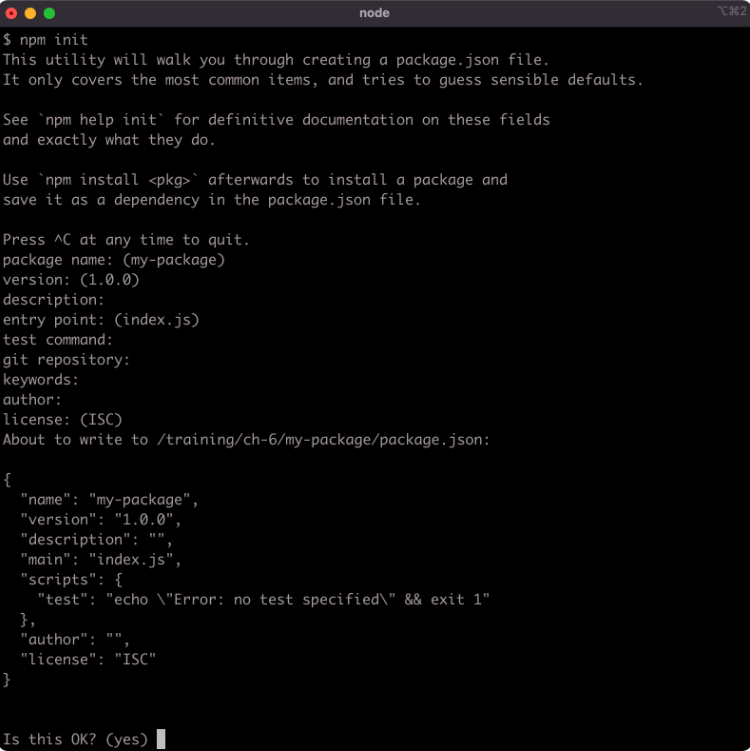
Running npm init will start a CLI wizard that will ask some questions:
For our purposes we can hit return for every one of the questions.
A shorter way to accept the default value for every question is to use the -y flag:
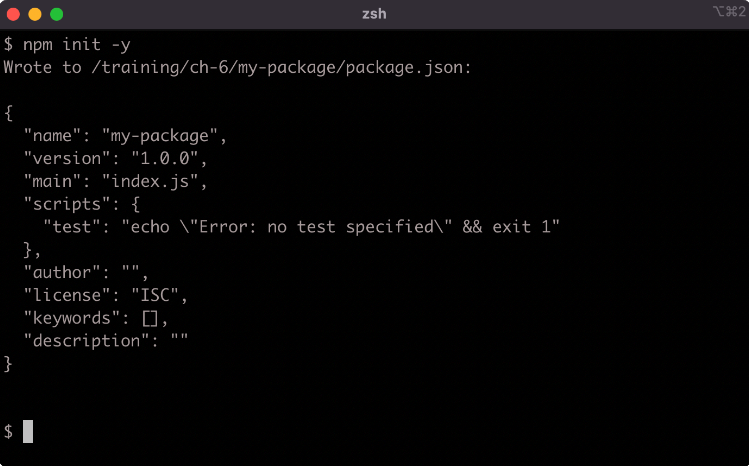
The default fields in a generated package.json are:
name– the name of the packageversion– the current version number of the packagedescription– a package description, this is used for meta analysis in package registriesmain– the entry-point file to load when the package is loadedscripts– namespaced shell scripts, these will be discussed later in this sectionkeywords– array of keywords, improves discoverability of a published packageauthor– the package authorlicense– the package license.
The npm init command can be run again in a folder with an existing package.json and any answers supplied will update the package.json. This can be useful when the package has also been initialized as a git project and has had a remote repo added. When run in a git repository, the npm init -y command will read the repositories remote URI from git and add it to package.json.
Installing Dependencies (1)
Once a folder has a package.json file, dependencies can be installed.
Let's install a logger:
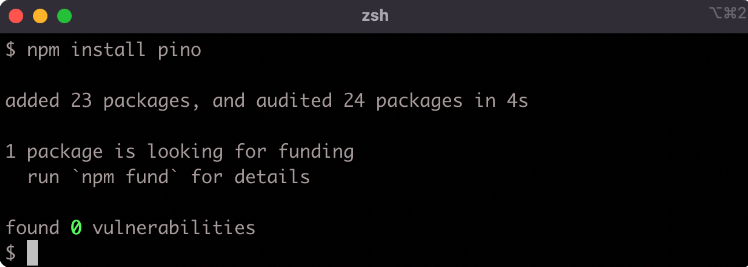
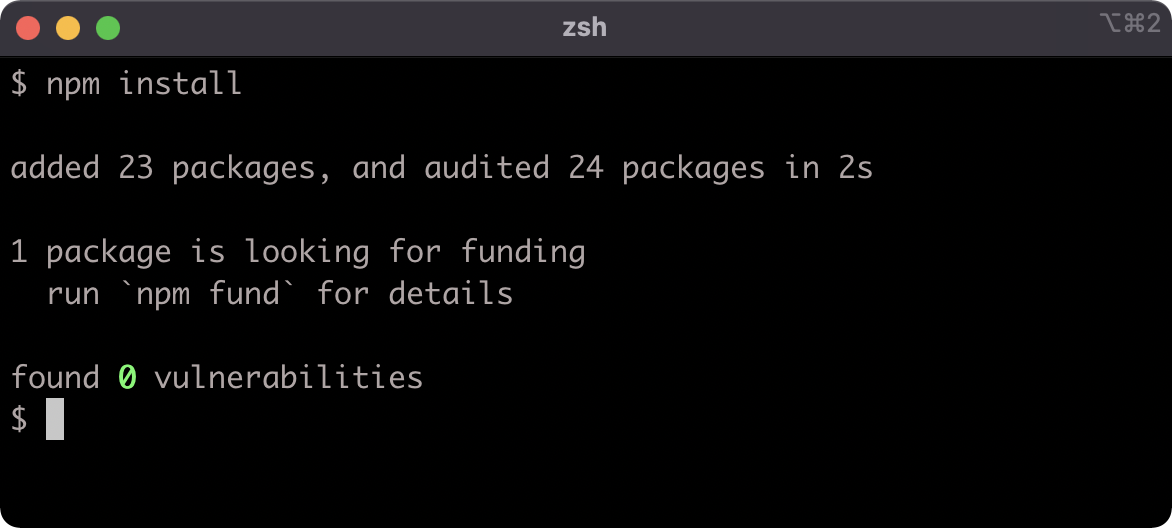
npm install pino
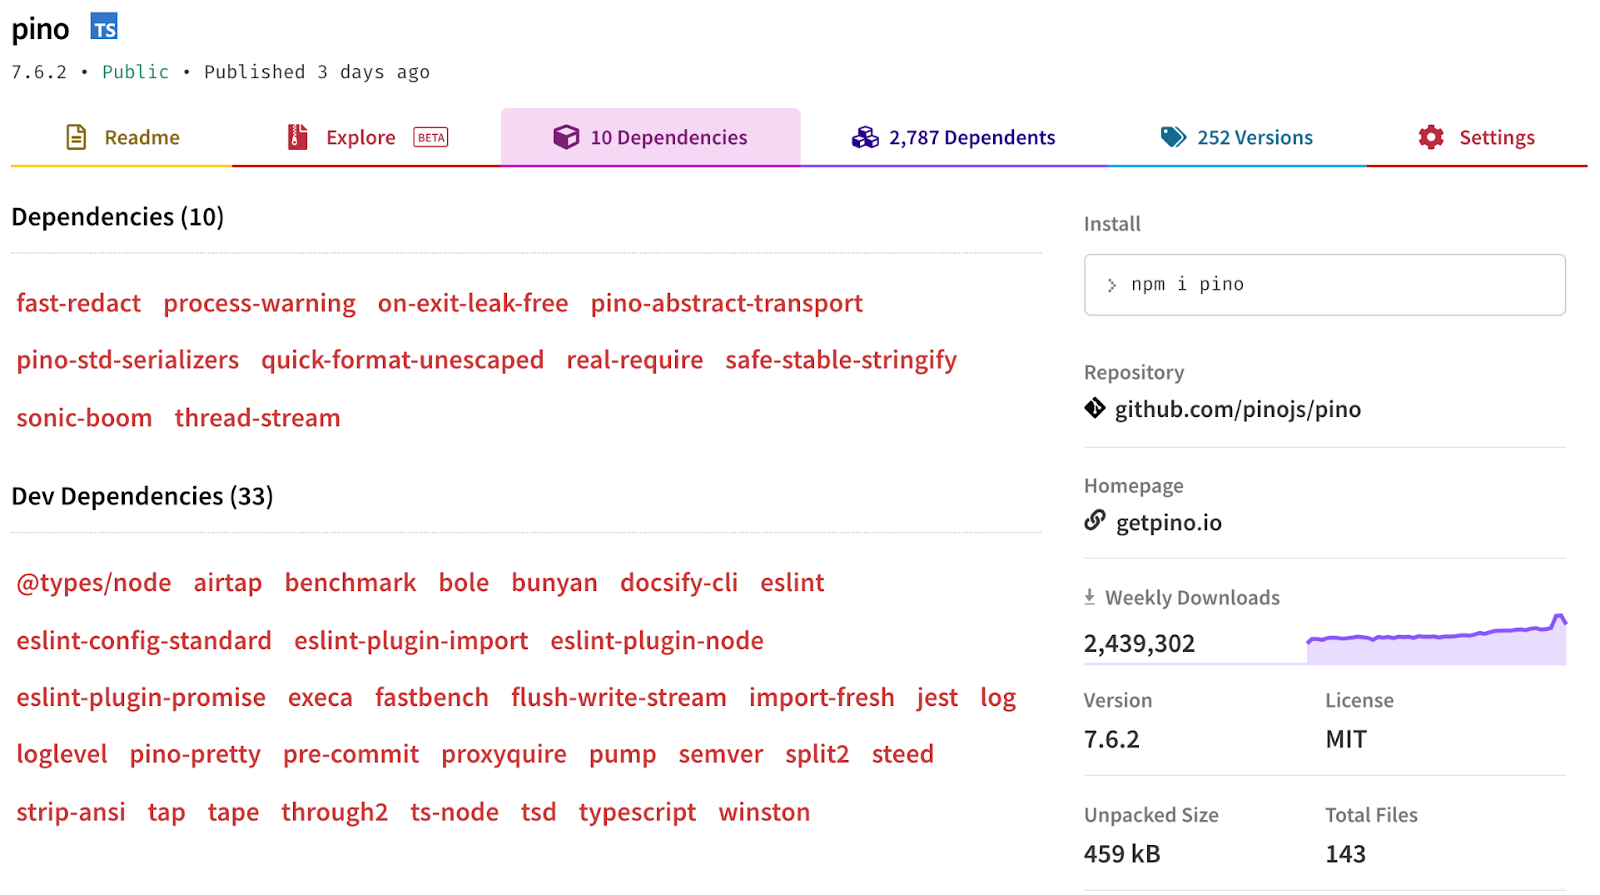
Information about any ecosystem package can be found on npmjs.com, for instance for information about the logger we installed see Pino's Documentation.
Once the dependency is installed the package.json file will have the following content:
{
  "name": "my-package",
  "version": "1.0.0",
  "description": "",
  "main": "index.js",
  "scripts": {
    "test": "echo \"Error: no test specified\" && exit 1"
  },
  "keywords": [],
  "author": "",
  "license": "ISC",
  "dependencies": {
    "pino": "^7.6.2"
  }
}
Running the npm install command has modified the package.json file by adding a "dependencies" field:
"dependencies": {
  "pino": "^7.6.2"
}
The "dependencies" field contains an object, the keys of the object contain dependency namespaces, the values in the object contain the Semver range version number for that dependency. We will explore the Semver format later in this section.
Running npm install pino without specifying a version will install the latest version of the package, so the version number may vary when following these steps. If the installed version number doesn't match up, this is fine as long as the major number (the first number) is 7. If a new major release of pino is available, we can instead execute npm install pino@7 to ensure we're using the same major version.
In addition, a node_modules folder and a package-lock.json file will have been added into the my-package folder:

The package-lock.json file contains a map of all dependencies with their exact versions, npm will use this file when installing in future, so that the exact same dependencies are installed. As a default setting, this is somewhat limiting depending on context and goals. When creating applications, it makes sense to introduce a package-lock.json once the project is nearing release. Prior to that, or when developing modules it makes more sense to allow npm to pull in the latest dependencies (depending on how they're described in the package.json, more on this later) so that the project naturally uses the latest dependencies during development. Automatic package-lock.json generation can be turned off with the following command:
node -e "fs.appendFileSync(path.join(os.homedir(), '.npmrc'), '\npackage-lock=false\n')"
This appends package-lock=false to the .npmrc file in the user home directory. To manually generate a package-lock.json file for a project the --package-lock flag can be used when installing: npm install --package-lock. Whether to use the default package-lock behavior ultimately depends on context and preference, it's important to understand that dependencies have to be manually upgraded (even for patch and minor) if a package-lock.json file is present.
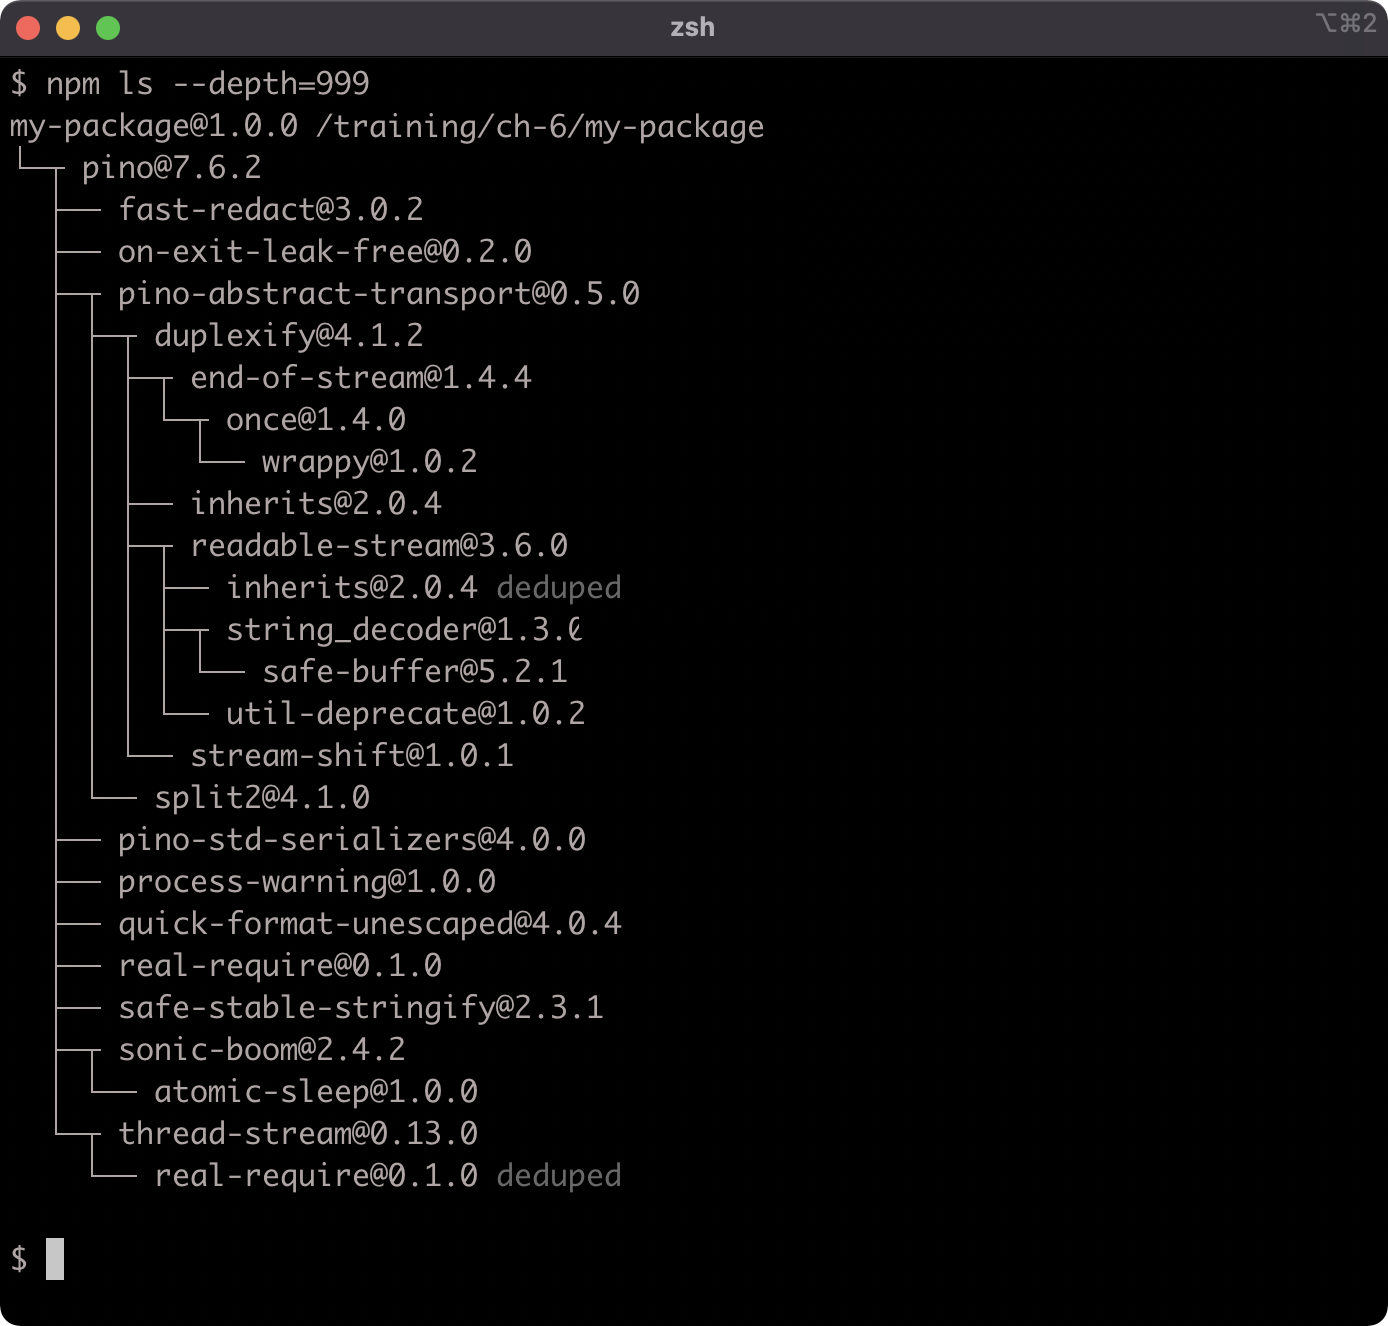
The node_modules folder contains the logger package, along with all the packages in its dependency tree:
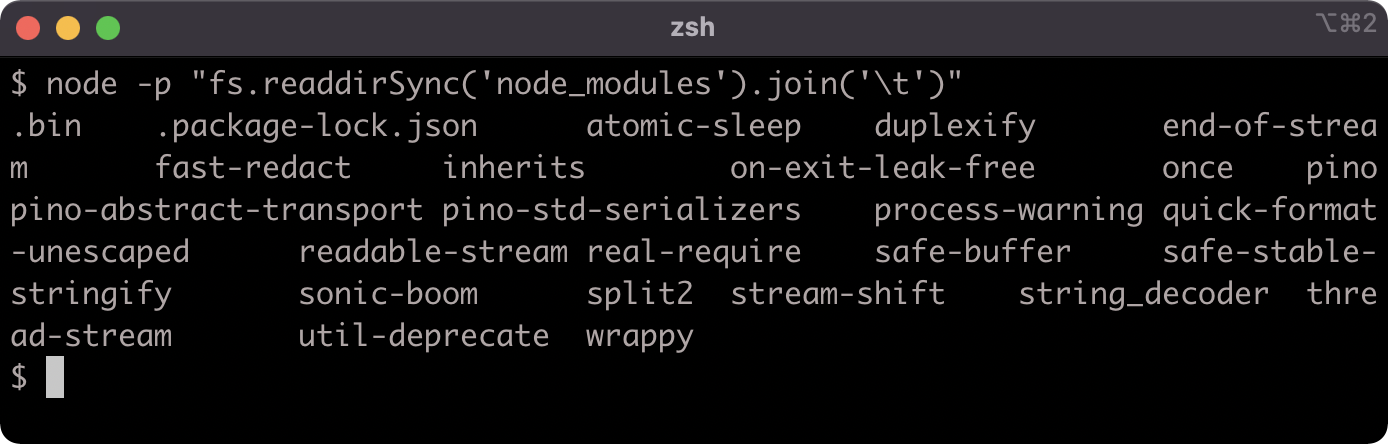
The npm install command uses a maximally flat strategy where all packages in a dependency tree placed at the top level of the node_modules folder unless there are two different versions of the same package in the dependency tree, in which case the packages may be stored in a nested node_modules folder.
The npm ls command can be used to describe the dependency tree of a package, although as of version 8 of npm the --depth flag must be set to a high number to output more than top-level dependencies:

Installing Dependencies (2)
Notice how the flatstr sub-dependency occurs twice in the output. The second occurrence has the word deduped next to it. The flatstr module is a dependency of both pino and its direct dependency sonic-boom, but both pino and sonic-boom rely on the same version of flatstr. Which allows npm to simply place a single flatstr package in the node_modules folder.
Now that we have the dependency we can use it:

Loading dependencies will be covered comprehensively in Section 7: "Node's Module System".
A primary reason for adding the installed dependency to the package.json file is to make the node_modules folder disposable.
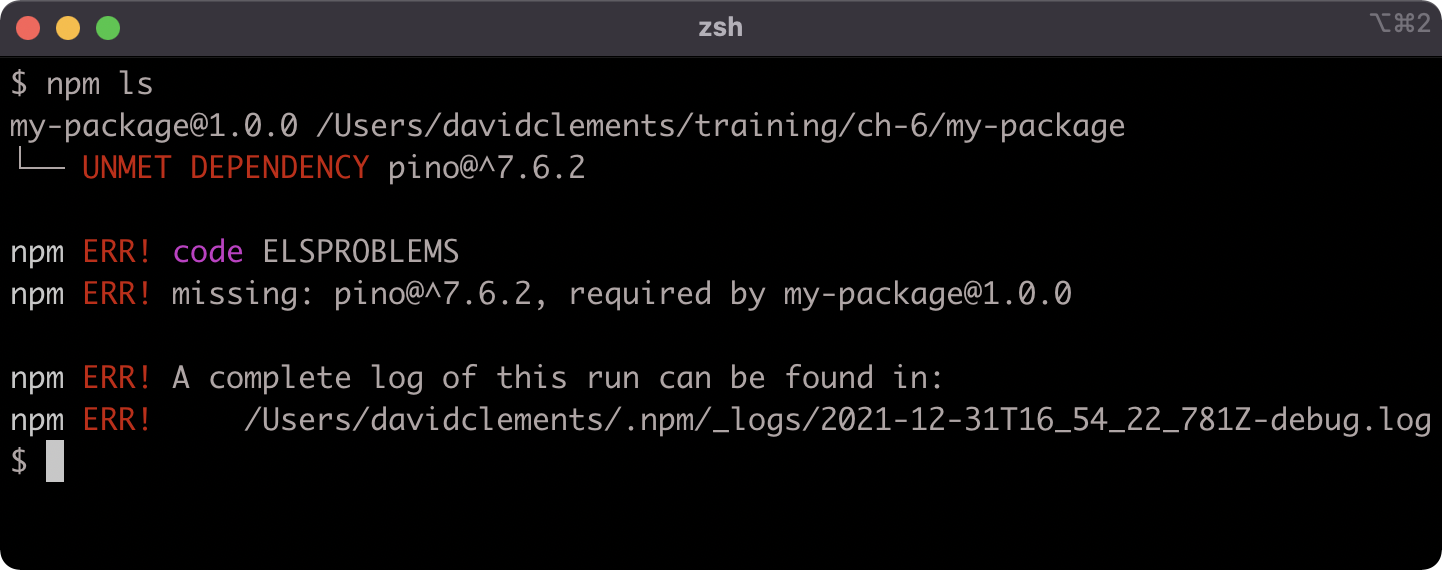
Let's delete the node_modules folder:
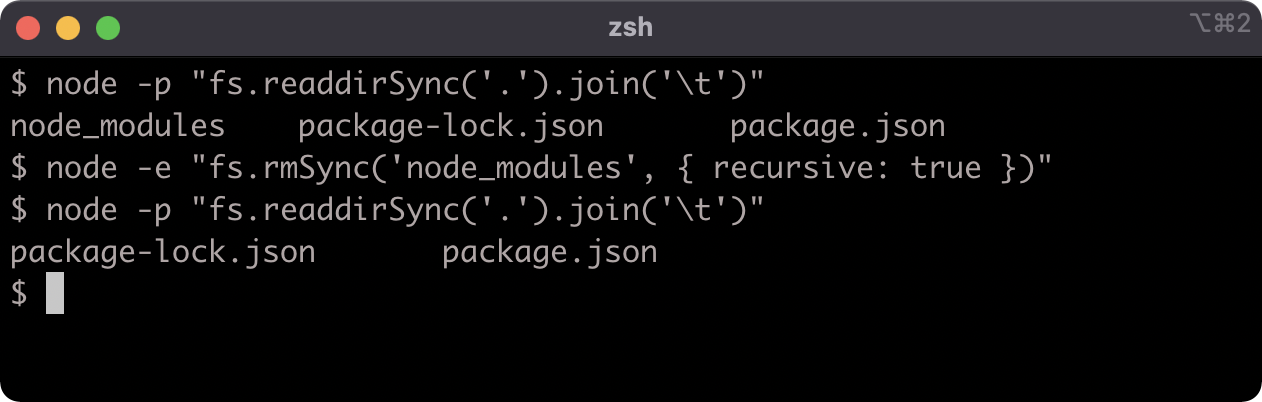
If we run npm ls it won't print out the same tree any more because the dependency isn't installed, but it will warn that the dependency should be installed:
To install the dependencies in the package.json file, run npm install without specifying a dependency namespace:
npm install
Running npm ls now will show that the logger has been installed again:

The node_modules folder should not be checked into git, the package.json should be the source of truth.
Development Dependencies (1)
Running npm install without any flags will automatically save the dependency to the package.json file's "dependencies" field. Not all dependencies are required for production, some are tools to support the development process. These types of dependencies are called development dependencies.
An important characteristic of development dependencies is that only top level development dependencies are installed. The development dependencies of sub-dependencies will not be installed.
Dependencies and development dependencies can be viewed in the Dependency tab of any given package on npmjs.com, for pino that can be accessed at Pino's Dependencies Documentation.
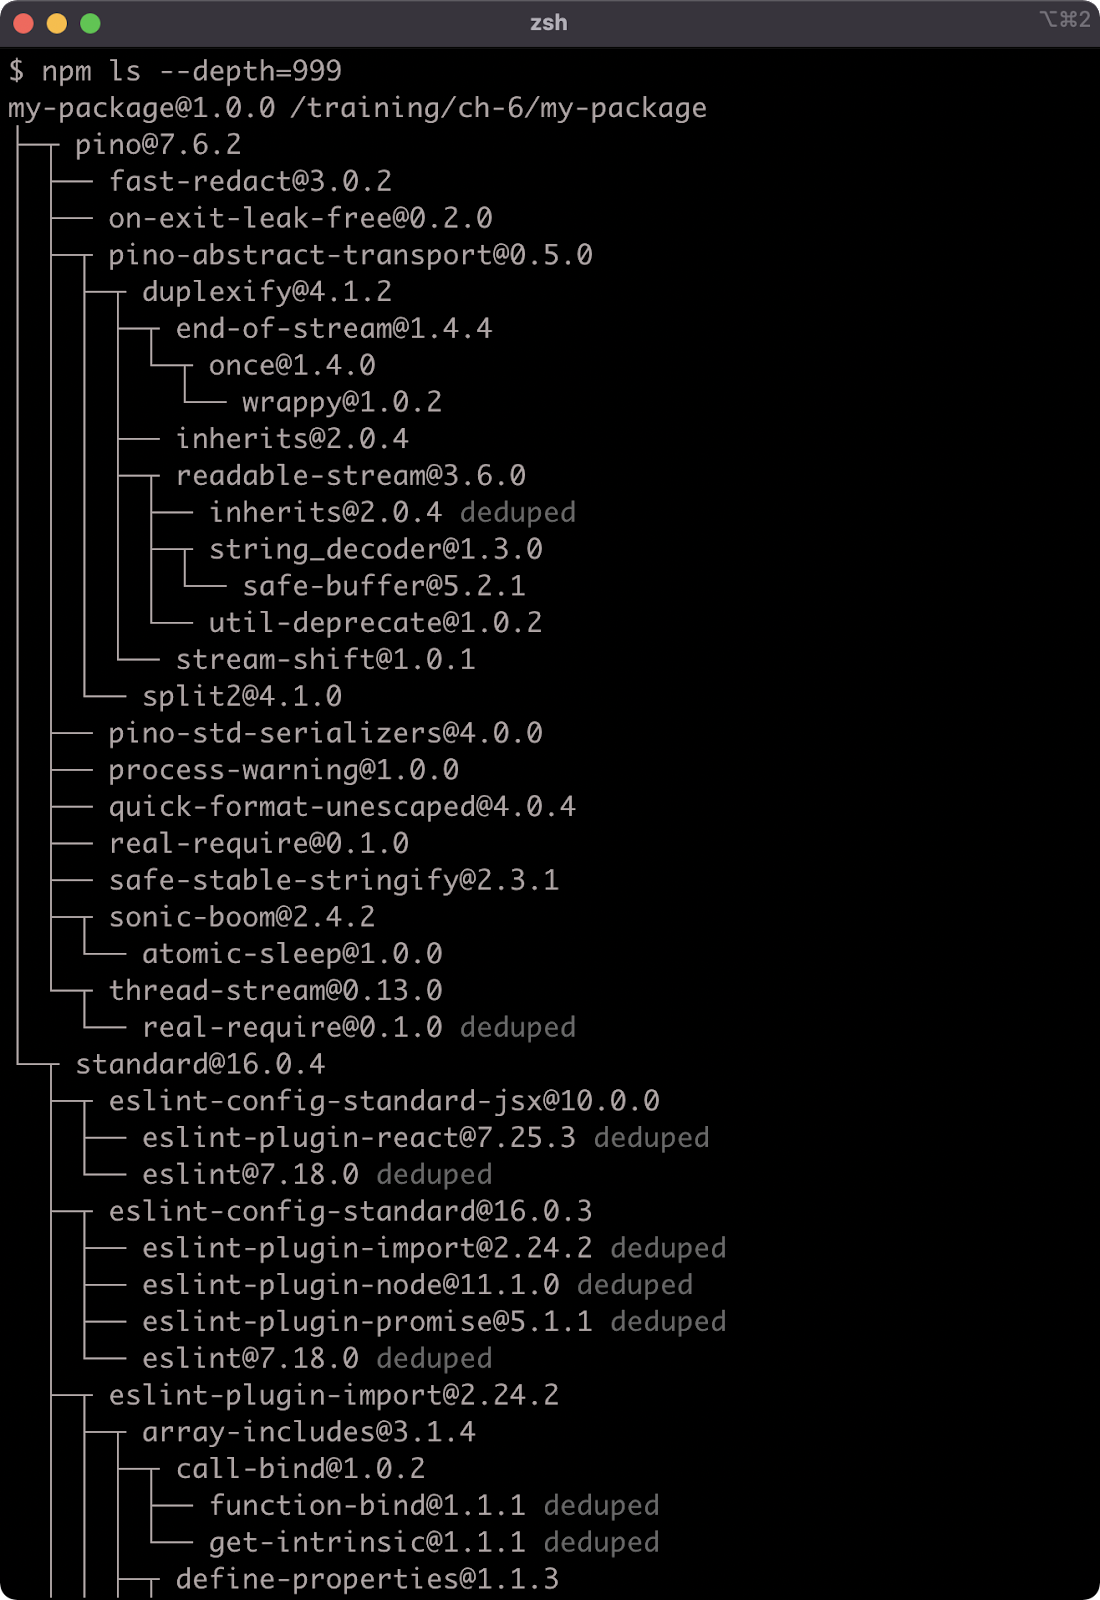
When we run npm ls --depth=999 we only see the production dependencies in the tree, none of the development dependencies are installed, because the development dependencies of installed packages are never installed.
npm ls --depth=999
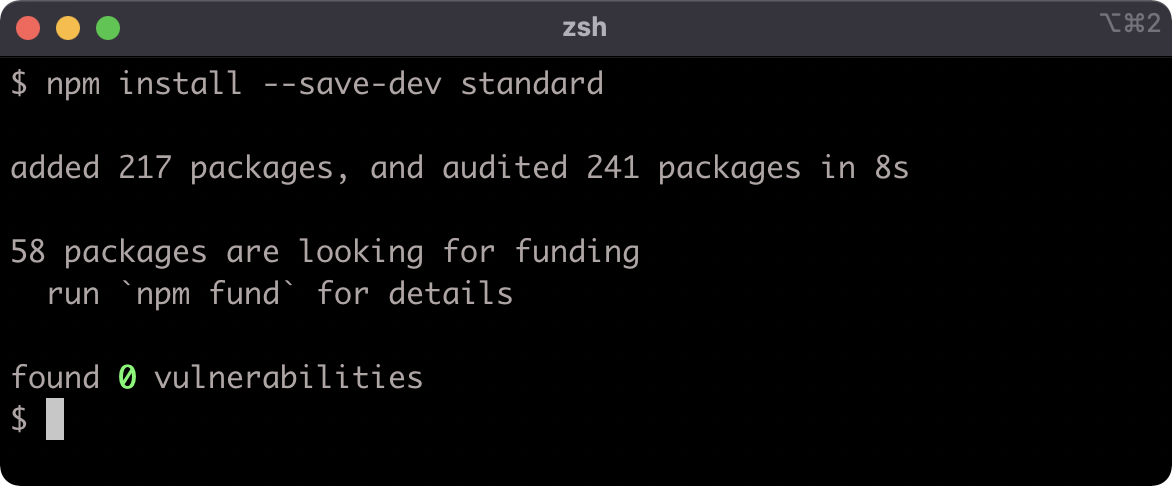
Let's install a linter as a development dependency into my-package:
npm install --save-dev standard
Now let's take a look at the package.json file:
{
  "name": "my-package",
  "version": "1.0.0",
  "description": "",
  "main": "index.js",
  "scripts": {
    "test": "echo \"Error: no test specified\" && exit 1"
  },
  "keywords": [],
  "author": "",
  "license": "ISC",
  "dependencies": {
    "pino": "^7.6.2"
  },
  "devDependencies": {
    "standard": "^16.0.4"
  }
}
Development Dependencies (2)
In addition to the "dependencies" field there is now a "devDependencies" field.
Running npm ls --depth=999 now reveals a much larger dependency tree:
When deploying a service or application for production use, we don't want to install any dependencies that aren't needed in production.
A --production flag can be used with npm install so that development dependencies are ignored.
Let's remove the node_modules folder:
node -e "fs.rmSync('node_modules', {recursive: true})"
Node is being used here to remove the node_modules folder because this command is platform independent, but we can use any approach to remove the folder as desired.

Now let's run npm install with the --production flag:
npm install --production
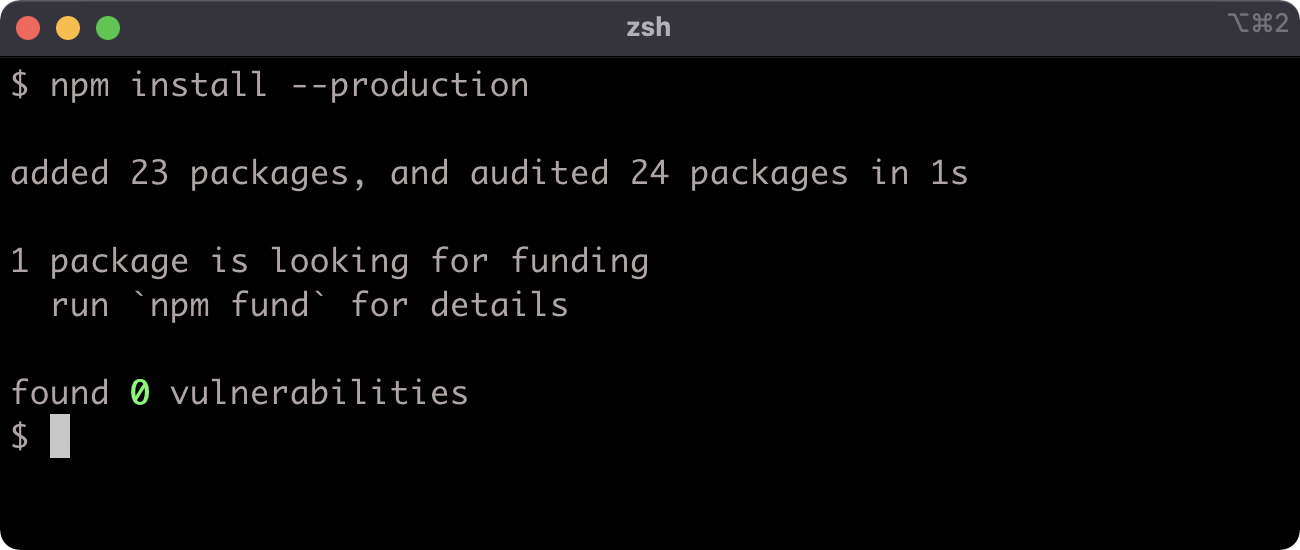
While pino and standard are both dependencies of my-package, only pino will be installed when --production is used because standard is specified as a development dependency in the package.json. This can be verified:
npm ls --depth=999
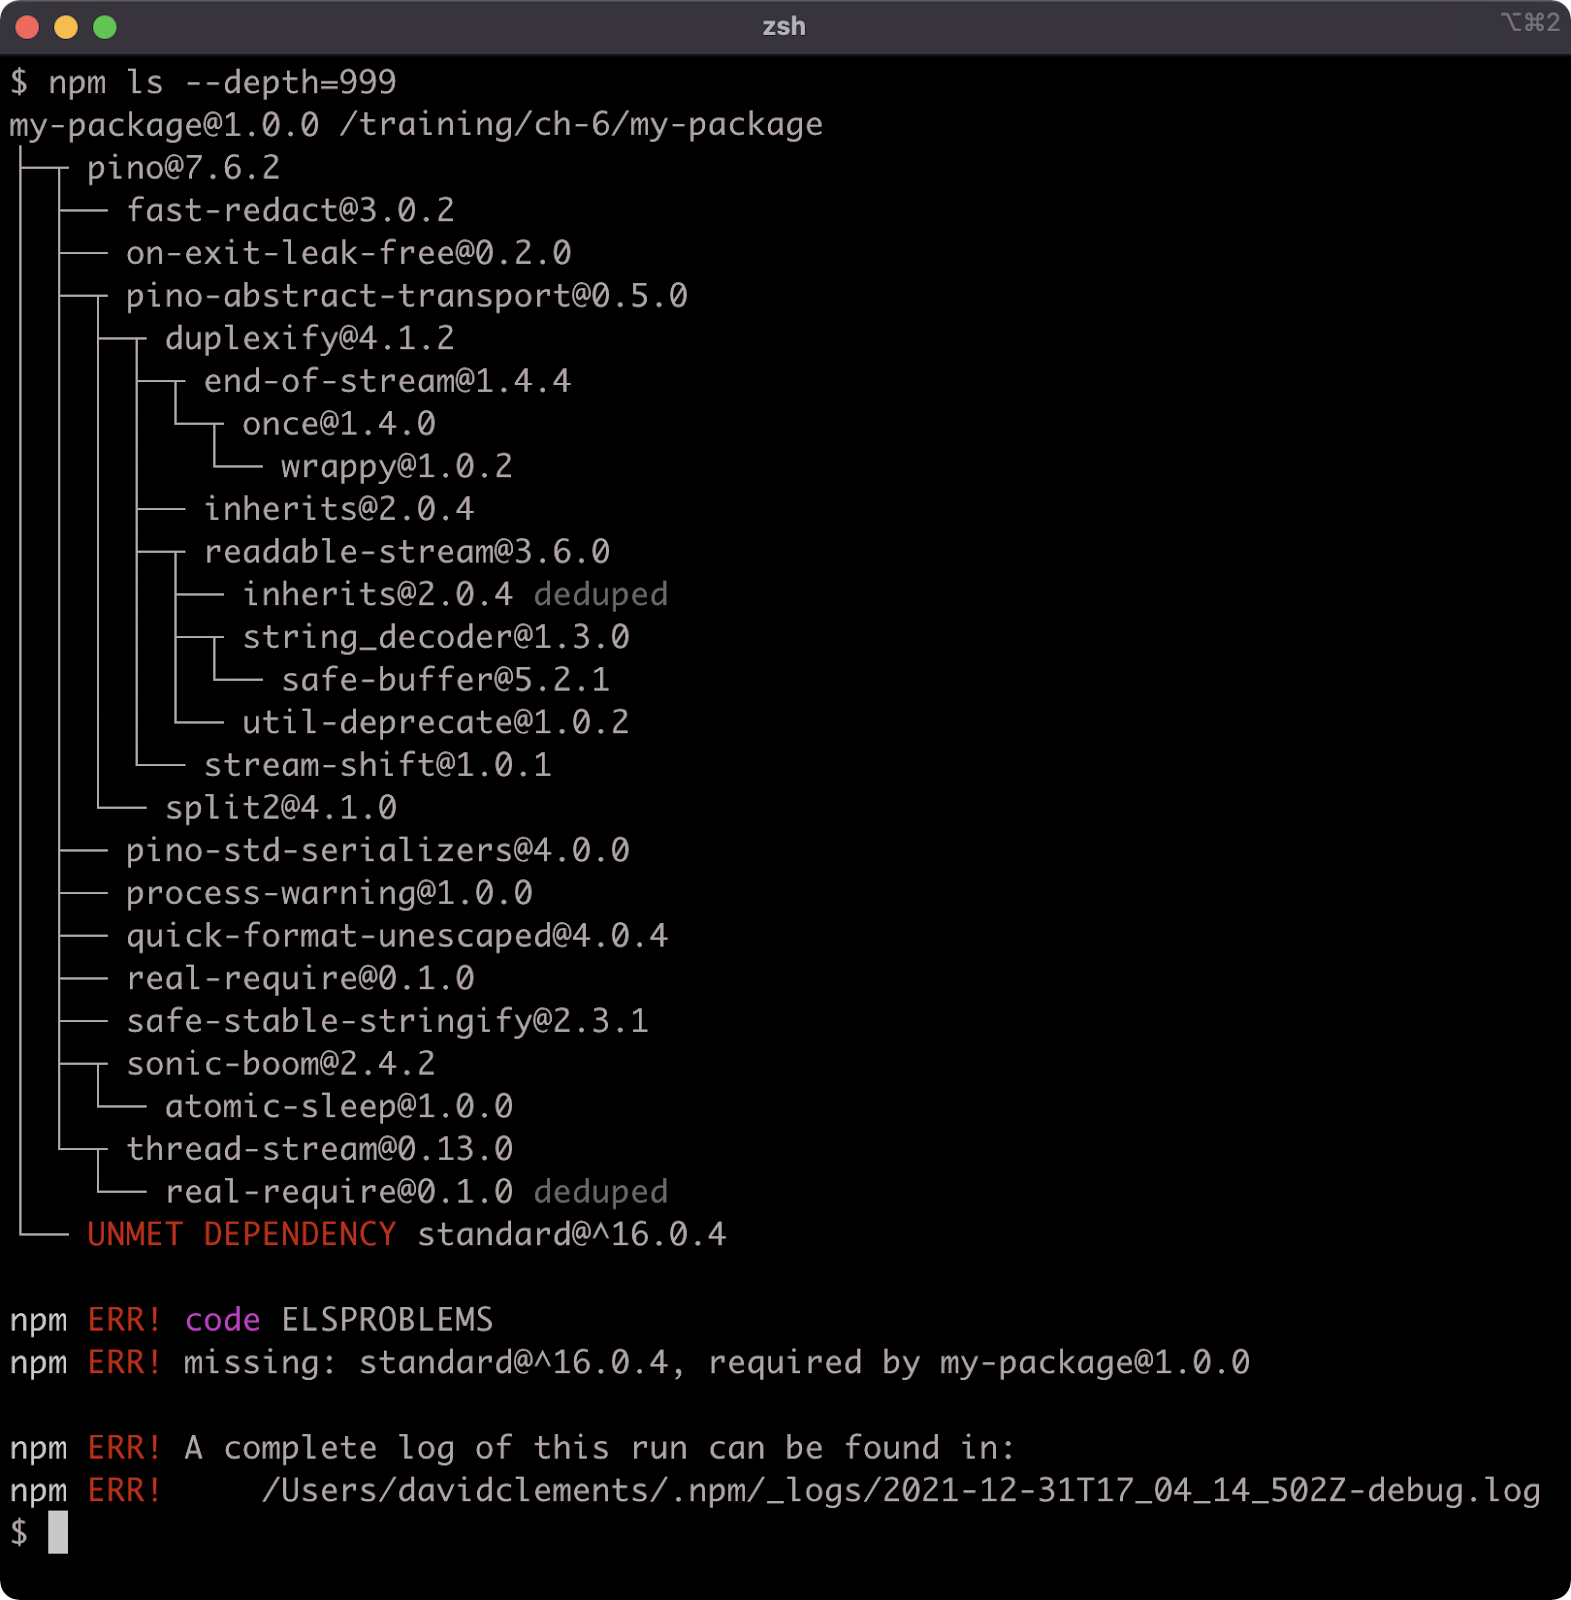
The error message is something of a misdirect, the development dependency is deliberately omitted in this scenario.
Understanding Semver
Let's look at the dependencies in the package.json file:
"dependencies": {
  "pino": "^7.6.2"
},
"devDependencies": {
  "standard": "^16.0.4"
}
We've installed two dependencies, pino at a Semver range of ^7.6.2 and standard at a Semver range of ^16.0.4. Our package version number is the Semver version 1.0.0. There is a distinction between the Semver format and a Semver range.
Understanding the Semver format is crucial to managing dependencies. A Semver is fundamentally three numbers separated by dots. The reason a version number is updated is because a change was made to the package. The three numbers separated by dots represent different types of change.
- Major: MAJOR is the left-most number. It means that the change breaks an API or a behavior.
- Minor: MINOR is the middle number. It means that the package has been extended in some way, for instance a new method, but it's fully backwards compatible. Upgrading to a minor should not break the package.
- Patch: PATCH is the right-most number. It means that there has been a bug fix.
This is the core of the Semver format, but there are extensions which won't be covered here, for more information on Semver see Semver's website.
A Semver range allows for a flexible versioning strategy. There are many ways to define a Semver range.
One way is to use the character "x" in any of the MAJOR.MINOR.PATCH positions, for example 1.2.x will match all PATCH numbers. 1.x.x will match all MINOR and PATCH numbers.
By default npm install prefixes the version number of a package with a caret (^) when installing a new dependency and saving it to the package.json file.
Our specified pino version in the package.json file is ^7.6.2. This is another way to specify a Semver range: by prefixing the version with a caret (^). Using a caret on version numbers is basically the same as using an x in the MINOR and PATCH positions, so ^7.6.2 is the same as 7.x.x. However there are exceptions when using 0, for example ^0.0.0 is not the same as 0.x.x, see the "Caret Ranges ^1.2.3 ^0.2.5 ^0.0.4" section of npmjs Documentation. For non-zero MAJOR numbers, ^MAJOR.MINOR.PATCH is interpreted as MAJOR.x.x.
The complete syntax for defining ranges is verbose, see semver's website for full details, and try out npm semver calculator for an interactive visualization.
Package Scripts (1)
The "scripts" field in package.json can be used to define aliases for shell commands that are relevant to a Node.js project.
To demonstrate the concept, let's add a lint script. Currently the package.json "scripts" field looks like so:
"scripts": {
  "test": "echo \"Error: no test specified\" && exit 1"
},
Let's update it to the following:
"scripts": {
  "test": "echo \"Error: no test specified\" && exit 1",
  "lint": "standard"
},
Recall that we have a development dependency installed called standard. This is a code linter, see "JavaScript Standard Style" article for more details.
Packages can assign a "bin" field in their package.json, which will associate a namespace with a Node program script within that package. In the case of standard, it associates a command named standard with a Node program script that performs linting. The associated commands of all installed packages are available within any defined package.json scripts.
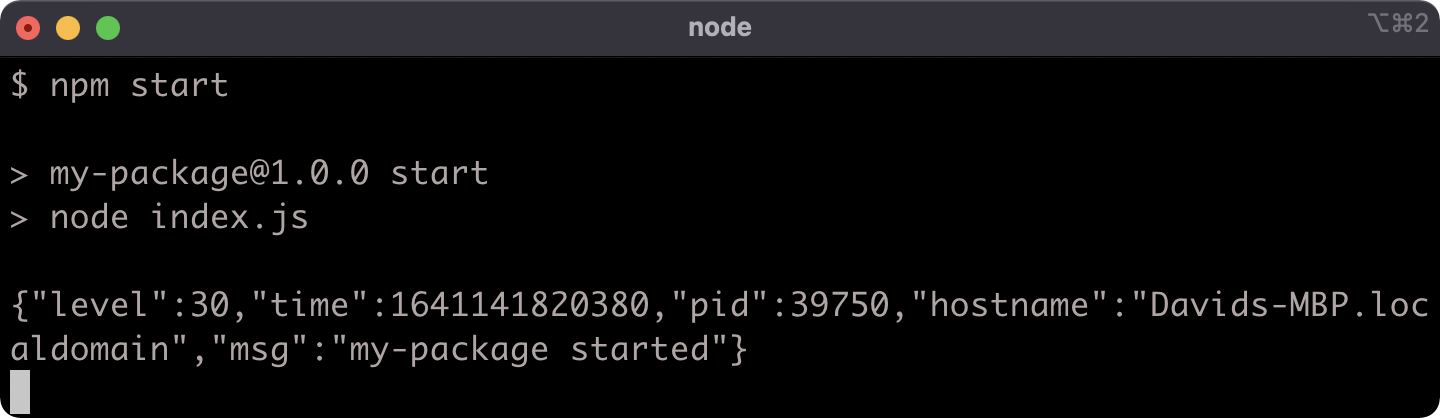
We need some code to lint. Let's add a file to my-package called index.js with the following contents:
'use strict';
console.log('my-package started');
process.stdin.resume();
Let's make sure all dependencies are installed before we try out the "lint" script by running.
npm install
Next, to execute the script use npm run:
npm run lint
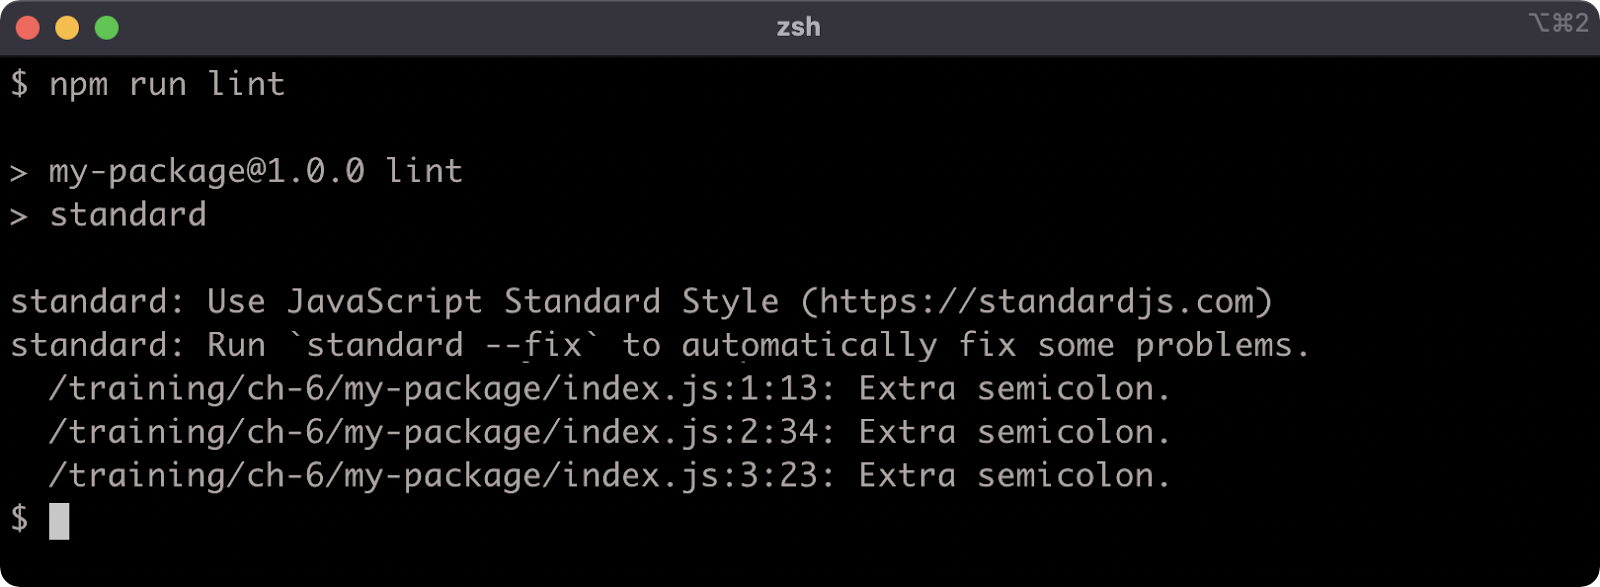
We have some lint errors. The standard linter has a --fix flag that we can use to autocorrect the lint errors. We can use a double dash (--) to pass flags via npm run to the aliased command:
npm run lint -- --fix
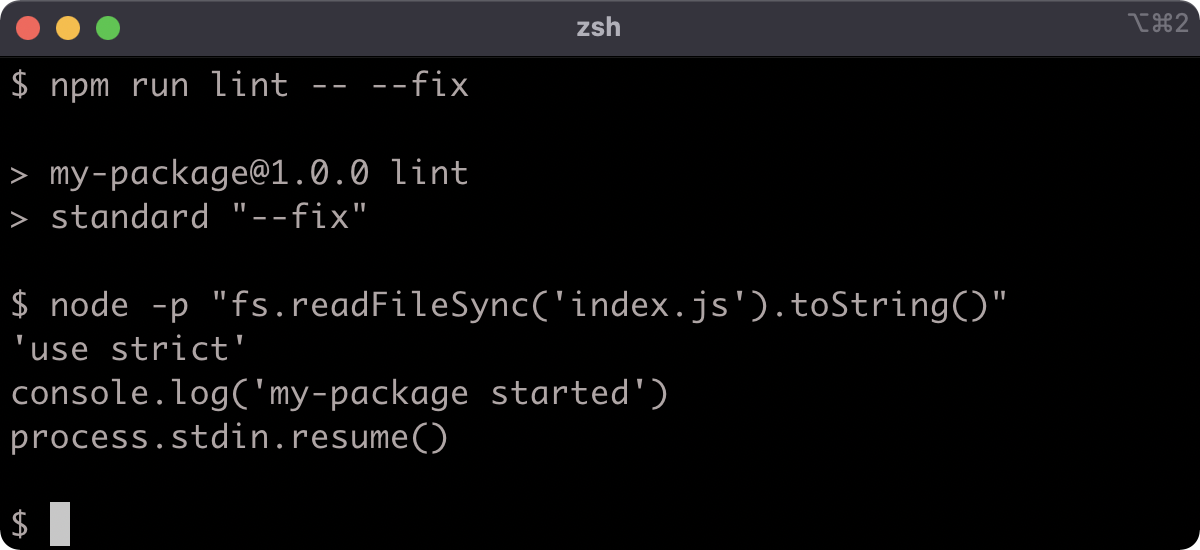
Package Scripts (2)
As a result the index.js file was altered according to the lint rules, and saved.
There are two package scripts namespaces that have dedicated npm commands: npm test and npm start.
The package.json already has a "test" field, let's run npm test:
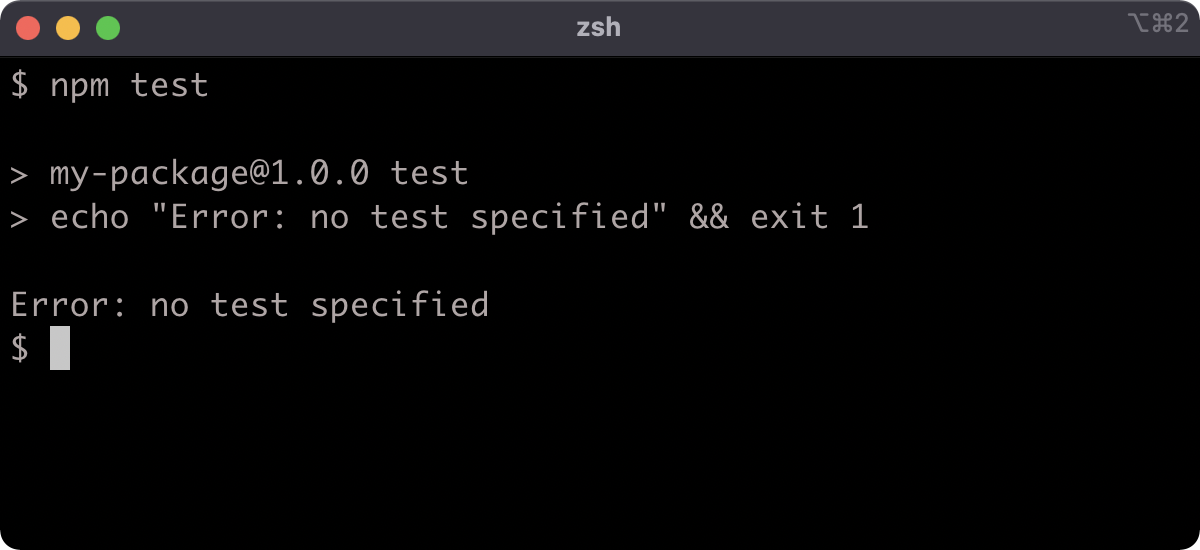
The "test" field in the package.json scripts is as follows:
"test": "echo \"Error: no test specified\" && exit 1"
The output is as expected. Testing will be explored in full in Section 16 - "Writing Unit Tests".
Note that we did not have to use npm run test, the npm test command is an alias for npm run test. This aliasing only applies to test and start. Our npm run lint command cannot be executed using npm lint for example.
Let's add one more script, a "start" script, edit the package.json scripts field to match the following:
"scripts": {
  "start": "node index.js",
  "test": "echo \"Error: no test specified\" && exit 1",
  "lint": "standard"
},
Now let's run npm start:
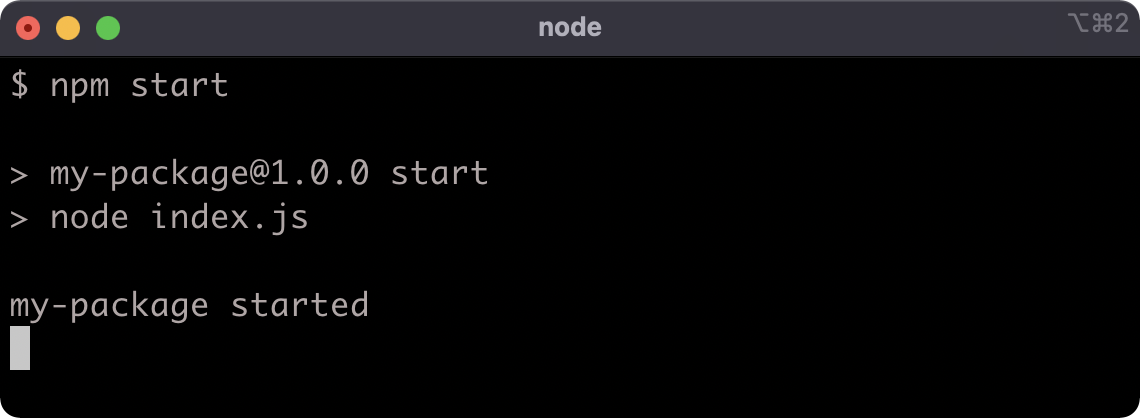
To exit the process, hit CTRL-C.
Lab Exercises
Lab 6.1 - Install a Development Dependency
The labs-1 folder has a package.json file in it. Install nonsynchronous as a development dependency. Run npm test in the labs-1 folder to check that the task has been completed:
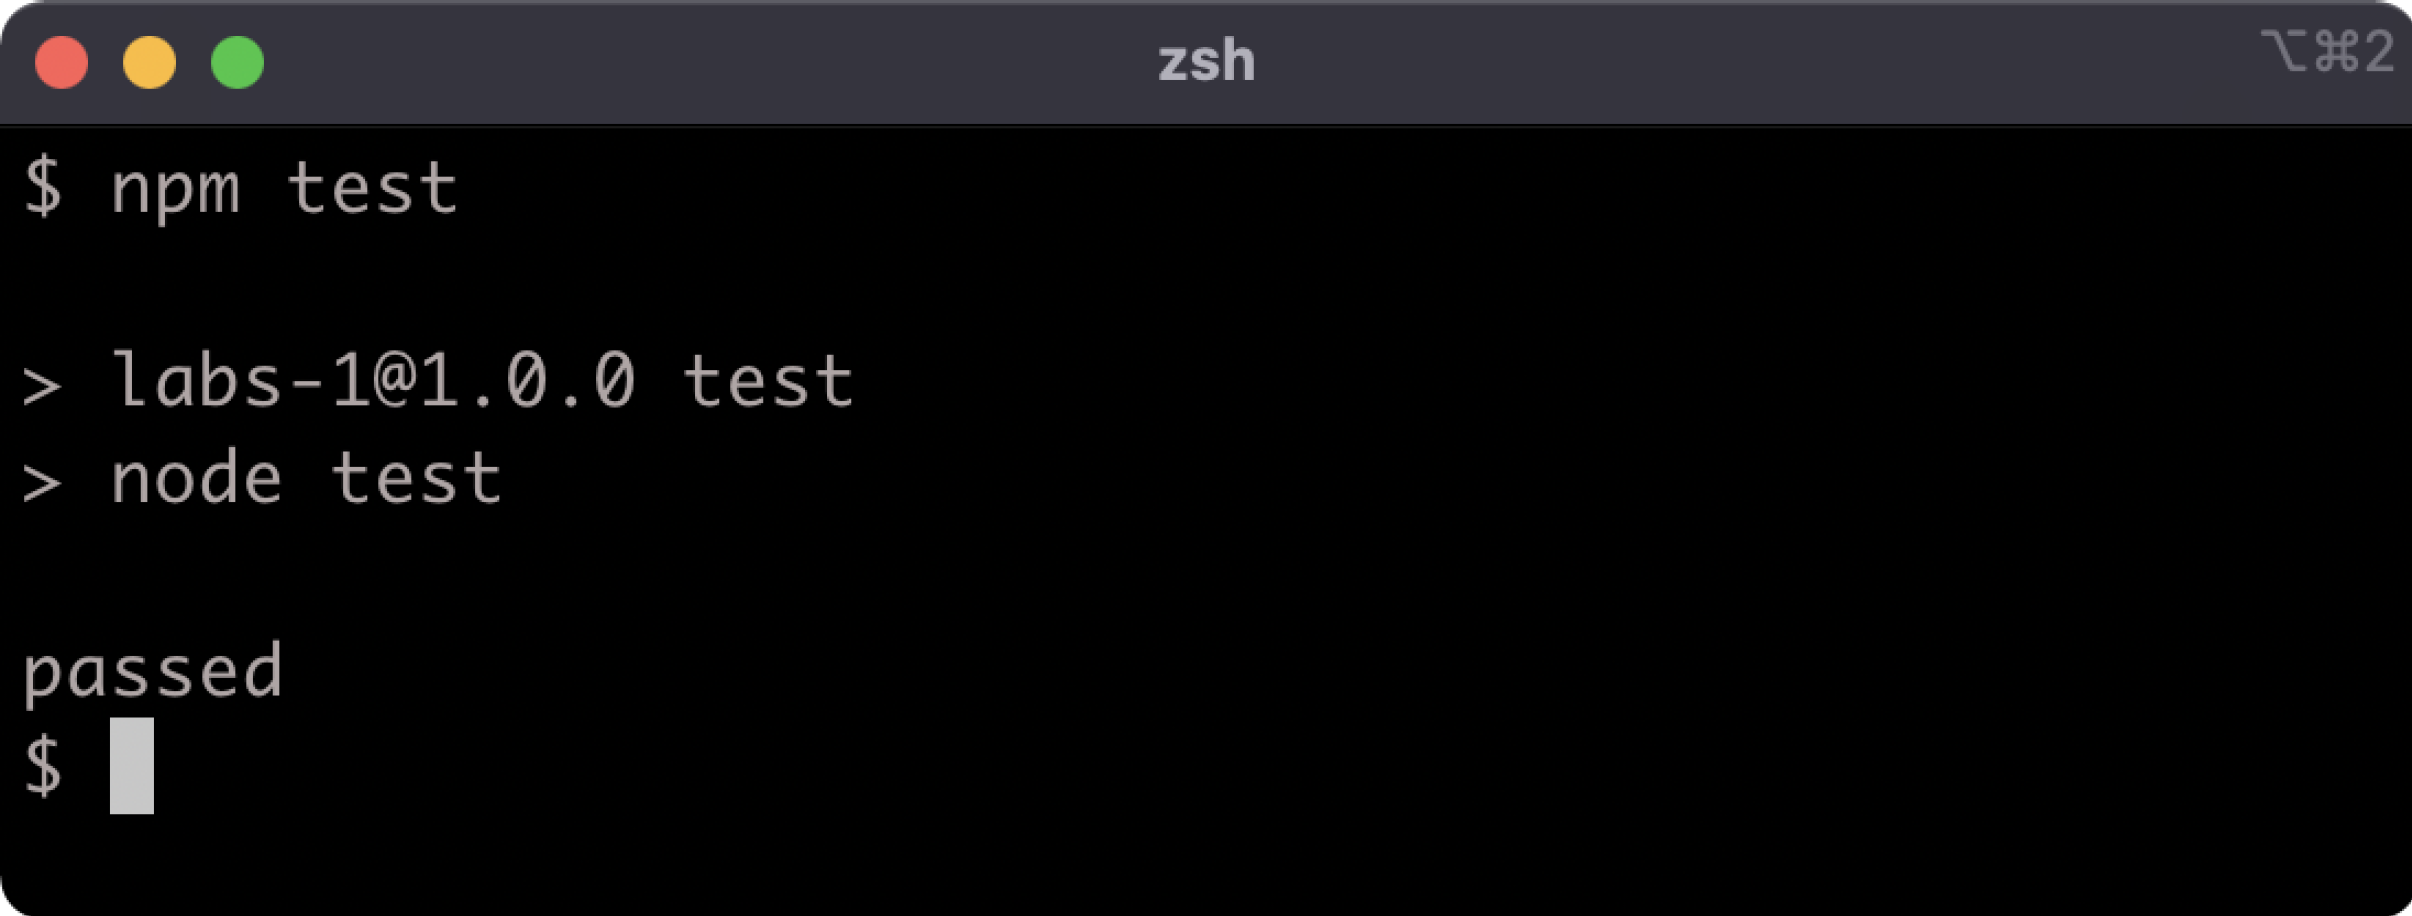
If the output says "passed" then the task was completed correctly.
Lab 6.2 - Install a Dependency Using a Semver Range
The labs-2 folder contains a package.json file. Install the following dependencies at the specified version ranges, and ensure that those ranges are correctly specified in the package.json file:
- Install
fastifyat greater than or equal to2.0.0, while accepting all future MINOR and PATCH versions - Install
rfdcat exactly version1.1.3
Run npm install to install the development dependency required to validate this exercise, and then run npm test in the labs-2 folder to check that the task has been completed:
If the output says "passed" then the task was completed correctly.
7 - Node's module systems
Introduction
Chapter Overview
In Node.js the module is a unit of code. Code should be divided up into modules and then composed together in other modules. Packages expose modules, modules expose functionality. But in Node.js a file can be a module as well, so libraries are also modules. In this chapter we'll learn how to create and load modules. We'll also be taking a cursory look at the difference between language-native EcmaScript Modules (ESM) and the CommonJS (CJS) module system that Node used (and still uses) prior to the introduction of the EcmaScript Module system into JavaScript itself.
Learning Objectives
By the end of this chapter, you should be able to:
- Learn how to load modules.
- Discover how to create modules.
- Understand the interoperability challenges between ESM and CJS.
- Lookup a modules file path.
- Detect whether a module is the entry point of an application.
Node's Module Systems
Loading a Module with CJS
By the end of Section 6 - "Packages & Dependencies" we had a my-package folder, with a package.json file and an index.js file.
The package.json file is as follows:
{
  "name": "my-package",
  "version": "1.0.0",
  "main": "index.js",
  "scripts": {
    "start": "node index.js",
    "test": "echo \"Error: no test specified\" && exit 1",
    "lint": "standard"
  },
  "author": "",
  "license": "ISC",
  "keywords": [],
  "description": "",
  "dependencies": {
    "pino": "^7.6.2"
  },
  "devDependencies": {
    "standard": "^16.0.4"
  }
}
The index.js file has the following content:
'use strict'
console.log('my-package started')
process.stdin.resume()
Let's make sure the dependencies are installed.
On the command line, with the my-package folder as the current working directory run the install command:
npm install
As long as Pino is installed, the module that the Pino package exports can be loaded.
Let's replace the console.log statement in our index.js file with a logger that we instantiate from the Pino module:.
Modify the index.js file to the following:
'use strict'
const pino = require('pino')
const logger = pino()
logger.info('my-package started')
process.stdin.resume()
Now the Pino module has been loaded using require. The require function is passed a package's namespace, looks for a directory with that name in the node_modules folder and returns the exported value from the main file of that package.
When we require the Pino module we assign the value returned from require to the constant: pino.
In this case the Pino module exports a function, so pino references a function that creates a logger.
We assign the result of calling pino() to the logger reference. Then logger.info is called to generate a log message.
Now if we run npm start we should see a JSON formatted log message:
Hit CTRL-C to exit the process.
To understand the full algorithm that require uses to load modules, see Node.js Documentation, "All Together...".
Creating a CJS Module
The result of require won't always be a function that when called generates an instance, as in the case of Pino. The require function will return whatever is exported from a module.
Let's create a file called format.js in the my-package folder:
'use strict'

const upper = (str) => {
  if (typeof str === 'symbol') str = str.toString()
  str += ''
  return str.toUpperCase()
}

module.exports = { upper: upper }
We created a function called upper which will convert any input to a string and convert that string to an upper-cased string. Whatever is assigned to module.exports will be the value that is returned when the module is required. The require function returns the module.exports of the module that it is loading. In this case, module.exports is assigned to an object, with an upper key on it that references the upper function.
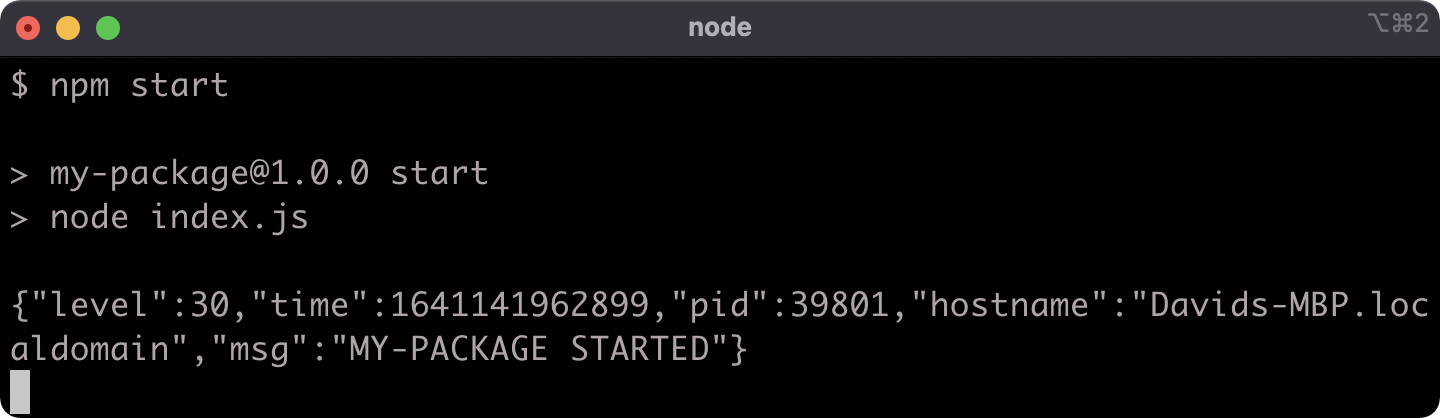
The format.js file can now be loaded into our index.js file as a local module. Modify index.js to the following:
'use strict'
const pino = require('pino')
const format = require('./format')
const logger = pino()
logger.info(format.upper('my-package started'))
process.stdin.resume()
The format.js file is loaded into the index.js file by passing a path into require. The extension (.js) is allowed but not necessary. So require('./format') will return the module.exports value in format.js, which is an object that has an upper method. The format.upper method is called within the call to logger.info which results in an upper-cased string "MY-PACKAGE STARTED" being passed to logger.info.
Now we have both a package module (pino) and a local module (format.js) loaded and used in the index.js file.
We can see this in action by running npm start:
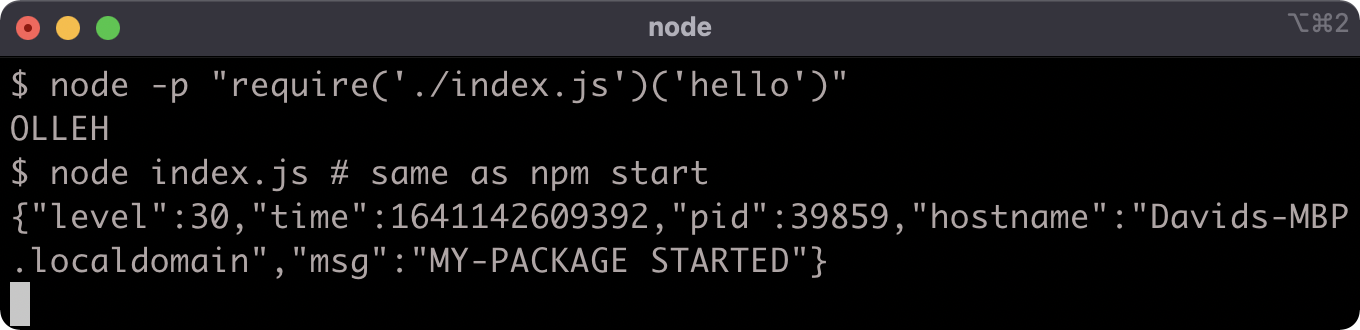
Detecting Main Module in CJS
The "start" script in the package.json file executes node index.js. When a file is called with node that file is the entry point of a program. So currently my-package is behaving more like an application or service than a package module.
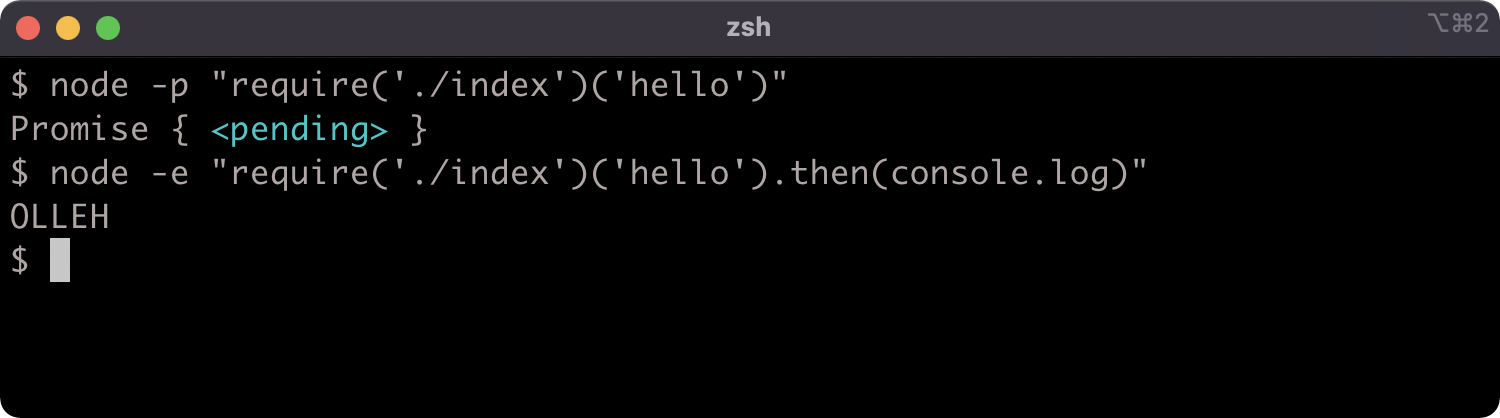
In its current form, if we require the index.js file it will behave exactly the same way:
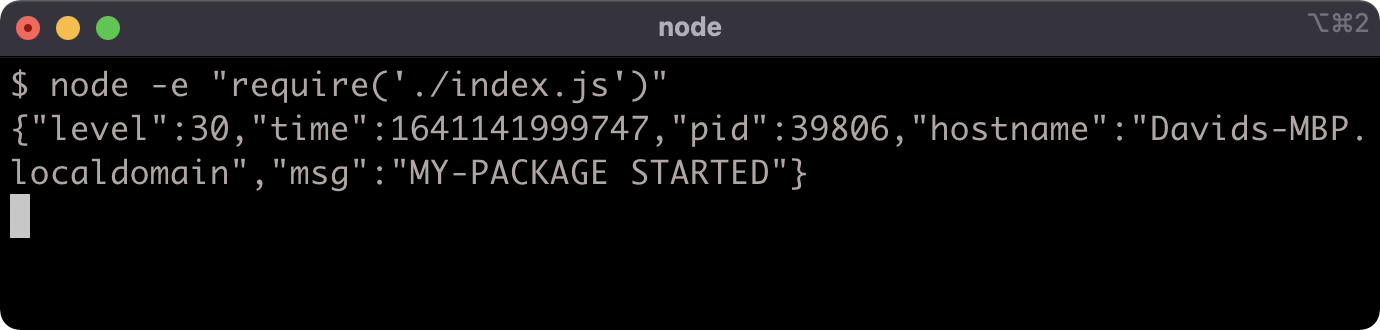
In some situations we may want a module to be able to operate both as a program and as a module that can be loaded into other modules.
When a file is the entry point of a program, it's the main module. We can detect whether a particular file is the main module.
Let's modify the index.js file to the following:
'use strict'
const format = require('./format')

if (require.main === module) {
  const pino = require('pino')
  const logger = pino()
  logger.info(format.upper('my-package started'))
  process.stdin.resume()
} else {
  const reverseAndUpper = (str) => {
    return format.upper(str).split('').reverse().join('')
  }
  module.exports = reverseAndUpper
}
Now the index.js file has two operational modes.
If it is loaded as a module, it will export a function that reverses and upper-cases a string:
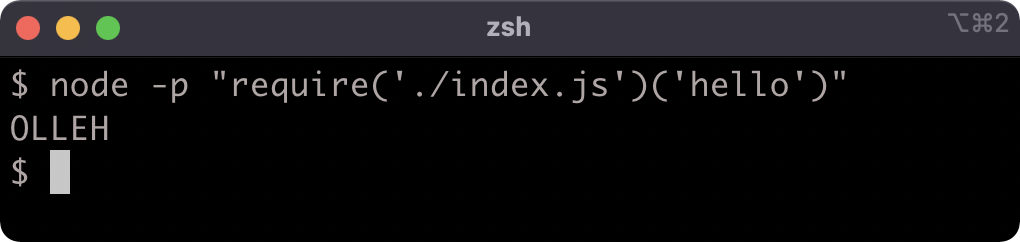
But if it's executed with node, it will exhibit the original behavior:
Converting a Local CJS File to a Local ESM File
EcmaScript Modules (ESM) was introduced to the EcmaScript specification as part of EcmaScript 2015 (formerly known as EcmaScript 6). One of the main goals of the specification was for module includes to be statically analyzable, which allows browsers to pre-parse out imports similar to collecting any <script> tags as the web page loads.
Due to the complexity involved with retrofitting a static module system into a dynamic language, it took about three years for major browsers to implement it. It took even longer for ESM to be implemented in Node.js, since interoperability with the Node's existing CJS module system has been a significant challenge - and there are still pain points as we will see.
A crucial difference between CJS and ESM is that CJS loads every module synchronously and ESM loads every module asynchronously (again, this shows the specification choices for the native JavaScript module system to work well in browsers, acting like a script tag).
It's important to differentiate between ESM and what we'll call "faux-ESM". Faux-ESM is ESM-like syntax that would typically be transpiled with Babel. The syntax looks similar or even identical, but the behavior can vary significantly. Faux-ESM in Node compiles to CommonJS, and in the browser compiles to using a bundled synchronous loader. Either way faux-ESM loads modules synchronously whereas native ESM loads modules asynchronously.
A Node application (or module) can contain both CJS and ESM files.
Let's convert our format.js file from CJS to ESM. First we'll need to rename so that it has an .mjs extension:

In a future section, we'll look at converting a whole project to ESM, which allows us to use .js extensions for ESM files (CJS files then must have the .cjs extension). For now, we're just converting a single CJS file to an ESM file.
Whereas CJS modifies a module.exports object, ESM introduces native syntax. To create a named export, we just use the export keyword in front of an assignment (or function declaration). Let's update the format.mjs code to the following:
export const upper = (str) => {
  if (typeof str === 'symbol') str = str.toString()
  str += ''
  return str.toUpperCase()
}
We no longer need the 'use strict' pragma since ESM modules essentially execute in strict-mode anyway.
If we now try to execute npm start, we'll see the following failure:

This error occurs because the require function will not automatically resolve a filename without an extension ('./format') to an .mjs extension. There is no point fixing this, since attempting to require the ESM file will fail anyway:
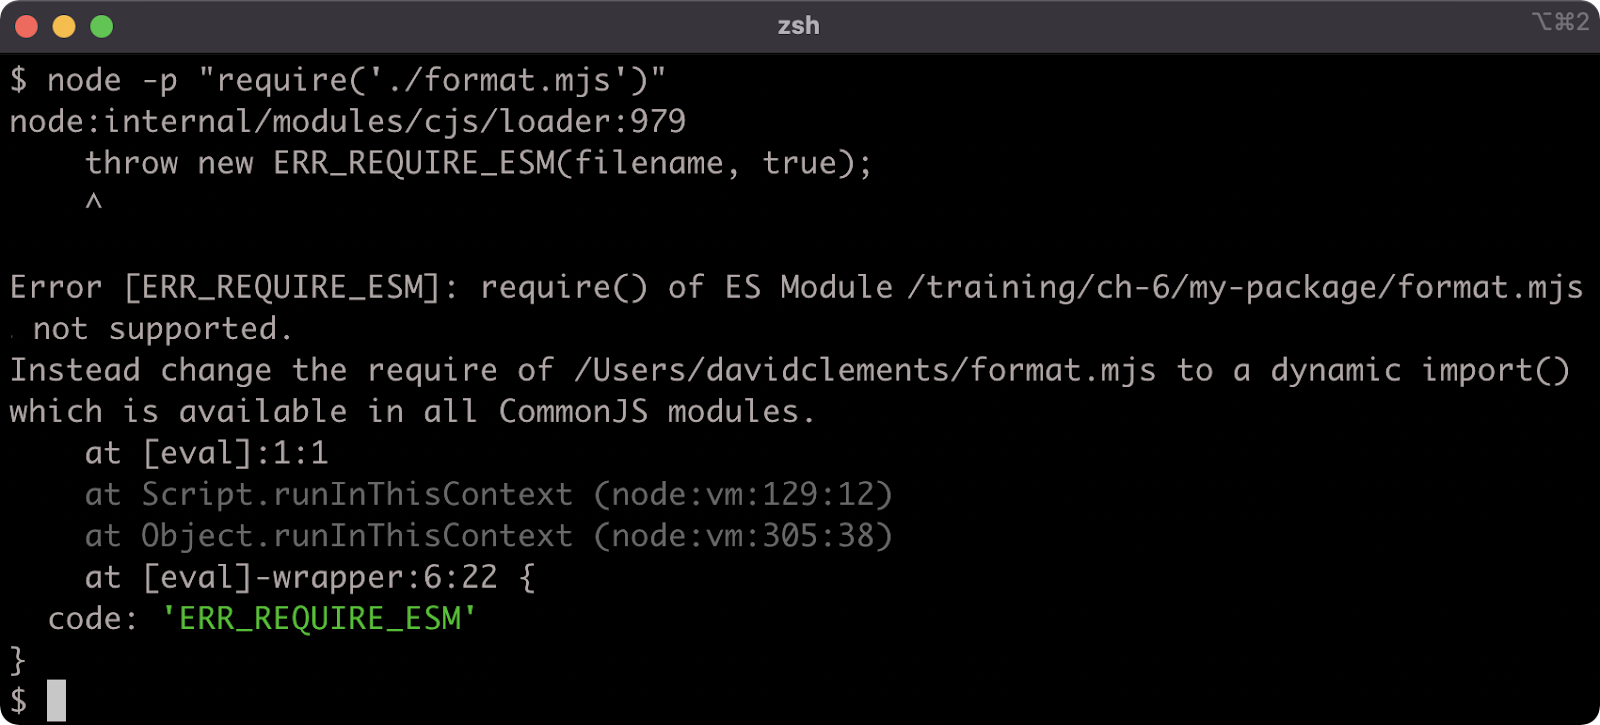
Our project is now broken. This is deliberate. In the next section we'll look at an (imperfect) way to load an ESM file into a CJS file.
Dynamically Loading an ESM Module in CJS
The distinction between synchronous and asynchronous module loading is important, because while ESM can import CJS, CJS cannot require ESM since that would break the synchronous constraint. This is a tension point with regard to Node's ecosystem. In order for modules to work with both module systems, they must expose a CJS interface, but like it or not ESM is JavaScript's native module system.
However it is possible to asynchronously load an ESM module for use in a CJS module using dynamic import, but as we'll see this has some consequences.
Let's convert the code of index.js to the following:
'use strict'

if (require.main === module) {
  const pino = require('pino')
  const logger = pino()
  import('./format.mjs').then((format) => {
    logger.info(format.upper('my-package started'))
    process.stdin.resume()
  }).catch((err) => {
    console.error(err)
    process.exit(1)
  })
} else {
  let format = null
  const reverseAndUpper = async (str) => {
    format = format || await import('./format.mjs')
    return format.upper(str).split('').reverse().join('')
  }
  module.exports = reverseAndUpper
}
Dynamic import can be fine for some cases. In the first logic branch, where we log out and then resume STDIN it doesn't impact the code in any serious way, other than taking slightly longer to execute. If we run npm start we should see the same result as before:

n the second logic branch, however, we had to convert a synchronous function to use an asynchronous abstraction. We could have used a callback but we used an async function, since dynamic import returns a promise, we can await it. In the next chapter we'll discuss asynchronous abstractions in-depth. Suffice it to say, using dynamic import to load an ESM module into CJS forced a change to our API. The reverseAndUpper function now returns a promise, which resolves to the result. This is obviously a breaking change, and seems otherwise unnecessary for the intended functionality.
In the next section, we'll convert the entire project to an ESM package.
Converting a CJS Package to an ESM Package (1)
We can opt-in to ESM-by-default by adding a type field to the package.json and setting it to "module". Our package.json should look as follows:
{
  "name": "my-package",
  "version": "1.0.0",
  "main": "index.js",
  "type": "module",
  "scripts": {
    "start": "node index.js",
    "test": "echo \"Error: no test specified\" && exit 1",
    "lint": "standard"
  },
  "author": "",
  "license": "ISC",
  "keywords": [],
  "description": "",
  "dependencies": {
    "pino": "^7.6.2"
  },
  "devDependencies": {
    "standard": "^16.0.4"
  }
}
We can rename format.mjs back to format.js. The following command can be used to do so:
node -e "fs.renameSync('./format.mjs', './format.js')"
Now let's modify the code in index.js to the following:
import { realpath } from 'fs/promises'
import url from 'url'
import * as format from './format.js'

const isMain = process.argv[1] &&
 await realpath(fileURLToPath(import.meta.url)) ===
 await realpath(process.argv[1])

if (isMain) {
  const { default: pino } = await import('pino')
  const logger = pino()
  logger.info(format.upper('my-package started'))
  process.stdin.resume()
}

export default (str) => {
  return format.upper(str).split('').reverse().join('')
}
We should now be able to run npm start as usual:

We can also now import our module (within another ESM module) and use it:

Converting a CJS Package to an ESM Package (2)
Whereas in CJS, we assigned a function to module.exports, in ESM we use the export default keyword and follow with a function expression to set a function as the main export. The default exported function is synchronous again, as it should be. In the CJS module we assign to module.exports in an else branch. Since CJS is implemented in JavaScript, it's dynamic and therefore this is without issue. However, ESM exports must be statically analyzable and this means they can't be conditionally declared. The export keyword only works at the top level.
EcmaScript Modules were primarily specified for browsers, this introduced some new challenges in Node.js. There is no concept of a main module in the spec, since modules are initially loaded via HTML, which could allow for multiple script tags. We can however infer that a module is the first module executed by Node by comparing process.argv[1] (which contains the execution path of the entry file) with import.meta.url.
Since ESM was primarily made with browsers in mind, there is no concept of a filesystem or even namespaces in the original ESM specification. In fact, the use of namespaces or file paths when using Node with ESM is due to the Node.js implementation of ESM modules, and not actually part of the specification. But the original ESM specification deals only with URLs, as a result import.meta.url holds a file:// URL pointing to the file path of the current module. On a side note, in browsers import maps can be used to map namespaces and file paths to URLs.
We can use the fileURLToPath utility function from the Node core url module to convert import.meta.url to a straightforward path, so that we can compare it with the path held in process.argv[1]. We also defensively use realpath to normalize both URLs to allow for scenarios where symlinks are used.
The realpath function we use is from the core fs/promises module. This is an asynchronous filesystem API that uses promises instead of callbacks. One compelling feature of modern ESM is Top-Level Await (TLA). Since all ESM modules load asynchronously it's possible to perform related asynchronous operations as part of a module's initialization. TLA allows the use of the await keyword in an ESM modules scope, at the top level, as well as within async functions. We use TLA to await the promise returned by each realpath call, and the promise returned by the dynamic import inside the if statement.
Regarding the dynamic import, notice that we had to reassign the default property to pino. Static imports will assign the default export to a defined name. For instance, the import url from 'url' statement causes the default export of the url module to be assigned to the url reference. However dynamic imports return a promise which resolves to an object, if there's a default export the default property of that object will be set to it.
Another static import statement is import { realpath } from 'fs/promises'. This syntax allows us to pull out a specific named export from a module into a reference by the same name (in this case, realpath). To import our format.js we use import * as format from './format.js'. Note that we use the full filename, ESM does not support loading modules without the full extension. This means loading an index.js file via its directory name is also not supported in ESM. The format.js file only has the named upper export, there is no default export. Attempting to use import format from './format.js' would result in a SyntaxError about how format.js does not have a default export. We could have used the syntax we used to import the realpath function (e.g. import { upper } from './format.js') but since the code is already using format.upper(...) we can instead use import * as to load all named exports into an object named format. Similar to how dynamic import works, if a module has a default export and import * as is used to load it, the resulting object will have a default property holding the default export.
For more information on EcmaScript modules see "JavaScript Modules" and Node.js Documentation.
Resolving a Module Path in CJS
The require function has a method called require.resolve. This can be used to determine the absolute path for any required module.
Let's create a file in my-package and call it resolve-demo.cjs, and place the following code into it:
'use strict'

console.log()
console.group('# package resolution')
console.log(`require('pino')`, '\t', ' =>', require.resolve('pino'))
console.log(`require('standard')`, '\t', ' =>', require.resolve('standard'))
console.groupEnd('')
console.log()

console.group('# directory resolution')
console.log(`require('.')`, '\t\t', ' =>', require.resolve('.'))
console.log(`require('../my-package')`, '=>', require.resolve('../my-package'))
console.groupEnd()
console.log()

console.group('# file resolution')
console.log(`require('./format')`, '\t', ' =>', require.resolve('./format'))
console.log(`require('./format.js')`, ' =>', require.resolve('./format.js'))
console.groupEnd()
console.log()

console.group('# core APIs resolution')
console.log(`require('fs')`, '\t', ' =>', require.resolve('fs'))
console.log(`require('util')`, '\t', ' =>', require.resolve('util'))
console.groupEnd()
console.log()
If we execute resolve-demo.cjs with node we'll see the resolved path for each of the require examples:
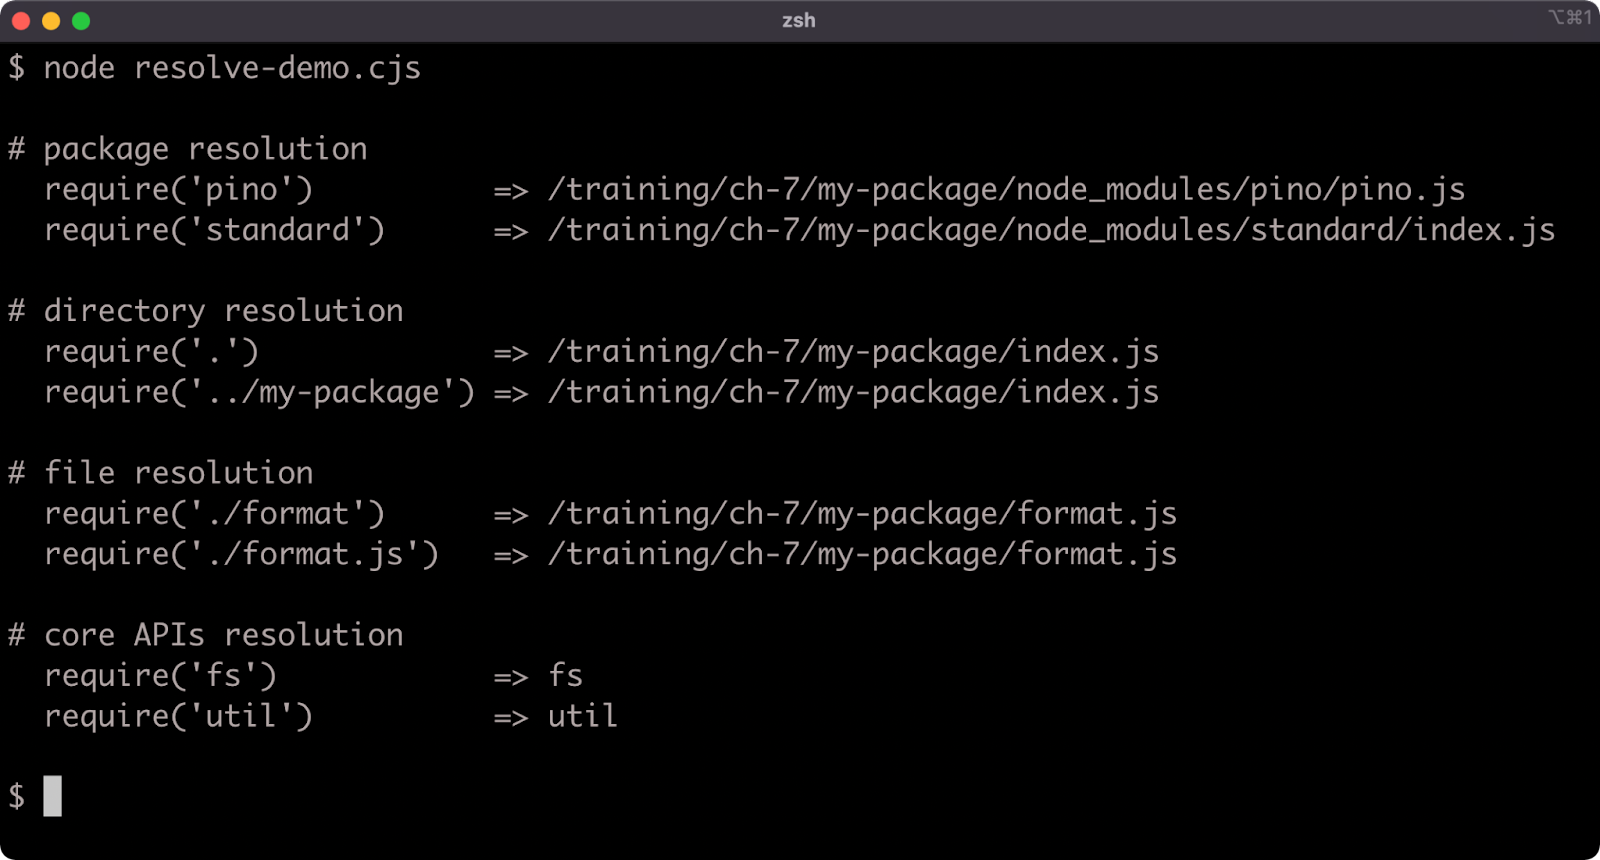
Resolving a Module Path in ESM (1)
However, since Node.js has implemented ESM with the ability to load packages, core modules and relative file paths the ability to resolve an ESM module is important. Currently there is experimental support for an import.meta.resolve function which returns a promise that resolves to the relevant file:// URL for a given valid input. Since this is experimental, and behind the --experimental-import-meta-resolve flag, we'll discuss an alternative approach to module resolution inside an EcmaScript Module. For more information on import.meta.resolve see Node.js Documentation (import.meta.resolve(specifier[, parent])).
Until import.meta.resolve becomes stable, we need an alternative approach. We could consider partially bridge the gap between CJS and ESM module resolution by passing import.meta.url to the createRequire function which is part of the Node core module API:
import { pathToFileURL } from 'url'
import { createRequire } from 'module'

const require = createRequire(import.meta.url)

console.log(
  `import 'pino'`,
  '=>',
  pathToFileURL(require.resolve('pino')).toString()
)
If we were to save this as create-require-demo.js and run it, we should see something similar to the following:

This is ultimately only a partial solution because of a fairly recent Package API called Conditional Exports. This API allows a package to define export files for different environments, primarily CJS and ESM. So if a package's package.json exports field defines an ESM entry point, the require.resolve function will still resolve to the CJS entry point because require is a CJS API.
For example, the tap module sets an exports field that points to a .js file by default, but a .mjs file when imported. See this link. To demonstrate how using createRequire is insufficient let's install tap into my-package:
npm install tap
Then let's extend the code in create-require-demo.js to contain the following:
import { pathToFileURL } from 'url'
import { createRequire } from 'module'

const require = createRequire(import.meta.url)

console.log(
  `import 'pino'`,
  '=>',
  pathToFileURL(require.resolve('pino')).toString()
)

console.log(
  `import 'tap'`,
  '=>',
  pathToFileURL(require.resolve('tap')).toString()
)
Resolving a Module Path in ESM (2)
If we execute the updated file we should see something like the following:
The require.resolve('tap') call returns the path to the default export (lib/tap.js) instead of the ESM export (lib/tap.mjs). While Node's implementation of ESM can load CJS files, if a project explicitly exports an ESM file it would be better if we can resolve such an ESM file path from an ESM module.
We can use the ecosystem import-meta-resolve module to get the best results for now. From the my-package folder, install import-meta-resolve:
npm install import-meta-resolve
Then create a file called import-meta-resolve-demo.js, with the following code:
import { resolve } from 'import-meta-resolve'

console.log(
  `import 'pino'`,
  '=>',
  await resolve('pino', import.meta.url)
)

console.log(
  `import 'tap'`,
  '=>',
  await resolve('tap', import.meta.url)
)
If we run this file with Node, we should see something like the following:

Lab Exercises
Lab 7.1 - Creating a Module
The labs-1 folder has an index.js file. Write a function that takes two numbers and adds them together, and then export that function from the index.js file. Run npm test to check whether index.js was correctly implemented. If it was the output should contain "passed!":
By default, the labs-1 folder is set up as a CJS project, but if desired, the package.json can be modified to convert to an ESM module (by either setting the type field to module or renaming index.js to index.mjs and setting the type field accordingly). The exercise can be completed either with the default CJS or with ESM or both.
Lab 7.2 - Loading a Module
The labs-2 is a sibling to labs-1. In the index.js file of labs-2, load the module that was created in the previous lab task and use that module to console.log the sum of 19 and 23.
The labs-2 folder is set up as a CJS project. Recall that ESM can load CJS but CJS cannot load ESM during initialization. If the prior exercise was completed as an ESM module it cannot be synchronously loaded into a CJS module. Therefore if the prior exercise was completed in the form of an ESM module, this exercise must also be similarly converted to ESM.
When index.js is executed with node it should output 42:

Run npm test to check whether index.js was correctly implemented. If it was, the output should contain "passed!":
8 - Asynchronous control flow
Introduction
Chapter Overview
Node.js is a server-side JavaScript platform, and JavaScript is an event-driven language. That means that code execution isn't necessarily sequential, tasks can be scheduled and then another operation can occur at a future point when the scheduled task completes. Take the setTimeout function as an example. A task is scheduled (wait for a specified amount of milliseconds), when the task completes (when the specified time has passed) the function passed to setTimeout is called. In the meantime, the next line of code after the setTimeout was already executed. All asynchronous Input/Output in Node.js works in the same way. In this section we're going to investigate various common control flow patterns in Node.js. Each lesson within this section will introduce a native asynchronous abstraction, and then discuss ways to implement asynchronous control flow for both serial and parallel execution.
Learning Objectives
By the end of this chapter, you should be able to:
- Understand native asynchronous primitives.
- Understand serial and parallel control flow with callbacks.
- Understand serial and parallel control flow with promises.
- Understand serial and parallel control flow with
async/await.
Asynchronous Control Flow
Callbacks (1) A callback is a function that will be called at some future point, once a task has been completed. Until the fairly recent introduction of async/await, which will be discussed shortly, callback functions were the only way to manage asynchronous flow.
The fs module (file system operations) will be discussed at length in Section 13 - "Using the File System" but for purposes of illustration, let's take a look at an example readFile call:
const { readFile } = require('fs')
readFile(__filename, (err, contents) => {
  if (err) {
    console.error(err)
    return
  }
  console.log(contents.toString())
})
If this is placed into a file and executed the program will read its own source code and print it out. To understand why it loads itself, it's important to know that _filename in Node.js holds the path of the file currently being executed. This is the first argument passed to readFile. The readFile function schedules a task, which is to read the given file. When the file has been read, the readFile function will call the function provided as the second argument.
The second argument to readFile is a function that has two parameters, err and contents. This function will be called when readFile has completed its task. If there was an error, then the first argument passed to the function will be an error object representing that error, otherwise it will be null. Always having an error as the first parameter is convention in Node, this type of error-first callback is known as an Errback.
If the readFile function is successful, the first argument (err) will be null and the second argument (contents) will be the contents of the file.
The time it takes to complete an operation will be different depending on the operation. For instance if three files of significantly different sizes were read, the callback for each readFile call would be called relative to the size of the file regardless of which order they began to be read.
Imagine a program with three variables, smallFile, mediumFile, bigFile each which holds a string pointing to the path of a file of a greater size than the last. If we want to log out the contents of each file based on when that file has been loaded, we can do something like the following:
const { readFile } = require('fs')
const [ bigFile, mediumFile, smallFile ] = Array.from(Array(3)).fill(__filename)

const print = (err, contents) => {
  if (err) {
    console.error(err)
    return
  }
  console.log(contents.toString())
}
readFile(bigFile, print)
readFile(mediumFile, print)
readFile(smallFile, print)
On line two smallFile, mediumFile, and bigFile are mocked (i.e. it's pretend) and they're actually all the same file. The actual file they point to doesn't matter, it only matters that we understand they represent different file sizes for the purposes of understanding.
If the files were genuinely different sizes, the above would print out the contents of smallFile first and bigFile last even though the readFile operation for bigFile was called first. This is one way to achieve parallel execution in Node.js.
What if we wanted to use serial execution, let's say we want bigFile to print first, then mediumFile even though they take longer to load than smallFile. Well now the callbacks have to be placed inside each other:
const { readFile } = require('fs')
const [ bigFile, mediumFile, smallFile ] = Array.from(Array(3)).fill(__filename)
const print = (err, contents) => {
  if (err) {
    console.error(err)
    return
  }
  console.log(contents.toString())
}
readFile(bigFile, (err, contents) => {
  print(err, contents)
  readFile(mediumFile, (err, contents) => {
    print(err, contents)
    readFile(smallFile, print)
  })
})
Serial execution with callbacks is achieved by waiting for the callback to call before starting the next asynchronous operation.
What if we want all of the contents of each file to be concatenated together and logged once all files are loaded?
The following example pushes the contents of each file to an array and then logs the array when all files are loaded:
const { readFile } = require('fs')
const [ bigFile, mediumFile, smallFile ] = Array.from(Array(3)).fill(__filename)
const data = []
const print = (err, contents) => {
  if (err) {
    console.error(err)
    return
  }
  console.log(contents.toString())
}
readFile(bigFile, (err, contents) => {
  if (err) print(err)
  else data.push(contents)
  readFile(mediumFile, (err, contents) => {
    if (err) print(err)
    else data.push(contents)
    readFile(smallFile, (err, contents) => {
      if (err) print(err)
      else data.push(contents)
      print(null, Buffer.concat(data))
    })
  })
})
Callbacks (2)
On a side note, Buffers are covered in Section 11 - "Using Buffers", the use of Buffer.concat here takes the three buffer objects in the data array and concatenates them together.
So far we've used three asynchronous operations, but how would an unknown amount of asynchronous operations be supported? Let's say we have a files array instead. Like the smallFile, mediumFile and bigFile variables, the files array is also conceptual. The idea is that files array could be any length and the goal is to print all the file contents out in the order they appear in the array:
const { readFile } = require('fs')
const files = Array.from(Array(3)).fill(__filename)
const data = []
const print = (err, contents) => {
  if (err) {
    console.error(err)
    return
  }
  console.log(contents.toString())
}
let count = files.length
let index = 0
const read = (file) => {
  readFile(file, (err, contents) => {
    index += 1
    if (err) print(err)
    else data.push(contents)
    if (index < count) read(files[index])
    else print(null, Buffer.concat(data))
  })
}

read(files[index])
In this case a self-recursive function, read, is created along with two variables, count and index. The count variable is the amount of files to read, the index variable is used to track which file is currently being read. Once a file has been read and added to the data array, read is called again if index < count. Otherwise the data array is concatenated and printed out. To reiterate, it doesn't matter that these operations happen to be file reading operations. Control flow patterns apply universally to all asynchronous operations.
Callback-based serial execution can become quite complicated, quite quickly. Using a small library to manage the complexity is advised. One library that can be used for this is fastseries (see npmjs's website). Also, review Section 6 -"Packages & Dependencies" and Section 7 - "Node's Module System" for how to install and load any module from npm.
The following is the same serial execution with fastseries:
const { readFile } = require('fs')
const series = require('fastseries')()
const files = Array.from(Array(3)).fill(__filename)

const print = (err, data) => {
  if (err) {
    console.error(err)
    return
  }
  console.log(Buffer.concat(data).toString())
}

const readers = files.map((file) => {
  return (_, cb) => {
    readFile(file, (err, contents) => {
      if (err) cb(err)
      else cb(null, contents)
    })
  }
})

series(null, readers, null, print)
Here the array of files is mapped into an array of functions that fastseries can consume. This array of functions is assigned to readers and passed as the second argument to series. The mapped functions have two parameters. The second parameter is cb, the callback function which we must call to let fastseries know we have finished an asynchronous operation so that it can move on to processing the function in the readers array.
The cb function takes two arguments, the first is the error object or null (depending on whether there was an error). The second is the result of the asynchronous operation - which is called contents here. The first parameter of the mapped function (readers) will be whatever the last result was. Since we don't use that parameter, we assigned the parameter to an underscore (_) to signal it's not of interest for this case. The final parameter passed to series is print, this will be called when all the readers have been processed by fastseries. The second argument of print is called data here, fastseries will pass an array of all the results to print.
This example using fastseries is not totally equivalent to the prior example using the index and count variables, because the error handling is different. In the fastseries example if an error occurs, it's passed to the cb function and fastseries will call print with the error and then end. However in the prior example, we call print with the err but continue to read any other files in the array. To get exactly the same behavior we would have to change the readers array to the following:
const readers = files.map((file) => {
  return (_, cb) => {
    readFile(file, (err, contents) => {
      if (err) {
        print(err)
        cb(null, Buffer.alloc(0))
      } else cb(null, contents)
    })
  }
})
Promises (1)
A promise is an object that represents an asynchronous operation. It's either pending or settled, and if it is settled it's either resolved or rejected. Being able to treat an asynchronous operation as an object is a useful abstraction. For instance, instead of passing a function that should be called when an asynchronous operation completes into another function (eg. a callback), a promise that represents the asynchronous operation can be returned from a function instead.
Let's consider the two approaches, the following is a callback-based approach:
function myAsyncOperation (cb) {
doSomethingAsynchronous((err, value) => { cb(err, value) })
}

myAsyncOperation(functionThatHandlesTheResult)
Now let's consider the same in promise form:
function myAsyncOperation () {
  return new Promise((resolve, reject) => {
    doSomethingAsynchronous((err, value) => {
      if (err) reject(err)
      else resolve(value)
    })
  })
}

const promise = myAsyncOperation()
// next up: do something with promise
Instead of myAsyncOperation taking a callback, it returns a promise. The imaginary doSomethingAsynchronous function is callback based, so it has to be wrapped in a promise. To achieve this the Promise constructor is used, it's passed a function called the executor function which has two parameters: resolve and reject. In error cases the error object is passed to reject, in success cases the asynchronously resolved value is passed to resolve.
In Node there is a nicer way to this with the promisify function from the util module:
const { promisify } = require('util')
const doSomething = promisify(doSomethingAsynchronous)
function myAsyncOperation () {
  return doSomething()
}

const promise = myAsyncOperation()
// next up: do something with promise
Generally, the best way to handle promises is with async/await, which will be discussed later in this section. But the methods to handle promise success or failure are then and catch:
const promise = myAsyncOperation()
promise
  .then((value) => { console.log(value) })
  .catch((err) => { console.error(err) })
Note that then and catch always return a promise, so these calls can be chained. First then is called on promise and catch is called on the result of then (which is a promise).
Let's see promises in action with a more concrete example:
const { promisify } = require('util')
const { readFile } = require('fs')

const readFileProm = promisify(readFile)

const promise = readFileProm(__filename)

promise.then((contents) => {
  console.log(contents.toString())
})

promise.catch((err) => {
  console.error(err)
})
This will result in the file printing itself. Here we have the same readFile operation as in the last section, but the promisify function is used to convert a callback-based API to a promise-based one. When it comes to the fs module we don't actually have to do this, the fs module exports a promises object with promise-based versions. Let's rewrite the above in a more condensed form:
const { readFile } = require('fs').promises

readFile(__filename)
  .then((contents) => {
    console.log(contents.toString())
  })
  .catch(console.error)
This time we've used the ready-made promise-based readFile function, used chaining for the catch and we pass console.error directly to catch instead of using an intermediate function.
If a value is returned from then, the then method will return a promise that resolves to that value:
const { readFile } = require('fs').promises

readFile(__filename)
  .then((contents) => {
    return contents.toString()
  })
  .then((stringifiedContents) => {
    console.log(stringifiedContents)
  })
  .catch(console.error)
In this case the first then handler returns a promise that resolves to the stringified version of contents. So when the second then is called on the result of the first then the handler of the second then is called with the stringified contents. Even though an intermediate promise is created by the first then we still only need the one catch handler as rejections are propagated.
Promises (2)
If a promise is returned from a then handler, the then method will return that promise, this allows for an easy serial execution pattern:
const { readFile } = require('fs').promises
const [ bigFile, mediumFile, smallFile ] = Array.from(Array(3)).fill(__filename)

const print = (contents) => {
  console.log(contents.toString())
}
readFile(bigFile)
  .then((contents) => {
    print(contents)
return readFile(mediumFile)
})
.then((contents) => {
print(contents)
return readFile(smallFile)
})
.then(print)
.catch(console.error)
Once bigFile has been read, the first then handler returns a promise for reading mediumFile. The second then handler receives the contents of mediumFile and returns a promise for reading smallFile. The third then handler is the prints the contents of the smallFile and returns itself. The catch handler will handle errors from any of the intermediate promises.
Let's consider the same scenario of the files array that we dealt with in the previous section. Here's how the same behavior could be achieved with promises:
const { readFile } = require('fs').promises
const files = Array.from(Array(3)).fill(__filename)
const data = []
const print = (contents) => {
  console.log(contents.toString())
}
let count = files.length
let index = 0
const read = (file) => {
  return readFile(file).then((contents) => {
    index += 1
    data.push(contents)
    if (index < count) return read(files[index])
    return data
  })
}

read(files[index])
  .then((data) => {
    print(Buffer.concat(data))
  })
  .catch(console.error)
The complexity here is about the same as a callback based approach. However, we will see later that combining promises with async/await drastically reduces the complexity of serial execution. As with the callback-based example, we use a data array and count and index variables. But a then handler is called on the readFile promise, and if index < count the then handler returns a promise of read for the next file in the array. This allows us to neatly decouple the fetching of the data from the printing of the data. The then handler near the bottom of the code receives the populated data array and prints it out.
Depending on what we are trying to achieve there is a much simpler way to achieve the same effect without it being serially executed:
const { readFile } = require('fs').promises
const files = Array.from(Array(3)).fill(__filename)
const print = (data) => {
  console.log(Buffer.concat(data).toString())
}

const readers = files.map((file) => readFile(file))

Promise.all(readers)
  .then(print)
  .catch(console.error)
The Promise.all function takes an array of promises and returns a promise that resolves when all promises have been resolved. That returned promise resolves to an array of the values for each of the promises. This will give the same result of asynchronously reading all the files and concatenating them in a prescribed order, but the promises will run in parallel. For this case that's even better.
However if one of the promises was to fail, Promise.all will reject, and any successfully resolved promises are ignored. If we want more tolerance of individual errors, Promise.allSettled can be used:
const { readFile } = require('fs').promises
const files = [__filename, 'not a file', __filename]
const print = (results) => {
  results
    .filter(({status}) => status === 'rejected')
    .forEach(({reason}) => console.error(reason))
  const data = results
    .filter(({status}) => status === 'fulfilled')
    .map(({value}) => value)
  const contents = Buffer.concat(data)
  console.log(contents.toString())
}

const readers = files.map((file) => readFile(file))

Promise.allSettled(readers)
  .then(print)
  .catch(console.error)
The Promise.allSettled function returns an array of objects representing the settled status of each promise. Each object has a status property, which may be rejected or fulfilled (which means resolved). Objects with a rejected status will contain a reason property containing the error associated with the rejection. Objects with a fulfilled status will have a value property containing the resolved value. We filter all the rejected settled objects and pass the reason of each to console.error. Then we filter all the fulfilled settled objects and create an array of just the values using map. This is the data array, holding all the buffers of successfully read files.
Finally, if we want promises to run in parallel independently we can either use Promise.allSettled or simple execute each of them with their own then and catch handlers:
const { readFile } = require('fs').promises
const [ bigFile, mediumFile, smallFile ] = Array.from(Array(3)).fill(__filename)

const print = (contents) => {
  console.log(contents.toString())
}

readFile(bigFile).then(print).catch(console.error)
readFile(mediumFile).then(print).catch(console.error)
readFile(smallFile).then(print).catch(console.error)
Next, we'll find even more effective ways of working with promises using async/await.
Async/Await (1)
The keywords async and await allow for an approach that looks stylistically similar to synchronous code. The async keyword is used before a function to declare an async function:
async function myFunction () { }
An async function always returns a promise. The promise will resolve to whatever is returned inside the async function body.
The await keyword can only be used inside of async functions. The await keyword can be used with a promise, this will pause the execution of the async function until the awaited promise is resolved. The resolved value of that promise will be returned from an await expression.
Here's an example of the same readFile operation from the previous section, but this time using an async function:
const { readFile } = require('fs').promises

async function run () {
  const contents = await readFile(__filename)
  console.log(contents.toString())
}

run().catch(console.error)
We create an async function called run. Within the function we use the await keyword on the return value of readFile(__filename), which is a promise. The execution of the run async function is paused until readFile(__filename) resolves. When it resolves the contents constant will be assigned the resolve value. Then we log the contents out.
To start the async function we call it like any other function. An async function always returns a promise, so we call the catch method to ensure that any rejections within the async function are handled. For instance, if readFile had an error, the awaited promise would reject, this would make the run function reject and we'd handle it in the catch handler.
The async/await syntax enables the cleanest approach to serial execution.
The following is the sequential execution of varying file sizes example adapted to async/await:
const { readFile } = require('fs').promises
const print = (contents) => {
  console.log(contents.toString())
}
const [ bigFile, mediumFile, smallFile ] = Array.from(Array(3)).fill(__filename)

async function run () {
  print(await readFile(bigFile))
  print(await readFile(mediumFile))
  print(await readFile(smallFile))
}

run().catch(console.error)
To determine the order in which we want operations to resolve in async/await we simply await those operations in that order.
Concatenating files after they've been loaded is also trivial with async/await:
const { readFile } = require('fs').promises
const print = (contents) => {
  console.log(contents.toString())
}
const [ bigFile, mediumFile, smallFile ] = Array.from(Array(3)).fill(__filename)

async function run () {
  const data = [
    await readFile(bigFile),
    await readFile(mediumFile),
    await readFile(smallFile)
  ]
  print(Buffer.concat(data))
}

run().catch(console.error)
Notice that we did not need to use index or count variables to track asynchronous execution of operations. We were also able to populate the data array declaratively instead of pushing state into it. The async/await syntax allows for declarative asynchronous implementations.
What about the scenario with a files array of unknown length? The following is an async/await approach to this:
const { readFile } = require('fs').promises

const print = (contents) => {
  console.log(contents.toString())
}

const files = Array.from(Array(3)).fill(__filename)

async function run () {
  const data = []
  for (const file of files) {
    data.push(await readFile(file))
  }
  print(Buffer.concat(data))
}

run().catch(console.error)
Here we use an await inside a loop. For scenarios where operations must be sequentially called this is fitting. However for scenarios where the output only has to be ordered, but the order in which asynchronous operations resolves is immaterial we can again use Promise.all but this time await the promise that Promise.all returns:
const { readFile } = require('fs').promises
const files = Array.from(Array(3)).fill(__filename)
const print = (contents) => {
  console.log(contents.toString())
}

async function run () {
  const readers = files.map((file) => readFile(file))
  const data = await Promise.all(readers)
  print(Buffer.concat(data))
}

run().catch(console.error)
Here we use map on the files array to create an array of promises as returned from readFile. We call this array readers. Then we await Promise.all(readers) to get an array of buffers. At this point it's the same as the data array we've seen in prior examples. This is parallel execution with sequentially ordered output.
Async/Await (2)
As before, Promise.all will atomically reject if any of the promises fail. We can again use Promise.allSettled to tolerate errors in favor of getting necessary data:
const { readFile } = require('fs').promises
const files = [__filename, 'foo', __filename]
const print = (contents) => {
console.log(contents.toString())
}

async function run () {
const readers = files.map((file) => readFile(file))
const results = await Promise.allSettled(readers)

results
.filter(({status}) => status === 'rejected')
.forEach(({reason}) => console.error(reason))

const data = results
.filter(({status}) => status === 'fulfilled')
.map(({value}) => value)

print(Buffer.concat(data))
}

run().catch(console.error)
The async/await syntax is highly specialized for serial control flow. The trade-off is that parallel execution in async functions with using Promise.all, Promise.allSettled, Promise.any or Promise.race can become difficult or unintuitive to reason about.
Let's remind ourselves of the callback-based parallel execution example:
const { readFile } = require('fs')
const [ bigFile, mediumFile, smallFile ] = Array.from(Array(3)).fill(__filename)

const print = (err, contents) => {
if (err) {
console.error(err)
return
}
console.log(contents.toString())
}
readFile(bigFile, print)
readFile(mediumFile, print)
readFile(smallFile, print)
To get the exact same parallel operation behavior as in the initial callback example within an async function so that the files are printed as soon as they are loaded we have to create the promises, use a then handler and then await the promises later on:
const { readFile } = require('fs').promises
const [bigFile, mediumFile, smallFile] = Array.from(Array(3)).fill(__filename)

const print = (contents) => {
  console.log(contents.toString())
}

async function run() {
  const big = readFile(bigFile)
  const medium = readFile(mediumFile)
  const small = readFile(smallFile)

  big.then(print)
  medium.then(print)
  small.then(print)

  await small
  await medium
  await big
}

run().catch(console.error)
This will ensure the contents are printed out chronologically, according to the time it took each of them to load. If the complexity for parallel execution grows it may be better to use a callback based approach and wrap it at a higher level into a promise so that it can be used in an async/await function:
const { promisify } = require('util')
const { readFile } = require('fs')
const [bigFile, mediumFile, smallFile] = Array.from(Array(3)).fill(__filename)

const read = promisify((cb) => {
  let index = 0
  const print = (err, contents) => {
    index += 1
    if (err) {
      console.error(err)
      if (index === 3) cb()
      return
    }
    console.log(contents.toString())
    if (index === 3) cb()
  }
  readFile(bigFile, print)
  readFile(mediumFile, print)
  readFile(smallFile, print)
})

async function run() {
  await read()
  console.log('finished!')
}

run().catch(console.error)
Here we've wrapped the callback-based parallel execution approach into a function that accepts a callback (cb) and we've passed that whole function into promisify. This means that our read function returns a promise that resolves when all three parallel operations are done, after which the run function logs out: finished!
Canceling Asynchronous Operations
Sometimes it turns out that an asynchronous operation doesn't need to occur after it has already started. One solution is to not start the operation until it's definitely needed, but this would generally be the slowest implementation. Another approach is to start the operation, and then cancel it if conditions change. A standardized approach to canceling asynchronous operations that can work with fire-and-forget, callback-based and promise-based APIs and in an async/await context would certainly be welcome. This is why Node core has embraced the AbortController with AbortSignal Web APIs.
While AbortController with AbortSignal can be used for callback-based APIs, it's generally used in Node to solve for the fact that promise-based APIs return promises.
To use a very simple example, here's a traditional JavaScript timeout:
const timeout = setTimeout(() => {
  console.log('will not be logged')
}, 1000)

setImmediate(() => { clearTimeout(timeout) })
This code will output nothing, because the timeout is cleared before its callback can be called. How can we achieve the same thing with a promise-based timeout? Let's consider the following code (we're using ESM here to take advantage of Top-Level Await):
import { setTimeout } from 'timers/promises'

const timeout = setTimeout(1000, 'will be logged')

setImmediate(() => {
  clearTimeout(timeout) // do not do this, it won't work
})

console.log(await timeout)
This code outputs "will be logged" after one second. Instead of using the global setTimeout function, we're using the setTimeout function exported from the core timers/promises module. This exported setTimeout function doesn't need a callback, instead it returns a promise that resolves after the specified delay. Optionally, the promise resolves to the value of the second argument. This means that the timeout constant is a promise, which is then passed to clearTimeout. Since it's a promise and not a timeout identifier, clearTimeout silently ignores it, so the asynchronous timeout operation never gets canceled. Below the clearTimeout we log the resolved promise of the value by passing await timeout to console.log. This is a good example of when an asynchronous operation has a non-generic cancelation API that cannot be easily applied to a promisified API that performs the same asynchronous operation. Other cases could be when a function returns an instance with a cancel method, or an abort method, or a destroy method with many other possibilities for method names that could be used to stop an on-going asynchronous operation. Again this won't work when returning a simple native promise. This is where accepting an AbortSignal can provide a conventional escape-hatch for canceling a promisified asynchronous operation.
We can ensure the promisified timeout is canceled like so:
import { setTimeout } from 'timers/promises'

const ac = new AbortController()
const { signal } = ac
const timeout = setTimeout(1000, 'will NOT be logged', { signal })

setImmediate(() => {
  ac.abort()
})

try {
  console.log(await timeout)
} catch (err) {
  // ignore abort errors:
  if (err.code !== 'ABORT_ERR') throw err
}
This now behaves as the typical timeout example, nothing is logged out because the timer is canceled before it can complete. The AbortController constructor is a global, so we instantiate it and assign it to the ac constant. An AbortController instance has an AbortSignal instance on its signal property. We pass this via the options argument to timers/promises setTimeout, internally the API will listen for an abort event on the signal instance and then cancel the operation if it is triggered. We trigger the abort event on the signal instance by calling the abort method on the AbortController instance, this causes the asynchronous operation to be canceled and the promise is fulfilled by rejecting with an AbortError. An AbortError has a code property with the value 'ABORT_ERR', so we wrap the await timeout in a try/catch and rethrow any errors that are not AbortError objects, effectively ignoring the AbortError.
Many parts of the Node core API accept a signal option, including fs, net, http, events, child_process, readline and stream. In the next chapter, "Node's Event System", there's an additional AbortController example where it's used to cancel promisified events.
Lab Exercises
Lab 8.1 - Parallel Execution
In the labs-1 folder, the parallel.js file contains the following:
const print = (err, contents) => {
  if (err) console.error(err)
  else console.log(contents)
}

const opA = (cb) => {
  setTimeout(() => {
    cb(null, 'A')
  }, 500)
}

const opB = (cb) => {
  setTimeout(() => {
    cb(null, 'B')
  }, 250)
}

const opC = (cb) => {
  setTimeout(() => {
    cb(null, 'C')
  }, 125)
}
The opA function must be called before opB, and opB must be called before opC.
Call functions in parallel.js in such a way that C then B then A is printed out.
Lab 8.2 - Serial Execution
In the labs-2 folder, the serial.js file contains the following:
const { promisify } = require('util')

const print = (err, contents) => {
  if (err) console.error(err)
  else console.log(contents)
}

const opA = (cb) => {
  setTimeout(() => {
    cb(null, 'A')
  }, 500)
}

const opB = (cb) => {
  setTimeout(() => {
    cb(null, 'B')
  }, 250)
}

const opC = (cb) => {
  setTimeout(() => {
    cb(null, 'C')
  }, 125)
}
Call the functions in such a way that A then B then C is printed out. Remember promisify can be used to convert a callback API to a promise-based API. The promisify function is included at the top of serial.js in case a promise based solution is prefered.
9 - Node's event system
Introduction
Chapter Overview
The EventEmitter constructor in the events module is the functional backbone of many Node core API's. For instance, HTTP and TCP servers are an event emitter, a TCP socket is an event emitter, HTTP request and response objects are event emitters. In this section we'll explore how to create and consume EventEmitters.
Learning Objectives
By the end of this chapter, you should be able to:
- Explain how to create an event emitter.
- Discuss how to consume event emitters.
- Describe key behaviors of event emitters.
Node's Event System
Creating an Event Emitter
The events module exports an EventEmitter constructor:
const { EventEmitter } = require('events')
In modern node the events module is the EventEmitter constructor as well:
const EventEmitter = require('events')
Both forms are fine for contemporary Node.js usage.
To create a new event emitter, call the constructor with new:
const myEmitter = new EventEmitter()
A more typical pattern of usage with EventEmitter, however, is to inherit from it:
class MyEmitter extends EventEmitter {
  constructor (opts = {}) {
    super(opts)
    this.name = opts.name
  }
}
Emitting Events
To emit an event call the emit method:
const { EventEmitter } = require('events')
const myEmitter = new EventEmitter()
myEmitter.emit('an-event', some, args)
The first argument passed to emit is the event namespace. In order to listen to an event this namespace has to be known. The subsequent arguments will be passed to the listener.
The following is an example of using emit with inheriting from EventEmitter:
const { EventEmitter } = require('events')
class MyEmitter extends EventEmitter {
  constructor (opts = {}) {
    super(opts)
    this.name = opts.name
  },
  destroy (err) {
    if (err) { this.emit('error', err) }
    this.emit('close')
  }
}
The destroy method we created for the MyEmitter constructor class calls this.emit. It will also emit a close event. If an error object is passed to destroy it will emit an error event and pass the error object as an argument.
Next, we'll find out how to listen for emitted events.
Listening for Events
To add a listener to an event emitter the addListener method or it's alias on method is used:
const { EventEmitter } = require('events')

const ee = new EventEmitter()
ee.on('close', () => { console.log('close event fired!') })
ee.emit('close')
The key line here is:
ee.on('close', () => { console.log('close event fired!') })
It could also be written as:
ee.addListener('close', () => {
  console.log('close event fired!')
})
Arguments passed to emit are received by the listener function:
ee.on('add', (a, b) => { console.log(a + b) }) // logs 13
ee.emit('add', 7, 6)
Ordering is important, in the following will the event listener will not fire:
ee.emit('close')
ee.on('close', () => { console.log('close event fired!') })
This is because the event is emitted before the listener is added.
Listeners are also called in the order that they are registered:
const { EventEmitter } = require('events')
const ee = new EventEmitter()
ee.on('my-event', () => { console.log('1st') })
ee.on('my-event', () => { console.log('2nd') })
ee.emit('my-event')
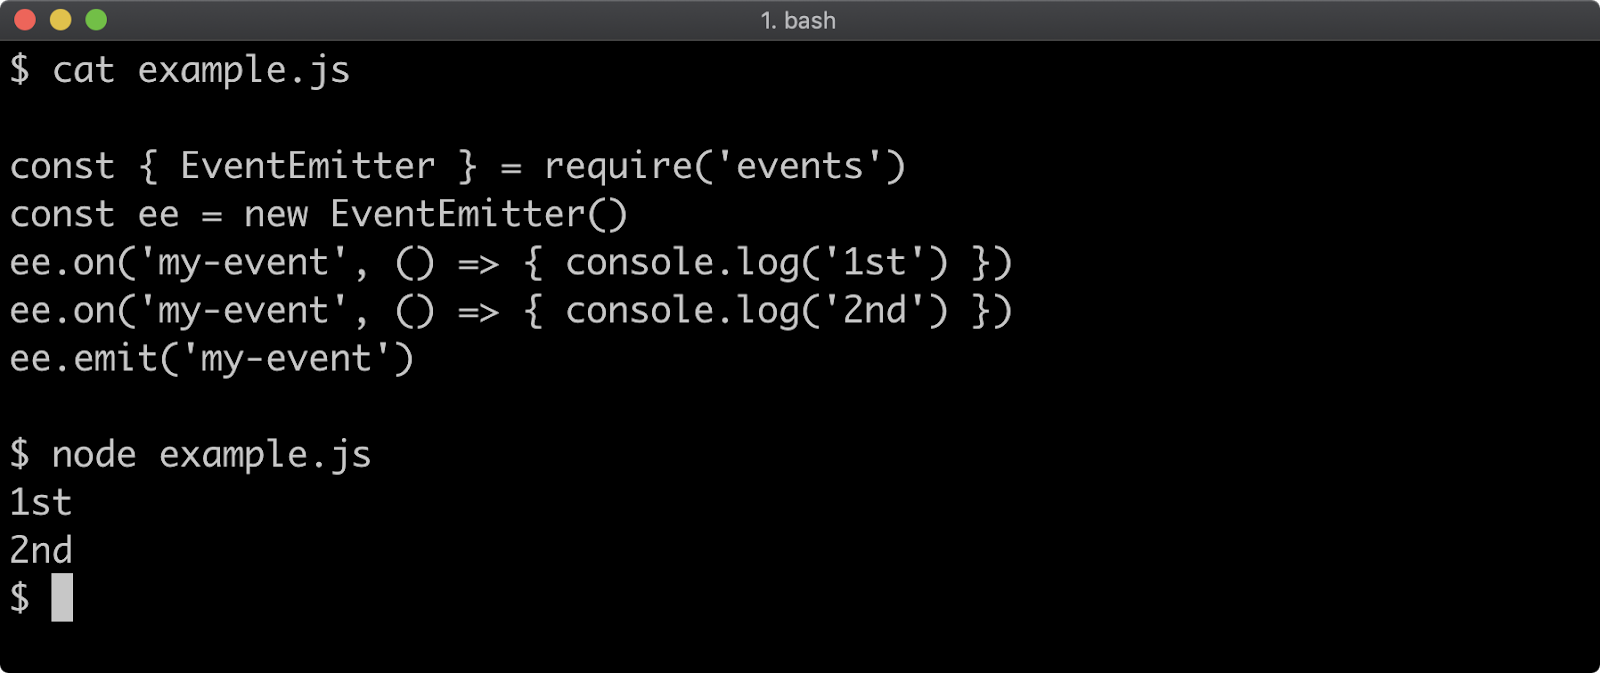
The prependListener method can be used to inject listeners into the top position:
const { EventEmitter } = require('events')
const ee = new EventEmitter()
ee.on('my-event', () => { console.log('2nd') })
ee.prependListener('my-event', () => { console.log('1st') })
ee.emit('my-event')
Single Use Listener
An event can also be emitted more than once:
const { EventEmitter } = require('events')
const ee = new EventEmitter()
ee.on('my-event', () => { console.log('my-event fired') })
ee.emit('my-event')
ee.emit('my-event')
ee.emit('my-event')
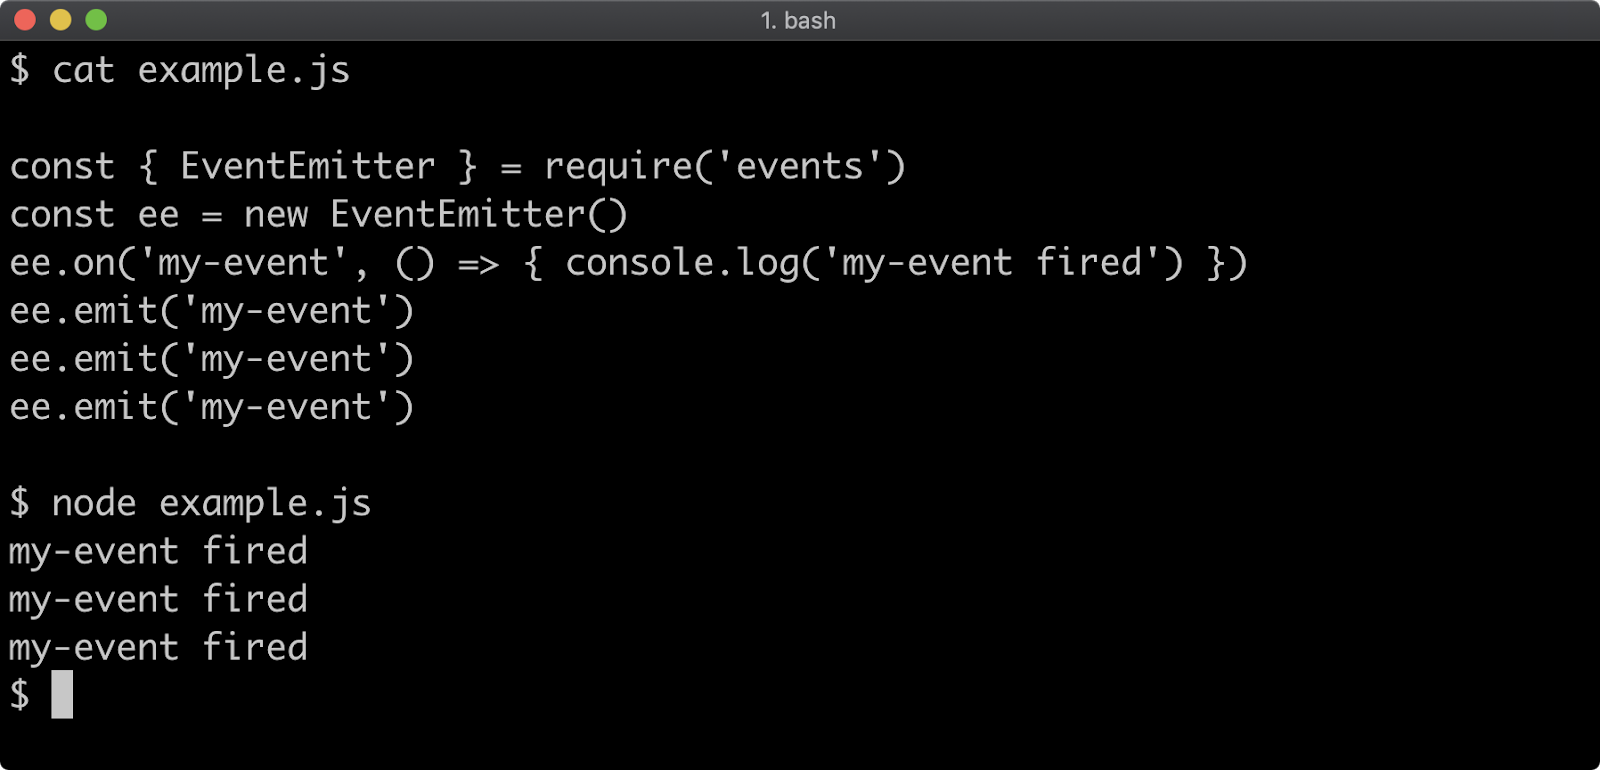
The once method will immediately remove its listener after it has been called:
const { EventEmitter } = require('events')
const ee = new EventEmitter()
ee.once('my-event', () => { console.log('my-event fired') })
ee.emit('my-event')
ee.emit('my-event')
ee.emit('my-event')
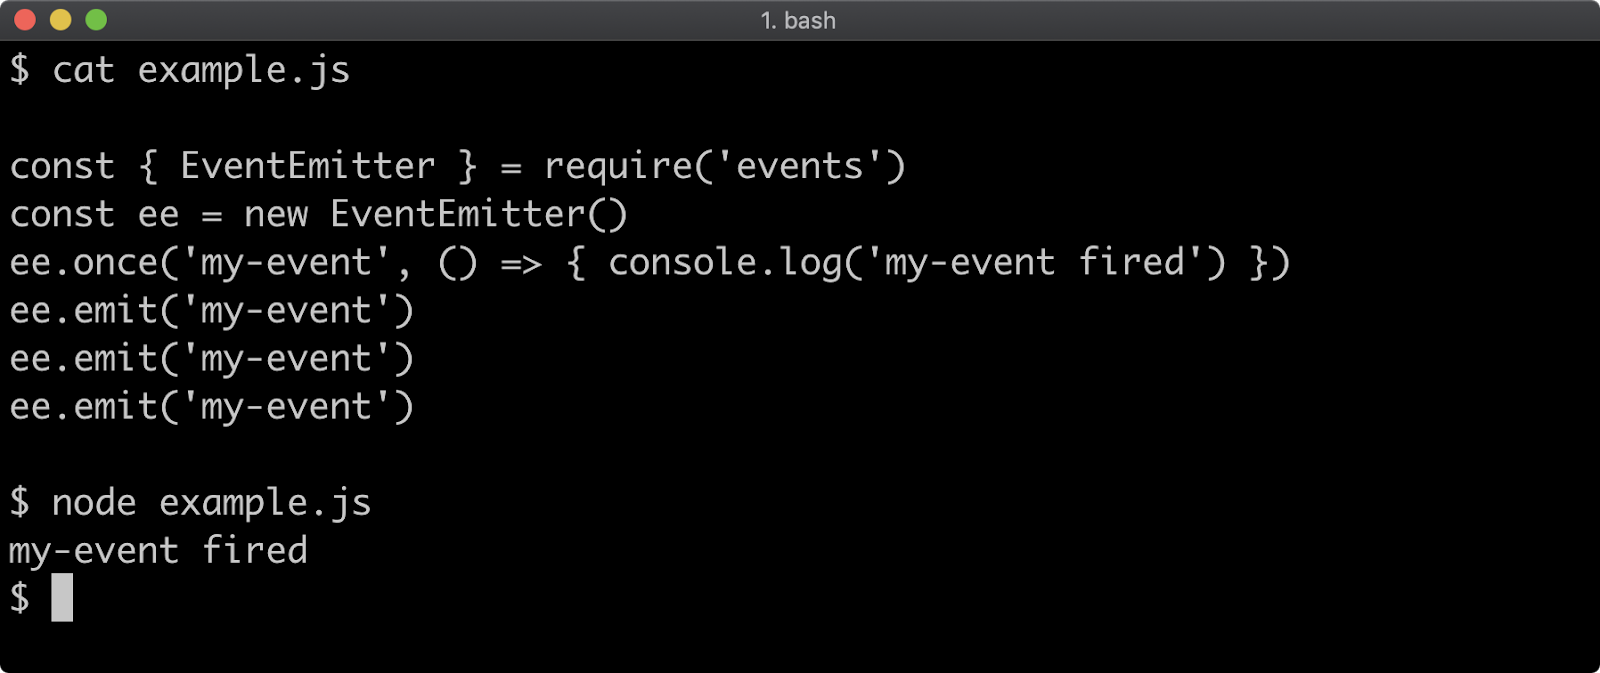
Removing Listeners
The removeListener method can be used to remove a previously registered listener.
The removeListener method takes two arguments, the event name and the listener function.
In the following example, the listener1 function will be called twice, but the listener2 function will be called five times:
const { EventEmitter } = require('events')
const ee = new EventEmitter()

const listener1 = () => { console.log('listener 1') }
const listener2 = () => { console.log('listener 2') }

ee.on('my-event', listener1)
ee.on('my-event', listener2)

setInterval(() => {
  ee.emit('my-event')
}, 200)

setTimeout(() => {
  ee.removeListener('my-event', listener1)
}, 500)

setTimeout(() => {
  ee.removeListener('my-event', listener2)
}, 1100)
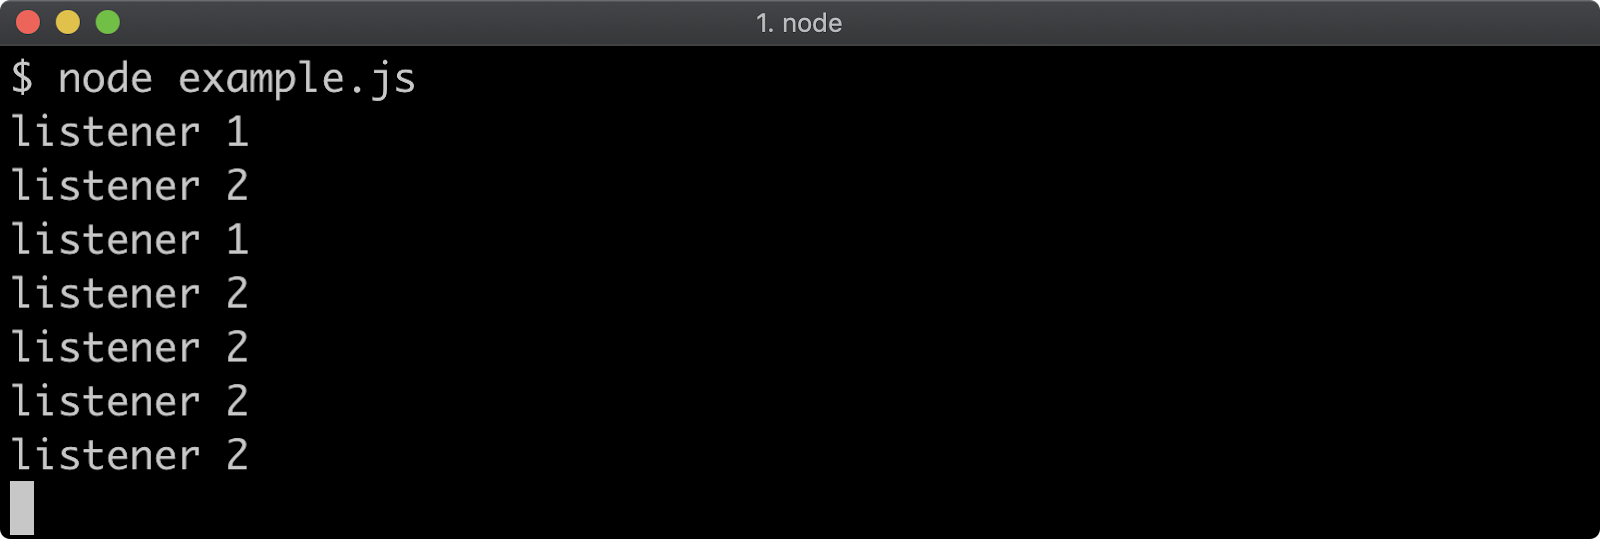
The 'my-event' event is emitted every 200 milliseconds. After 500 milliseconds the listener1 function is removed. So listener1 is only called twice before it's removed. But at the 1100 milliseconds point, listener2 is removed. So listener2 is triggered five times.
The removeAllListeners method can be used to remove listeners without having a reference to their function. It can take either no arguments in which case every listener on an event emitter object will be removed, or it can take an event name in order to remove all listeners for a given event.
The following will trigger two 'my-event' listeners twice, but will trigger the 'another-event' listener five times:
const { EventEmitter } = require('events')
const ee = new EventEmitter()

const listener1 = () => { console.log('listener 1') }
const listener2 = () => { console.log('listener 2') }

ee.on('my-event', listener1)
ee.on('my-event', listener2)
ee.on('another-event', () => { console.log('another event') })

setInterval(() => {
  ee.emit('my-event')
  ee.emit('another-event')
}, 200)

setTimeout(() => {
  ee.removeAllListeners('my-event')
}, 500)

setTimeout(() => {
  ee.removeAllListeners()
}, 1100)
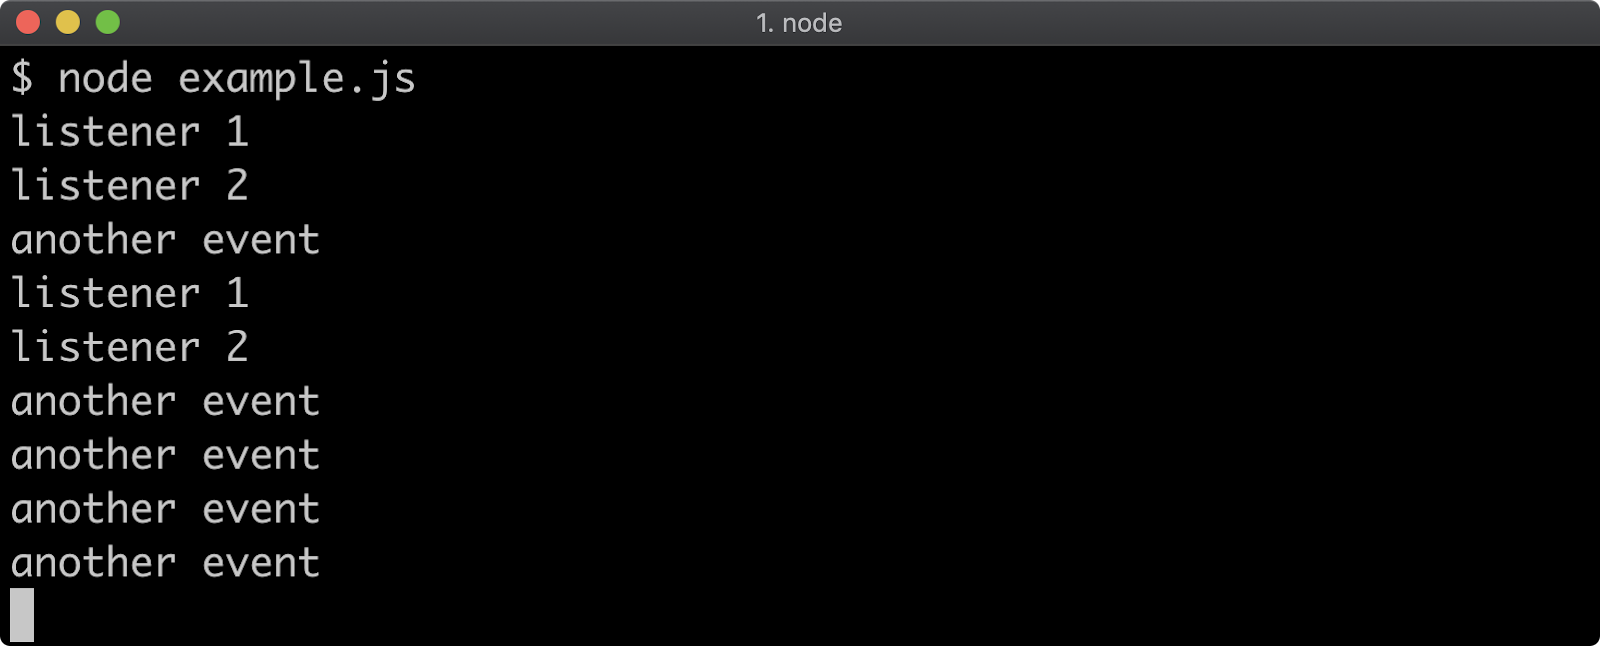
The 'my-event' and 'another-event' events are triggered every 200 milliseconds. After 500 milliseconds all listeners for 'my-event' are removed, so the two listeners are triggered twice before they are removed. After 1100 milliseconds removeAllListeners method is called with no arguments, which removes the remaining 'another-event' listener, thus it is called five times.
The error Event
Emitting an 'error' event on an event emitter will cause the event emitter to throw an exception if a listener for the 'error' event has not been registered:
Consider the following:
const { EventEmitter } = require('events')
const ee = new EventEmitter()

process.stdin.resume() // keep process alive

ee.emit('error', new Error('oh oh'))
This will cause the process to crash and output an error stack trace:
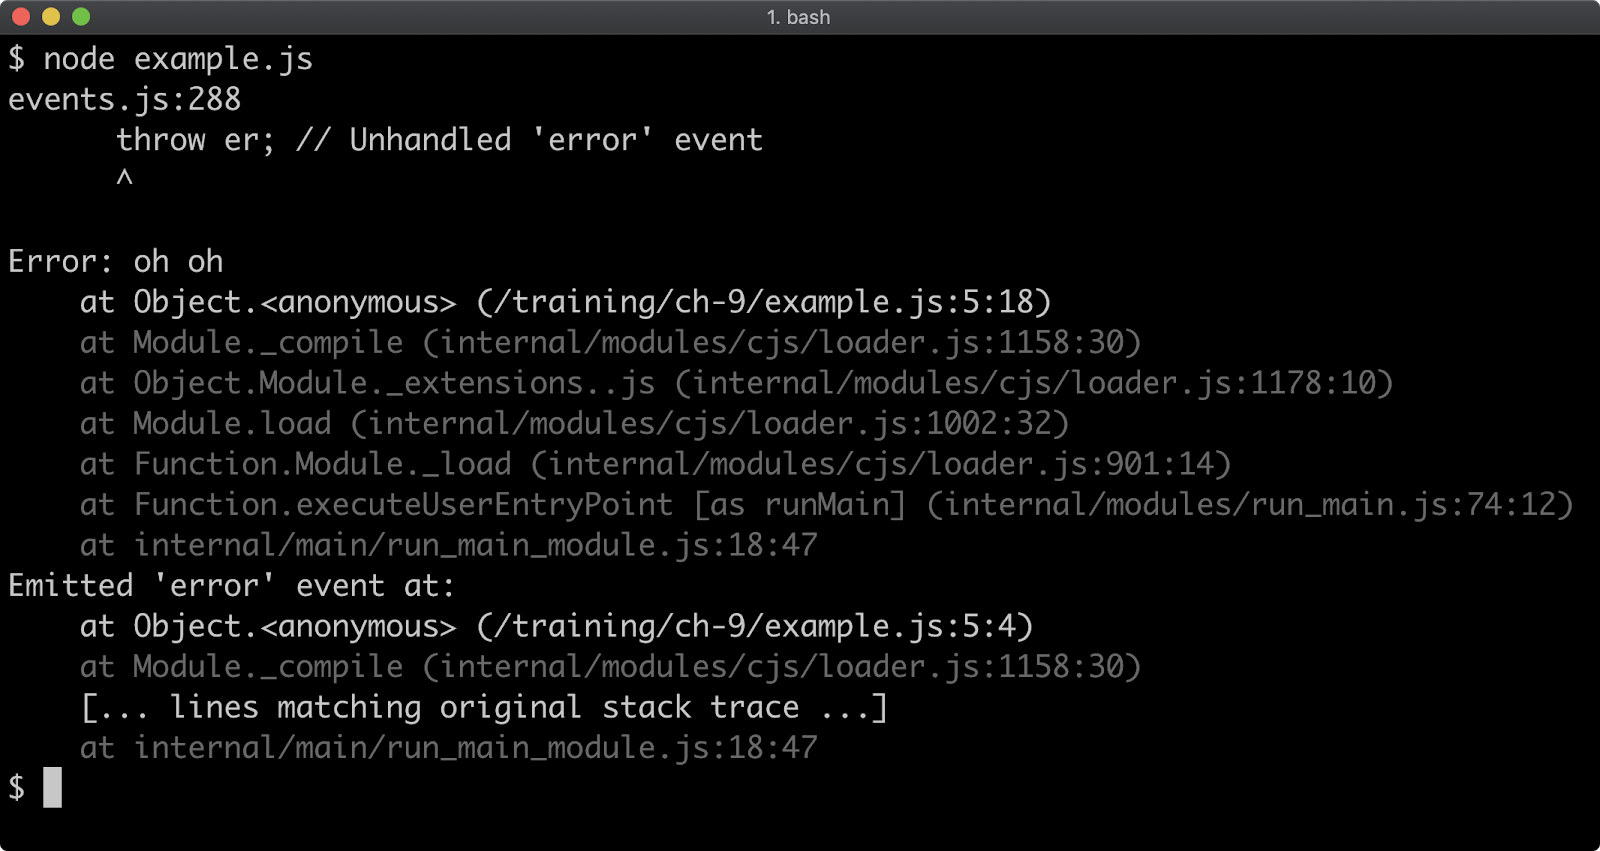
If a listener is registered for the error event the process will no longer crash:
const { EventEmitter } = require('events')
const ee = new EventEmitter()

process.stdin.resume() // keep process alive

ee.on('error', (err) => {
  console.log('got error:', err.message )
})

ee.emit('error', new Error('oh oh'))

Promise-Based Single Use Listener and AbortController
In the prior chapter, "Asynchronous Control Flow", we discussed AbortController as a means of canceling asynchronous operations. It can also be used to cancel promisified event listeners. The events.once function returns a promise that resolves once an event has been fired:
import someEventEmitter from './somewhere.js'
import { once } from 'events'

await once(someEventEmitter, 'my-event')
Execution will pause on the line starting await once, until the registered event fires. If it never fires, execution will never proceed past that point. This makes events.once useful in async/await or ESM Top-Level Await scenarios (we're using ESM for Top-Level Await here), but we need an escape-hatch for scenarios where an event might not fire. For example the following code will never output pinged!:
import { once, EventEmitter } from 'events'
const uneventful = new EventEmitter()

await once(uneventful, 'ping')
console.log('pinged!')
This is because the uneventful event emitter doesn't emit any events at all. Let's imagine that it could emit an event, but it might not or it might take longer than is acceptable for the event to emit. We can use an AbortController to cancel the promisifed listener after 500 milliseconds like so:
import { once, EventEmitter } from 'events'
import { setTimeout } from 'timers/promises'

const uneventful = new EventEmitter()

const ac = new AbortController()
const { signal } = ac

setTimeout(500).then(() => ac.abort())

try {
  await once(uneventful, 'ping', { signal })
  console.log('pinged!')
} catch (err) {
  // ignore abort errors:
  if (err.code !== 'ABORT_ERR') throw err
  console.log('canceled')
}
This code will now output canceled every time. Since uneventful never emits pinged, after 500 milliseconds ac.abort is called, and this causes the signal instance passed to events.once to emit an abort event which triggers events.once to reject the returned promise with an AbortError. We check for the AbortError, rethrowing if the error isn't related to the AbortController. If the error is an AbortError we log out canceled.
We can make this a little bit more realistic by making the event listener sometimes take longer than 500 milliseconds, and sometimes take less than 500 milliseconds:
import { once, EventEmitter } from 'events'
import { setTimeout } from 'timers/promises'

const sometimesLaggy = new EventEmitter()

const ac = new AbortController()
const { signal } = ac

setTimeout(2000 * Math.random(), null, { signal }).then(() => {
  sometimesLaggy.emit('ping')
})

setTimeout(500).then(() => ac.abort())

try {
  await once(sometimesLaggy, 'ping', { signal })
  console.log('pinged!')
} catch (err) {
  // ignore abort errors:
  if (err.code !== 'ABORT_ERR') throw err
  console.log('canceled')
}
About three out of four times this code will log out canceled, one out of four times it will log out pinged!. Also note an interesting usage of AbortController here: ac.abort is used to cancel both the event.once promise and the first timers/promises setTimeout promise. The options object must be the third argument with the timers/promises setTimeout function, the second argument can be used to specify the resolved value of the timeout promise. In our case we set the resolved value to null by passing null as the second argument to timers/promises setTimeout.
Lab Exercises
Lab 9.1 - Single Use Listener
The labs-1 index.js file contains the following code:
'use strict'
const assert = require('assert')
const { EventEmitter } = require('events')

const ee = new EventEmitter()
let count = 0
setInterval(() => {
  ee.emit('tick')
}, 100)

function listener() {
  count++
  setTimeout(() => {
    assert.equal(count, 1)
    assert.equal(this, ee)
    console.log('passed!')
  }, 250)
}
Register the listener function with the ee event emitter in such a way that the listener function is only called a single time. If implemented correctly, the program should print out passed!:
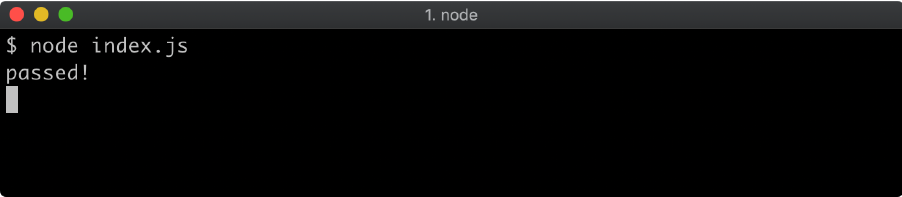
Lab 9.2 - Implementing a Timeout Error
The labs-2 folder has an index.js file containing the following:
'use strict'
const { EventEmitter } = require('events')

process.nextTick(console.log, 'passed!')

const ee = new EventEmitter()

ee.emit('error', Error('timeout'))
Currently the process crashes:
Without removing any of the existing code, and without using a try/catch block add some code which stops the process from crashing. When implemented correctly the process should output passed!.
10 - Handling errors
Introduction
Chapter Overview
Error handling is a broad and opinionated subject. The basics of error handling is somewhat addressed in Section 8 - "Asynchronous Control Flow", however this chapter will focus solely on creating, managing and propagating errors in synchronous, promise-based and async/await and callback based scenarios.
Learning Objectives
By the end of this chapter, you should be able to:
- Understand the general purpose of errors.
- Get to grips with different types of errors.
- Understand how to create an error.
- Intercept and identify errors.
- Explore error propagation in various scenarios.
Handling Errors
Kinds of Errors
Very broadly speaking errors can be divided into two main groups:
- Operational errors
- Developer errors
Operational Errors are errors that happen while a program is undertaking a task. For instance, network failure would be an operational error. Operational errors should ideally be recovered from by applying a strategy that is appropriate to the scenario. For instance, in the case of a network error, a strategy would likely be to retry the network operation.
Developer Error is where a developer has made a mistake. The main example of this is invalid input. In these cases the program should not attempt to continue running and should instead crash with a helpful description so that the developer can address their mistake.
Throwing
Typically, an input error is dealt with by using the throw keyword:
function doTask (amount) {
  if (typeof amount !== 'number') throw new Error('amount must be a number')
  return amount / 2
}
If doTask is called with a non-number, for instance doTask('here is some invalid input') the program will crash:
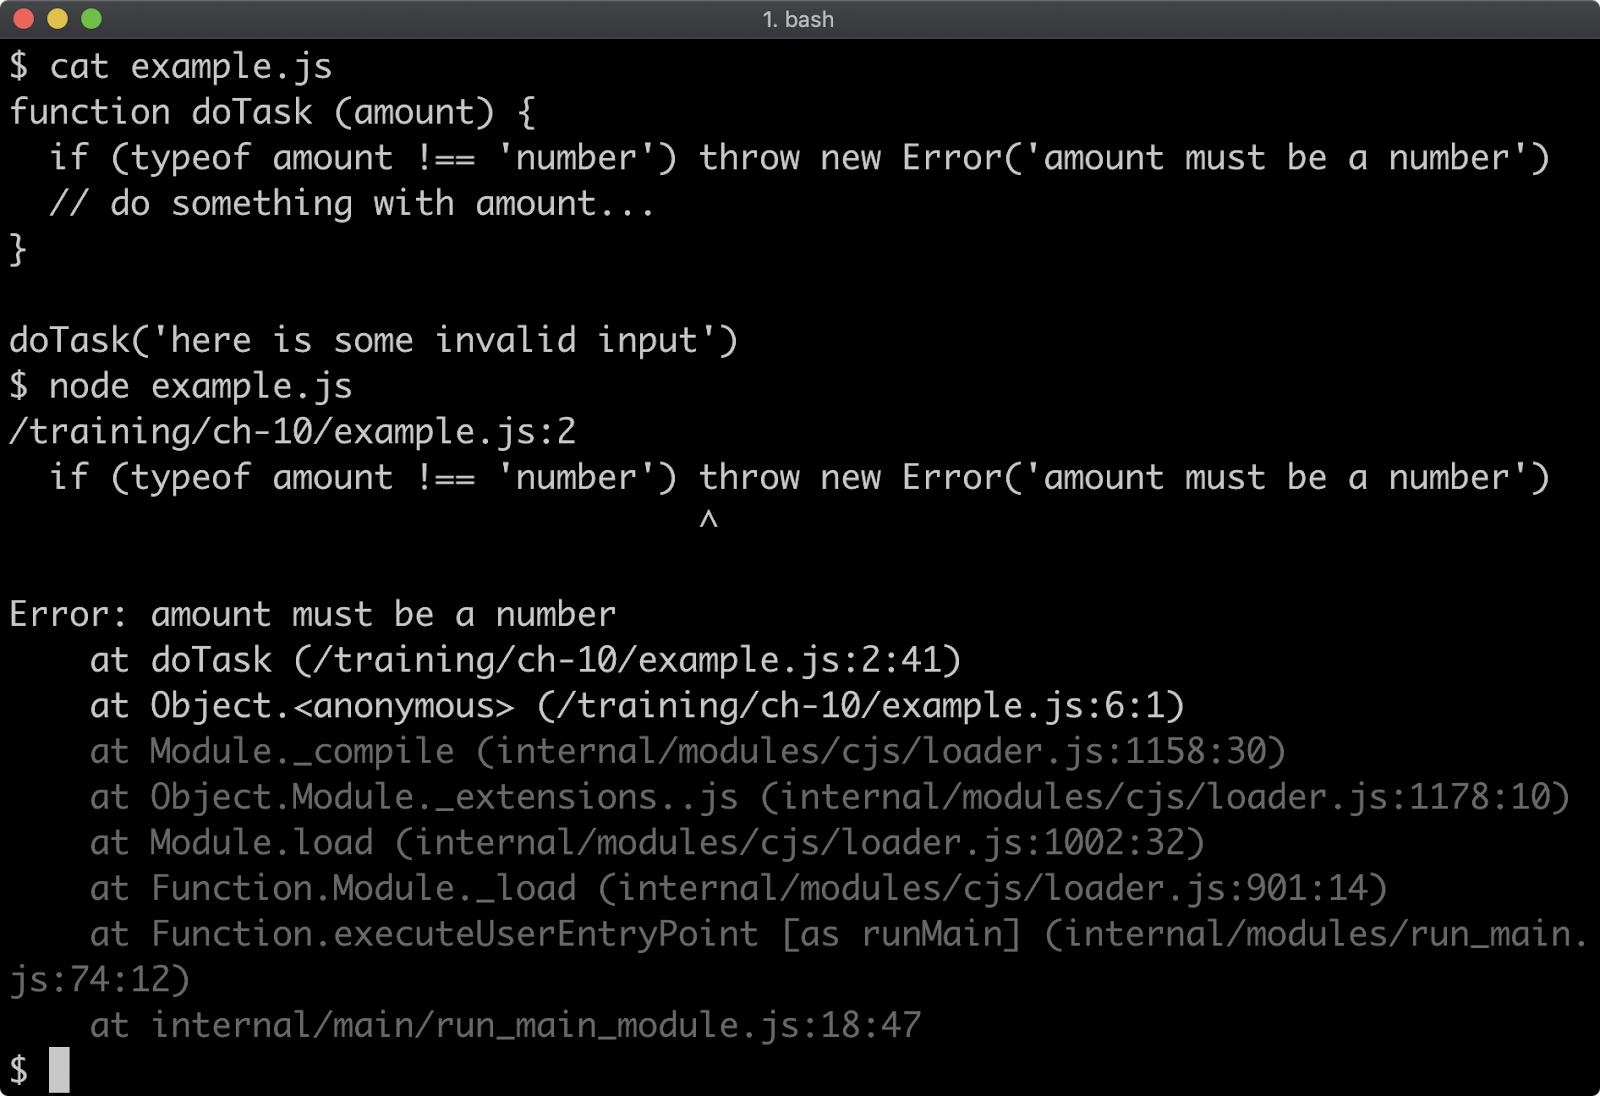
When the program crashes, a stack trace is printed. This stack trace comes from the error object we created straight after using the throw keyword. The Error constructor is native to JavaScript, and takes a string as the Error message, while auto generating a stack trace when created.
While it's recommended to always throw object instantiated from Error (or instantiated from a constructor that inherits from Error), it is possible to throw any value:
function doTask (amount) {
  if (typeof amount !== 'number') throw new Error('amount must be a number')
  // THE FOLLOWING IS NOT RECOMMENDED:
  if (amount <= 0) throw 'amount must be greater than zero'
  return amount / 2
}

doTask(-1)
By passing -1 to doTask here, it will trigger a throw of a string, instead of an error:

In this case there is no stack trace because an Error object was not thrown. As noted in the output the --trace-uncaught flag can be used to track the exception however this is not ideal. It's highly recommended to only throw objects that derive from the native Error constructor, either directly or via inheritance.
Native Error Constructors
As discussed in the previous section, Error is the native constructor for generating an error object. To create an error, call new Error and pass a string as a message:
new Error('this is an error message')
There are six other native error constructors that inherit from the base Error constructor, these are:
EvalErrorSyntaxErrorRangeErrorReferenceErrorTypeErrorURIError
These error constructors exist mostly for native JavaScript API's and functionality. For instance, a ReferenceError will be automatically thrown by the JavaScript engine when attempting to refer to a non-existent reference:
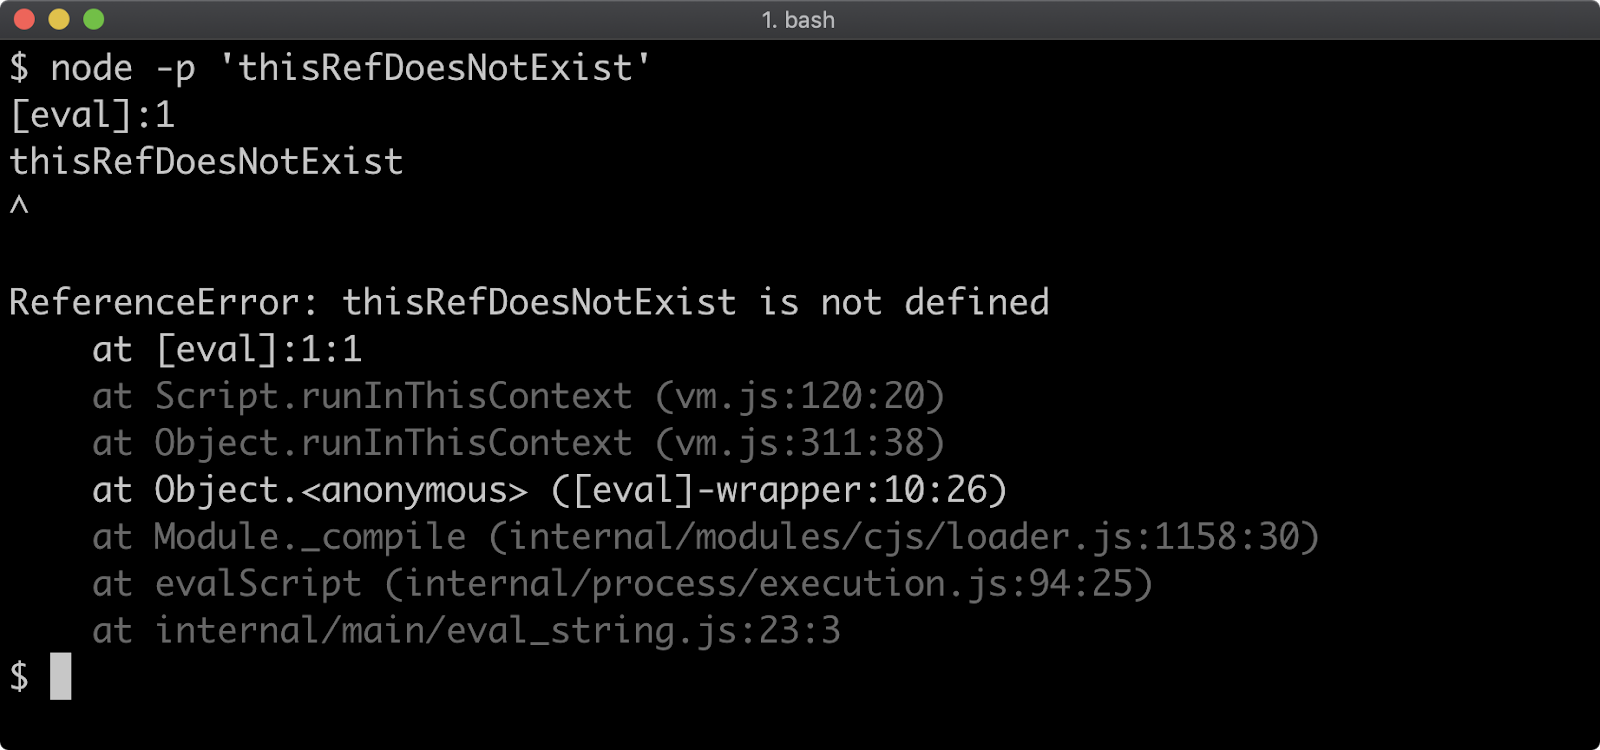
Like any object, an error object can have its instance verified:
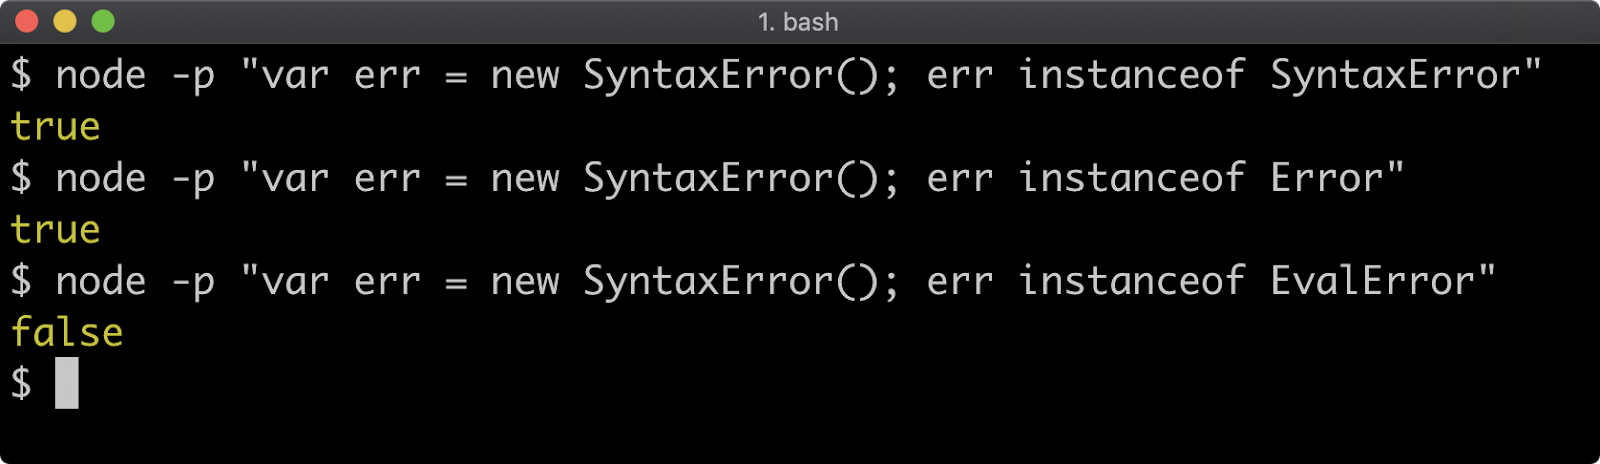
Notice that, given err is an object created with new SyntaxError(), it is both an instanceof SyntaxError and an instanceof Error, because SyntaxError - and all other native errors, inherit from Error.
Native errors objects also have a name property which contains the name of the error that created it:

For the most part, there's only two of these error constructors that are likely to be thrown in library or application code, RangeError and TypeError. Let's update the code from the previous section to use these two error constructors:
function doTask (amount) {
  if (typeof amount !== 'number') throw new TypeError('amount must be a number')
  if (amount <= 0) throw new RangeError('amount must be greater than zero')
  return amount / 2
}
The following is the output of calling doTask(-1):
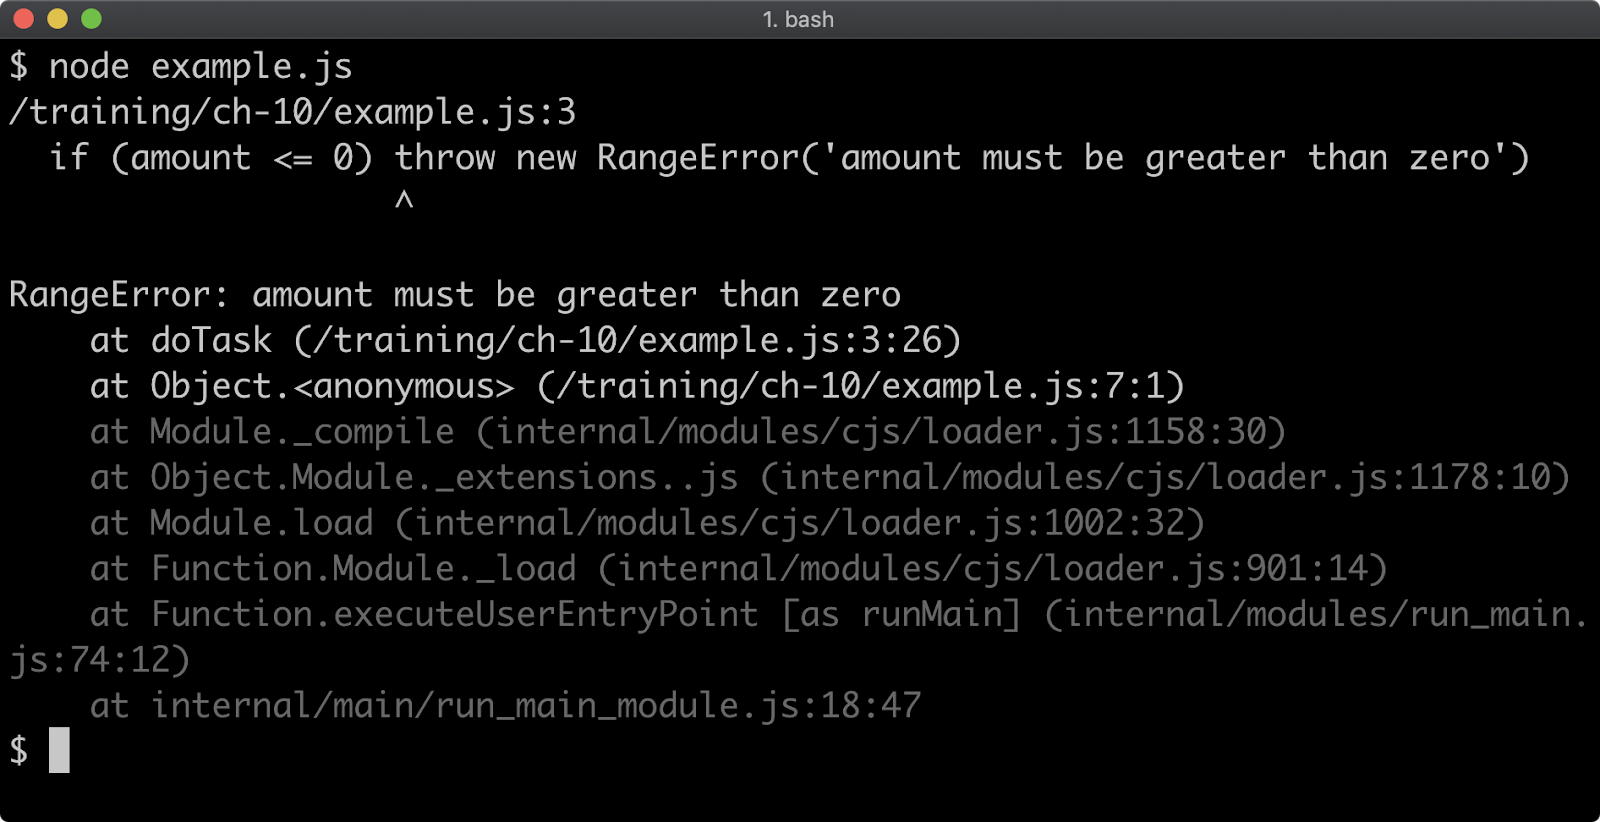
This time the error message is prefixed with RangeError instead of Error.
The following is the result of calling doTask('here is some invalid input'):
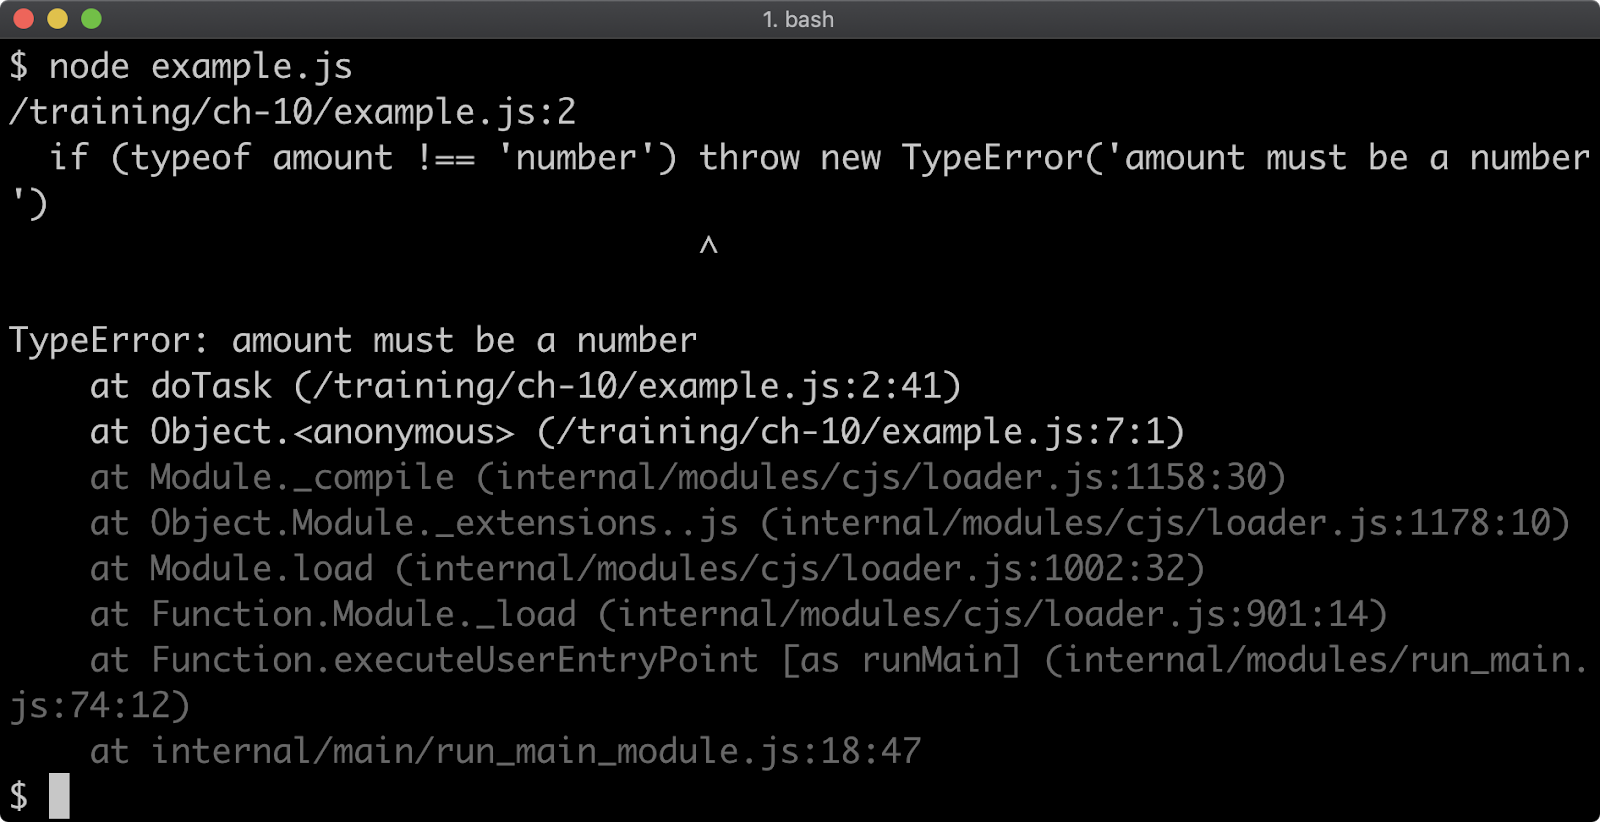
This time the error message is prefixed with TypeError instead of Error.
For more information about native errors see MDN web docs - "Error".
Custom Errors
The native errors are a limited and rudimentary set of errors that can never cater to all possible application errors. There are different ways to communicate various error cases but we will explore two: subclassing native error constructors and use a code property. These aren't mutually exclusive.
Let's add a new validation requirement for the doTask function's amount argument, such that it may only contain even numbers.
In our first iteration we'll create an error and add a code property:
function doTask (amount) {
  if (typeof amount !== 'number') throw new TypeError('amount must be a number')
  if (amount <= 0) throw new RangeError('amount must be greater than zero')
  if (amount % 2) {
    const err = Error('amount must be even')
    err.code = 'ERR_MUST_BE_EVEN'
    throw err
  }
  return amount / 2
}

doTask(3)
Executing the above will result in the following:
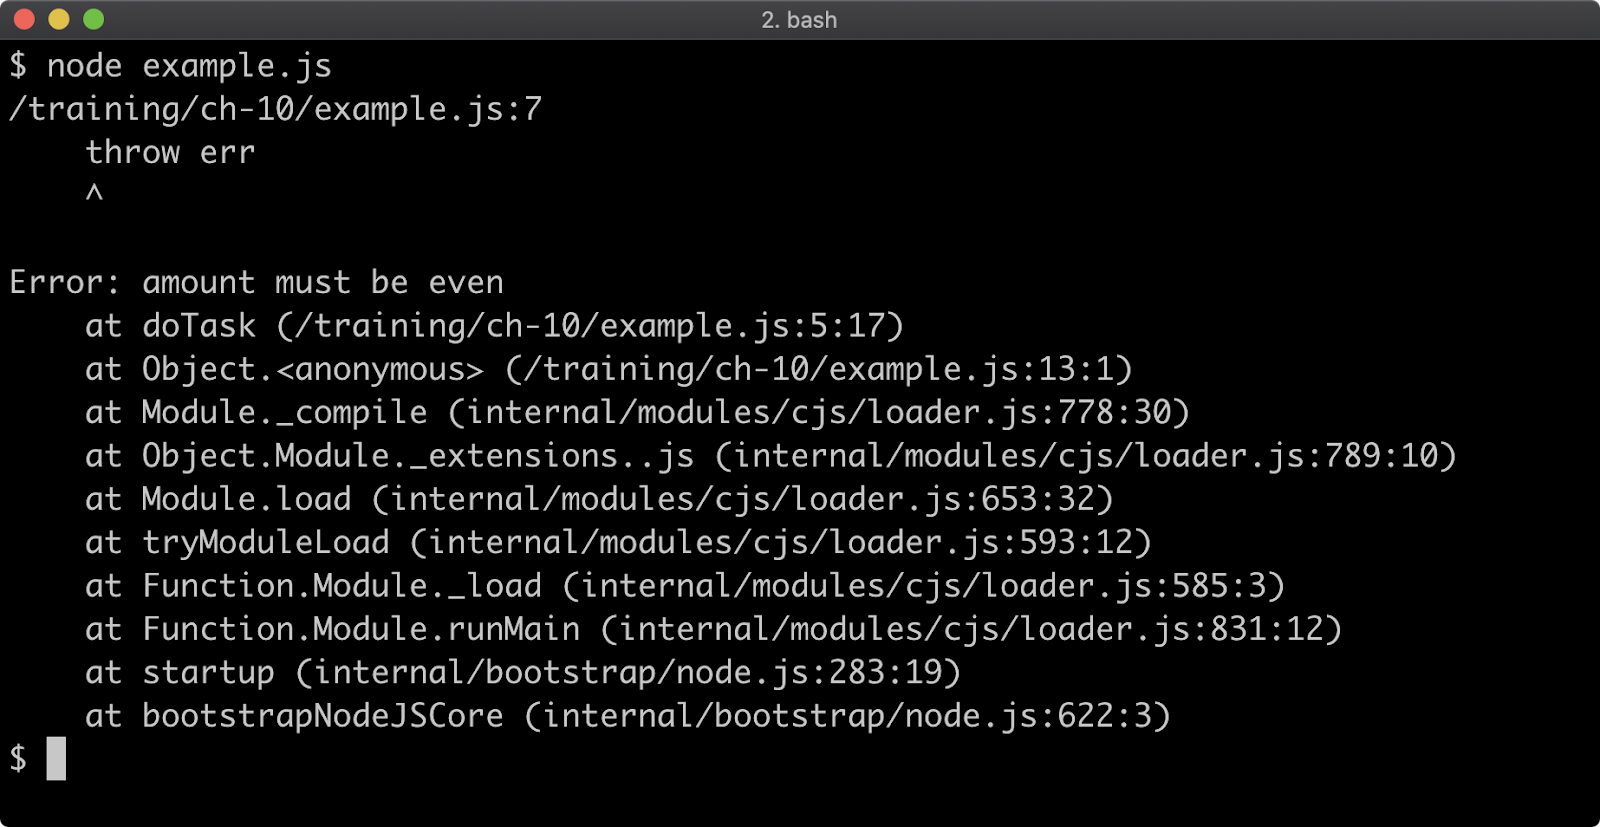
In the next section we'll see how to intercept and identify errors but when this error occurs it can be identified by the code value that was added and then handled accordingly. Node code API's use the approach of creating a native error (either Error or one of the six constructors that inherit from Error) adding a code property. For a list of possible error codes see "Node.js Error Codes".
We can also inherit from Error ourselves to create a custom error instance for a particular use case. Let's create an OddError constructor:
class OddError extends Error {
  constructor (varName = '') {
    super(varName + ' must be even')
  }
  get name () { return 'OddError' }
}
The OddError constructor extends Error and takes an argument called varName. In the constructor method we call super which calls the parent constructor (which is Error) with a string composed of varName concatenated with the string ' must be even'. When instantantiated like so, new OddError('amount') this will result in an error message if 'amount must be even'. Finally we add a name getter which returns 'OddError' so that when the error is displayed in the terminal its name corresponds to the name of our custom error constructor. Using a name getter is a simple way to make the name non-enumerable and since it's only accessed in error cases it's fine from a performance perspective to use a getter in this limited case.
Now we'll update doTask to use OddError:
function doTask (amount) {
  if (typeof amount !== 'number') throw new TypeError('amount must be a number')
  if (amount <= 0) throw new RangeError('amount must be greater than zero')
  if (amount % 2) throw new OddError('amount')
  return amount / 2
}

doTask(3)
This will result in the following output:

The strategies of using a custom error constructor and adding a code property are not mutually exclusive, we can do both. Let's update OddError like so:
class OddError extends Error {
  constructor(varName = '') {
    super(varName + ' must be even')
    this.code = 'ERR_MUST_BE_EVEN'
  }
  get name() {
    return 'OddError [' + this.code + ']'
  }
}
When executed with the updated error this results in the following:
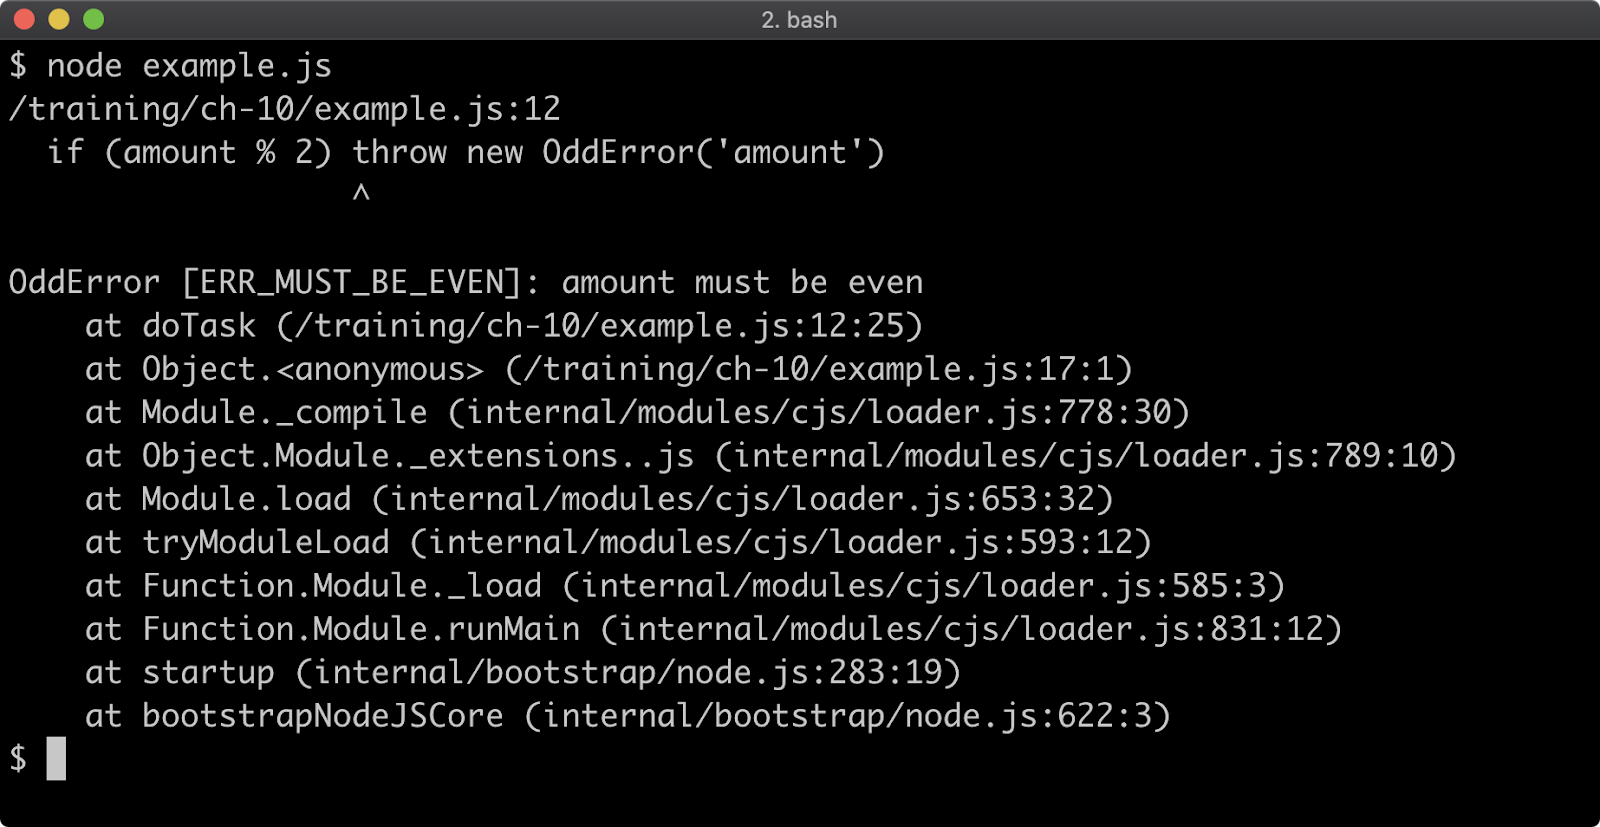
Try/Catch (1)
When an error is thrown in a normal synchronous function it can be handled with a try/catch block.
Using the same code from the previous section, we'll wrap the doTask(3) function call with a try/catch block:
try {
  const result = doTask(3)
  console.log('result', result)
} catch (err) {
  console.error('Error caught: ', err)
}
Executing this updated code will result in the following:
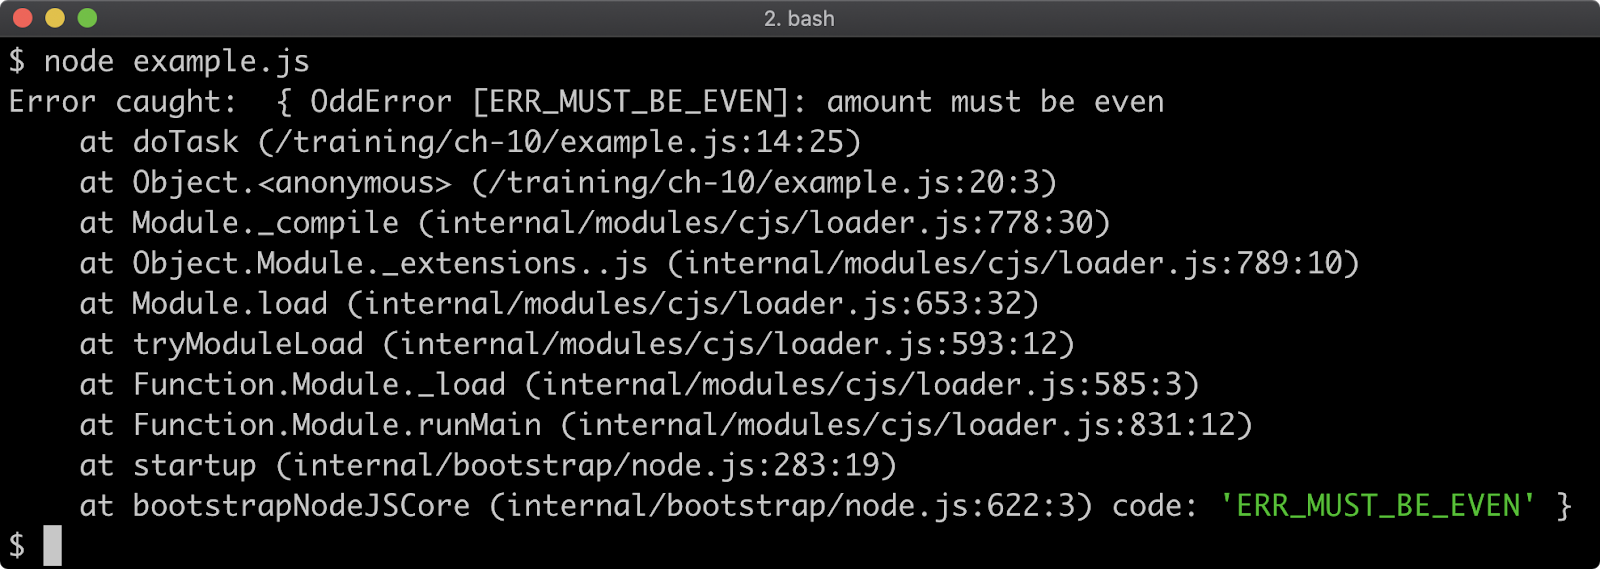
In this case we controlled how the error was output to the terminal but with this pattern we can also apply any error handling measure as the scenario requires.
Let's update argument passed to doTask to a valid input:
try {
  const result = doTask(4)
  console.log('result', result)
} catch (err) {
  console.error('Error caught: ', err)
}
This will result in the following output:
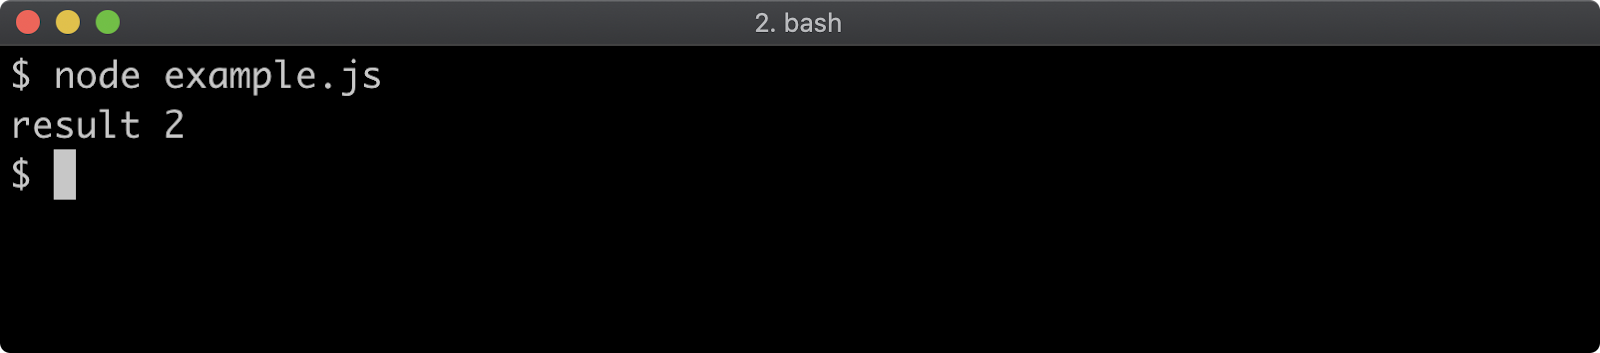
When the invocation is doTask(4), doTask does not throw an error and so program execution proceeds to the next line, console.log('result', result), which outputs result 2. When the input is invalid, for instance doTask(3) the doTask function will throw and so program execution does not proceed to the next line but instead jumps to the catch block.
Rather than just logging the error, we can determine what kind of error has occurred and handle it accordingly:
try {
  const result = doTask(4)
  console.log('result', result)
} catch (err) {
  if (err instanceof TypeError) {
    console.error('wrong type')
  } else if (err instanceof RangeError) {
    console.error('out of range')
  } else if (err instanceof OddError) {
    console.error('cannot be odd')
  } else {
    console.error('Unknown error', err)
  }
}
Let's take the above code but change the input for the doTask call in the following three ways:
doTask(3)doTask('here is some invalid input')doTask(-1)
If we execute the code after each change, each error case will lead to a different outcome:
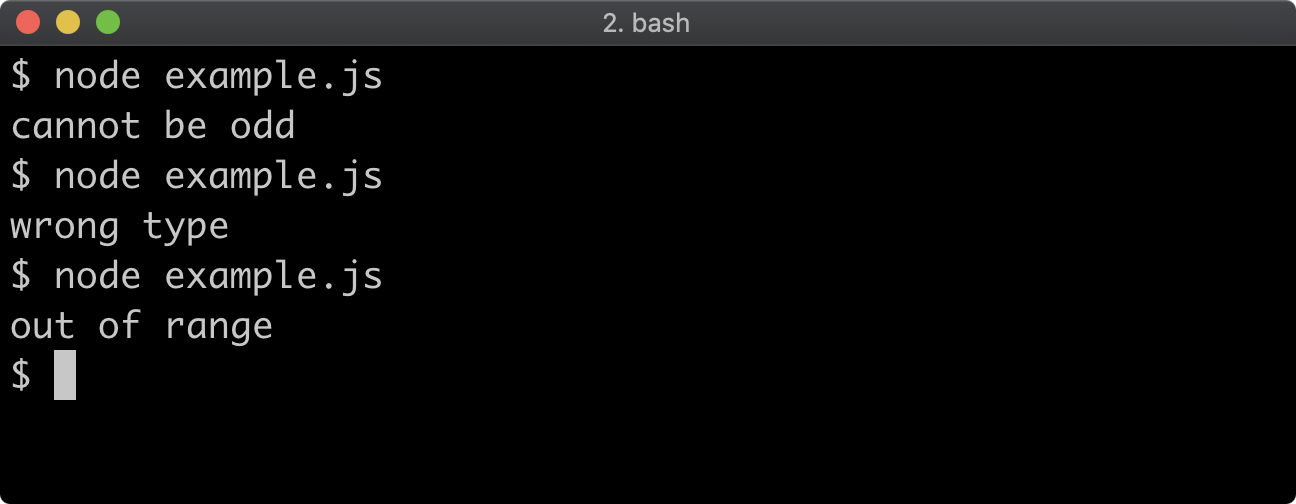
The first case causes an instance of our custom OddError constructor to be thrown, this is detected by checking whether the caught error (err) is an instance of OddError and then the message cannot be odd is logged. The second scenario leads to an instance of TypeError to be thrown which is determined by checking if err is an instance of TypeError in which case wrong type is output. In the third variation and instance of RangeError is thrown, the caught error is determined to be an instance of RangeError and then out of range is printed to the terminal.
However, checking the instance of an error is flawed, especially when checking against native constructors. Consider the following change to the code:
try {
  const result = doTask(4)
  result()
  console.log('result', result)
} catch (err) {
  if (err instanceof TypeError) {
    console.error('wrong type')
  } else if (err instanceof RangeError) {
    console.error('out of range')
  } else if (err.code === 'ERR_MUST_BE_EVEN') {
    console.error('cannot be odd')
  } else {
    console.error('Unknown error', err)
  }
}
Between calling doTask and the console.log the value returned from doTask(4) (which will be 2), which is assigned to result is called as a function (result()). The returned value is a number, not a function so this will result in an error object which, an instance of TypeError so the output will be wrong type. This can cause confusion, it's all too easy to assume that the TypeError came from doTask whereas it was actually generated locally.

Try/Catch (2)
To mitigate this, it's better to use duck-typing in JavaScript. This means looking for certain qualities to determine what an object is - e.g. if it looks like a duck, and quacks like a duck it's a duck. To apply duck-typing to error handling, we can follow what Node core APIs do and use a code property.
Let's write a small utility function for adding a code to an error object:
function codify (err, code) {
  err.code = code
  return err
}
Now we'll pass the TypeError and RangeError objects to codify with context specific error codes:
function doTask (amount) {
  if (typeof amount !== 'number') throw codify(
    new TypeError('amount must be a number'),
    'ERR_AMOUNT_MUST_BE_NUMBER'
  )
  if (amount <= 0) throw codify(
    new RangeError('amount must be greater than zero'),
    'ERR_AMOUNT_MUST_EXCEED_ZERO'
  )
  if (amount % 2) throw new OddError('amount')
  return amount/2
}
Finally we can update the catch block to check for the code property instead of using an instance check:
try {
  const result = doTask(4)
  result()
  console.log('result', result)
} catch (err) {
  if (err.code === 'ERR_AMOUNT_MUST_BE_NUMBER') {
    console.error('wrong type')
  } else if (err.code === 'ERRO_AMOUNT_MUST_EXCEED_ZERO') {
    console.error('out of range')
  } else if (err.code === 'ERR_MUST_BE_EVEN') {
    console.error('cannot be odd')
  } else {
    console.error('Unknown error', err)
  }
}
Now erroneously calling result as a function will cause the error checks to reach the final else branch in the catch block:
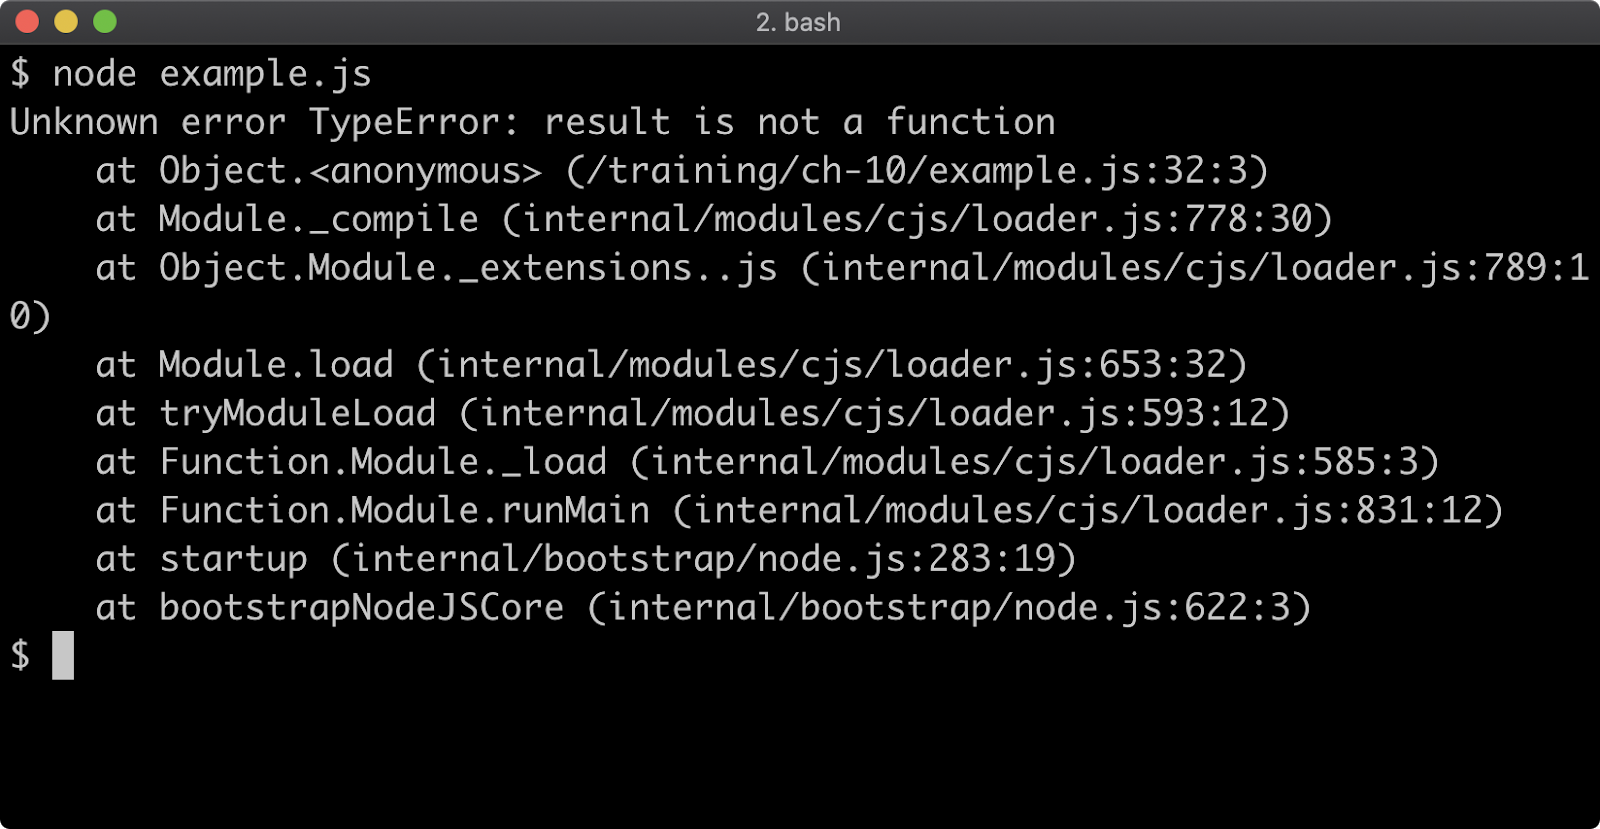
It's important to realize that try/catch cannot catch errors that are thrown in a callback function that is called at some later point. Consider the following:
// WARNING: NEVER DO THIS:
try {
  setTimeout(() => {
    const result = doTask(3)
    console.log('result', result)
  }, 100)
} catch (err) {
  if (err.code === 'ERR_AMOUNT_MUST_BE_NUMBER') {
    console.error('wrong type')
  } else if (err.code === 'ERRO_AMOUNT_MUST_EXCEED_ZERO') {
    console.error('out of range')
  } else if (err.code === 'ERR_MUST_BE_EVEN') {
    console.error('cannot be odd')
  } else {
    console.error('Unknown error', err)
  }
}
The doTask(3) call will throw an OddError error, but this will not be handled in the catch block because the function passed to setTimeout is called a hundred milliseconds later. By this time the try/catch block has already been executed, so this will result in the error not being handled:
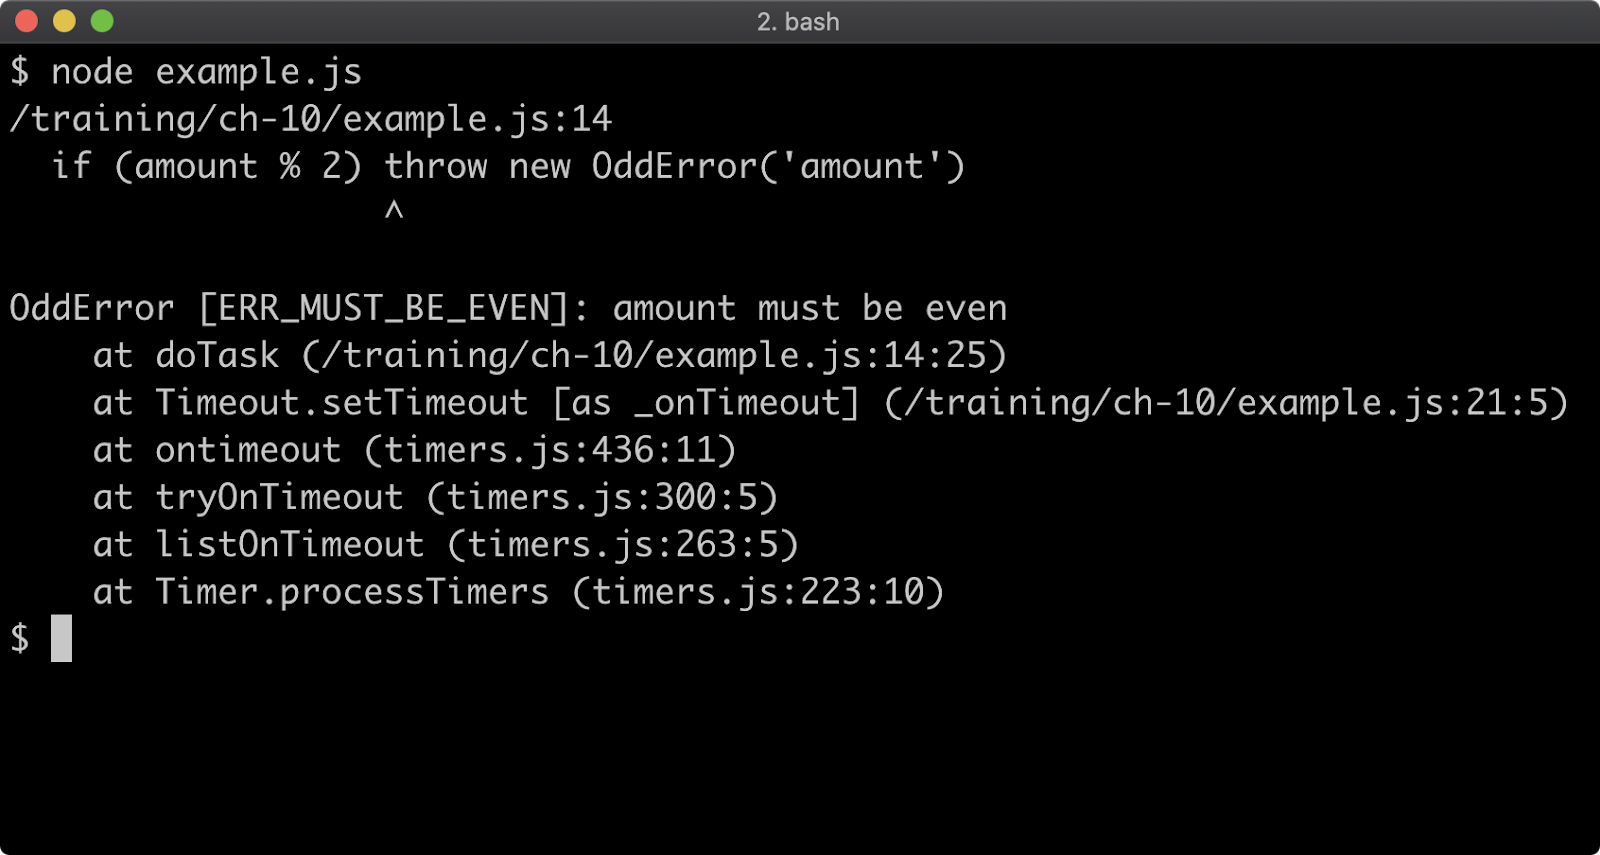
When encountering such an antipattern, an easy fix is to move the try/catch into the body of the callback function:
setTimeout(() => {
  try {
    const result = doTask(3)
    console.log('result', result)
  } catch (err) {
    if (err.code === 'ERR_AMOUNT_MUST_BE_NUMBER') {
      console.error('wrong type')
    } else if (err.code === 'ERRO_AMOUNT_MUST_EXCEED_ZERO') {
      console.error('out of range')
    } else if (err.code === 'ERR_MUST_BE_EVEN') {
      console.error('cannot be odd')
    } else {
      console.error('Unknown error', err)
    }
  }
}, 100)
Rejections
In Chapter 8 - "Asynchronous Control Flow" we explored asynchronous syntax and patterns focusing on callback patterns, Promise abstractions and async/await syntax. So far we have dealt with errors that occur in a synchronous code. Meaning, that a throw occurs in a normal synchronous function (one that isn't async/await, promise-based or callback-based). When a throw in a synchronous context is known as an exception. When a promise rejects, it's representing an asynchronous error. One way to think about exceptions and rejections is that exceptions are synchronous errors and rejections are asynchronous errors.
Let's imagine that doTask has some asynchronous work to do, so we can use a callback based API or we can use a promise-based API (even async/await is promise-based).
Let's convert doTask to return a promise that resolves to a value or rejects if there's an error:
function doTask (amount) {
  return new Promise((resolve, reject) => {
    if (typeof amount !== 'number') {
      reject(new TypeError('amount must be a number'))
      return
    }
    if (amount <= 0) {
      reject(new RangeError('amount must be greater than zero'))
      return
    }
    if (amount % 2) {
      reject(new OddError('amount'))
      return
    }
    resolve(amount/2)
  })
}

doTask(3)
The promise is created using the Promise constructor, see MDN web docs - "Constructor Syntax" for full details. The function passed to Promise is called the tether function, it takes two arguments, resolve and reject which are also functions. We call resolve when the operation is a success, or reject when it is a failure. In this conversion, we're passing an error into reject for each of our error cases so that the returned promise will reject when doTask is passed invalid input.
Calling doTask with an invalid input, as in the above, will result in an unhandled rejection:
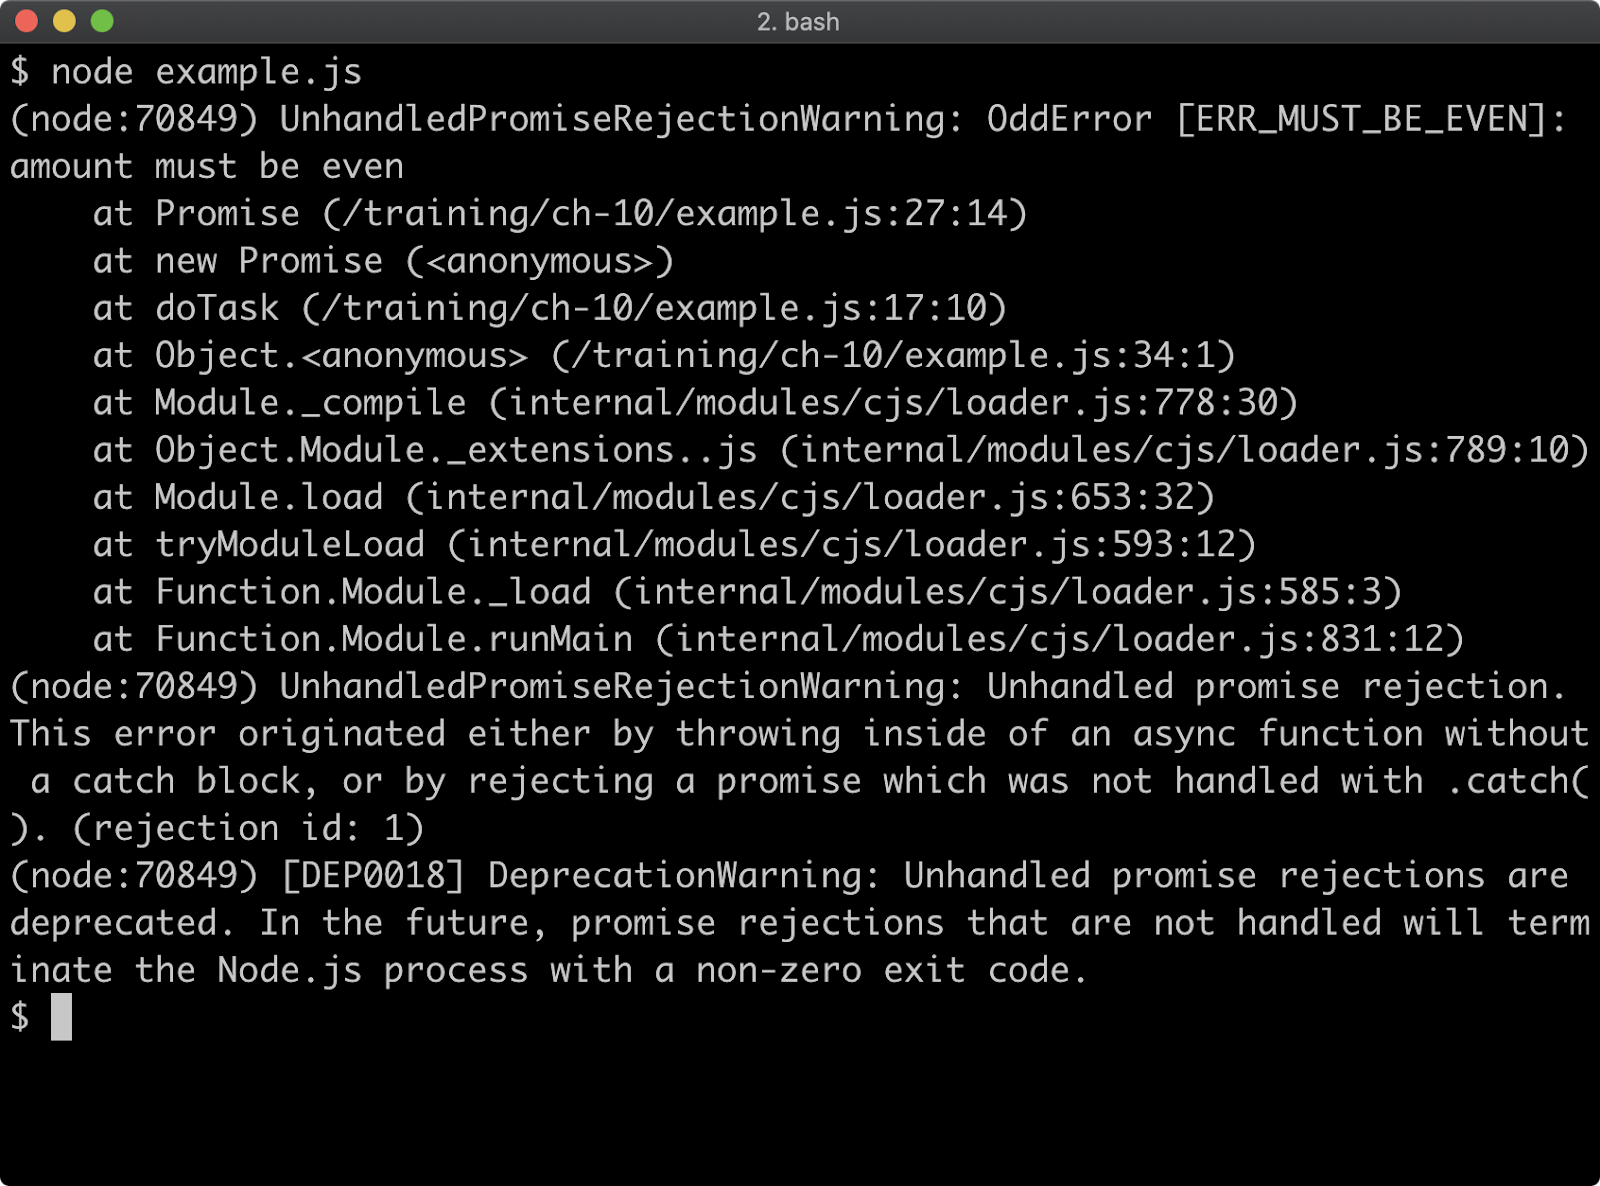
The rejection is unhandled because promises must use the catch method to catch rejections and so far we haven't attached a catch handler. Let's modify the doTask call to the following:
doTask(3)
  .then((result) => {
    console.log('result', result)
  })
  .catch((err) => {
    if (err.code === 'ERR_AMOUNT_MUST_BE_NUMBER') {
      console.error('wrong type')
    } else if (err.code === 'ERRO_AMOUNT_MUST_EXCEED_ZERO') {
      console.error('out of range')
    } else if (err.code === 'ERR_MUST_BE_EVEN') {
      console.error('cannot be odd')
    } else {
      console.error('Unknown error', err)
    }

  })
Now this is functionality equivalent to the synchronous non-promise based form of our code, the error are handled in the same way:

A then handler was also added alongside a catch handler, so when the doTask function is successful the result will be logged out. Here's what happens if we change doTask(3) in the above code to doTask(4):
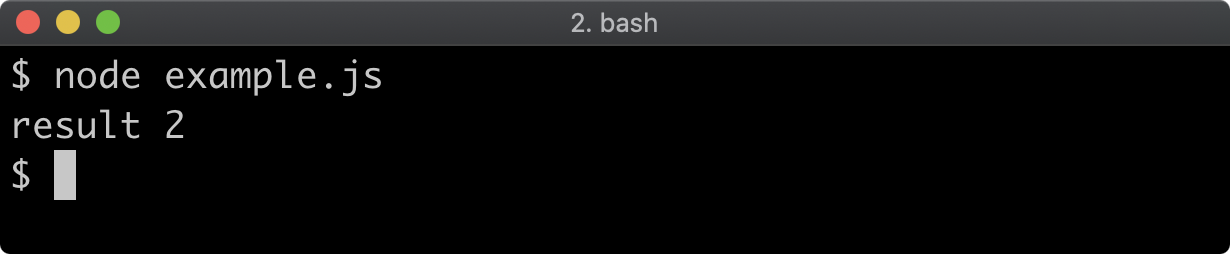
It's very important to realize that when the throw appears inside a promise handler, that will not be an exception, that is it won't be an error that is synchronous. Instead it will be a rejection, the then or catch handler will return a new promise that rejects as a result of a throw within a handler.
Let's modify the then handler so that a throw occurs inside the handler function:
doTask(4)
  .then((result) => {
    throw Error('spanner in the works')
  })
  .catch((err) => {
    if (err instanceof TypeError) {
      console.error('wrong type')
    } else if (err instanceof RangeError) {
      console.error('out of range')
    } else if (err.code === 'ERR_MUST_BE_EVEN') {
      console.error('cannot be odd')
    } else {
      console.error('Unknown error', err)
    }
  })
If we run this updated code we'll see the following:
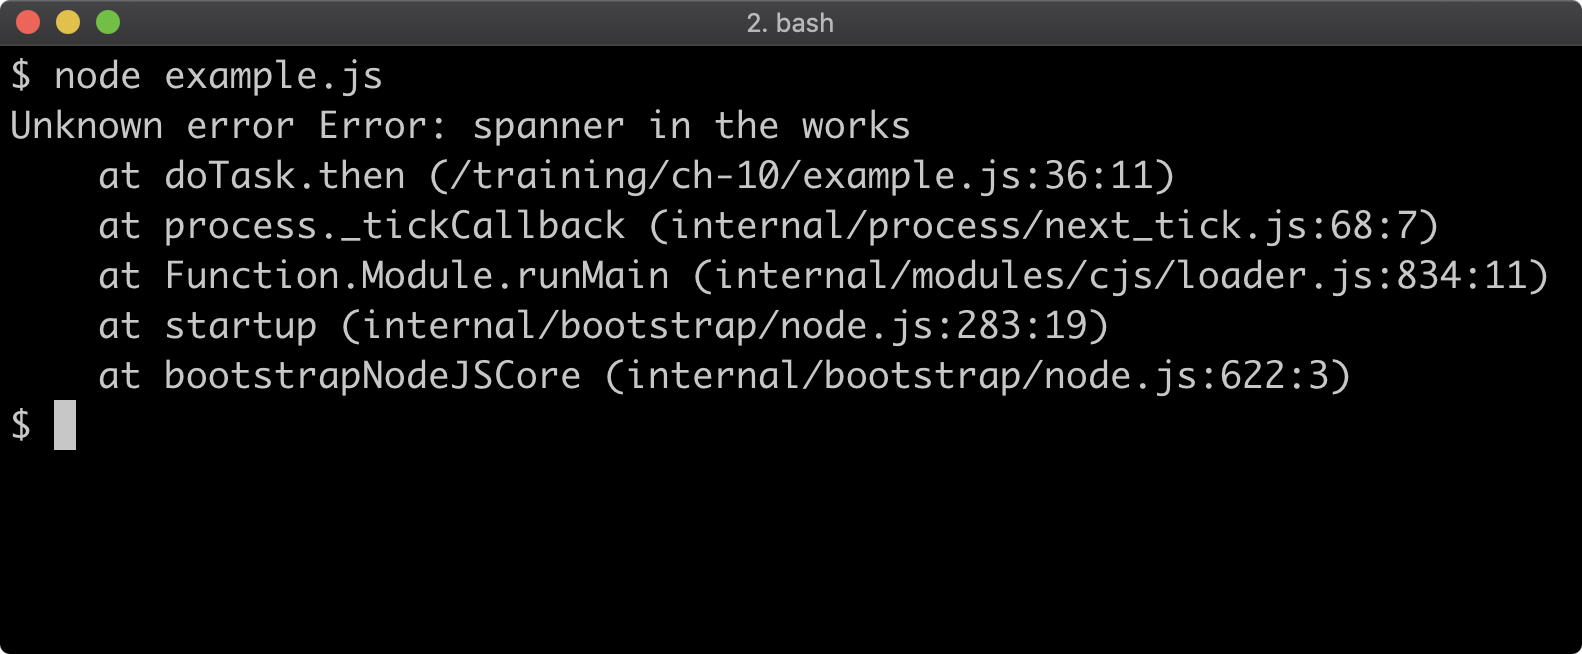
Even though doTask(4) does not cause a promise rejection, the throw in the then handler does. So the catch handler on the promise returned from then will reach the final else branch and output unknown error. Bear in mind that functions can call functions, so any function in a call stack of functions that originates in a then handler could throw, which would result in a rejection instead of the normally anticipated exception.
Async Try/Catch
The async/await syntax supports try/catch of rejections. In other words we can use try/catch on asynchronous promise-based APIs instead of using then and catch handler as in the next section, let's create a async function named run and reintroduce the same try/catch pattern that was used when calling the synchronous form of doTask:
async function run () {
  try {
    const result = await doTask(3)
    console.log('result', result)
  } catch (err) {
    if (err instanceof TypeError) {
      console.error('wrong type')
    } else if (err instanceof RangeError) {
      console.error('out of range')
    } else if (err.code === 'ERR_MUST_BE_EVEN') {
      console.error('cannot be odd')
    } else {
      console.error('Unknown error', err)
    }
  }
}

run()
The only difference, other than wrapping the try/catch in an async function, is that we await doTask(3) so that the async function can handle the promise automatically. Since 3 is an odd number, the promise returned from doTask will call reject with our custom OddError and the catch block will identify the code property and then output cannot be odd:
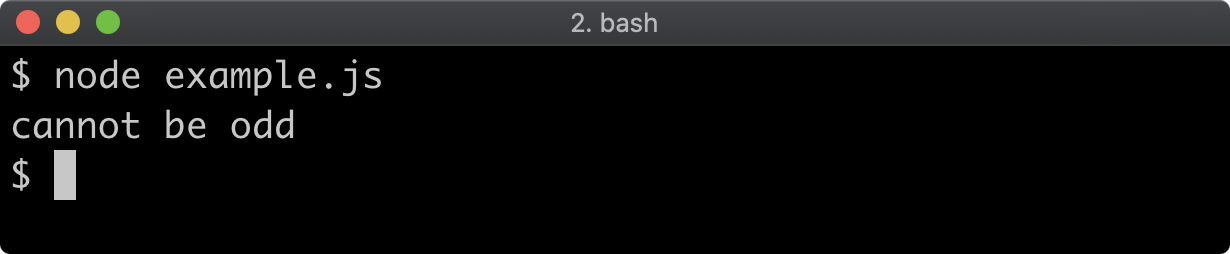
Using an async function with a try/catch around an awaited promise is syntactic sugar. The catch block in the async run function is the equivalent of the catch method handler in the previous section. An async function always returns a promise that resolves to the returned value, unless a throw occurs in that async function, in which case the returned promise rejects. This means we can convert our doTask function from returning a promise where we explicitly call reject within a Promise tether function to simply throwing again.
Essentially we can convert doTask to its original synchronous form but prefix async to the function signature, like so:
async function doTask (amount) {
  if (typeof amount !== 'number') throw new TypeError('amount must be a number')
  if (amount <= 0) throw new RangeError('amount must be greater than zero')
  if (amount % 2) throw new OddError('amount')
  return amount/2
}
This is, again, the same functionality as the synchronous version but it allows for the possibility of doTask to perform other asynchronous tasks, for instance making a request to an HTTP server, writing a file or reading from a database. All of the errors we've been creating and handling are developer errors but in an asynchronous context we're more likely to encounter operational errors. For instance, imagine that an HTTP request fails for some reason - that's an asynchronous operational error and we can handle it in exactly the same way as the developer errors we're handling in this section. That is, we can await the asynchronous operation and then catch any operational errors as well.
As an example, let's imagine we have a function called asyncFetchResult that makes an HTTP request, sending the amount to another HTTP server for it to be processed. If the other server is successful the promise returned from asyncFetchResult resolves to the value provided by the HTTP service. If the fetch request is unsuccessful for any reason (either because of a network error, or an error in the service) then the promise will reject. We could use the asyncFetchResult function like so:
async function doTask (amount) {
  if (typeof amount !== 'number') throw new TypeError('amount must be a number')
  if (amount <= 0) throw new RangeError('amount must be greater than zero')
  if (amount % 2) throw new OddError('amount')
  const result = await asyncFetchResult(amount)
  return result
}
It's important to note that asyncFetchResult is an imaginary function for conceptual purposes only in order to explain the utility of this approach so the above code will not work. However conceptually speaking, in the case where the promise returned from asyncFetchResult rejects this will cause the promise returned from doTask to reject (because the promise returned from asyncFetchResult is awaited). That would trigger in turn the catch block in the run async function. So the catch block could then be extended to handle that operational error. This is error propagation in an async/await context. In the next and final section we will explore propagating errors in synchronous function, async/await and promise and callback-based scenarios.
Propagation (1)
Error propagation is where, instead of handling the error, we make it the responsibility of the caller instead. We have a doTask function that may throw, and a run function which calls doTask and handles the error. When using async/await functions if we want to propagate an error we simply rethrow it.
The following is the full implementation of our code in async/await form with run handling known errors but propagating unknown errors:
class OddError extends Error {
  constructor (varName = '') {
    super(varName + ' must be even')
    this.code = 'ERR_MUST_BE_EVEN'
  }
  get name () {
    return 'OddError [' + this.code + ']'
  }
}

function codify (err, code) {
  err.code = code
  return err
}

async function doTask (amount) {
  if (typeof amount !== 'number') throw codify(
    new TypeError('amount must be a number'),
    'ERR_AMOUNT_MUST_BE_NUMBER'
  )
  if (amount <= 0) throw codify(
    new RangeError('amount must be greater than zero'),
    'ERR_AMOUNT_MUST_EXCEED_ZERO'
  )
  if (amount % 2) throw new OddError('amount')
  throw Error('some other error')
  return amount/2
}

async function run () {
  try {
    const result = await doTask(4)
    console.log('result', result)
  } catch (err) {
    if (err.code === 'ERR_AMOUNT_MUST_BE_NUMBER') {
      throw Error('wrong type')
    } else if (err.code === 'ERRO_AMOUNT_MUST_EXCEED_ZERO') {
      throw Error('out of range')
    } else if (err.code === 'ERR_MUST_BE_EVEN') {
      throw Error('cannot be odd')
    } else {
      throw err
    }
  }
}
run().catch((err) => { console.error('Error caught', err) })
For purposes of explanation the doTask function unconditionally throws an error when input is valid so that we show the error propagation. The error doesn't correspond to any of the known errors and so instead of logging it out, it is rethrown. This causes the promise returned by the run async function to reject, thus triggering the catch handler which is attached to it. This catch handler logs out Error caught along with the error:

Error propagation for synchronous code is almost exactly the same, syntactically. We can convert doTask and run into non-async functions by removing the async keyword:
function doTask (amount) {
  if (typeof amount !== 'number') throw codify(
    new TypeError('amount must be a number'),
    'ERR_AMOUNT_MUST_BE_NUMBER'
  )
  if (amount <= 0) throw codify(
    new RangeError('amount must be greater than zero'),
    'ERR_AMOUNT_MUST_EXCEED_ZERO'
  )
  if (amount % 2) throw new OddError('amount')
  throw Error('some other error')
  return amount/2
}

function run () {
  try {
    const result = doTask('not a valid input')
    console.log('result', result)
  } catch (err) {
    if (err.code === 'ERR_AMOUNT_MUST_BE_NUMBER') {
      throw Error('wrong type')
    } else if (err.code === 'ERRO_AMOUNT_MUST_EXCEED_ZERO') {
      throw Error('out of range')
    } else if (err.code === 'ERR_MUST_BE_EVEN') {
     throw Error('cannot be odd')
    } else {
      throw err
    }
  }
}

try { run() } catch (err) { console.error('Error caught', err) }
In addition to removing the async keyword remove the await keyword from within the try block of the run function because we're now back to dealing with synchronous execution. The doTask function returns a number again, instead of a promise. The run function is also now synchronous, since the async keyword was removed it no longer returns a promise. This means we can't use a catch handler, but we can use try/catch as normal. The net effect is that now a normal exception is thrown and handled in the catch block outside of run.

Propagation (2)
Finally for the sake of exhaustive exploration of error propagation we'll look at the same example using callback-based syntax. In Chapter 8 - "Asynchronous Control Flow" we explore error-first callbacks, convert doTask to pass errors as the first argument of a callback:
function doTask (amount, cb) {
  if (typeof amount !== 'number') {
    cb(codify(
      new TypeError('amount must be a number'),
      'ERR_AMOUNT_MUST_BE_NUMBER'
    ))
    return
  }
  if (amount <= 0) {
    cb(codify(
      new RangeError('amount must be greater than zero'),
      'ERR_AMOUNT_MUST_EXCEED_ZERO'
    ))
    return
  }
  if (amount % 2) {
    cb(new OddError('amount'))
    return
  }
  cb(null, amount/2)
}
The doTask function now takes two arguments, amount and cb. Let's insert the same artificial error as in the other examples, in order to demonstrate error propagation:
function doTask (amount, cb) {
  if (typeof amount !== 'number') {
    cb(codify(
      new TypeError('amount must be a number'),
     'ERR_AMOUNT_MUST_BE_NUMBER'
    ))
    return
  }
  if (amount <= 0) {
    cb(codify(
      new RangeError('amount must be greater than zero'),
      'ERR_AMOUNT_MUST_EXCEED_ZERO'
    ))
    return
  }
  if (amount % 2) {
    cb(new OddError('amount'))
    return
  }
  cb(Error('some other error'))
  return
  cb(null, amount/2)
}
Similarly the run function has to be adapted to take a callback (cb) so that errors can propagate via that callback function. When calling doTask we need to now supply a callback function and check whether the first err argument of the callback is truthy to generate the equivalent of a catch block:
function run (cb) {
  doTask(4, (err, result) => {
    if (err) {
      if (err.code === 'ERR_AMOUNT_MUST_BE_NUMBER') {
        cb(Error('wrong type'))
      } else if (err.code === 'ERRO_AMOUNT_MUST_EXCEED_ZERO') {
        cb(Error('out of range'))
      } else if (err.code === 'ERR_MUST_BE_EVEN') {
        cb(Error('cannot be odd'))
      } else {
        cb(err)
      }
      return
    }

    console.log('result', result)
  })
}

run((err) => {
  if (err) console.error('Error caught', err)
})
Finally, at the end of the above code we call run and pass it a callback function, which checks whether the first argument (err) is truthy and if it is the error is logged as the way as in the other two forms:

Much like using async/await or Promises this callback-based form isn't necessary unless we also have asynchronous work to do. We've explored examples where some errors are handled whereas others are propagated based on whether the error can be identified. Whether or not an error is propagated is very much down to context. Other reasons to propagate an error might be when error handling strategies have failed at a certain level. For instance retrying a network request a certain amount of times before propagating an error. Generally speaking, try to propagate errors for handling at the highest level possible. In a module this is the main file of the module, in an application this is in the entry point file.
Lab Exercises
Lab 10.1 - Synchronous Error Handling
The native URL constructor can be used to parse URLs, it's been wrapped into a function called
parseURL:
function parseURL (str) {
  const parsed = new URL(str)
  return parsed
}
If URL is passed a unparsable URL string it will throw, so calling parseURL('foo') will result in an exception:
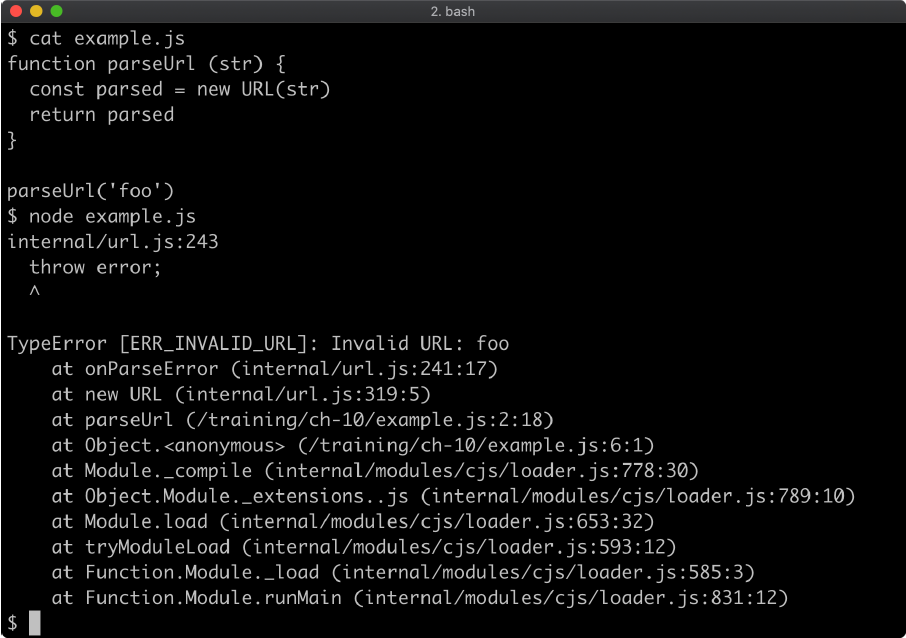
The labs-1 folder contains an index.js file with the following content:
'use strict'
const assert = require('assert')

function parseUrl(str) {
  const parsed = new URL(str)
  return parsed
}

assert.doesNotThrow(() => { parseUrl('invalid-url') })
assert.equal(parseUrl('invalid-url'), null)
assert.deepEqual(
  parseUrl('http://example.com'),
  new URL('http://example.com')
)

console.log('passed!')
Modify the parseURL function body such that instead of throwing an error, it returns null when the URL is invalid. Use the fact that URL will throw when given invalid input to determine whether or not to return null or a parsed object.
Once implemented, execute the index.js file with node, if the output says passed! then the exercise was completed successfully:

Lab 10.2 - Async Function Error Handling
The following code loads the fs module and uses its promises interface to read a file based on a file path passed to a read function:
const fs = require('fs')

async function read(file) {
  const content = await fs.promises.readFile(file)
  return content
}
The promise returned from fs.promises.readFile may reject for a variety of reasons, for instance if the specified file path doesn't exist or the process doesn't have permissions to access it. In this scenario, we don't care what the reason for failure is, we just want to propagate a single error instance from the native Error constructor with the message 'failed to read'.
The labs-2 index.js file contains the following code:
'use strict'
const fs = require('fs')
const assert = require('assert')

async function read(file) {
  const content = await fs.promises.readFile(file)
  return content
}

async function check() {
  await assert.rejects(
    read('not-a-valid-filepath'),
    new Error('failed to read')
  )
  assert.deepEqual(
    await read(__filename),
    fs.readFileSync(__filename)
  )
  console.log('passed!')
}

check()
Modify the body of the read function so that any possible rejection by the promise returned from the fs.promises.readFile call results in the read function rejecting with a new Error('failed to read') error. If implemented correctly, when node index.js is executed the output should be passed!:

11 - Using buffers
Introduction
Chapter Overview
Handling binary data in server-side programming is an essential capability. In Node.js binary data is handled with the Buffer constructor. When an encoding isn't set, reading from the file system, or from a network socket, or any type of I/O will result in one or more array-like instances that inherit from the Buffer constructor. In this chapter we'll explore how to handle binary data in Node.
Learning Objectives
By the end of this chapter, you should be able to:
- Understand the anatomy of a
Bufferinstance. - Safely and unsafely create buffers.
- Convert between buffers and other data structures.
Using Buffers
The Buffer Instance
The Buffer constructor is a global, so there's no need to require any core module in order to use the Node core Buffer API:
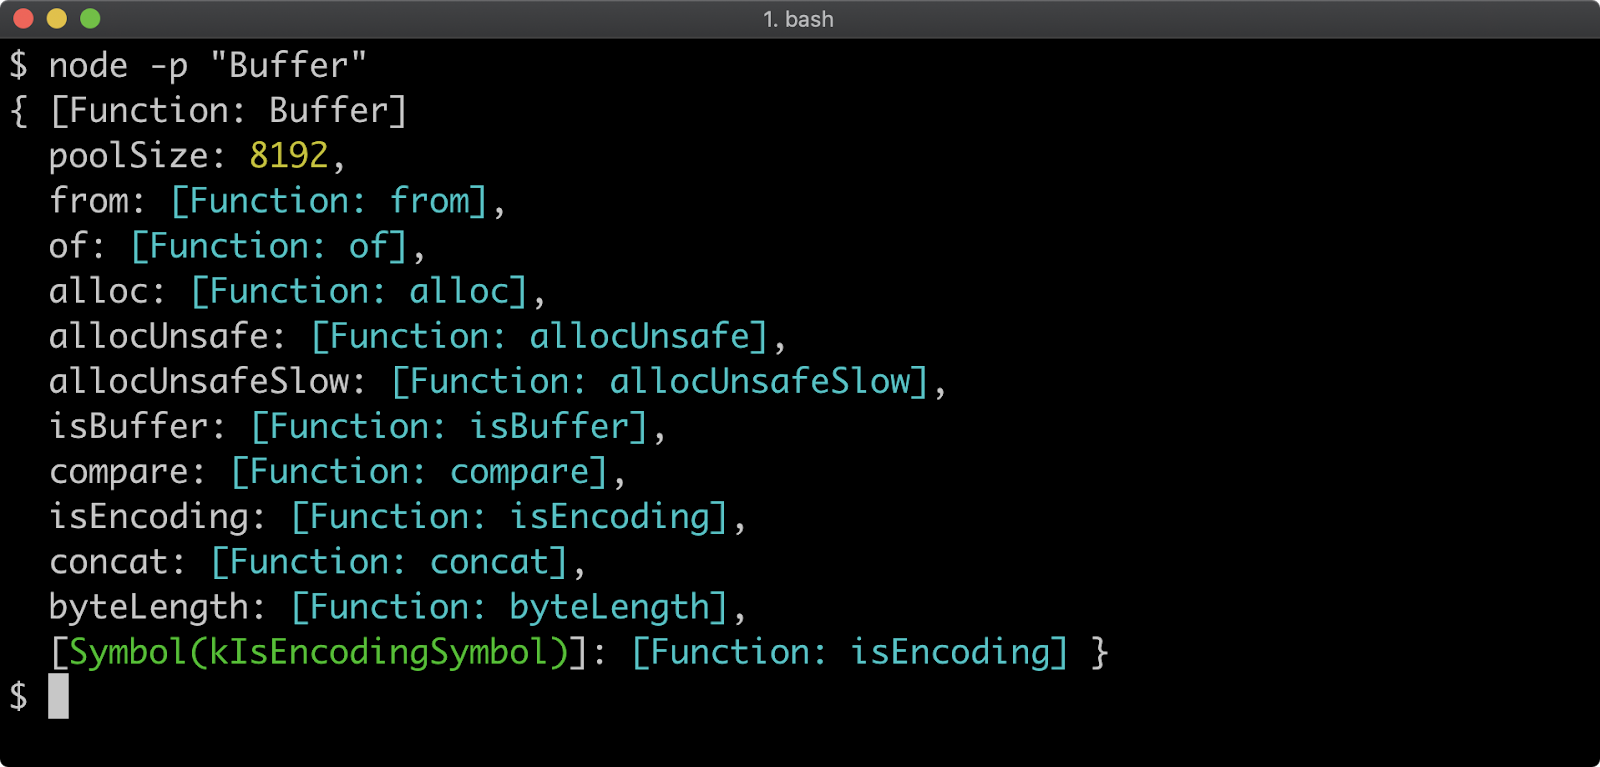
When the Buffer constructor was first introduced into Node.js the JavaScript language did not have a native binary type. As the language evolved the ArrayBuffer and a variety of Typed Arrays were introduced to provide different "views" of a buffer. For example, an ArrayBuffer instance be accessed with a Float64Array where each set of 8 bytes is interpreted as a 64-bit floating point number, or an Int32Array where each 4 bytes represents a 32bit, two's complement signed integer or a Uint8Array where each byte represents an unsigned integer between 0-255. For more info and a full list of possible typed arrays see "JavaScript Typed Arrays" by MDN web docs.
When these new data structures were added to JavaScript, the Buffer constructor internals were refactored on top of the Uint8Array typed array. So a buffer object is both an instance of Buffer and an instance (at the second degree) of Uint8Array.
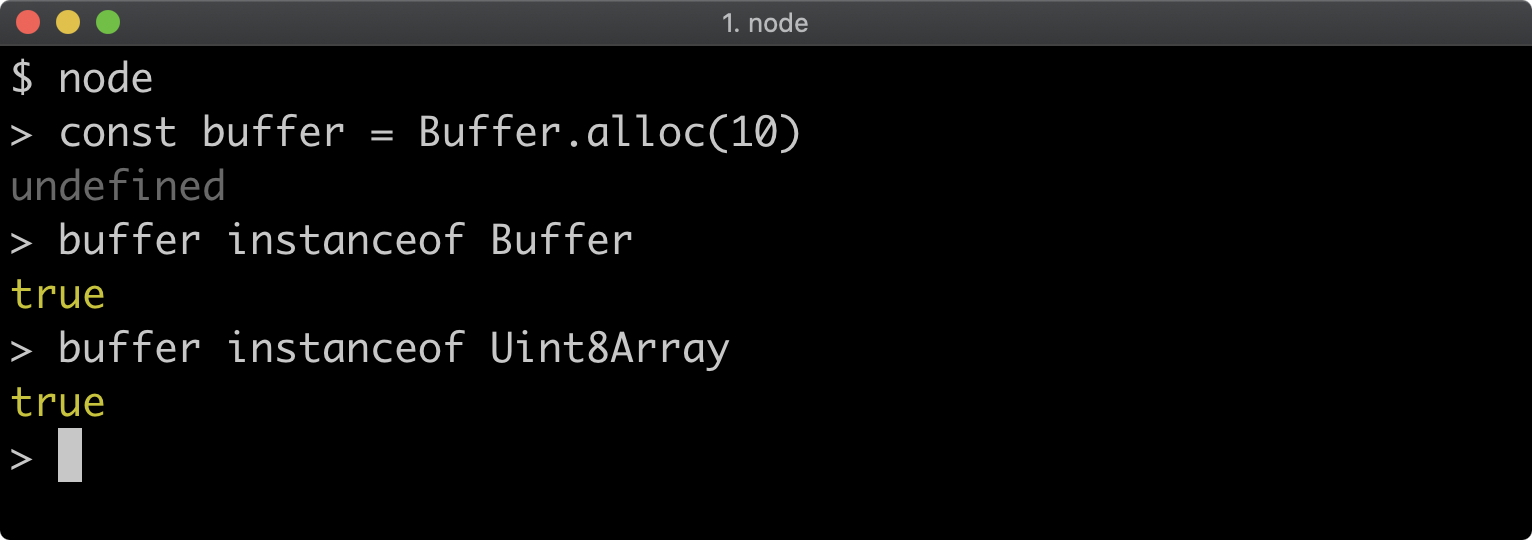
This means there are additional API's that can be availed of beyond the Buffer methods. For more information, see "Uint8Array" by MDN web docs. And for a full list of the Buffers API's which sit on top of the Uint8Array API see Node.js Documentation.
One key thing to note is that the Buffer.prototype.slice method overrides the Uint8Array.prototype.slice method to provide a different behavior. Whereas the Uint8Array slice method will take a copy of a buffer between two index points, the Buffer slice method will return a buffer instance that references the binary data in the original buffer that slice was called on:
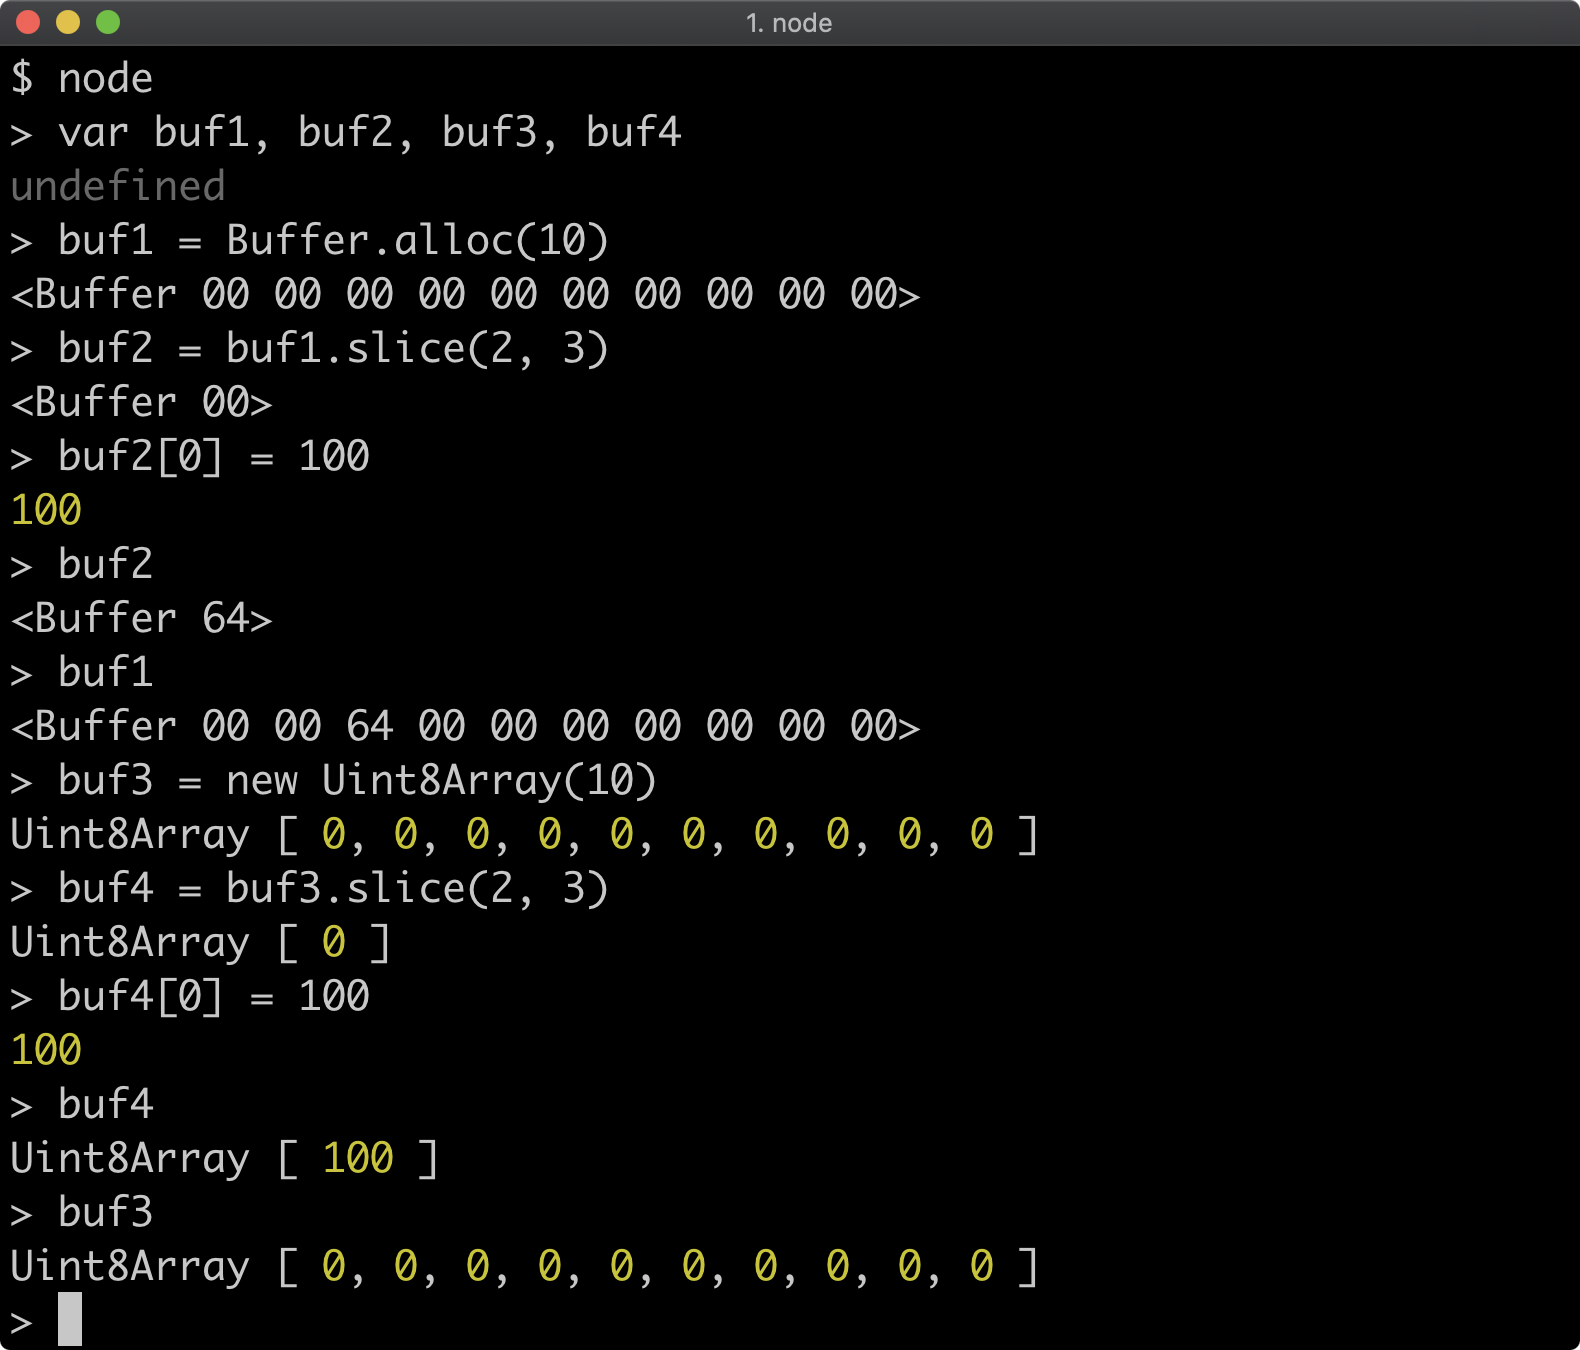
In the above, when we create buf2 by calling buf1.slice(2, 3) this is actually a reference to the third byte in buf1. So when we assign buf2[0] to 100, buf1[2] is also updated to the same, because it's the same piece of memory. However, using a Uint8Array directly, taking a slice of buf3 to create buf4 creates a copy of the third byte in buf3 instead. So when buf4[0] is assigned to 100, buf3[2] stays at 0 because each buffer is referred to completely separate memory.
Allocating Buffers
Usually a constructor would be called with the new keyword, however with Buffer this is deprecated and advised against. Do not instantiate buffers using new.
The correct way to allocate a buffer of a certain amount of bytes is to use Buffer.alloc:
const buffer = Buffer.alloc(10)
The above would allocate a buffer of 10 bytes. By default the Buffer.alloc function produces a zero-filled buffer:
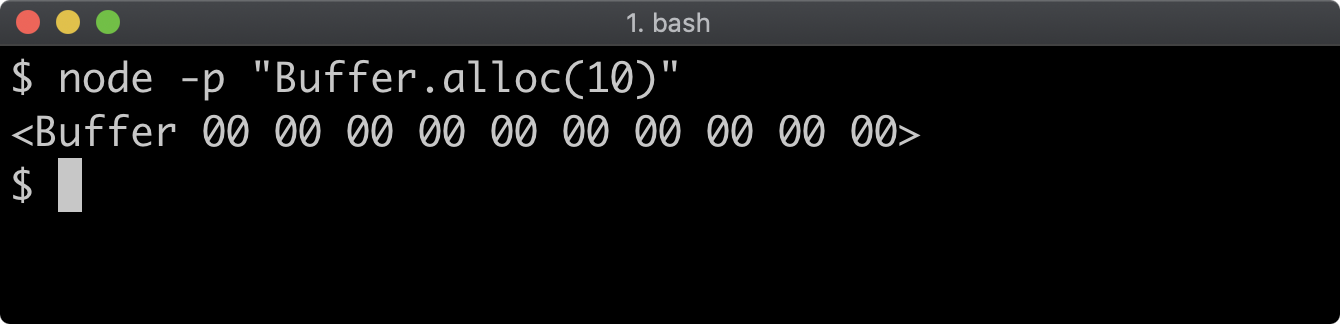
When a buffer is printed to the terminal it is represented with <Buffer ...> where the ellipsis (…) in this case signifies a list of bytes represented as hexadecimal numbers. For instance a single byte buffer, where the byte's decimal value is 100 (and its binary value is 1100100), would be represented as <Buffer 64>.
Using Buffer.alloc is the safe way to allocate buffers. There is an unsafe way:
const buffer = Buffer.allocUnsafe(10)
Any time a buffer is created, it's allocated from unallocated memory. Unallocated memory is only ever unlinked, it isn't wiped. This means that unless the buffer is overwritten (e.g. zero-filled) then an allocated buffer can contain fragments of previously deleted data. This poses a security risk, but the method is available for advanced use cases where performance advantages may be gained and security and the developer is fully responsible for the security of the implementation.
Every time Buffer.allocUnsafe is used it will return a different buffer of garbage bytes:

In most cases, allocation of buffers won't be something we have to deal with on a regular basis. However if we ever do need to create a buffer, it's strongly recommended to use Buffer.alloc instead of Buffer.unsafeAlloc.
One of the reasons that new Buffer is deprecated is because it used to have the Buffer.unsafeAlloc behavior and now has the Buffer.alloc behavior which means using new Buffer will have a different outcome on older Node versions. The other reason is that new Buffer also accepts strings.
The key take-away from this section is: if we need to safely create a buffer, use Buffer.alloc.
Converting Strings to Buffers
The JavaScript string primitive is a frequently used data structure, so it's important to cover how to convert from strings to buffers and from buffers to strings.
A buffer can be created from a string by using Buffer.from:
const buffer = Buffer.from('hello world')
When a string is passed to Buffer.from the characters in the string are converted to byte values:
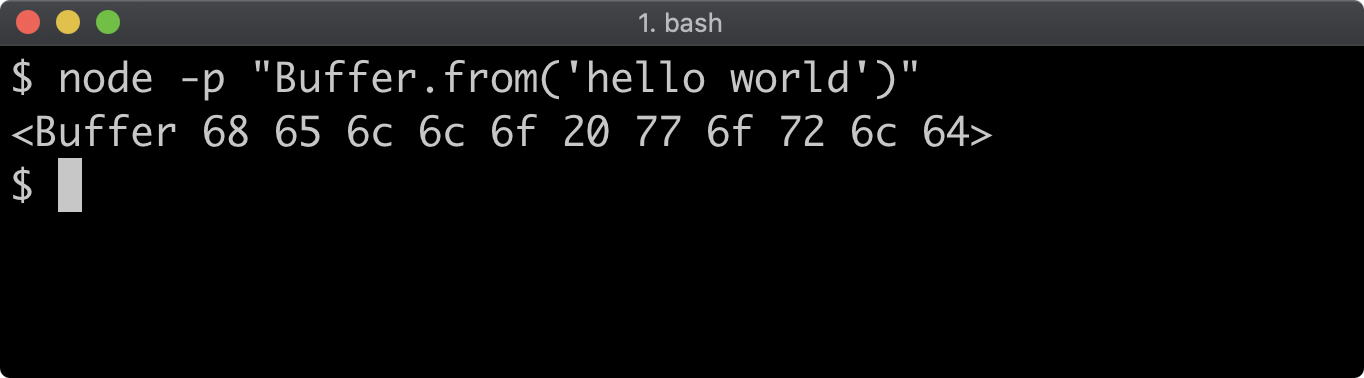
In order to convert a string to a binary representation, an encoding must be assumed. The default encoding that Buffer.from uses is UTF8. The UTF8 encoding may have up to four bytes per character, so it isn't safe to assume that string length will always match the converted buffer size.
For instance, consider the following:
console.log('👀'.length) // will print 2
console.log(Buffer.from('👀').length) // will print 4
Even though there is one character in the string, it has a length of 2. This is to do with how Unicode symbols work, but explaining the reasons for this in depth are far out of scope for this subject. However, for a full deep dive into reasons for a single character string having a length of 2 see the following article "JavaScript Has a Unicode Problem" by Mathias Bynes.
When the string is converted to a buffer however, it has a length of 4. This is because in UTF8 encoding, the eyes emoji is represented with four bytes:
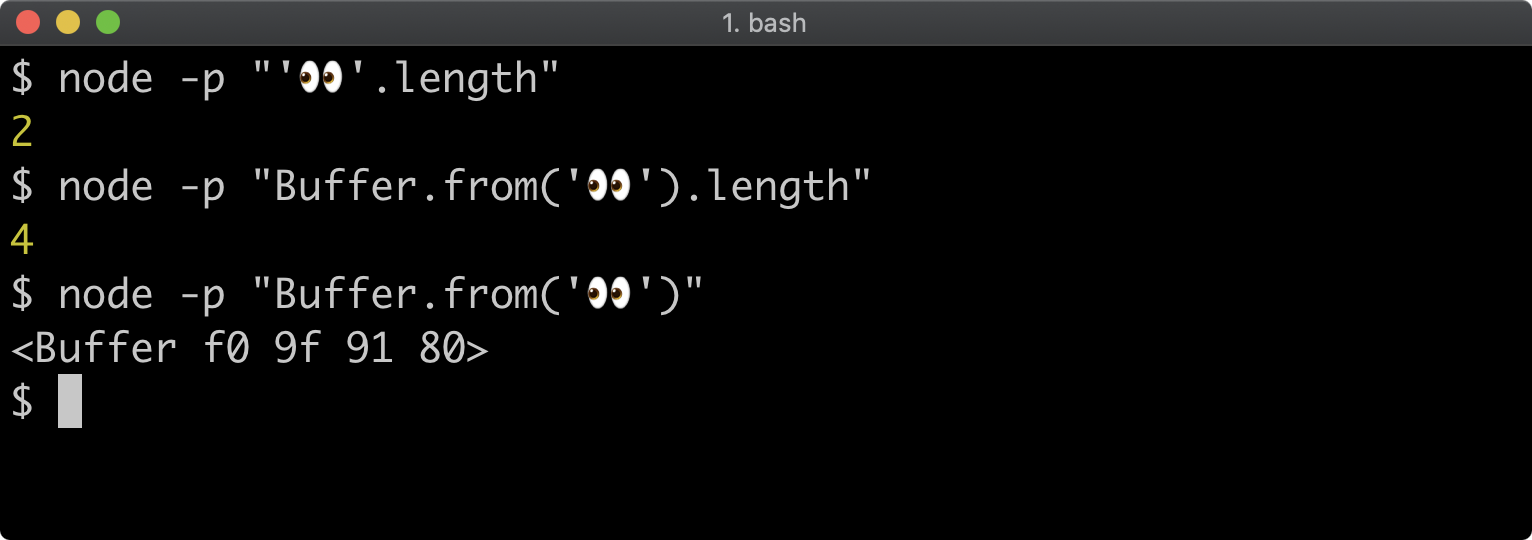
When the first argument passed to Buffer.from is a string, a second argument can be supplied to set the encoding. There are two types of encodings in this context: character encodings and binary-to-text encodings.
UTF8 is one character encoding, another is UTF16LE.
When we use a different encoding it results in a buffer with different byte values:

It can also result in different buffer sizes, with UTF16LE encoding the character A is two bytes whereas 'A'.length would be 1.
The supported byte-to-text encodings are hex and base64. Supplying one of these encodings allows us to represent the data in a string, this can be useful for sending data across the wire in a safe format.
Assuming UTF8 encoding, the base64 representation of the eyes emoji is 8J+RgA==. If we pass that to Buffer.from and pass a second argument of 'base64' it will create a buffer with the same bytes as Buffer.from('👀'):
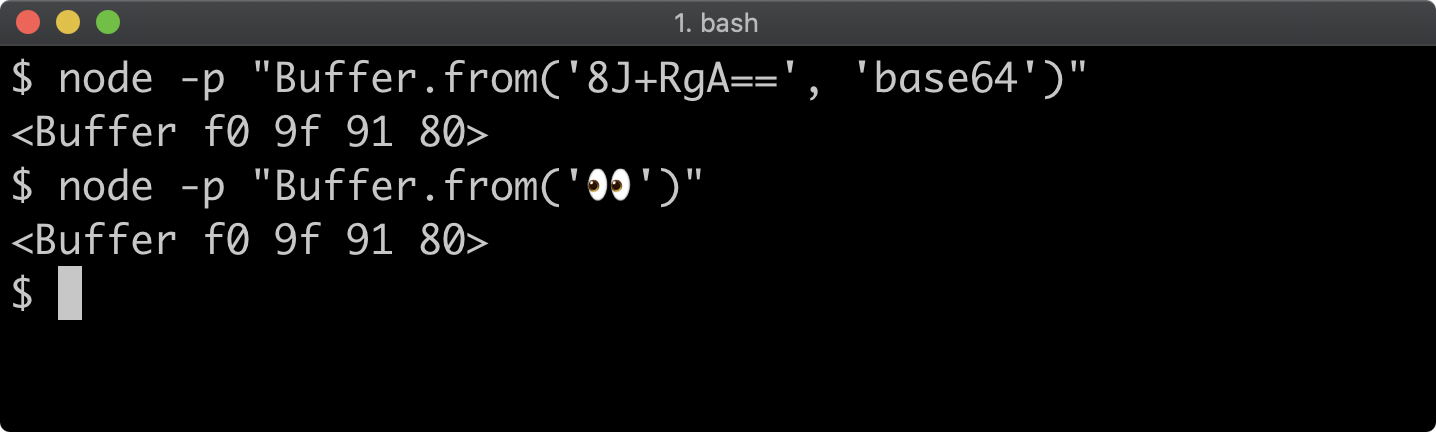
Converting Buffers to Strings
To convert a buffer to a string, call the toString method on a Buffer instance:
const buffer = Buffer.from('👀')
console.log(buffer) // prints <Buffer f0 9f 91 80>
console.log(buffer.toString()) // prints 👀
console.log(buffer + '') // prints 👀
On the last line in the example code, we also concatenate buffer to an empty string. This has the same effect as calling the toString method:
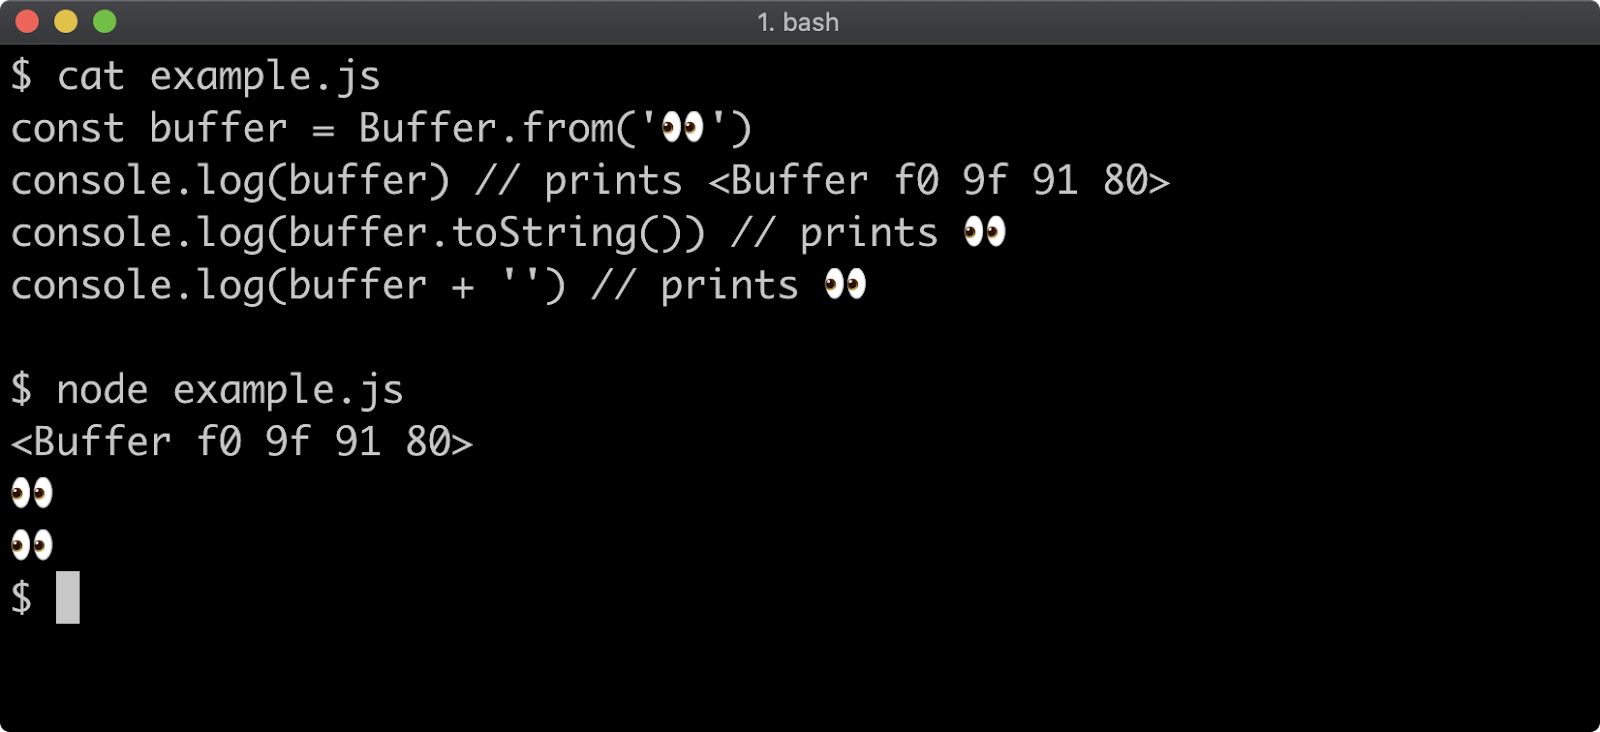
The toString method can also be passed an encoding as an argument:
const buffer = Buffer.from('👀')
console.log(buffer) // prints <Buffer f0 9f 91 80>
console.log(buffer.toString('hex')) // prints f09f9180
console.log(buffer.toString('base64')) // prints 8J+RgA==
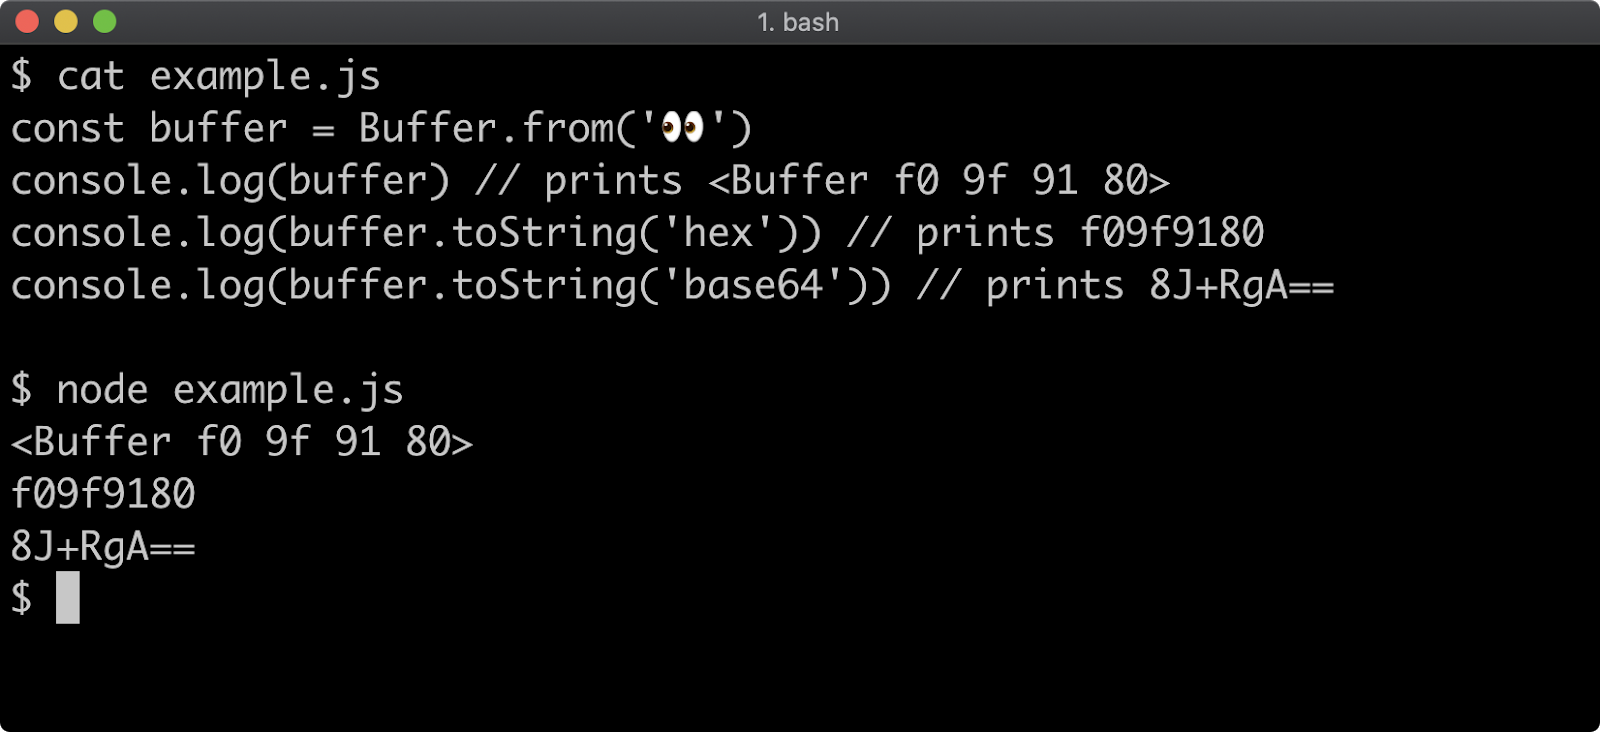
The UTF8 encoding format has between 1 and 4 bytes to represent each character, if for any reason one or more bytes is truncated from a character this will result in encoding errors. So in situations where we have multiple buffers that might split characters across a byte boundary the Node core string_decoder module should be used.
const { StringDecoder } = require('string_decoder')
const frag1 = Buffer.from('f09f', 'hex')
const frag2 = Buffer.from('9180', 'hex')
console.log(frag1.toString()) // prints �
console.log(frag2.toString()) // prints ��
const decoder = new StringDecoder()
console.log(decoder.write(frag1)) // prints nothing
console.log(decoder.write(frag2)) // prints 👀
Calling decoder.write will output a character only when all of the bytes representing that character have been written to the decoder:
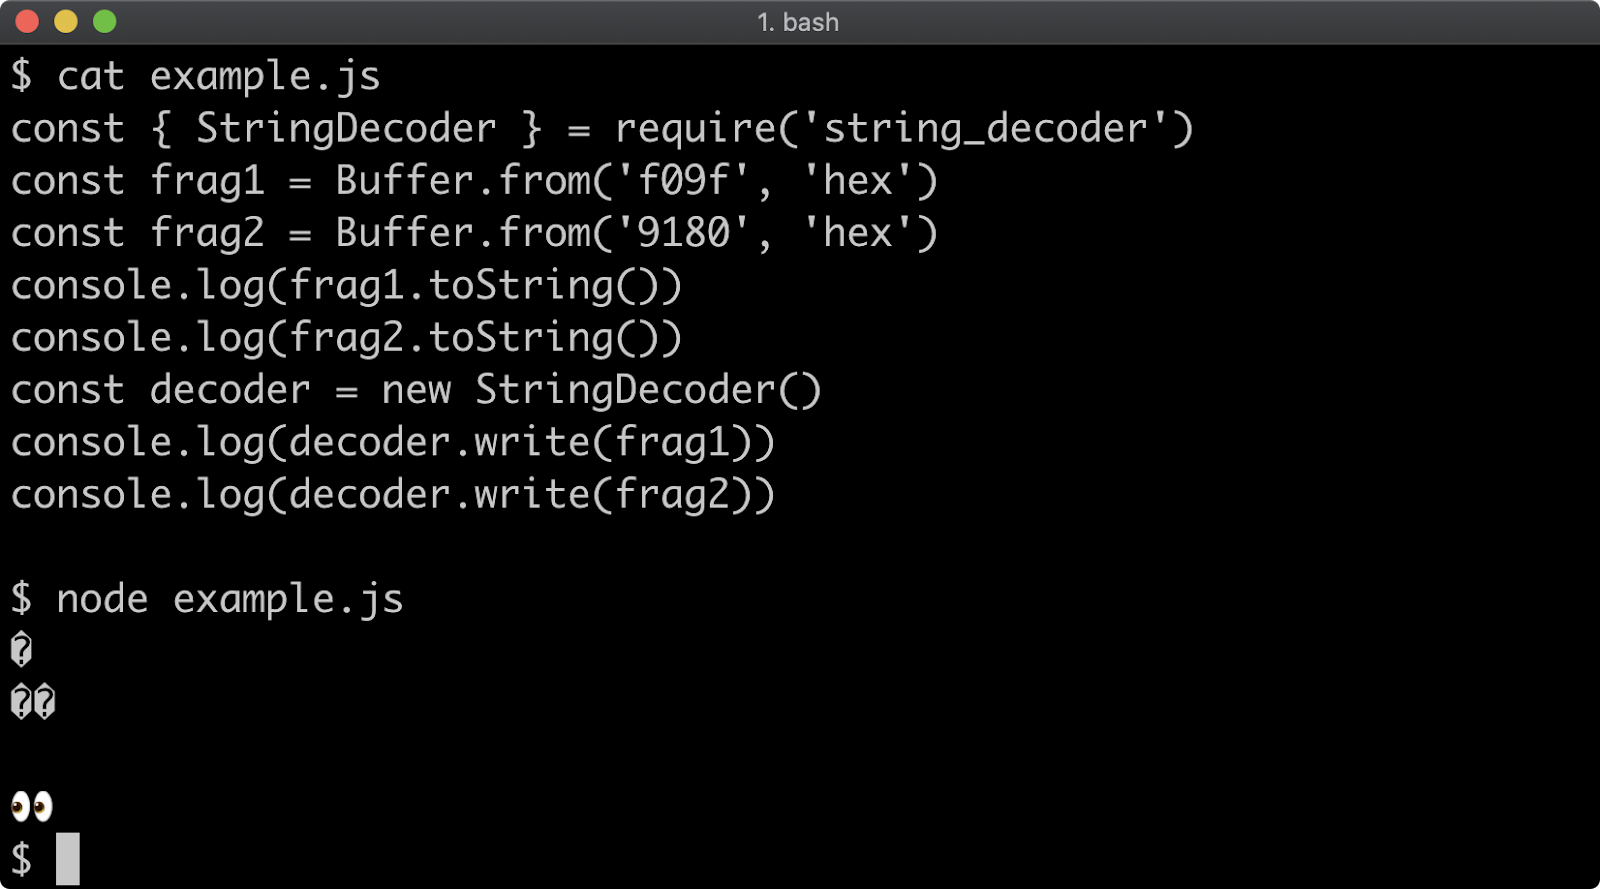
To learn more about the string_decoder see Node.js Documentation.
JSON Serializing and Deserializing Buffers
JSON is a very common serialization format, particularly when working with JavaScript-based applications. When JSON.stringify encounters any object it will attempt to call a toJSON method on that object if it exists. Buffer instances have a toJSON method which returns a plain JavaScript object in order to represent the buffer in a JSON-friendly way:
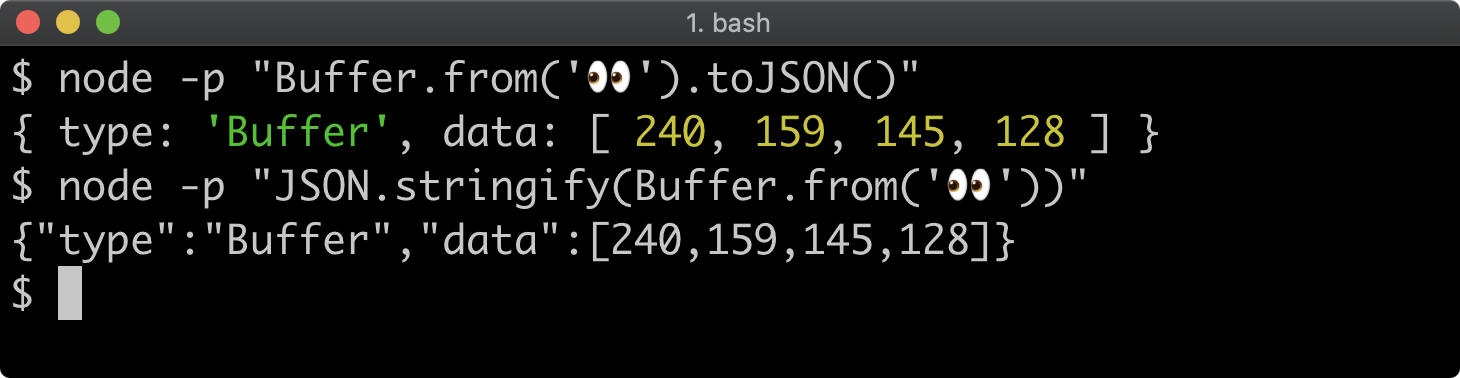
So Buffer instances are represented in JSON by an object that has a type property with a string value of 'Buffer' and a data property with an array of numbers, representing the value of each byte in the buffer.
When deserializing, JSON.parse will only turn that JSON representation of the buffer into a plain JavaScript object, to turn it into an object the data array must be passed to Buffer.from:
const buffer = Buffer.from('👀')
const json = JSON.stringify(buffer)
const parsed = JSON.parse(json)
console.log(parsed) // prints { type: 'Buffer', data: [ 240, 159, 145, 128 ] }
console.log(Buffer.from(parsed.data)) // prints <Buffer f0 9f 91 80>
When an array of numbers is passed to Buffer.from they are converted to a buffer with byte values corresponding to those numbers.
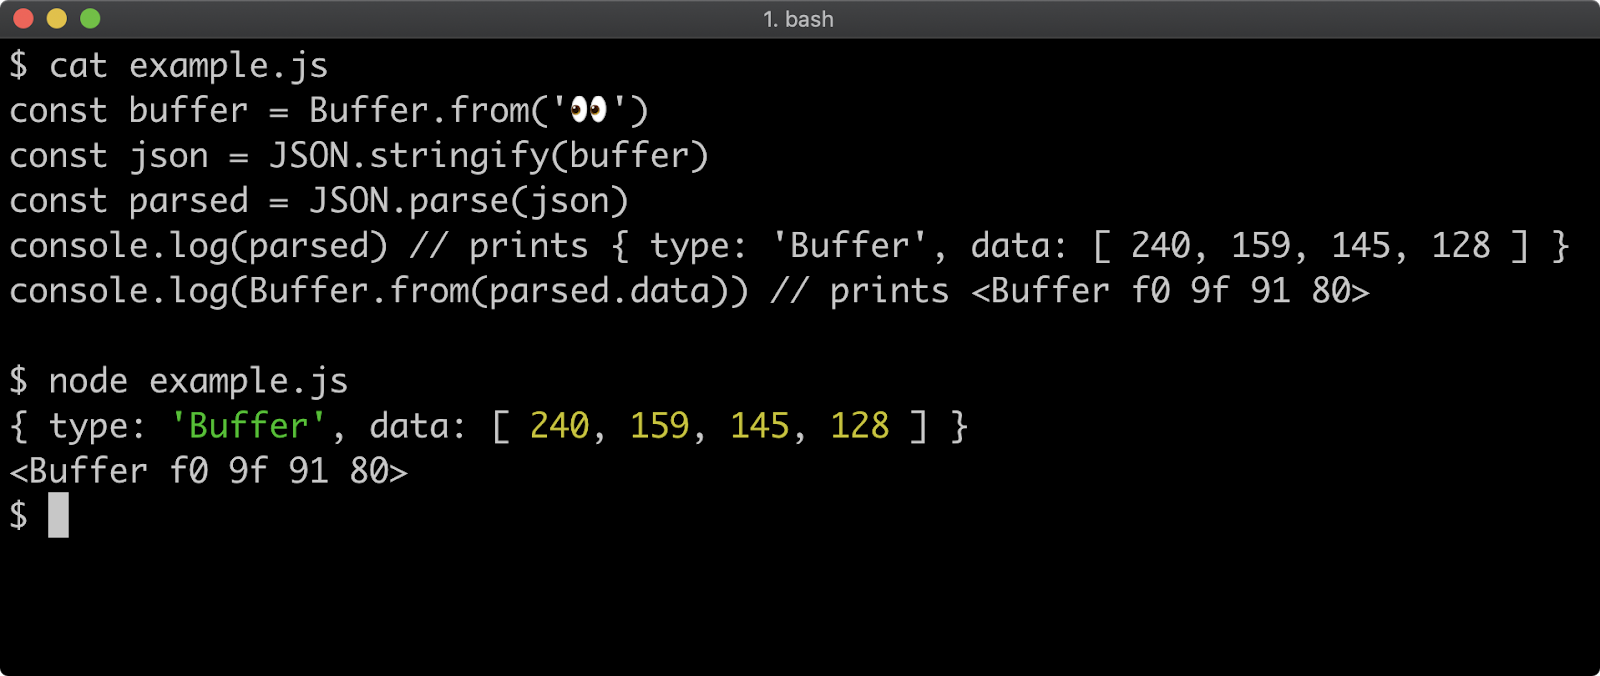
Lab Exercises
Lab 11.1 - Create a Buffer Safely
The index.js file in the lab-1 folder contains the following:
'use strict'
const assert = require('assert')
const buffer = Buffer.allocUnsafe(4096)
console.log(buffer)

for (const byte of buffer) assert.equal(byte, 0)
console.log('passed!')
Alter the code so that the buffer is safely allocated. Do not explicitly fill the buffer with anything. If the process prints the buffer and then logs passed!, the exercise was correctly completed.
Lab 11.2 - Convert a String to base64 Encoded String by Using a Buffer
The labs-2 index.js has the following code:
'use strict'
const assert = require('assert')
const str = 'buffers are neat'
const base64 = '' // convert str to base64

console.log(base64)

assert.equal(base64, Buffer.from([
  89, 110, 86, 109, 90, 109, 86, 121, 99,
  121, 66, 104, 99, 109, 85, 103, 98, 109,
  86, 104, 100, 65, 61, 61]))

console.log('passed!')
Using the Buffer API in some way, edit the code so that the base64 constant contains a base64 representation of the str constant.
If the process prints the base64 string and then logs passed!, the exercise was correctly completed.
12 - Working with streams
Introduction
Chapter Overview
Like buffers, streams can be found in many Node core APIs and ecosystem libraries. Streams facilitate high volume data processing without requiring exorbitant compute resources. As an abstraction, streams also provide an ergonomic benefit, supporting the decoupling of application logic around real time data using a functional programming paradigm.
In this section, we'll explore how to consume, create and safely connect streams together using the most common and best-practice-focused patterns to create incremental data processing pipelines.
Learning Objectives
By the end of this chapter, you should be able to:
- Distinguish the different types of streams.
- Create various types of streams.
- Understand stream events and how to handle them.
- Explain incremental data processing with Node.js.
Working with Streams
Stream Types
The Node core stream module exposes six constructors for creating streams:
StreamReadableWritableDuplexTransformPassThrough
Other common Node core APIs such as process, net, http and fs, child_process expose streams created with these constructors.
The Stream constructor is the default export of the stream module and inherits from the EventEmitter constructor from the events module. The Stream constructor is rarely used directly, but is inherited from by the other constructors.
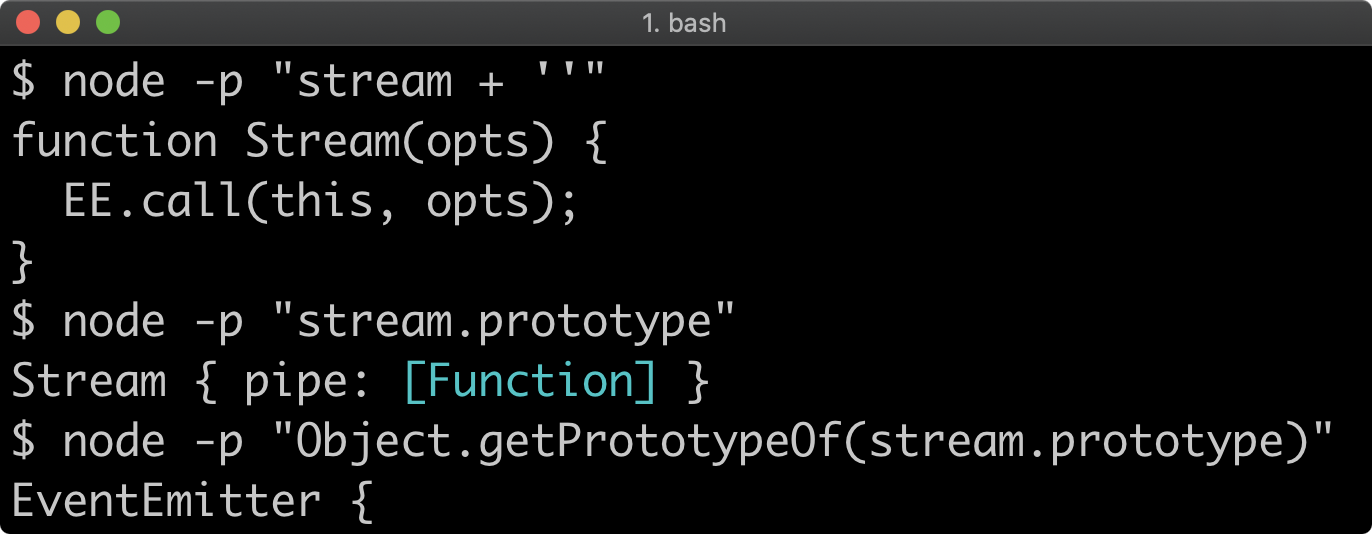
The only thing the Stream constructor implements is the pipe method, which we will cover later in this section.
The main events emitted by various Stream implementations that one may commonly encounter in application-level code are:
dataendfinishcloseerror
The data and end events will be discussed on the "Readable Streams" page later in this section, the finish is emitted by Writable streams when there is nothing left to write.
The close and error events are common to all streams. The error event may be emitted when a stream encounters an error, the close event may be emitted if a stream is destroyed which may happen if an underlying resource is unexpectedly closed. It's noteworthy that there are four events that could signify the end of a stream. On the "Determining End-of-Stream" page further in this section, we'll discuss a utility function that makes it easier to detect when a stream has ended.
For a full list of events see Class: stream.Writable and Class: stream.Readable sections of the Node.js Documentation.
Stream Modes
There are two stream modes:
- Binary streams
- Object streams
The mode of a stream is determined by its objectMode option passed when the stream is instantiated. The default objectMode is false, which means the default mode is binary. Binary mode streams only read or write Buffer instances (Buffers were covered in Chapter 11 - "Using Buffers").
In object mode streams can read or write JavaScript objects and all primitives (strings, numbers) except null, so the name is a slight misnomer. In Node core, most if not all object mode streams deal with strings. On the next pages the differences between these two modes will be covered as we explore the different stream types.
Readable Streams (1)
The Readable constructor creates readable streams. A readable stream could be used to read a file, read data from an incoming HTTP request, or read user input from a command prompt to name a few examples. The Readable constructor inherits from the Stream constructor which inherits from the EventEmitter constructor, so readable streams are event emitters. As data becomes available, a readable stream emits a data event.
The following is an example demonstrating the consuming of a readable stream:
'use strict'
const fs = require('fs')
const readable = fs.createReadStream(__filename)
readable.on('data', (data) => { console.log(' got data', data) })
readable.on('end', () => { console.log(' finished reading') })
The fs module here is used for demonstration purposes, readable stream interfaces are generic. The file system is covered in the next section, so we'll avoid in-depth explanation. But suffice to say the createReadStream method instantiates an instance of the Readable constructor and then causes it to emit data events for each chunk of the file that has been read. In this case the file would be the actual file executing this code, the implicitly available __filename refers to the file executing the code. Since it's so small only one data event would be emitted, but readable streams have a default highWaterMark option of 16kb. That means 16kb of data can be read before emitting a data event. So in the case of a file read stream, 64kb file would emit four data events. When there is no more data for a readable stream to read, an end event is emitted.
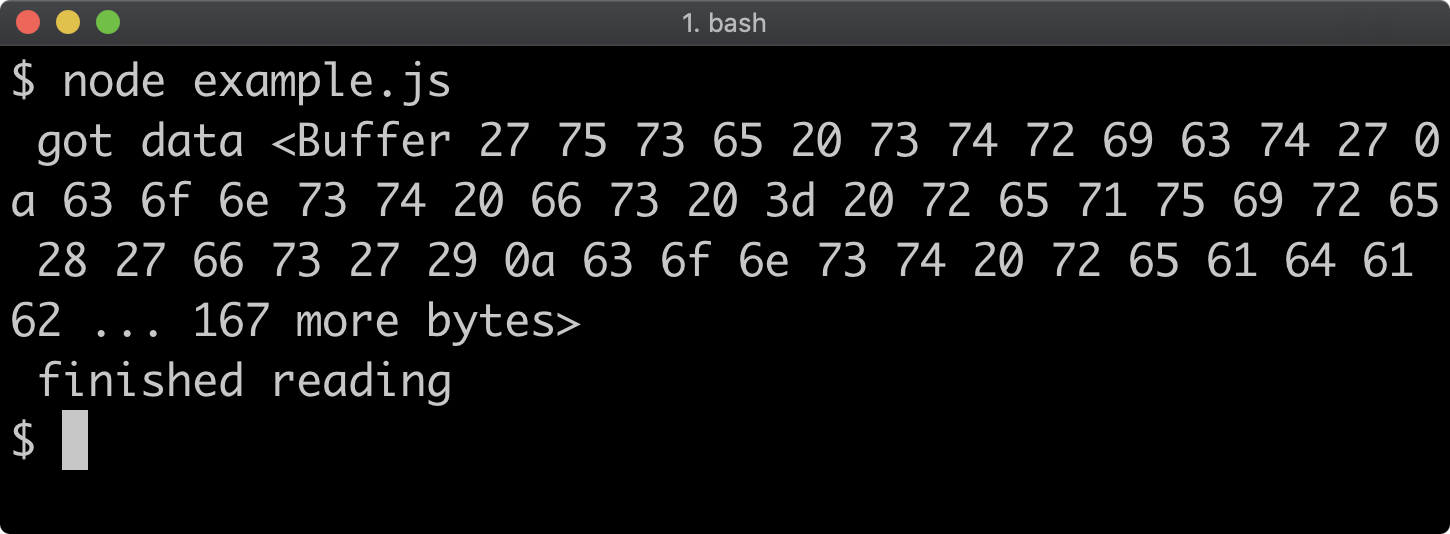
Readable streams are usually connected to an I/O layer via a C-binding, but we can create a contrived readable stream ourselves using the Readable constructor:
'use strict'
const { Readable } = require('stream')
const createReadStream = () => {
  const data = ['some', 'data', 'to', 'read']
  return new Readable({
    read () {
      if (data.length === 0) this.push(null)
      else this.push(data.shift())
    }
  })
}
const readable = createReadStream()
readable.on('data', (data) => { console.log('got data', data) })
readable.on('end', () => { console.log('finished reading') })
To create a readable stream, the Readable constructor is called with the new keyword and passed an options object with a read method. The read function is called any time Node internals request more data from the readable stream. The this keyword in the read method points to the readable stream instance, so data is sent from the read stream by calling the push method on the resulting stream instance. When there is no data left, the push method is called, passing null as an argument to indicate that this is the end-of-stream. At this point Node internals will cause the readable stream to emit the end event.
When this is executed four data events are emitted, because our implementation pushes each item in the stream. The read method we supply to the options object passed to the Readable constructor takes a size argument which is used in other implementations, such as reading a file, to determine how many bytes to read. As we discussed, this would typically be the value set by the highWaterMark option which defaults to 16kb.
The following shows what happens when we execute this code:
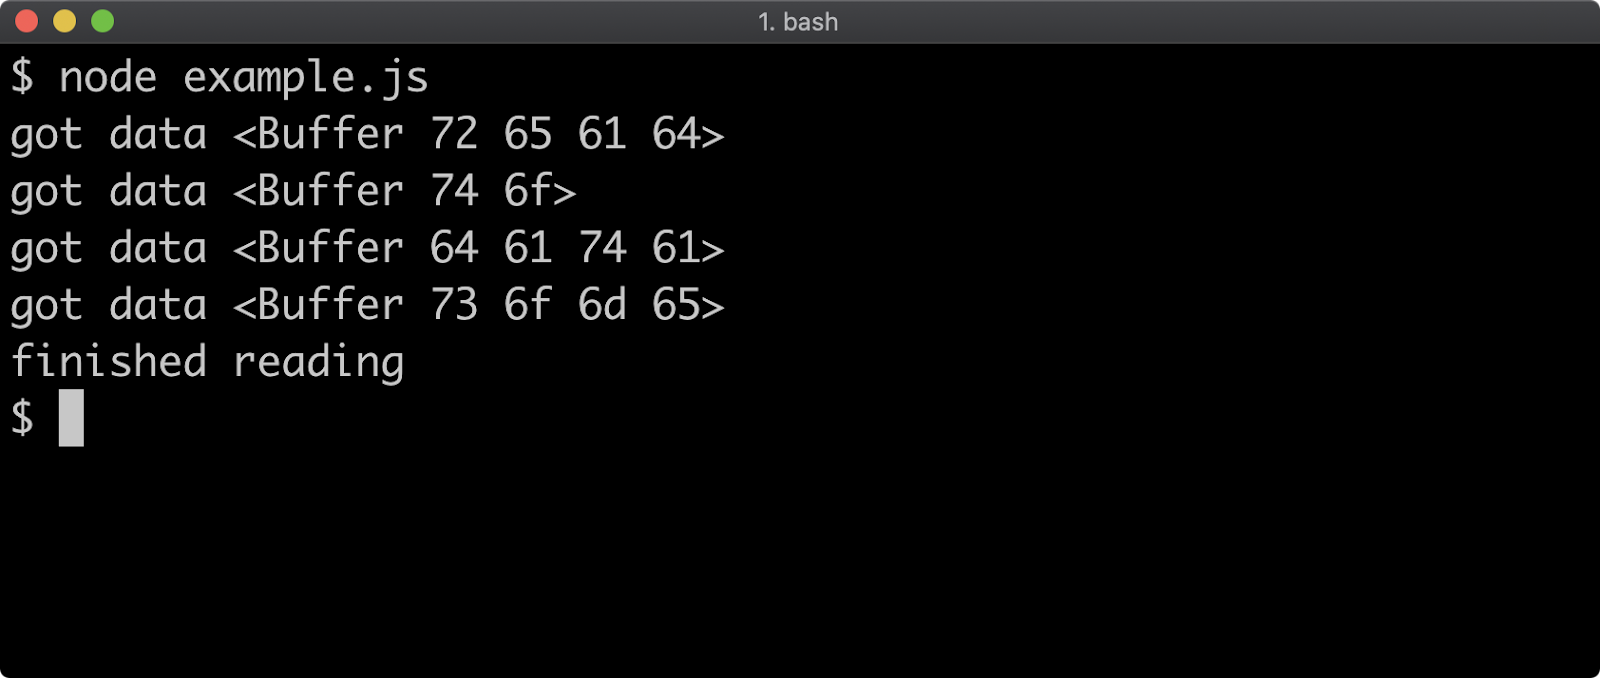
Readable Streams (2)
Notice how we pushed strings to our readable stream but when we pick them up in the data event they are buffers. Readable streams emit buffers by default, which makes sense since most use-cases for readable streams deal with binary data.
In the previous section, we discussed buffers and various encodings. We can set an encoding option when we instantiate the readable stream for the stream to automatically handle buffer decoding:
'use strict'
const { Readable } = require('stream')
const createReadStream = () => {
  const data = ['some', 'data', 'to', 'read']
  return new Readable({
    encoding: 'utf8',
    read () {
      if (data.length === 0) this.push(null)
      else this.push(data.shift())
    }
  })
}
const readable = createReadStream()
readable.on('data', (data) => { console.log('got data', data) })
readable.on('end', () => { console.log('finished reading') })
If we were to run this example code again with this one line changed, we would see the following:

Now when each data event is emitted it receives a string instead of a buffer. However because the default stream mode is objectMode: false, the string is pushed to the readable stream, converted to a buffer and then decoded to a string using UTF8.
When creating a readable stream without the intention of using buffers, we can instead set objectMode to true:
'use strict'
const { Readable } = require('stream')
const createReadStream = () => {
  const data = ['some', 'data', 'to', 'read']
  return new Readable({
    objectMode: true,
    read () {
      if (data.length === 0) this.push(null)
      else this.push(data.pop())
    }
  })
}
const readable = createReadStream()
readable.on('data', (data) => { console.log('got data', data) })
readable.on('end', () => { console.log('finished reading') })
This will again create the same output as before:
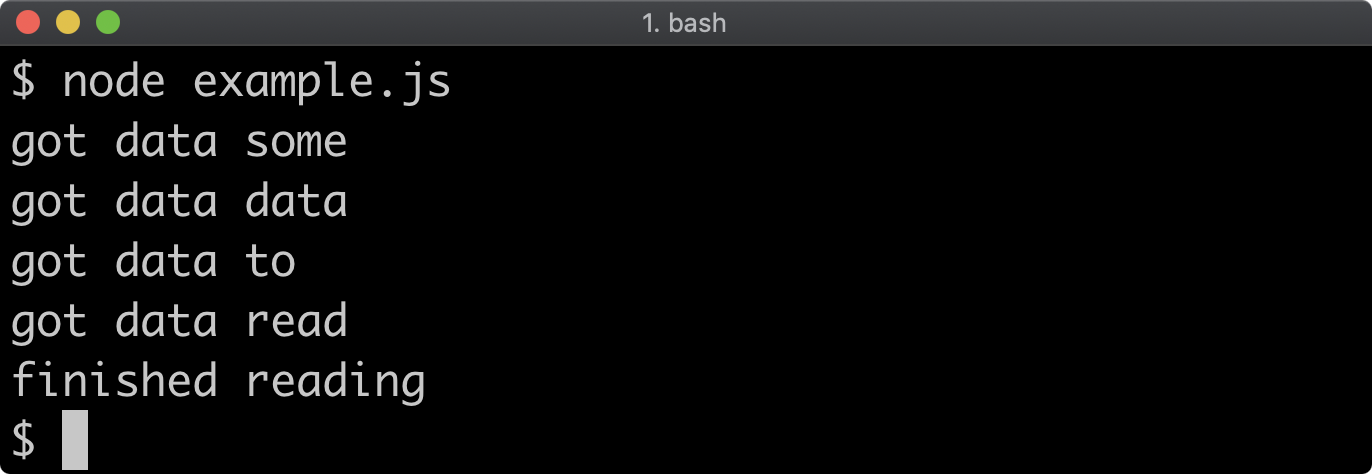
However this time the string is being sent from the readable stream without converting to a buffer first.
Our code example can be condensed further using the Readable.from utility method which creates streams from iterable data structures, like arrays:
'use strict'
const { Readable } = require('stream')
const readable = Readable.from(['some', 'data', 'to', 'read'])
readable.on('data', (data) => { console.log('got data', data) })
readable.on('end', () => { console.log('finished reading') })
This will result in the same output, the data events will receive the data as strings.
Contrary to the Readable constructor, the Readable.from utility function sets objectMode to true by default. For more on Readable.from see stream.Readable.from(iterable, [options]) section of the Node.js Documentation.
Writable Streams (1)
The Writable constructor creates writable streams. A writable stream could be used to write a file, write data to an HTTP response, or write to the terminal. The Writable constructor inherits from the Stream constructor which inherits from the EventEmitter constructor, so writable streams are event emitters.
To send data to a writable stream, the write method is used:
'use strict'
const fs = require('fs')
const writable = fs.createWriteStream('./out')
writable.on('finish', () => { console.log('finished writing') })
writable.write('A\n')
writable.write('B\n')
writable.write('C\n')
writable.end('nothing more to write')
The write method can be called multiple times, the end method will also write a final payload to the stream before ending it. When the stream is ended, the finish event is emitted. Our example code will take the string inputs, convert them to Buffer instance and then write them to the out file. Once it writes the final line it will output finished writing:
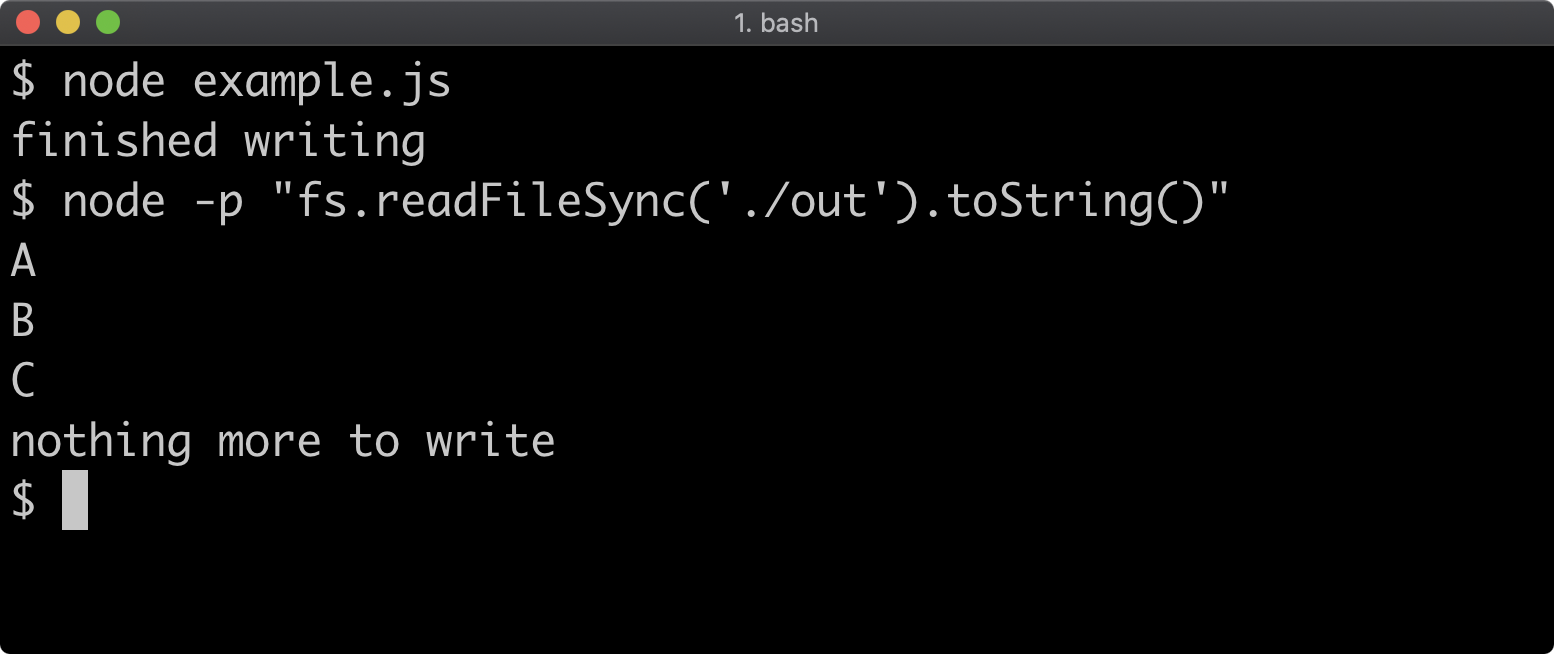
As with the read stream example, let's not focus on the fs module at this point, the characteristics of writable streams are universal.
Also similar to readable streams, writable streams are mostly useful for I/O, which means integrating a writable stream with a native C-binding, but we can likewise create a contrived write stream example:
'use strict'
const { Writable } = require('stream')
const createWriteStream = (data) => {
  return new Writable({
    write (chunk, enc, next) {
      data.push(chunk)
      next()
    }
  })
}
const data = []
const writable = createWriteStream(data)
writable.on('finish', () => { console.log('finished writing', data) })
writable.write('A\n')
writable.write('B\n')
writable.write('C\n')
writable.end('nothing more to write')
To create a writable stream, call the Writable constructor with the new keyword. The options object of the Writable constructor can have a write function, which takes three arguments, which we called chunk, enc, and next. The chunk is each piece of data written to the stream, enc is encoding which we ignore in our case and next is callback which must be called to indicate that we are ready for the next piece of data.
The point of a next callback function is to allow for asynchronous operations within the write option function, this is essential for performing asynchronous I/O. We'll see an example of asynchronous work in a stream prior to calling a callback in the following section.
In our implementation we add each chunk to the data array that we pass into our createWriteStream function.
When the stream is finished the data is logged out:
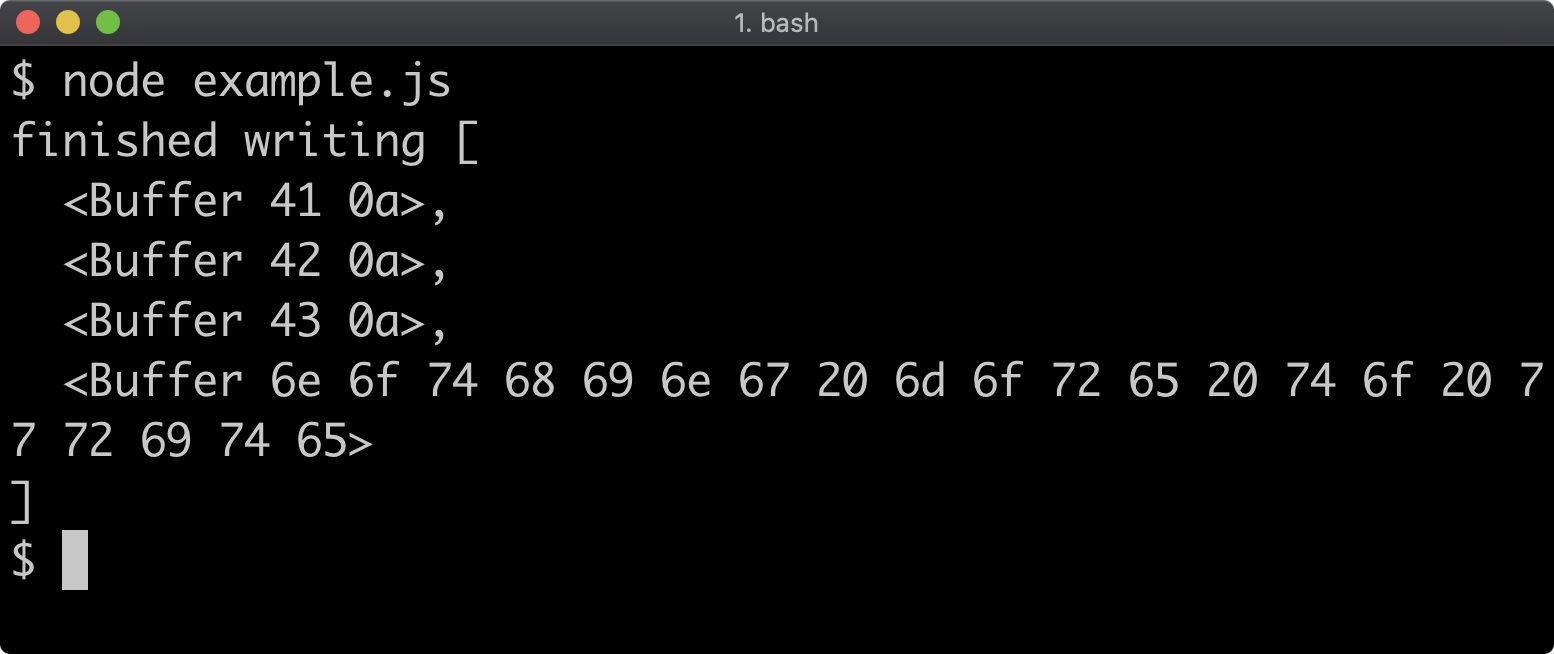
Note again, as with readable streams, the default objectMode option is false, so each string written to our writable stream instance is converted to a buffer before it becomes the chunk argument passed to the write option function. This can be opted out of by setting the decodeStrings option to false:
const createWriteStream = (data) => {
  return new Writable({
    decodeStrings: false,
    write (chunk, enc, next) {
      data.push(chunk)
      next()
    }
  })
}
const data = []
const writable = createWriteStream(data)
writable.on('finish', () => { console.log('finished writing', data) })
writable.write('A\n')
writable.write('B\n')
writable.write('C\n')
writable.end('nothing more to write')
This will result in the following output:
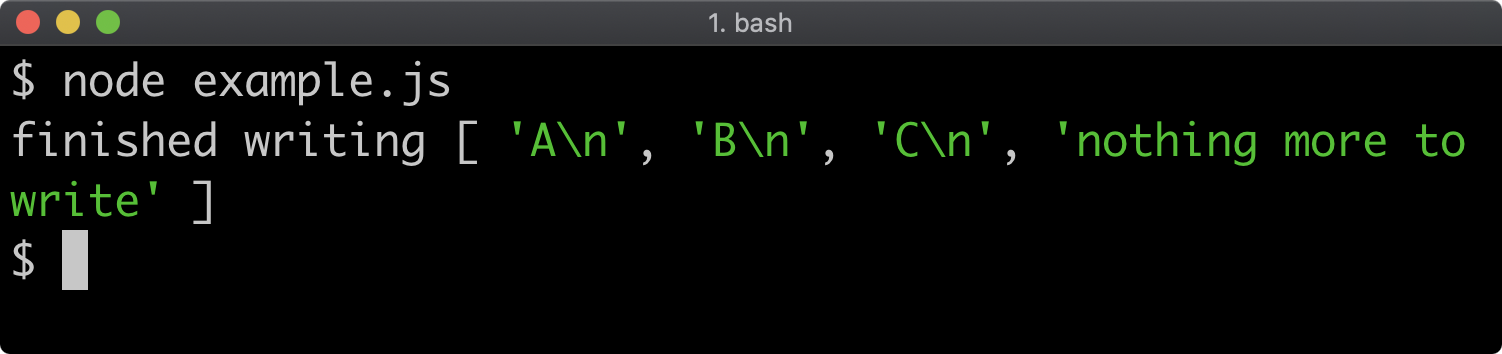
Writable Streams (2)
This will only allow strings or Buffers to be written to the stream, trying to pass any other JavaScript value will result in an error:
'use strict'
const { Writable } = require('stream')
const createWriteStream = (data) => {
  return new Writable({
    decodeStrings: false,
    write (chunk, enc, next) {
      data.push(chunk)
      next()
    }
  })
}
const data = []
const writable = createWriteStream(data)
writable.on('finish', () => { console.log('finished writing', data) })
writable.write('A\n')
writable.write(1)
writable.end('nothing more to write')
The above code would result in an error, causing the process to crash because we're attempting to write a JavaScript value that isn't a string to a binary stream:

Stream errors can be handled to avoid crashing the process, because streams are event emitters and the same special case for the error event applies. We'll explore that more on the "Determining End-of-Stream" page later in this section.
If we want to support strings and any other JavaScript value, we can instead set objectMode to true to create an object-mode writable stream:
'use strict'
const { Writable } = require('stream')
const createWriteStream = (data) => {
  return new Writable({
    objectMode: true,
    write (chunk, enc, next) {
      data.push(chunk)
      next()
    }
  })
}
const data = []
const writable = createWriteStream(data)
writable.on('finish', () => { console.log('finished writing', data) })
writable.write('A\n')
writable.write(1)
writable.end('nothing more to write')
By creating an object-mode stream, writing the number 1 to the stream will no longer cause an error:

Typically writable streams would be binary streams. However, in some cases object-mode readable-writable streams can be useful. In the next section we'll look at the remaining stream types.
Readable-Writable Streams (1)
In addition to the Readable and Writable stream constructors there are three more core stream constructors that have both readable and writable interfaces:
DuplexTransformPassThrough
We will explore consuming all three, but only create the most common user stream: the Transform stream.
The Duplex stream constructor's prototype inherits from the Readable constructor but it also mixes in functionality from the Writable constructor.
With a Duplex stream, both read and write methods are implemented but there doesn't have to be a causal relationship between them. In that, just because something is written to a Duplex stream doesn't necessarily mean that it will result in any change to what can be read from the stream, although it might. A concrete example will help make this clear, a TCP network socket is a great example of a Duplex stream:
'use strict'
const net = require('net')
net.createServer((socket) => {
  const interval = setInterval(() => {
    socket.write('beat')
  }, 1000)
  socket.on('data', (data) => {
    socket.write(data.toString().toUpperCase())
  })
  socket.on('end', () => { clearInterval(interval) })
}).listen(3000)
The net.createServer function accepts a listener function which is called every time a client connects to the server. The listener function is passed a Duplex stream instance which we called socket. Every second, socket.write('beat') is called, this is the first place the writable side of the stream is used. The stream is also listened to for data events and an end event, in these cases we are interacting with the readable side of the Duplex stream. Inside the data event listener we also write to the stream by sending back the incoming data after transforming it to upper case. The end event is useful for cleaning up any resources or on-going operations after a client disconnects. In our case we use it to clear the one second interval.
In order to interact with our server, we'll also create a small client. The client socket is also a Duplex stream:
'use strict'
const net = require('net')
const socket = net.connect(3000)

socket.on('data', (data) => {
  console.log('got data:', data.toString())
})
socket.write('hello')
setTimeout(() => {
  socket.write('all done')
  setTimeout(() => {
    socket.end()
  }, 250)
}, 3250)
The net.connect method returns a Duplex stream which represents the TCP client socket.
We listen for data events and log out the incoming data buffers, converting them to strings for display purposes. On the writable side, the socket.write method is called with a string, after three and a quarter seconds another payload is written, and another quarter second later the stream is ended by calling socket.end.
If we start both of the code examples as separate processes we can view the interaction:
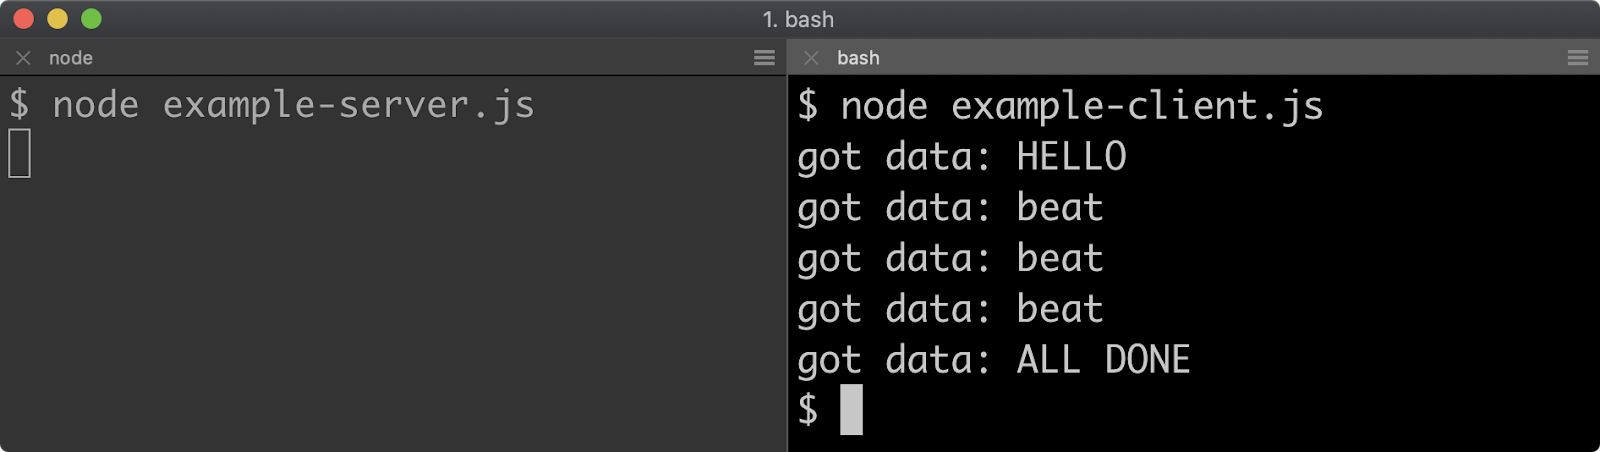
The purpose of this example is not to understand the net module in its entirety but to understand that it exposes a common API abstraction, a Duplex stream and to see how interaction with a Duplex stream works.
The Transform constructor inherits from the Duplex constructor. Transform streams are duplex streams with an additional constraint applied to enforce a causal relationship between the read and write interfaces. A good example is compression:
'use strict'
const { createGzip } = require('zlib')
const transform = createGzip()
transform.on('data', (data) => {
  console.log('got gzip data', data.toString('base64'))
})
transform.write('first')
setTimeout(() => {
  transform.end('second')
}, 500)
Readable-Writable Streams (2)
As data is written to the transform stream instance, data events are emitted on the readable side of that data in compressed format. We take the incoming data buffers and convert them to strings, using BASE64 encodings. This results in the following output:
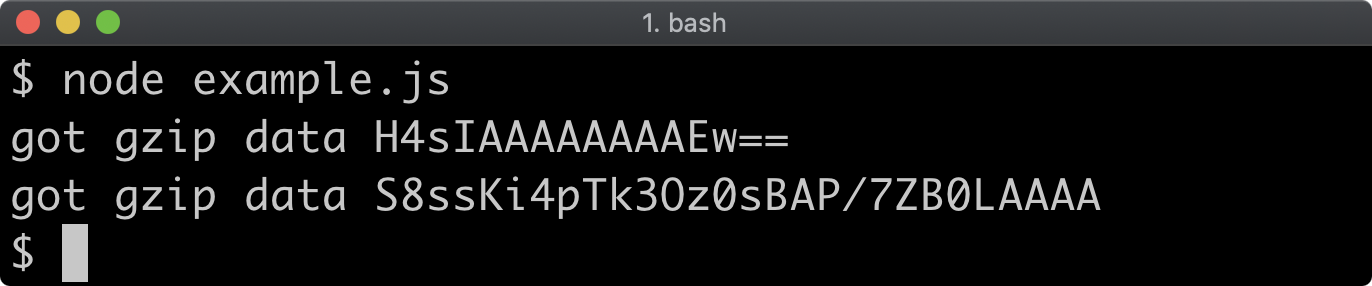
The way that Transform streams create this causal relationship is through how a transform stream is created. Instead of supplying read and write options functions, a transform option is passed to the Transform constructor:
'use strict'
const { Transform } = require('stream')
const { scrypt } = require('crypto')
const createTransformStream = () => {
  return new Transform({
    decodeStrings: false,
    encoding: 'hex',
    transform (chunk, enc, next) {
      scrypt(chunk, 'a-salt', 32, (err, key) => {
        if (err) {
          next(err)
          return
        }
        next(null, key)
      })
    }
  })
}
const transform = createTransformStream()
transform.on('data', (data) => {
  console.log('got data:', data)
})
transform.write('A\n')
transform.write('B\n')
transform.write('C\n')
transform.end('nothing more to write')
The transform option function has the same signature as the write option function passed to Writable streams. It accepts chunk, enc and the next function. However, in the transform option function the next function can be passed a second argument which should be the result of applying some kind of transform operation to the incoming chunk.
In our case we used the asynchronous callback-based crypto.scrypt method, as ever the key focus here is on streams implementation (to find out more about this method see the crypto.scrypt(password, salt, keylen[, options], callback) section of Node.js Documentation).
The crypto.scrypt callback is called once a key is derived from the inputs, or may be called if there was an error. In the event of an error we pass the error object to the next callback. In that scenario this would cause our transform stream to emit an error event. In the success case we call next(null, key). Passing the first argument as null indicates that there was no error, and the second argument is emitted as a data event from the readable side of the stream. Once we've instantiated our stream and assigned it to the transform constant, we write some payloads to the stream and then log out the hex strings we receive in the data event listener. The data is received as hex because we set the encoding option (part of the Readable stream options) to dictate that emitted data would be decoded to hex format. This produces the following result:
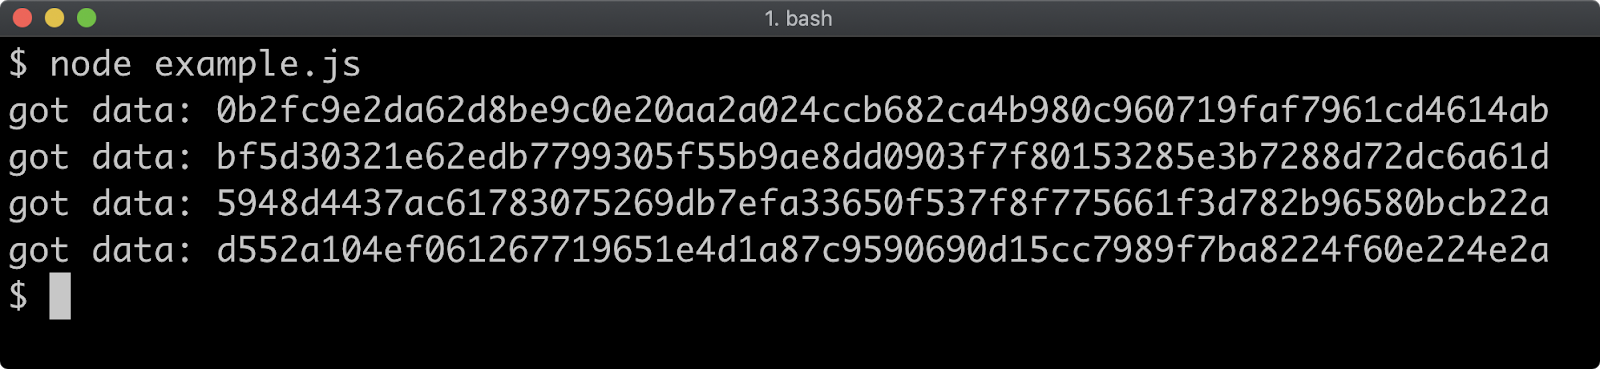
The PassThrough constructor inherits from the Transform constructor. It's essentially a transform stream where no transform is applied. For those familiar with Functional Programming this has similar applicability to the identity function ((val) => val), that is, it's a useful placeholder when a transform stream is expected but no transform is desired. See Lab 12.2 "Create a Transform Stream" to see an example of PassThrough being used.
Determining End-of-Stream
As we discussed earlier, there are at least four ways for a stream to potentially become inoperative:
closeeventerroreventfinisheventendevent
We often need to know when a stream has closed so that resources can be deallocated, otherwise memory leaks become likely.
Instead of listening to all four events, the stream.finished utility function provides a simplified way to do this:
'use strict'
const net = require('net')
const { finished } = require('stream')
net.createServer((socket) => {
  const interval = setInterval(() => {
    socket.write('beat')
  }, 1000)
  socket.on('data', (data) => {
    socket.write(data.toString().toUpperCase())
  })
  finished(socket, (err) => {
    if (err) {
      console.error('there was a socket error', err)
    }
    clearInterval(interval)
  })
}).listen(3000)
Taking the example on the previous "Readable-Writable Streams" page, we replaced the end event listener with a call to the finished utility function. The stream (socket) is passed to finished as the first argument and the second argument is a callback for when the stream ends for any reason. The first argument of the callback is a potential error object. If the stream were to emit an error event the callback would be called with the error object emitted by that event. This is a much safer way to detect when a stream ends and should be standard practice, since it covers every eventuality.
Piping Streams (1)
We can now put everything we've learned together and discover how to use a terse yet powerful abstraction: piping. Piping has been available in command line shells for decades, for instance here's a common Bash command:
cat some-file | grep find-something
The pipe operator instructs the console to read the stream of output coming from the left-hand command (cat some-file) and write that data to the right-hand command (grep find-something). The concept is the same in Node, but the pipe method is used.
Let's adapt the TCP client server from the "Readable-Writable Streams" page to use the pipe method. Here is the client server from earlier:
'use strict'
const net = require('net')
const socket = net.connect(3000)

socket.on('data', (data) => {
  console.log('got data:', data.toString())
})

socket.write('hello')
setTimeout(() => {
  socket.write('all done')
  setTimeout(() => {
    socket.end()
  }, 250)
}, 3250)
We'll replace the data event listener with a pipe:
'use strict'
const net = require('net')
const socket = net.connect(3000)

socket.pipe(process.stdout)

socket.write('hello')
setTimeout(() => {
  socket.write('all done')
  setTimeout(() => {
    socket.end()
  }, 250)
}, 3250)
Starting the example server from earlier and running the modified client results in the following:
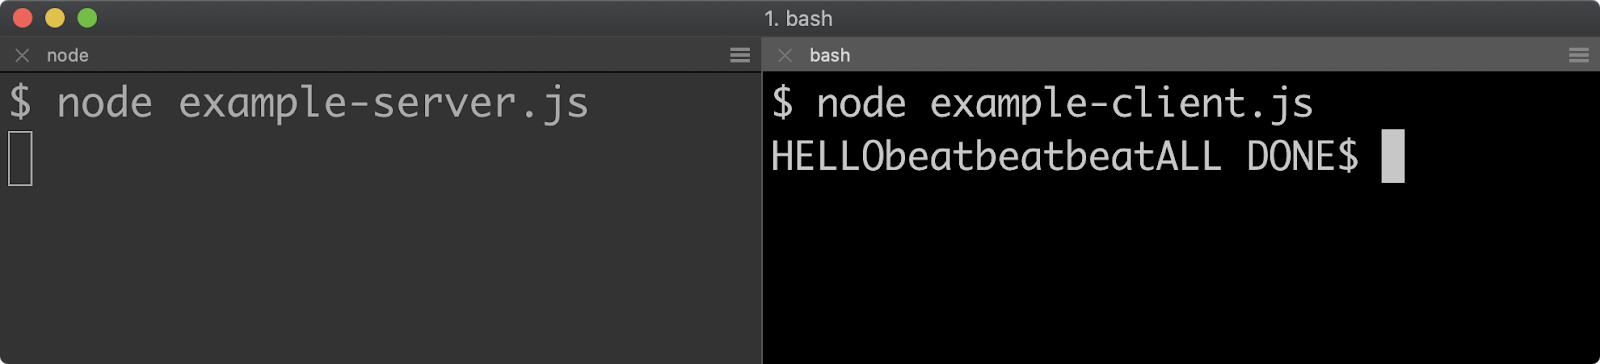
The process object will be explored in detail in Chapter 14 - "Process & Operating System", but to understand the code it's important to know that process.stdout is a Writable stream. Anything written to process.stdout will be printed out as process output. Note that there are no newlines, this is because we were using console.log before, which adds a newline whenever it is called.
The pipe method exists on Readable streams (recall socket is a Duplex stream instance and that Duplex inherits from Readable), and is passed a Writable stream (or a stream with Writable capabilities). Internally, the pipe method sets up a data listener on the readable stream and automatically writes to the writable stream as data becomes available.
Since pipe returns the stream passed to it, it is possible to chain pipe calls together: streamA.pipe(streamB).pipe(streamC). This is a commonly observed practice, but it's also bad practice to create pipelines this way. If a stream in the middle fails or closes for any reason, the other streams in the pipeline will not automatically close. This can create severe memory leaks and other bugs. The correct way to pipe multiple streams is to use the stream.pipeline utility function.
Piping Streams (2)
Let's combine the Transform stream we created on the "Readable-Writable Streams" pages and the TCP server as we modified it on the "Determining End-of-Stream" pages in order to create a pipeline of streams:
'use strict'
const net = require('net')
const { Transform, pipeline } = require('stream')
const { scrypt } = require('crypto')
const createTransformStream = () => {
  return new Transform({
    decodeStrings: false,
    encoding: 'hex',
    transform (chunk, enc, next) {
      scrypt(chunk, 'a-salt', 32, (err, key) => {
        if (err) {
          next(err)
          return
          }
        next(null, key)
      })
    }
  })
}

net.createServer((socket) => {
  const transform = createTransformStream()
  const interval = setInterval(() => {
    socket.write('beat')
  }, 1000)
  pipeline(socket, transform, socket, (err) => {
    if (err) {
      console.error('there was a socket error', err)
    }
    clearInterval(interval)
  })
}).listen(3000)
If we start both the modified TCP server and modified TCP client this will lead to the following result:

The first 64 characters are the hex representation of a key derived from the 'hello' string that the client Node process wrote to the client TCP socket Duplex stream. This was emitted as a data event on the TCP socket Duplex stream in the server Node process. It was then automatically written to our transform stream instance, which derived a key using crypto.scrypt within the transform option passed to the Transform constructor in our createTransformStream function. The result was then passed as the second argument of the next callback. This then resulted in a data event being emitted from the transform stream with the hex string of the derived key. That data was then written back to the server-side socket stream. Back in the client Node process, this incoming data was emitted as a data event by the client-side socket stream and automatically written to the process.stdout writable stream by the client Node process. The next 12 characters are the three beats written at one second intervals in the server. The final 64 characters are the hex representation of the derived key of the 'all done' string written to the client side socket. From there that payload goes through the exact same process as the first 'hello' payload.
The pipeline command will call pipe on every stream passed to it, and will allow a function to be passed as the final function. Note how we removed the finished utility method. This is because the final function passed to the pipeline function will be called if any of the streams in the pipeline close or fail for any reason.
Streams are a very large subject, this section has cut a pathway to becoming both productive and safe with streams. See Node.js Documentation to get even deeper on streams.
Piping Streams (2)
Let's combine the Transform stream we created on the "Readable-Writable Streams" pages and the TCP server as we modified it on the "Determining End-of-Stream" pages in order to create a pipeline of streams:
'use strict'
const net = require('net')
const { Transform, pipeline } = require('stream')
const { scrypt } = require('crypto')
const createTransformStream = () => {
  return new Transform({
    decodeStrings: false,
    encoding: 'hex',
    transform (chunk, enc, next) {
      scrypt(chunk, 'a-salt', 32, (err, key) => {
        if (err) {
          next(err)
          return
          }
        next(null, key)
      })
    }
  })
}

net.createServer((socket) => {
  const transform = createTransformStream()
  const interval = setInterval(() => {
    socket.write('beat')
  }, 1000)
  pipeline(socket, transform, socket, (err) => {
    if (err) {
      console.error('there was a socket error', err)
    }
    clearInterval(interval)
  })
}).listen(3000)
If we start both the modified TCP server and modified TCP client this will lead to the following result:
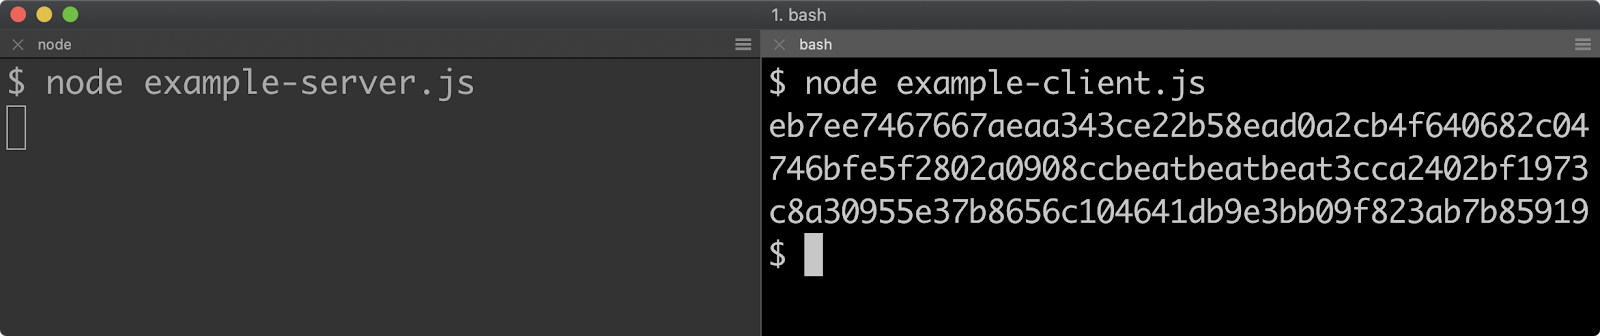
The first 64 characters are the hex representation of a key derived from the 'hello' string that the client Node process wrote to the client TCP socket Duplex stream. This was emitted as a data event on the TCP socket Duplex stream in the server Node process. It was then automatically written to our transform stream instance, which derived a key using crypto.scrypt within the transform option passed to the Transform constructor in our createTransformStream function. The result was then passed as the second argument of the next callback. This then resulted in a data event being emitted from the transform stream with the hex string of the derived key. That data was then written back to the server-side socket stream. Back in the client Node process, this incoming data was emitted as a data event by the client-side socket stream and automatically written to the process.stdout writable stream by the client Node process. The next 12 characters are the three beats written at one second intervals in the server. The final 64 characters are the hex representation of the derived key of the 'all done' string written to the client side socket. From there that payload goes through the exact same process as the first 'hello' payload.
The pipeline command will call pipe on every stream passed to it, and will allow a function to be passed as the final function. Note how we removed the finished utility method. This is because the final function passed to the pipeline function will be called if any of the streams in the pipeline close or fail for any reason.
Streams are a very large subject, this section has cut a pathway to becoming both productive and safe with streams. See Node.js Documentation to get even deeper on streams.
Lab Exercises
Lab 12.1 - Piping
The labs-1 folder has an index.js file containing the following:
'use strict'
const { Readable, Writable } = require('stream')
const assert = require('assert')
const createWritable = () => {
  const sink = []
  let piped = false
  setImmediate(() => {
    assert.strictEqual(piped, true, 'use the pipe method')
    assert.deepStrictEqual(sink, ['a', 'b', 'c'])
  })
  const writable = new Writable({
    decodeStrings: false,
    write(chunk, enc, cb) {
      sink.push(chunk)
      cb()
    },
    final() {
      console.log('passed!')
    }
  })
  writable.once('pipe', () => {
    piped = true
  })
  return writable
}

const readable = Readable.from(['a', 'b', 'c'])
const writable = createWritable()
// TODO - send all data from readable to writable:
Use the appropriate method to make sure that all data in the readable stream is automatically sent to the writable stream.
If successfully implemented the process will output: passed!
Lab 12.2 - Create a Transform Stream
The labs-2 folder has an index.js file containing the following:
'use strict'
const { Readable, Writable, Transform, PassThrough, pipeline } = require('stream')
const assert = require('assert')
const createWritable = () => {
  const sink = []
  const writable = new Writable({
    write(chunk, enc, cb) {
      sink.push(chunk.toString())
      cb()
    }
  })
  writable.sink = sink
  return writable
}
const readable = Readable.from(['a', 'b', 'c'])
const writable = createWritable()

// TODO: replace the pass through stream
// with a transform stream that uppercases
// incoming characters
const transform = new PassThrough()

pipeline(readable, transform, writable, (err) => {
  assert.ifError(err)
  assert.deepStrictEqual(writable.sink, ['A', 'B', 'C'])
  console.log('passed!')
})
Replace the line that states const transform = new PassThrough() so that transform is assigned to a transform stream that upper cases any incoming chunks. If successfully implemented the process will output: passed!
13 - Interacting with the file system
Introduction
Chapter Overview
When it was created, JavaScript was a browser-side language, so there are no in-built JavaScript primitives for interacting with the file system. However the ability to manipulate the file system is central to server-side programming. Node provides these abilities with the fs module and, in a supporting role, the path module. In this section, we'll take a guided tour of both modules.
Learning Objectives
By the end of this chapter, you should be able to:
- Understand path manipulation in Node.
- Query files and directories for meta-data and permissions controls.
- Dynamically respond to file system changes.
- Discover various ways to write files and read files and directories.
Interacting with the File System
File Paths (1)
Management of the file system is really achieved with two core modules, fs and path. The path module is important for path manipulation and normalization across platforms and the fs module provides APIs to deal with the business of reading, writing, file system meta-data and file system watching.
Before locating a relative file path, we often need to know where the particular file being executed is located. For this there are two variables that are always present in every module: __filename and __dirname.
The __filename variable holds the absolute path to the currently executing file, and the __dirname variable holds the absolute path to the directory that the currently executing file is in.
Let's say we have an example.js file at /training/ch-13/example.js, and the following is the content of the example.js file:
'use strict'
console.log('current filename', __filename)
console.log('current dirname', __dirname)
This would output the following:
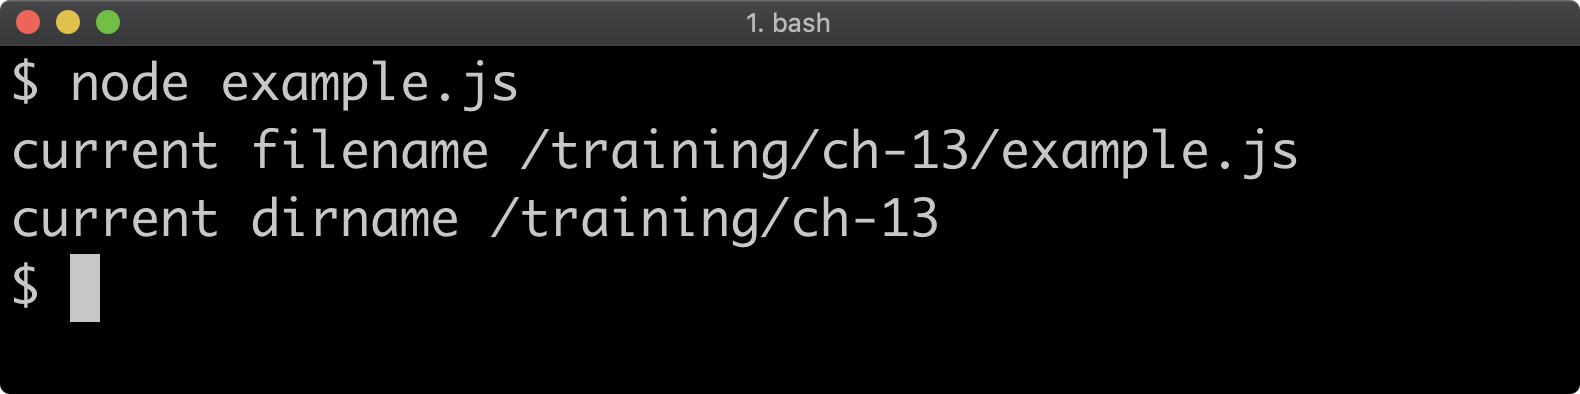
Even if we run the example.js file from a different working directory, the output will be the same:
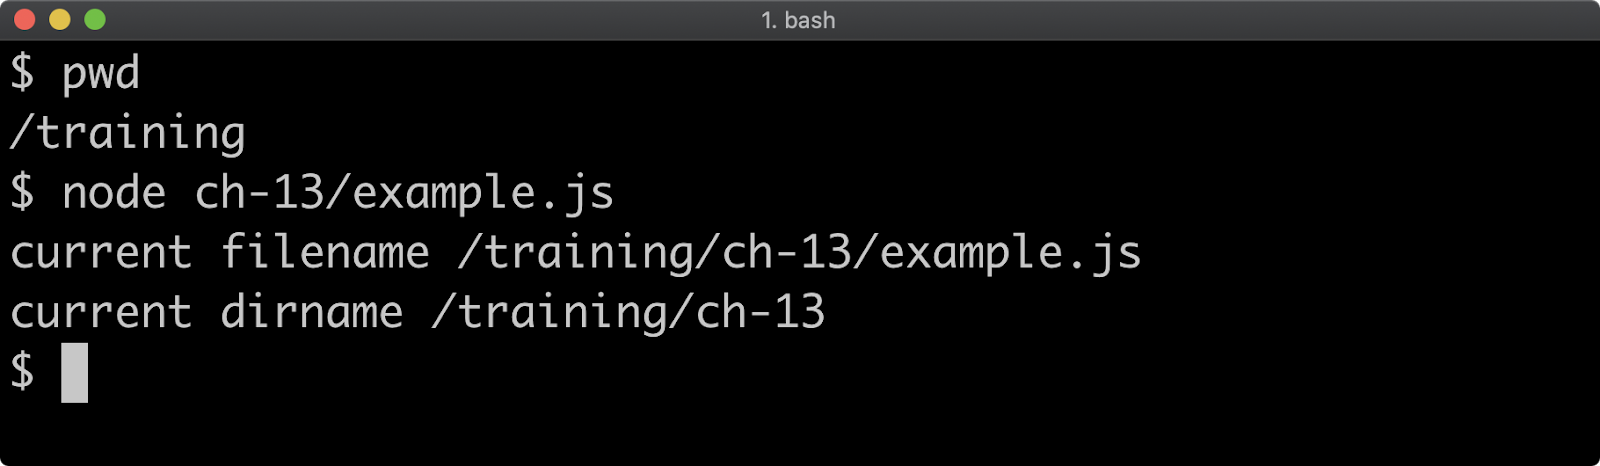
Probably the most commonly used method of the path module is the join method. Windows systems use different path separators to POSIX systems (such as Linux and macOS). For instance a path on Linux or macOS could be /training/ch-13/example.js whereas on Windows it would be (assuming the path was on drive C), C:\training\ch-13\example.js. To make matters worse, backslash is the escape character in JavaScript strings so to represent a Windows path in a string the path would need to be written as C:\\training\\ch-13\\example.js. The path.join method side-steps these issues by generating a path that's suitable for the platform.
Let's say we want to create a cross-platform path to a file named out.txt that is in the same folder as the file currently being executed. This can be achieved like so:
'use strict'
const { join } = require('path')
console.log('out file:', join(__dirname, 'out.txt'))
Given this code ran in an example.js file located in /training/ch-13 this will print out file: /training/ch-13/out.txt on macOS and Linux systems:

On a Windows system, assuming the example.js file is located in C:\\training\\ch-13 this will output out file: c:\\training\ch-13\out.txt on Windows systems.
File Paths (2)
The path.join method can be passed as many arguments as desired, for instance path.join('foo', 'bar', 'baz') will create the string 'foo/bar/baz' or 'foo\\bar\\baz' depending on platform.
Apart from path.isAbsolute which as the name suggests will return true if a given path is absolute, the available path methods can be broadly divided into path builders and path deconstructors.
Alongside path.join the other path builders are:
path.relative: Given two absolute paths, calculates the relative path between them.path.resolve: Accepts multiple string arguments representing paths. Conceptually each path represents navigation to that path. Thepath.resolvefunction returns a string of the path that would result from navigating to each of the directories in order using the command linecdcommand. For instancepath.resolve('/foo', 'bar', 'baz')would return'/foo/bar/baz', which is akin to executingcd /foothencd barthencd bazon the command line, and then finding out what the current working directory is.path.normalize: Resolves..and.dot in paths and strips extra slashes, for instancepath.normalize('/foo/../bar//baz')would return'/bar/baz'.path.format: Builds a string from an object. The object shape thatpath.formataccepts, corresponds to the object returned frompath.parsewhich we'll explore next.
The path deconstructors are path.parse, path.extname, path.dirname and path.basename. Let's explore these with a code example:
'use strict'
const { parse, basename, dirname, extname } = require('path')
console.log('filename parsed:', parse(__filename))
console.log('filename basename:', basename(__filename))
console.log('filename dirname:', dirname(__filename))
console.log('filename extname:', extname(__filename))
Given an execution path of /training/ch-13/example.js the following output will be the result on POSIX (e.g. non-Windows) systems:
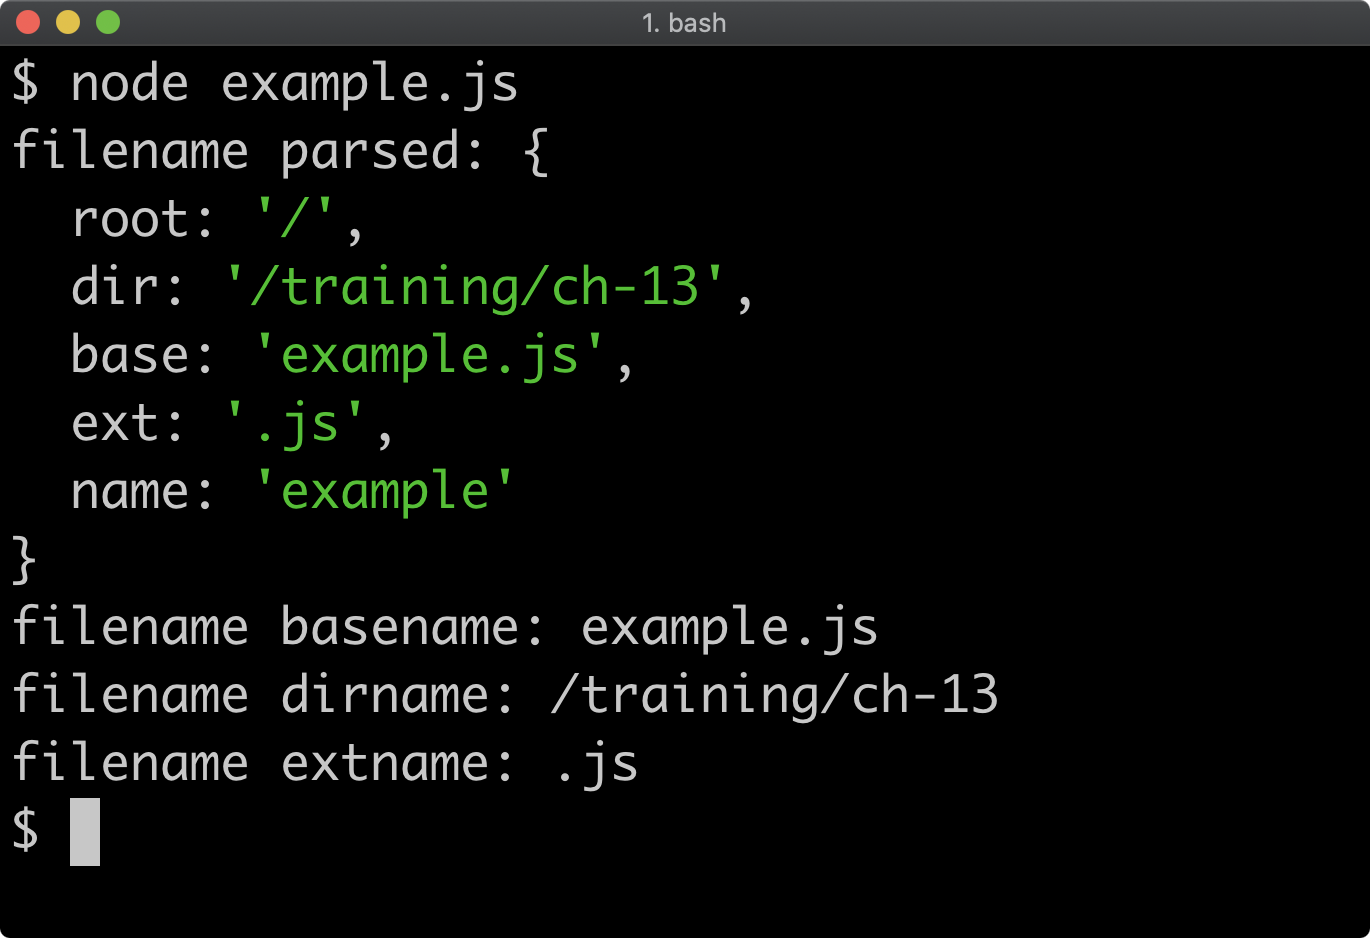
On Windows the output would be similar except the root property of the parsed object would contain the drive letter, e.g. 'C:\\' and both the dir property and the result of the dirname method would return paths with a drive letter and backslashes instead of forward slashes.
The parse method returns an object with root, dir, base, ext, and name properties. The root and name values can only be ascertained with the path module by using the parse method. The base, dir and ext properties can be individually calculated with the path.dirname and path.basename methods respectively.
This section has provided an overview with focus on common usage. Refer to the Node core path Documentation to learn more.
Reading and Writing (1)
The fs module has lower level and higher level APIs. The lower level API's closely mirror POSIX system calls. For instance, fs.open opens and possibly creates a file and provides a file descriptor handle, taking same options as the POSIX open command (see open(3) - Linux man page by linux.die.net and fs.open(path[, flags[, mode]], callback) section of the Node.js Documentation for more details). While we won't be covering the lower level APIs as these are rarely used in application code, the higher level API's are built on top of them.
The higher level methods for reading and writing are provided in four abstraction types:
- Synchronous
- Callback based
- Promise based
- Stream based
We'll first explore synchronous, callback-based and promised-based APIs for reading and writing files. Then we'll cover the filesystem streaming APIs.
All the names of synchronous methods in the fs module end with Sync. For instance, fs.readFileSync. Synchronous methods will block anything else from happening in the process until they have resolved. These are convenient for loading data when a program starts, but should mostly be avoided after that. If a synchronous method stops anything else from happening, it means the process can't handle or make requests or do any kind of I/O until the synchronous operation has completed.
Let's take a look at an example:
'use strict'
const { readFileSync } = require('fs')
const contents = readFileSync(__filename)
console.log(contents)
The above code will synchronously read its own contents into a buffer and then print the buffer:
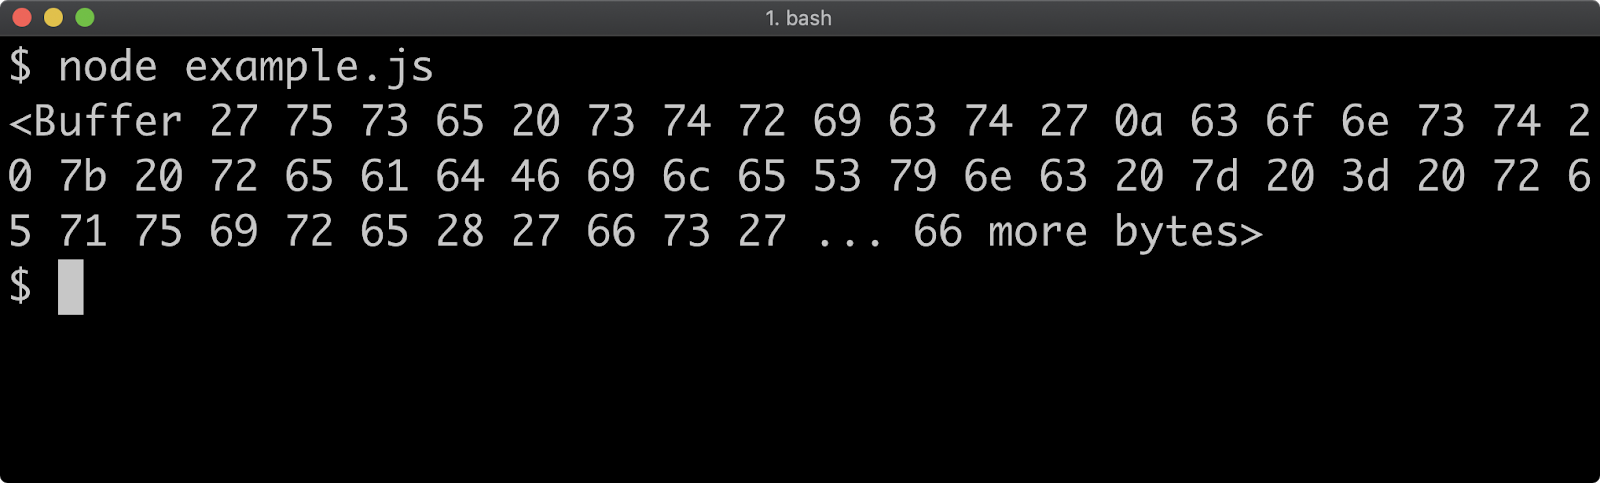
The encoding can be set in an options object to cause the fs.readFileSync function to return a string:
'use strict'
const { readFileSync } = require('fs')
const contents = readFileSync(__filename, {encoding: 'utf8'})
console.log(contents)
This will result in the file printing its own code:
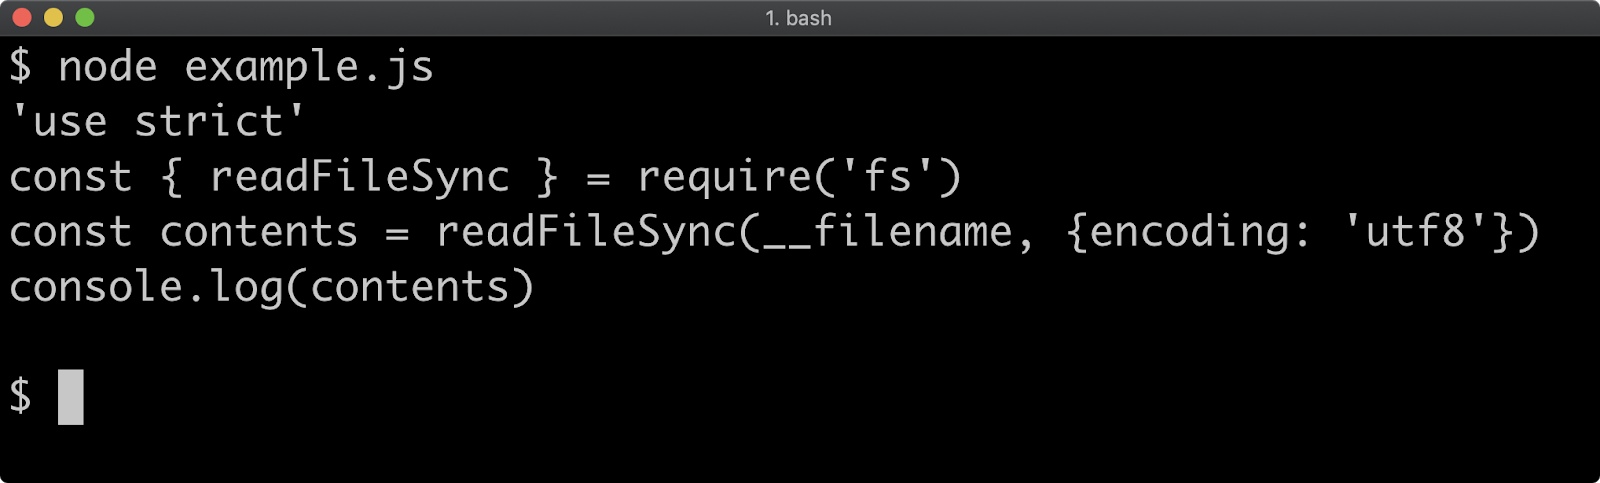
The fs.writeFileSync function takes a path and a string or buffer and blocks the process until the file has been completely written:
'use strict'
const { join } = require('path')
const { readFileSync, writeFileSync } = require('fs')
const contents = readFileSync(__filename, {encoding: 'utf8'})
writeFileSync(join(__dirname, 'out.txt'), contents.toUpperCase())
In this example, instead of logging the contents out, we've upper cased the contents and written it to an out.txt file in the same directory:
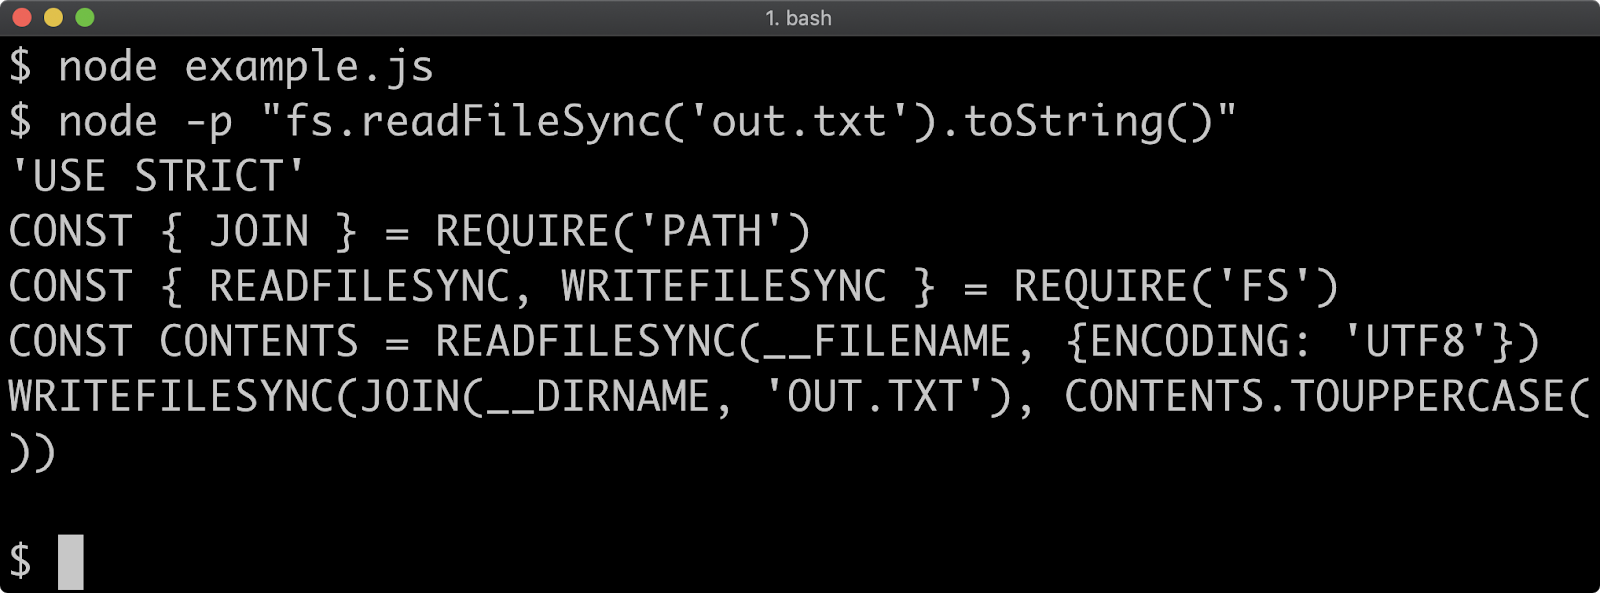
Reading and Writing (2)
An options object can be added, with a flag option set to 'a' to open a file in append mode:
'use strict'
const { join } = require('path')
const { readFileSync, writeFileSync } = require('fs')
const contents = readFileSync(__filename, {encoding: 'utf8'})
writeFileSync(join(__dirname, 'out.txt'), contents.toUpperCase(), {
  flag: 'a'
})
If we run that same code again the out.txt file will have the altered code added to it:
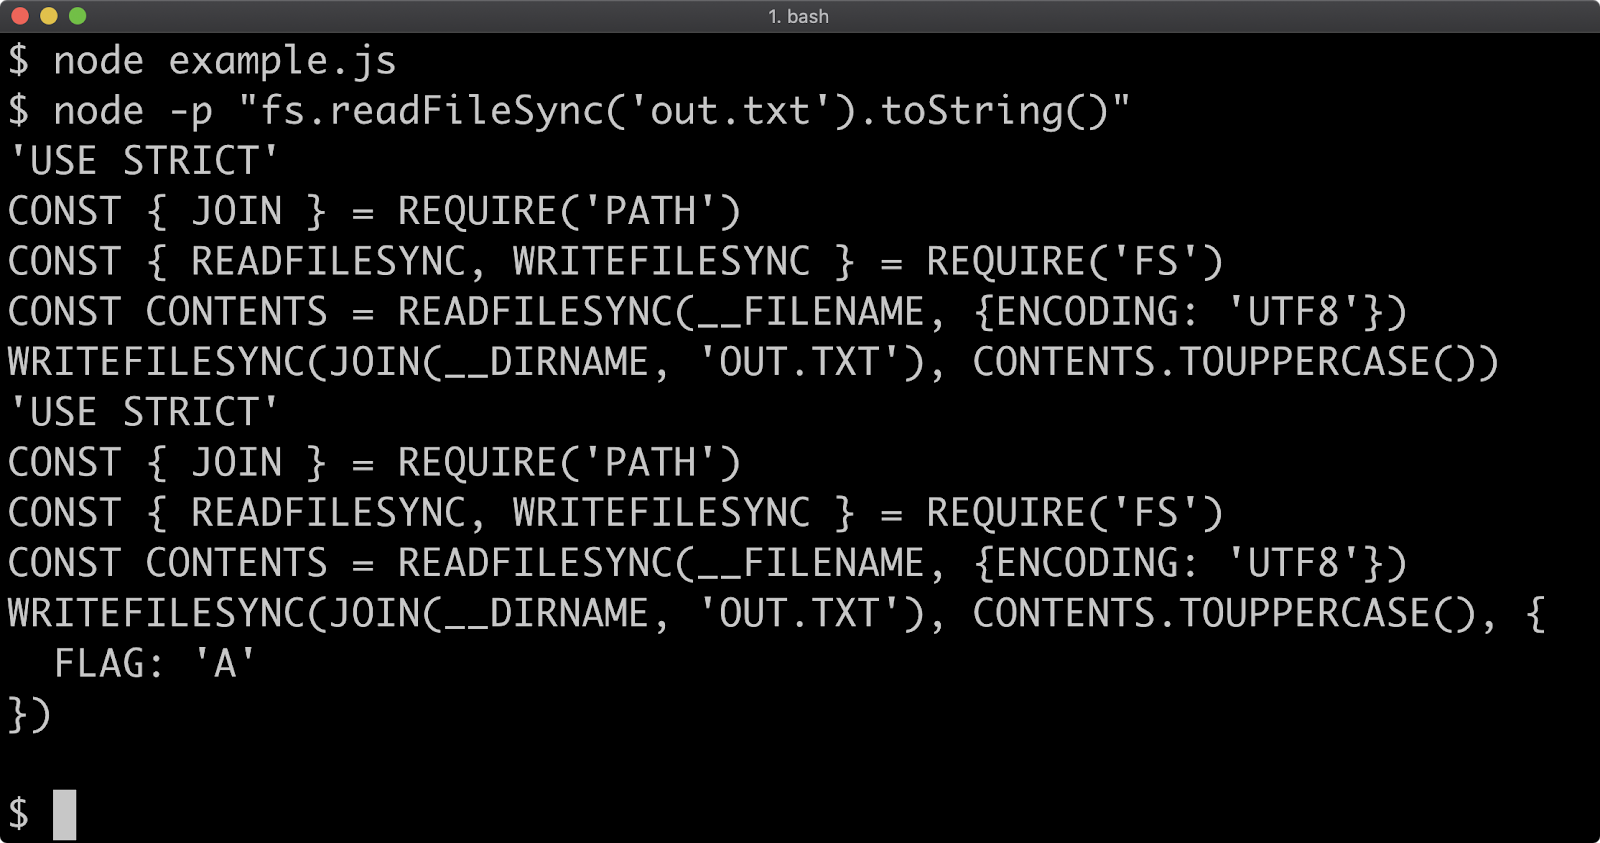
For a full list of supports flags, see File System Flags section of the Node.js Documentation.
If there's a problem with an operation the *Sync APIs will throw. So to perform error handling they need to be wrapped in a try/catch:
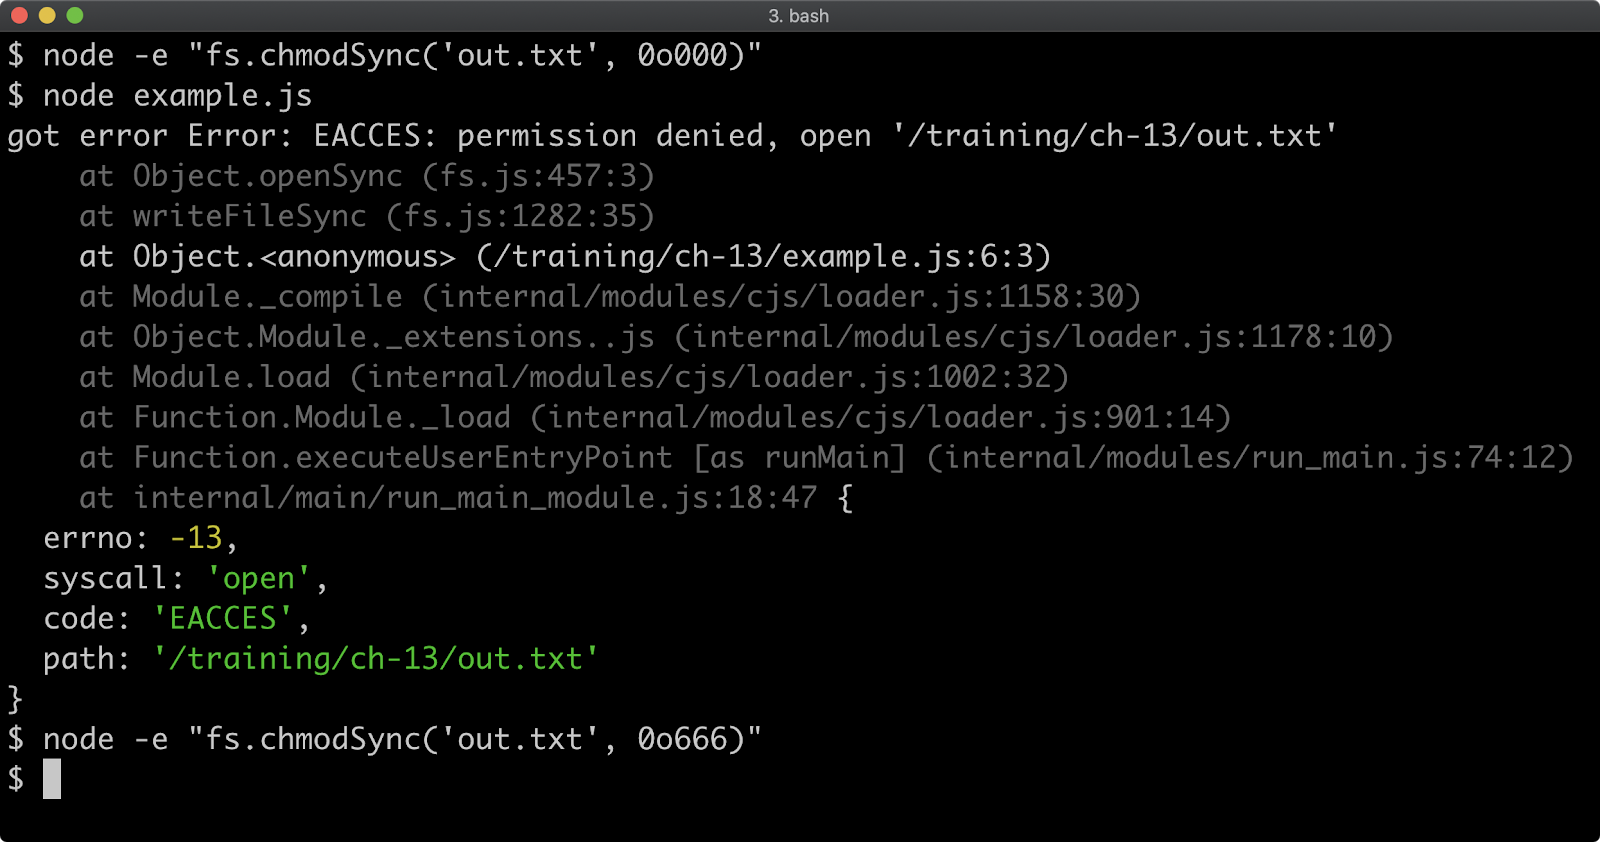
To create this error the fs.chmodSync method was used. It generated a permission denied error when the fs.writeFileSync method attempted to access it. This triggered the catch block with the error where it was logged out with console.error. The permissions were then restored at the end using fs.chmodSync again. For more on fs.chmodSync see Node.js Documentation.
In the case of the *Sync, APIs control flow is very simple because execution is sequential, the chronological ordering maps directly with the order of instructions in the file. However, Node works best when I/O is managed in the background until it is ready to be processed. For this, there's the callback and promise based filesystem APIs. The asynchronous control flow was discussed at length in Section 8 - "Asynchronous Control Flow", the choice on which abstraction to use depends heavily on project context. So let's explore both, starting with callback-based reading and writing.
The fs.readFile equivalent, with error handling, of the fs.readFileSync with encoding set to UTF8 example is:
'use strict'
const { readFile } = require('fs')
readFile(__filename, {encoding: 'utf8'}, (err, contents) => {
  if (err) {
    console.error(err)
    return
  }
})
Reading and Writing (3)
When the process is executed this achieves the same objective, it will print the file contents to the terminal:
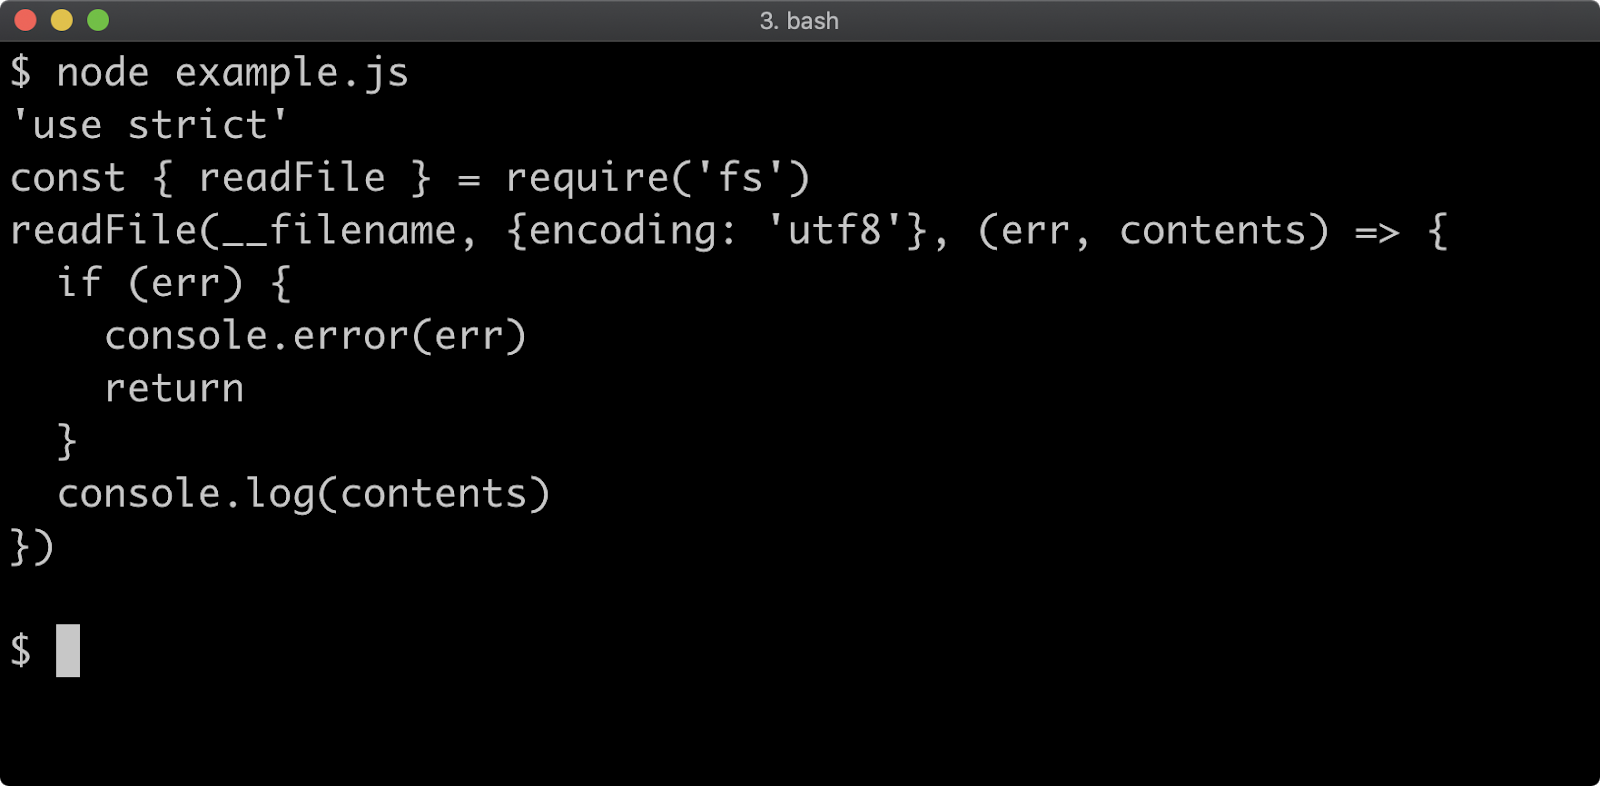
However, the actual behavior of the I/O operation and the JavaScript engine is different. In the readFileSync case execution is paused until the file has been read, whereas in this example execution is free to continue while the read operation is performed. Once the read operation is completed, then the callback function that we passed as the third argument to readFile is called with the result. This allows for the process to perform other tasks (accepting an HTTP request for instance).
Let's asynchronously write the upper-cased content to out.txt as well:
'use strict'
const { join } = require('path')
const { readFile, writeFile } = require('fs')
readFile(__filename, {encoding: 'utf8'}, (err, contents) => {
  if (err) {
    console.error(err)
    return
  }
  const out = join(__dirname, 'out.txt')
  writeFile(out, contents.toUpperCase(), (err) => {
    if (err) { console.error(err) }
  })
})
If the above executed is examined and the out.txt is examined it will contain the above code, but upper-cased:
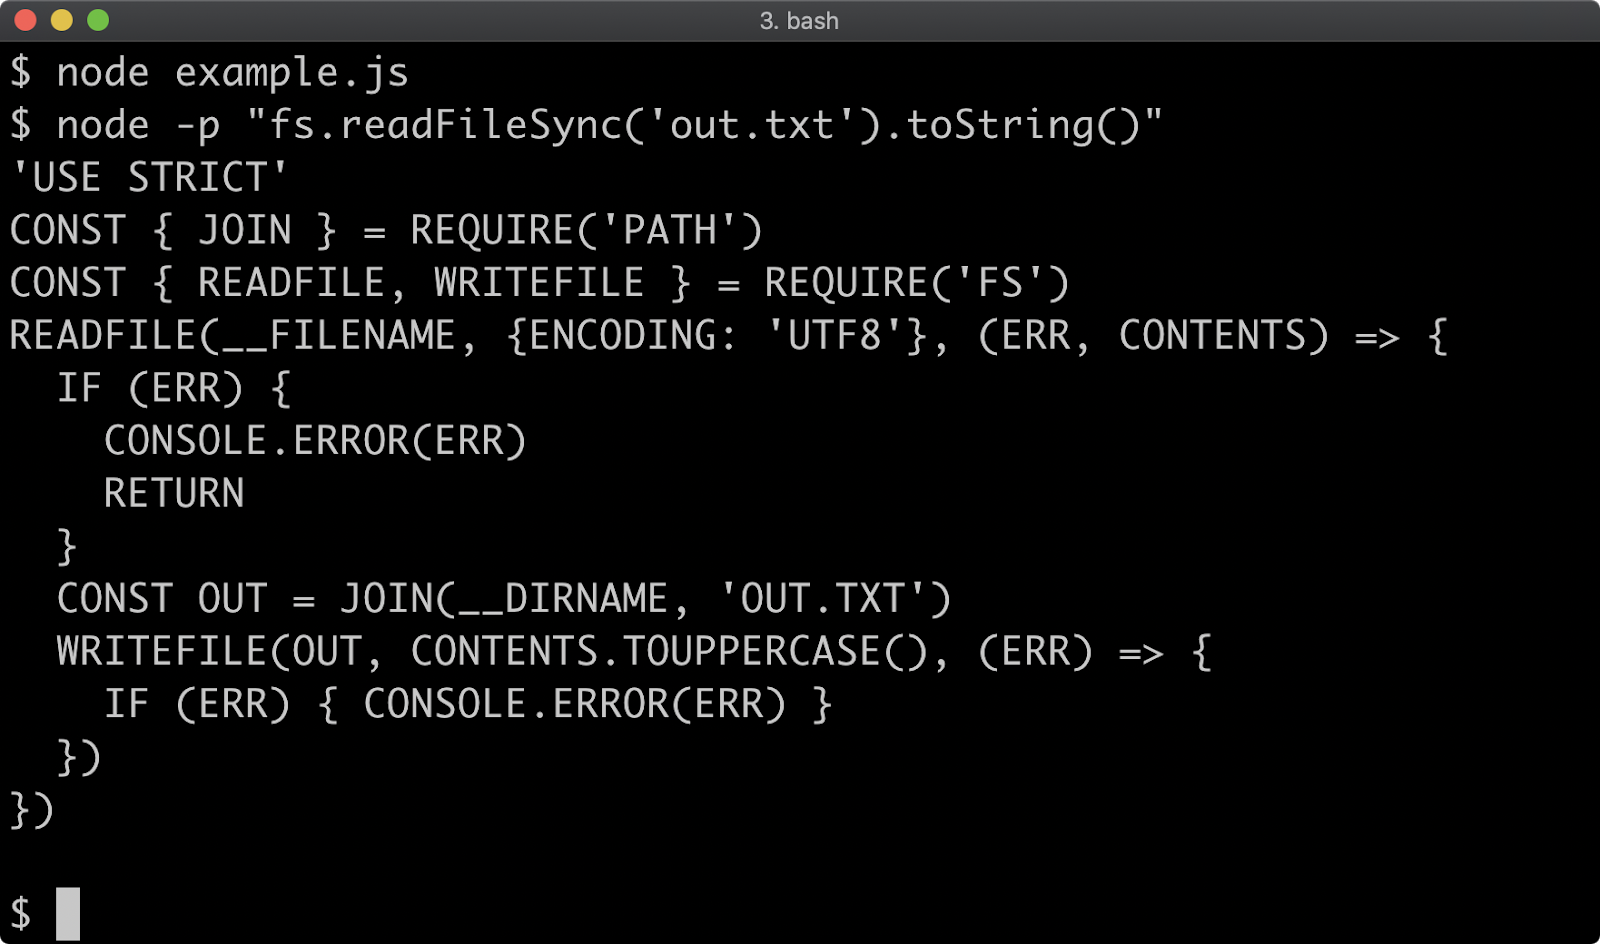
As discussed in Section 8 - "Asynchronous Control Flow", promises are an asynchronous abstraction like callbacks but can be used with async/await functions to provide the best of both worlds: easy to read sequential instructions plus non-blocking execution.
The fs.promises API provides most of the same asynchronous methods that are available on fs, but the methods return promises instead of accepting callbacks.
So instead of loading readFile and writeFile like so:
const { readFile, writeFile } = require('fs')
We can load the promise-based versions like so:
const { readFile, writeFile } = require('fs').promises
It's also possible to load fs.promises with require('fs/promises'), but using require('fs').promises is backwards compatible with legacy Node versions (v12 and v10).
Let's look at the same reading and writing example using fs.promises and using async/await to resolve the promises:
'use strict'
const { join } = require('path')
const { readFile, writeFile } = require('fs').promises
async function run () {
  const contents = await readFile(__filename, {encoding: 'utf8'})
  const out = join(__dirname, 'out.txt')
  await writeFile(out, contents.toUpperCase())
}

run().catch(console.error)
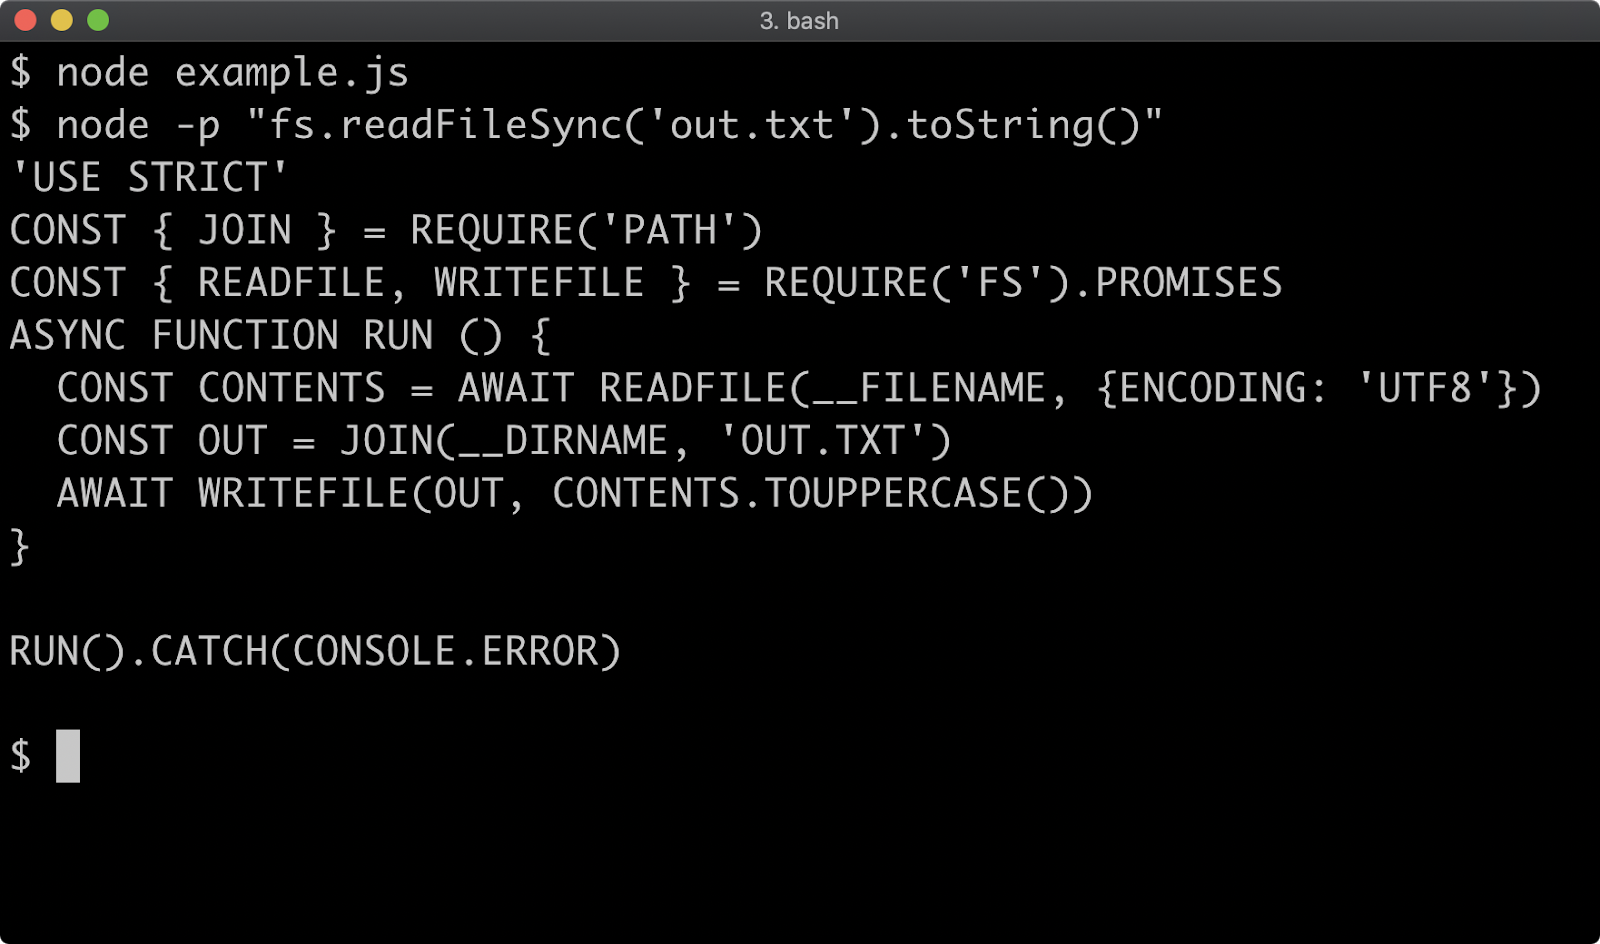
File Streams
Recall from the previous section that the fs module has four API types:
- Synchronous
- Callback-based
- Promise-based
- Stream-based
The fs module has fs.createReadStream and fs.createWriteStream methods which allow us to read and write files in chunks. Streams are ideal when handling very large files that can be processed incrementally.
Let's start by simply copying the file:
'use strict'
const { pipeline } = require('stream')
const { join } = require('path')
const { createReadStream, createWriteStream } = require('fs')

pipeline(
  createReadStream(__filename),
  createWriteStream(join(__dirname, 'out.txt')),
  (err) => {
    if (err) {
      console.error(err)
      return
    }
    console.log('finished writing')
  }
)
This pattern is excellent if dealing with a large file because the memory usage will stay constant as the file is read in small chunks and written in small chunks.
To reproduce the read, upper-case, write scenario we created in the previous section, we will need a transform stream to upper-case the content:
'use strict'
const { pipeline } = require('stream')
const { join } = require('path')
const { createReadStream, createWriteStream } = require('fs')
const { Transform } = require('stream')
const createUppercaseStream = () => {
  return new Transform({
    transform (chunk, enc, next) {
      const uppercased = chunk.toString().toUpperCase()
      next(null, uppercased)
    }
  })
}

pipeline(
  createReadStream(__filename),
  createUppercaseStream(),
  createWriteStream(join(__dirname, 'out.txt')),
  (err) => {
    if (err) {
      console.error(err)
      return
    }
    console.log('finished writing')
  }
)
Our pipeline now reads chunks from the file read stream, sends them through our transform stream where they are upper-cased and then sent on to the write stream to achieve the same result of upper-casing the content and writing it to out.txt:
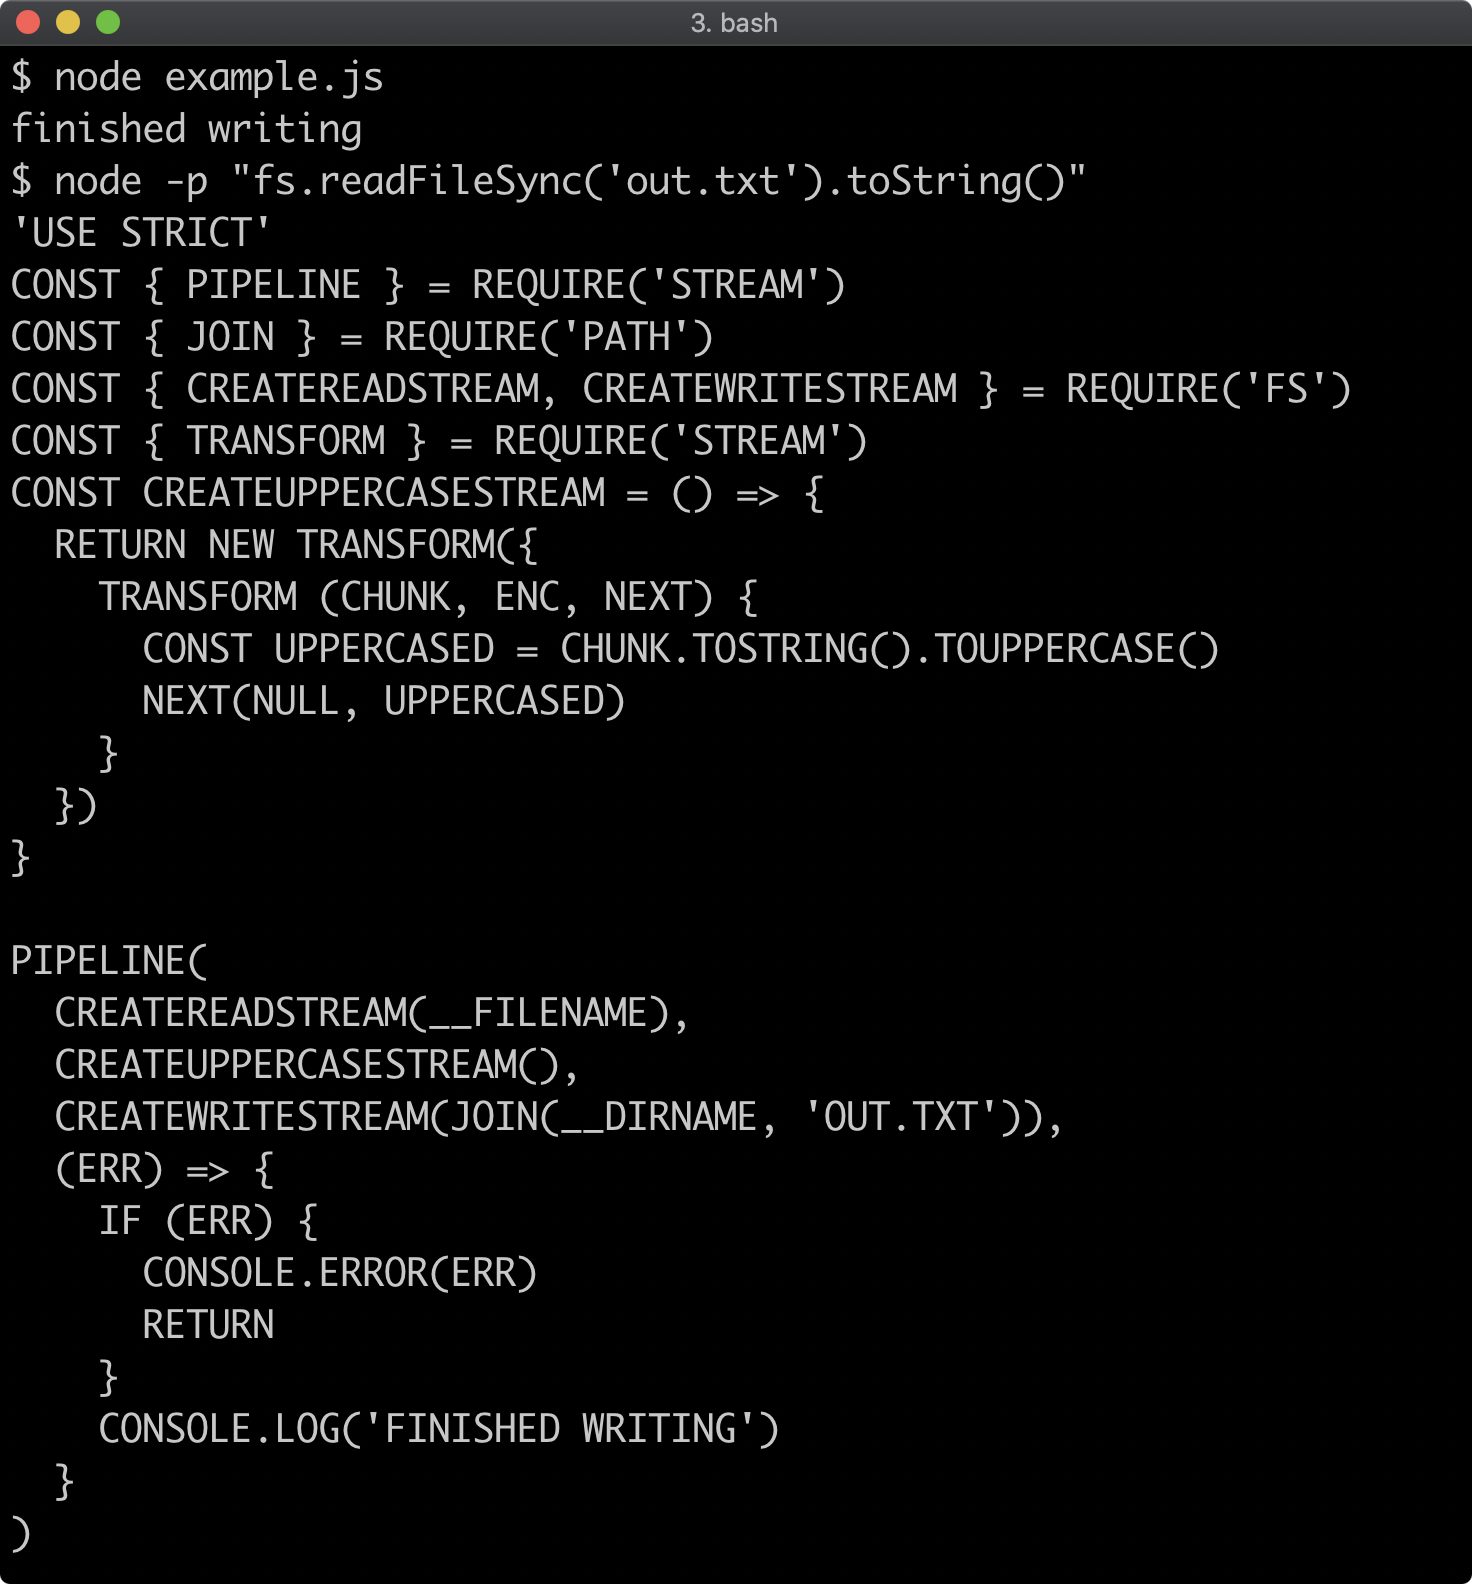
If necessary, review Chapter 12 again to fully understand this example.
Reading Directories (1)
Directories are a special type of file, which hold a catalog of files. Similar to files the fs module provides multiple ways to read a directory:
- Synchronous
- Callback-based
- Promise-based
- An async iterable that inherits from
fs.Dir
While it will be explored here, going into depth on the last bullet point is beyond the scope of this chapter, but see Class fs.Dir of the Node.js Documentation for more information.
The pros and cons of each API approach is the same as reading and writing files. Synchronous execution is recommended against when asynchronous operations are relied upon (such as when serving HTTP requests). Callback or promise-based are best for most cases. The stream-like API would be best for extremely large directories.
Let's say we have a folder with the following files:
example.jsfile-afile-bfile-c
The example.js file would be the file that executes our code. Let's look at synchronous, callback-based and promise-based at the same time:
'use strict'
const { readdirSync, readdir } = require('fs')
const { readdir: readdirProm } = require('fs').promises

try {
  console.log('sync', readdirSync(__dirname))
} catch (err) {
  console.error(err)
}

readdir(__dirname, (err, files) => {
  if (err) {
    console.error(err)
    return
  }
  console.log('callback', files)
})

async function run () {
  const files = await readdirProm(__dirname)
  console.log('promise', files)
}

run().catch((err) => {
  console.error(err)
})
When executed our example code outputs the following:

The first section of code executes readdirSync(__dirname), this pauses execution until the directory has been read and then returns an array of filenames. This is passed into the console.log function and so written to the terminal. Since it's a synchronous method, it may throw if there's any problem reading the directory, so the method call is wrapped in a try/catch to handle the error.
The second section used the readdir callback method, once the directory has been read the second argument (our callback function) will be called with the second argument being an array of files in the provided directory (in each example we've used __dirname, the current directory). In the case of an error the first argument of our callback function will be an error object, so we check for it and handle it, returning early from the function. In the success case, the files are logged out with console.log.
We aliased fs.promises.readdir to readdirProm to avoid namespace collision. In the third section the readdirProm(__dirname) invocation returns a promise which is awaited in the async run function. The directory is asynchronously read, so execution won't be blocked. However because run is an async function the function itself will pause until the awaited promise returned by readdirProm function resolves with the array of files (or rejects due to error). This resolved value is stored in the files array and then passed to console.log. If readdirProm does reject, the promise automatically returned from the run function will likewise reject. This is why when run is called a catch handler is attached to the result where the error can be handled.
For extremely large directories they can also be read as a stream using fs.opendir, fs.opendirSync or fs.promises.opendir method which provides a stream-like interface that we can pass to Readable.from to turn it into a stream (we covered Readable.from in the previous section - "Working with Streams").
Reading Directories (2)
This course does not attempt to cover HTTP, for that see the sibling course, Node.js Services Development (LFW212) - coming soon. However, for the final part of this section we'll examine a more advanced case: streaming directory contents over HTTP in JSON format:
'use strict'
const { createServer } = require('http')
const { Readable, Transform, pipeline } = require('stream')
const { opendir } = require('fs')

const createEntryStream = () => {
  let syntax = '[\n'
  return new Transform({
    writableObjectMode: true,
    readableObjectMode: false,
    transform (entry, enc, next) {
      next(null, `${syntax} "${entry.name}"`)
      syntax = ',\n'
    },
    final (cb) {
      this.push('\n]\n')
      cb()
    }
  })
}

createServer((req, res) => {
  if (req.url !== '/') {
    res.statusCode = 404
    res.end('Not Found')
    return
  }
  opendir(__dirname, (err, dir) => {
    if (err) {
      res.statusCode = 500
      res.end('Server Error')
      return
    }
    const dirStream = Readable.from(dir)
    const entryStream = createEntryStream()
    res.setHeader('Content-Type', 'application/json')
    pipeline(dirStream, entryStream, res, (err) => {
      if (err) console.error(err)
    })
  })
}).listen(3000)
The above example will respond to an HTTP request to http://localhost:3000 with a JSON array of files. In the following screenshot the server is started in the lower terminal and then an HTTP request is made with Node:

Since it's HTTP it can also be accessed with the browser:
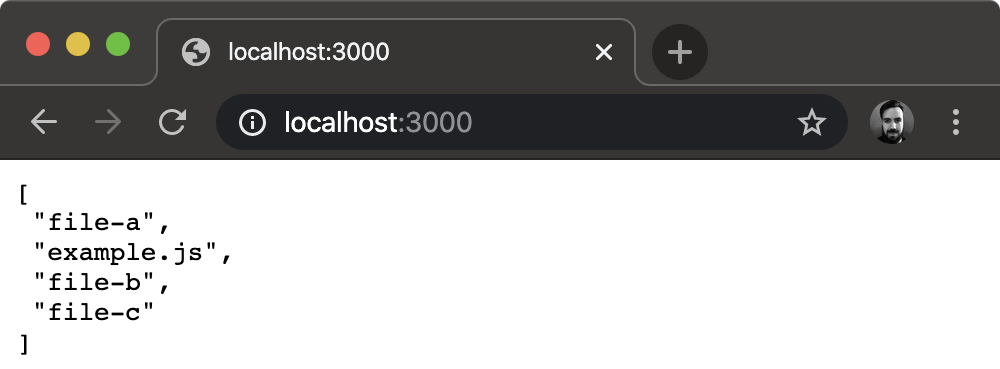
The fs.opendir calls the callback function that is passed to it with an instance of fs.Dir which is not a stream, but it is an async iterable (see for await...of and Symbol.asyncIterator sections of MDN web docs). The stream.Readable.from method can be passed an async iterable to convert it to a stream. Inside the function passed to createServer we do just that and assign it to dirStream. We also create an entryStream which is a transform stream that we've implemented in our createEntryStream function. The res object represents the HTTP response and is a writable stream. We set up a pipeline from dirStream to entryStream to res, passing a final callback to pipeline to log out any errors.
Some more advanced options are passed to the Transform stream constructor, writableObjectMode and readableObjectMode allow for the objectMode to be set for the read and write interfaces separately. The writableObjectMode is set to true because dirStream is an object stream (of fs.Dirent objects, see Class: fs.Dirent section of Node.js Documentation). The readableObjectMode is set to false because res is a binary stream. So our entryStream can be piped to from an object stream, but can pipe to a binary stream.
The writable side of the transform stream accepts objects, and dirStream emits objects which contain a name property. Inside the transform function option, a string is passed as the second argument to next, which is composed of the syntax variable and entry.name. For the first entry that is written to the transform stream, the syntax variable is '[\n' which opens up the JSON array. The syntax variable is then set to ',\n' which provides a delimiter between each entry.
The final option function is called before the stream ends, which allows for any cleanup or final data to send through the stream. In the final function this.push is called in order to push some final bytes to the readable side of the transform stream, this allows us to close the JSON array. When we're done we call the callback (cb) to let the stream know we've finished any final processing in the final function.
File Metadata
Metadata about files can be obtained with the following methods:
fs.stat,fs.statSync,fs.promises.statfs.lstat,fs.lstatSync,fs.promises.lstat
The only difference between the stat and lstat methods is that stat follows symbolic links, and lstat will get meta data for symbolic links instead of following them.
These methods return an fs.Stat instance which has a variety of properties and methods for looking up metadata about a file, see Class: fs.Stats section of the Node.js Documentation for the full API.
We'll now look at detecting whether a given path points to a file or a directory and we'll look at the different time stats that are available.
By now, we should understand the difference and trade-offs between the sync and async APIs so for these examples we'll use fs.statSync.
Let's start by reading the current working directory and finding out whether each entry is a directory or not.
'use strict'
const { readdirSync, statSync } = require('fs')

const files = readdirSync('.')

for (const name of files) {
  const stat = statSync(name)
  const typeLabel = stat.isDirectory() ? 'dir: ' : 'file: '
  console.log(typeLabel, name)
}
Since '.' is passed to readdirSync, the directory that will be ready will be whatever directory we're currently in.
Given a directory structure with the following:
example.jsa-dira-file
Where example.js is the file with our code in, if we run node example.js in that folder, we'll see something like the following:
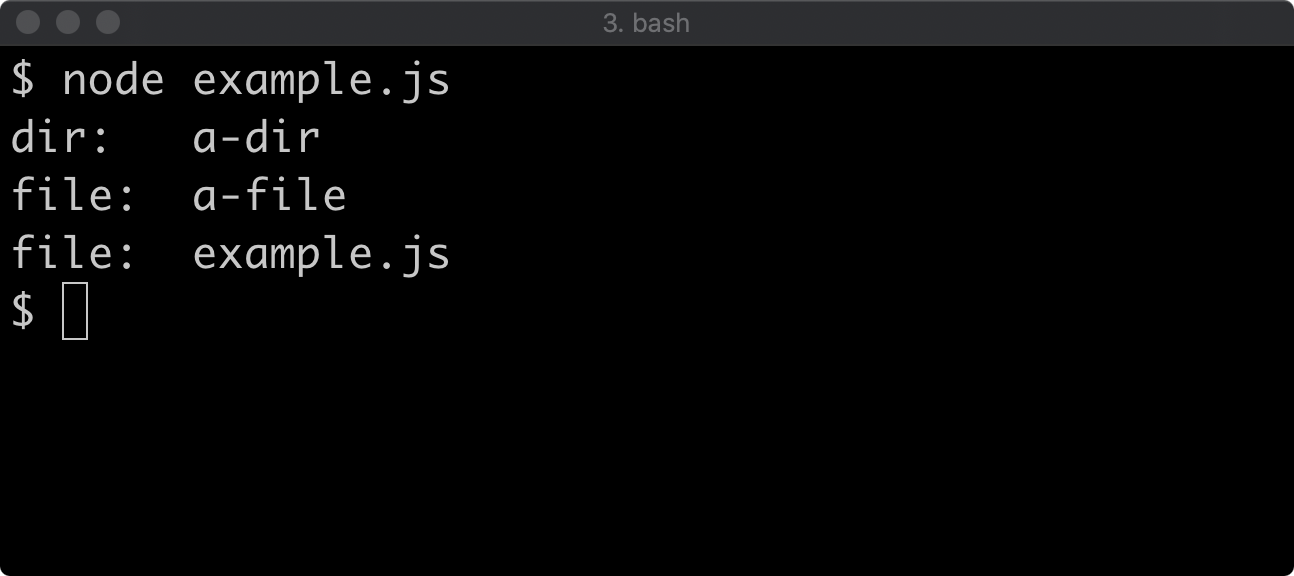
File Metadata (2)
Let's extend our example with time stats. There are four stats available for files:
- Access time
- Change time
- Modified time
- Birth time
The difference between change time and modified time, is modified time only applies to writes (although it can be manipulated by fs.utime), whereas change time applies to writes and any status changes such as changing permissions or ownership.
With default options, the time stats are offered in two formats, one is a Date object and the other is milliseconds since the epoch. We'll use the Date objects and convert them to locale strings.
Let's update our code to output the four different time stats for each file:
'use strict'
const { readdirSync, statSync } = require('fs')

const files = readdirSync('.')

for (const name of files) {
  const stat = statSync(name)
  const typeLabel = stat.isDirectory() ? 'dir: ' : 'file: '
  const { atime, birthtime, ctime, mtime } = stat
  console.group(typeLabel, name)
  console.log('atime:', atime.toLocaleString())
  console.log('ctime:', ctime.toLocaleString())
  console.log('mtime:', mtime.toLocaleString())
  console.log('birthtime:', birthtime.toLocaleString())
  console.groupEnd()
  console.log()
}
This will output something like the following:
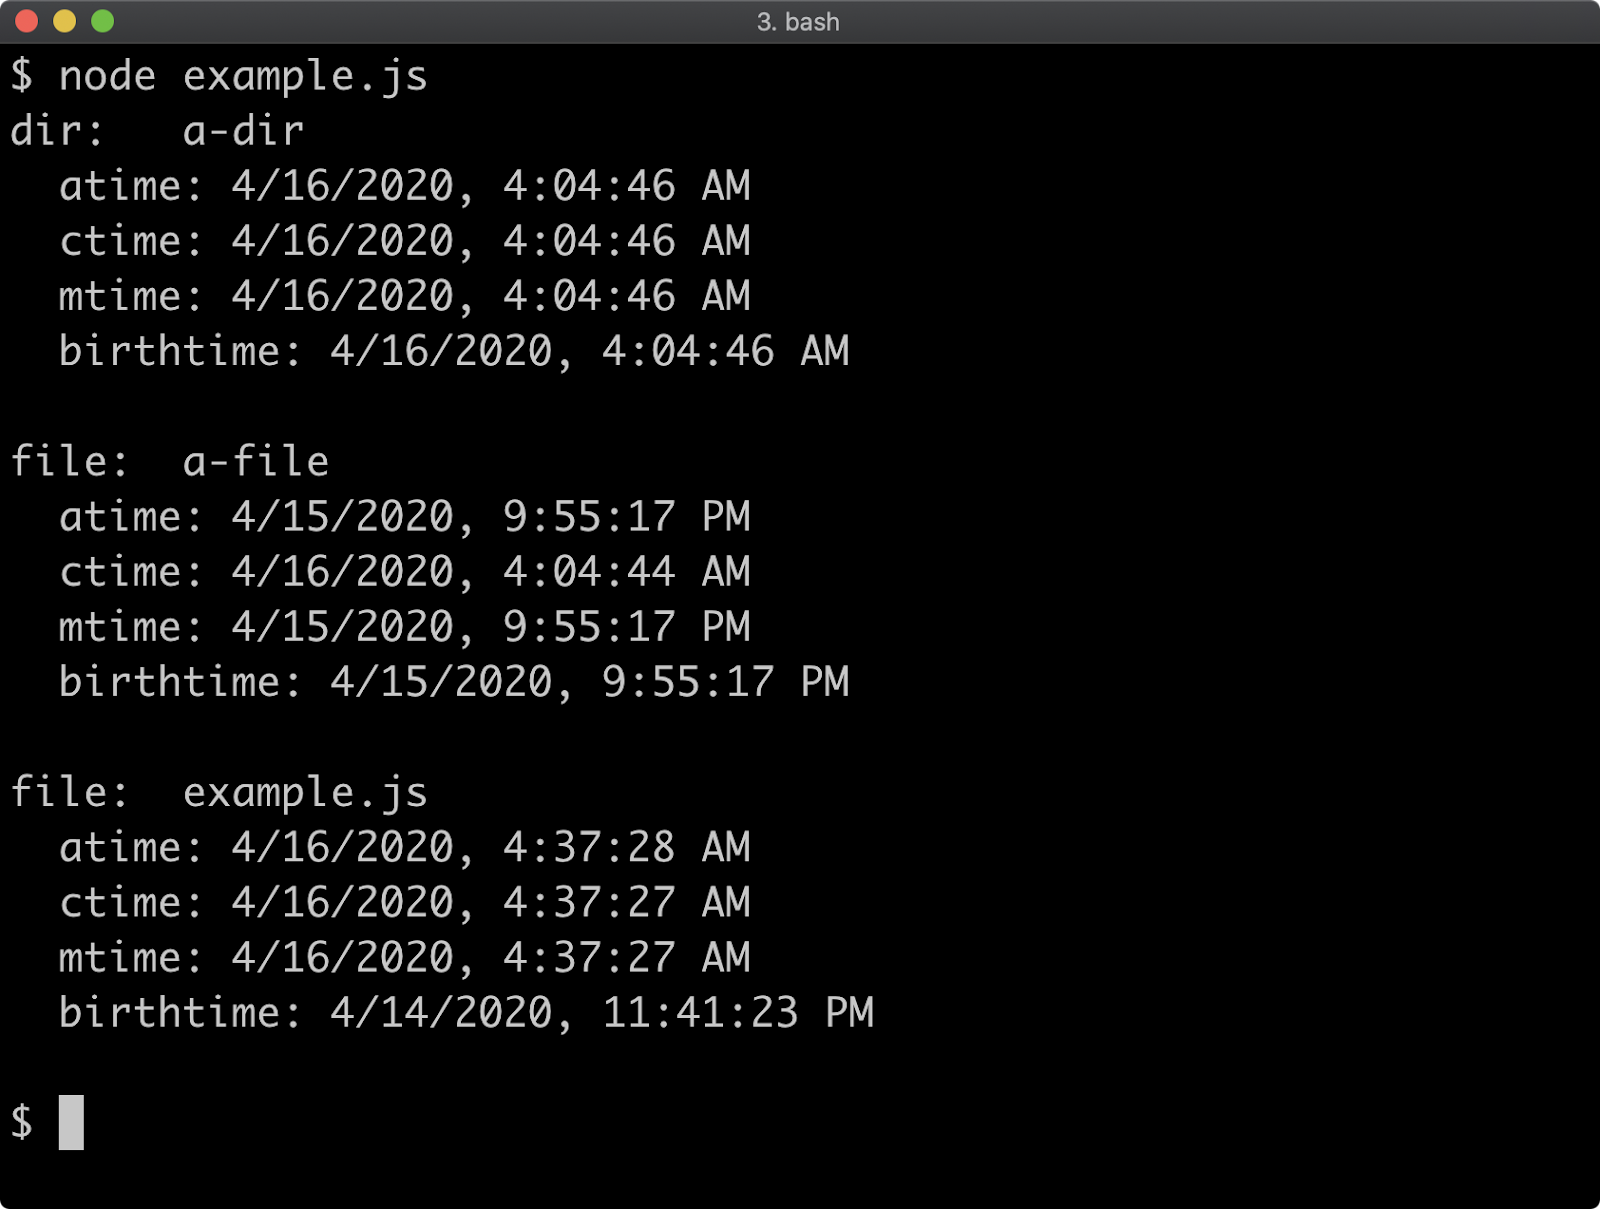
Watching (1)
The fs.watch method is provided by Node core to tap into file system events. It is however, fairly low level and not the most friendly of APIs. Now, we will explore the core fs.watch method. However, it's worth considering the ecosystem library, chokidar for file watching needs as it provides a friendlier high level API.
Let's start by writing watching the current directory and logging file names and events:
'use strict'
const { watch } = require('fs')

watch('.', (evt, filename) => {
  console.log(evt, filename)
})
The above code will keep the process open and watch the directory of wherever the code is executed from. Any time there's a change in the directory the listener function passed as the second argument to watch will be called with an event name (evt) and the filename related to the event.
The following screenshot shows the above code running in the top terminal, and file manipulation commands in the bottom section.
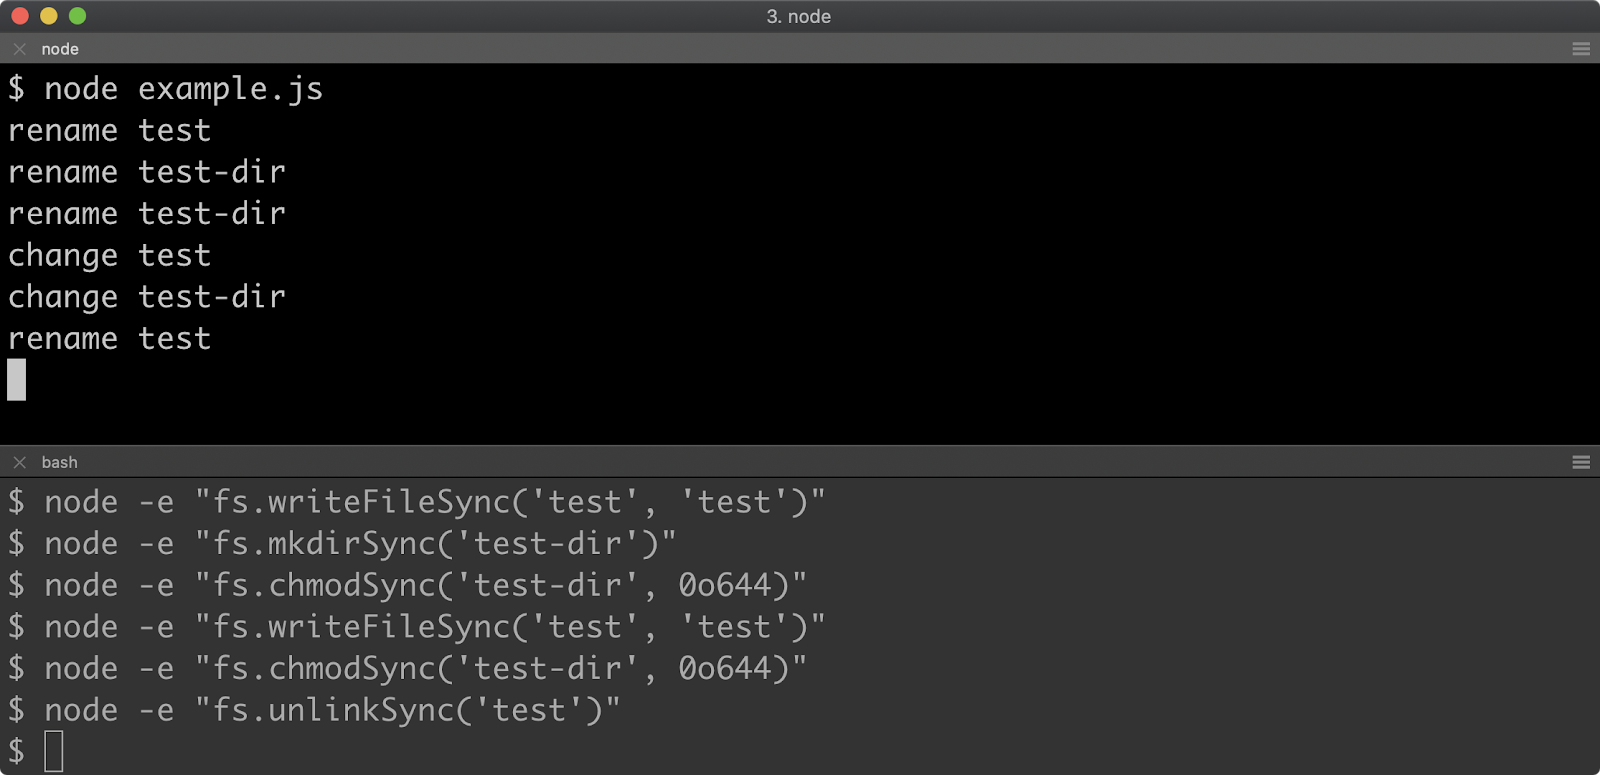
The output in the top section is output in real time for each command in the bottom section. Let's analyze the commands in the bottom section to the output in the top section:
- Creating a new file named
test (node -e "fs.writeFileSync('test', 'test')")generates an event calledrename. - Creating a folder called
test-dir (node -e "fs.mkdirSync('test-dir')")generates an event calledrename. - Setting the permissions of
test-dir (node -e "fs.chmodSync('test-dir', 0o644)")generates an event calledrename. - Writing the same content to the
testfile(node -e "fs.writeFileSync('test', 'test')")generates an event namedchange. - Setting the permissions of
test-dir (node -e "fs.chmodSync('test-dir', 0o644)")a second time generates achangeevent this time. - Deleting the
testfile (node -e "fs.unlinkSync('test')") generates arenameevent.
It may be obvious at this point that the supplied event isn't very useful. The fs.watch API is part of the low-level functionality of the fs module, it's repeating the events generated by the underlying operating system. So we can either use a library like chokidar as discussed at the beginning of this section or we can query and store information about files to determine that operations are occurring.
Watching (2)
We can discover whether a file is added by maintaining a list of files, and removing files when we find that a file was removed. If the file is known to us, we can further distinguish between a content update and a status update by checking whether the Modified time is equal to the Change time. If they are equal it's a content update, since a write operation will cause both to update. If they aren't equal it's a status update.
'use strict'
const { join, resolve } = require('path')
const { watch, readdirSync, statSync } = require('fs')

const cwd = resolve('.')
const files = new Set(readdirSync('.'))
watch('.', (evt, filename) => {
  try {
    const { ctimeMs, mtimeMs } = statSync(join(cwd, filename))
    if (files.has(filename) === false) {
      evt = 'created'
      files.add(filename)
    } else {
      if (ctimeMs === mtimeMs) evt = 'content-updated'
      else evt = 'status-updated'
    }
  } catch (err) {
    if (err.code === 'ENOENT') {
      files.delete(filename)
      evt = 'deleted'
    } else {
      console.error(err)
    }
  } finally {
    console.log(evt, filename)
  }
})
This approach uses a Set (a unique list), initializing it with the array of files already present in the current workings directory. The current working directory is retrieved using resolve('.'), although it's more usual to use process.cwd(). We'll explore the process object in the next chapter. If the files set doesn't have a particular filename, the evt parameter is reassigned to 'created'. The fs.statSync method throws, it may be because the file does not exist. In that case, the catch block will receive an error object that has a code property set to 'ENOENT'. If this occurs the filename is removed from the files set and evt is reassigned to 'deleted'. Back up in the try block, if the filename is in the files set we check whether ctimeMs is equal to mtimeMs (these are time stats provided in milliseconds). If they are equal, evt is set to 'content-updated', if not it is set to 'status-updated'.
If we execute our code, and the add a new file and delete it, it will output more suitable event names:
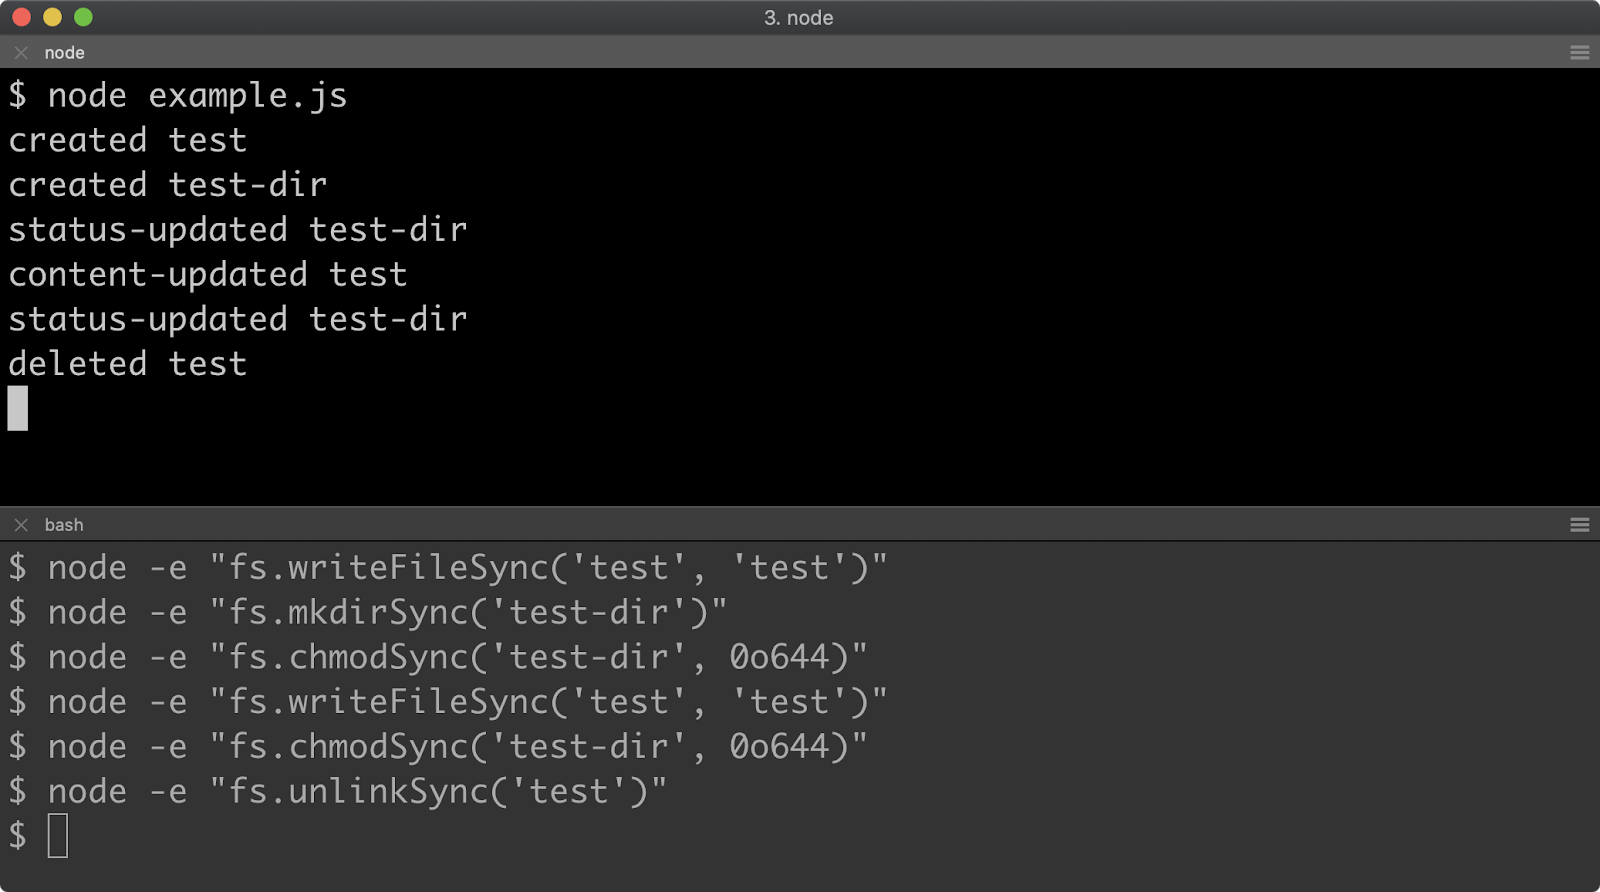
Lab Exercises
Lab 13.1 - Read Directory and Write File
The labs-1 folder contains an index.js file containing the following:
'use strict'
const assert = require('assert')
const { join } = require('path')
const fs = require('fs')
const project = join(__dirname, 'project')
try { fs.rmdirSync(project, { recursive: true }) } catch (err) { }
const files = Array.from(Array(5), () => {
  return join(project, Math.random().toString(36).slice(2))
})
fs.mkdirSync(project)
for (const f of files) fs.closeSync(fs.openSync(f, 'w'))

const out = join(__dirname, 'out.txt')

function exercise() {
  // TODO read the files in the project folder
  // and write them to the out.txt file
}

exercise()
assert(fs.readFileSync(out).toString(), files.toString())
console.log('passed!')
The above code will generate a project folder and add five files to it with pseudo-randomly generated filenames.
Complete the function named exercise so that all the files in the project folder, as stored in the project constant, are written to the out.txt file as stored in the out constant. Only the file names should be stored, not the full file paths, and file names should be comma separated.
For instance, given a project folder with the following files:
0p2ly0dluiw2ftl32u5zu58t4iilscua690370mamnsezfw8w7f8sm8
The out.txt should then contain:
0p2ly0dluiw, 2ftl32u5zu5, 8t4iilscua6, 90370mamnse, zfw8w7f8sm8
If successfully implemented, the process will output: passed!.
Lab 13.2 - Watching
The labs-2 folder contains an index.js file with the following:
'use strict'
const assert = require('assert')
const { join } = require('path')
const fs = require('fs')
const { promisify } = require('util')
const timeout = promisify(setTimeout)
const project = join(__dirname, 'project')
try { fs.rmdirSync(project, { recursive: true }) } catch (err) {
  console.error(err)
}
fs.mkdirSync(project)

let answer = ''

async function writer() {
  const { open, chmod, mkdir } = fs.promises
  const pre = join(project, Math.random().toString(36).slice(2))
  const handle = await open(pre, 'w')
  await handle.close()
  await timeout(500)
  exercise(project)
  const file = join(project, Math.random().toString(36).slice(2))
  const dir = join(project, Math.random().toString(36).slice(2))
  const add = await open(file, 'w')
  await add.close()
  await mkdir(dir)
  await chmod(pre, 0o444)
  await timeout(500)
  assert.strictEqual(
    answer,
    file,
    'answer should be the file (not folder) which was added'
  )
  console.log('passed!')
  process.exit()
}

writer().catch((err) => {
  console.error(err)
  process.exit(1)
})

function exercise(project) {
  const files = new Set(fs.readdirSync(project))
  fs.watch(project, (evt, filename) => {
    try {
      const filepath = join(project, filename)
      const stat = fs.statSync(filepath)

      // TODO - only set the answer variable if the filepath
      // is both newly created AND does not point to a directory

      answer = filepath
    } catch (err) {
    }
  })
}
When executed (e.g. using node index.js) this code will create a folder named project (removing it first if it already exists and then recreating it), and then perform some file system manipulations within the project folder.
The writer function will create a file before calling the exercise function, to simulate a pre-existing file, The exercise function will then be called which sets up a file watcher with fs.watch. The writer function then proceeds to create a file, a directory and changes the permissions of the previously existing file. These changes will trigger the listener function passed as the second argument to fs.watch.
The goal is to ensure that the answer variable is set to the newly created file. So when a directory is added, the answer variable should not be set to the directory path. When the preexisting files status is updated via a permissions change, the answer variable should not be set to that preexisting file.
If implemented correctly the process will output: passed!.
14 - Process and operating system
Introduction
Chapter Overview
A Node.js process is the program that is currently running our code. We can control and gather information about a process using the global process object. The Operating System is the host system on which a process runs, we can find out information about the Operating System of a running process using the core os module. In this chapter we'll explore both.
Learning Objectives
By the end of this chapter, you should be able to:
- Explain process input and output.
- Exit a process, exit codes and respond to a process closing.
- Gather information about the process.
- Gather information about the Operating System.
Process & Operating System
STDIO (1)
The ability to interact with terminal input and output is known as standard input/output, or STDIO. The process object exposes three streams:
process.stdin: A Readable stream for process input.process.stdou: A Writable stream for process output.process.stder: A Writable stream for process error output.
Streams were covered in detail earlier on, for any terms that seem unfamiliar, refer back to Chapter 12 - "Working with Streams".
In order to interface with process.stdin some input is needed. We'll use a simple command that generates random bytes in hex format:
node -p "crypto.randomBytes(100).toString('hex')"
Since bytes are randomly generated, this will produce different output every time, but it will always be 200 alphanumeric characters:
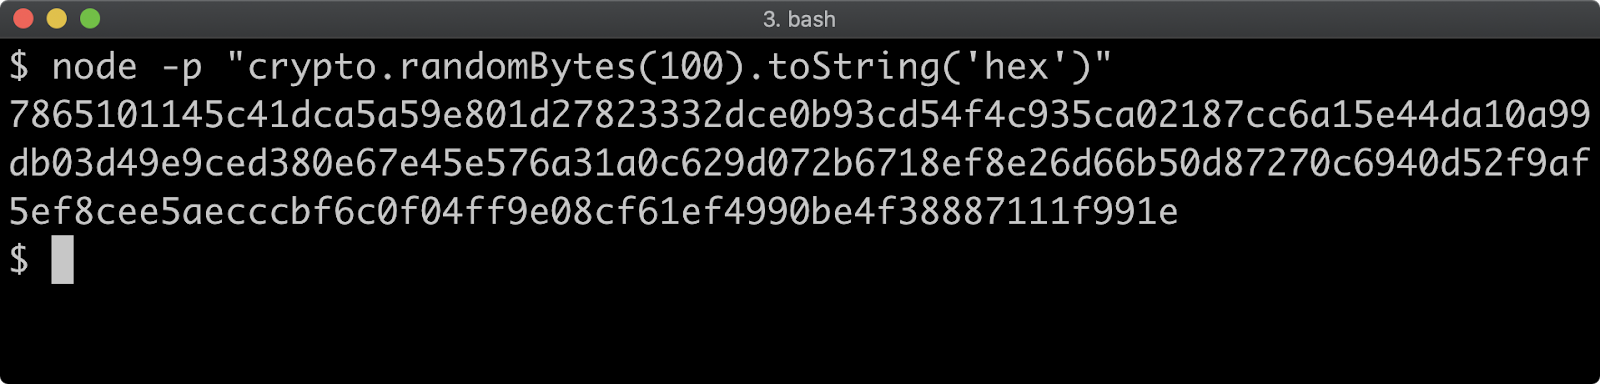
Let's start with an example.js file that simply prints that it was initialized and then exits:
'use strict'
console.log('initialized')
If we attempt to use the command line to pipe the output from the random byte command into our process, nothing will happen beyond the process printing that it was initialized:
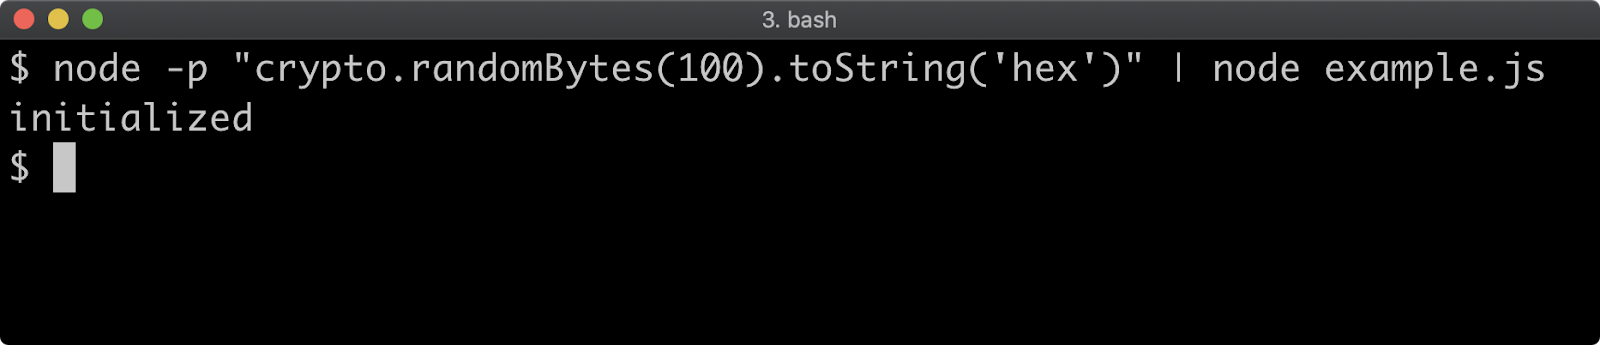
Let's extend our code so that we connect process.stdin to process.stdout:
'use strict'
console.log('initialized')
process.stdin.pipe(process.stdout)
This will cause the input that we're piping from the random bytes command into our process will be written out from our process:
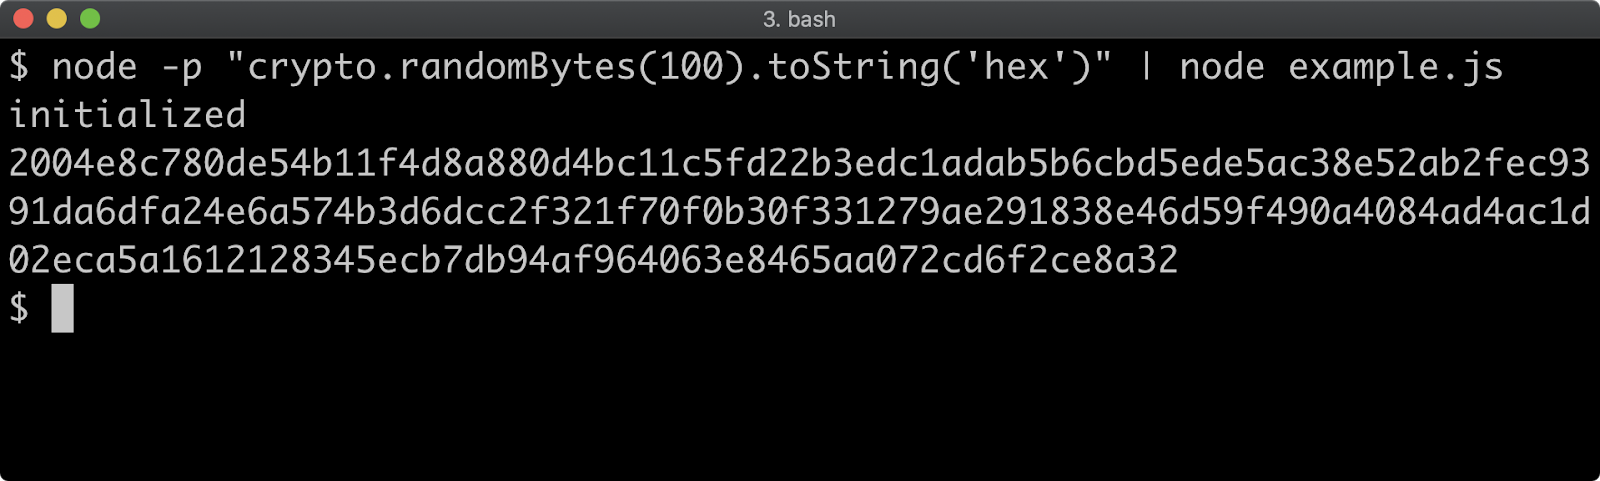
STDIO (2)
Since we're dealing with streams, we can take the uppercase stream from the previous chapter and pipe from process.stdin through the uppercase stream and out to process.stdout:
'use strict'
console.log('initialized')
const { Transform } = require('stream')
const createUppercaseStream = () => {
  return new Transform({
    transform (chunk, enc, next) {
      const uppercased = chunk.toString().toUpperCase()
      next(null, uppercased)
    }
  })
}

const uppercase = createUppercaseStream()

process.stdin.pipe(uppercase).pipe(process.stdout)
This will cause all the lowercase characters to become uppercase:
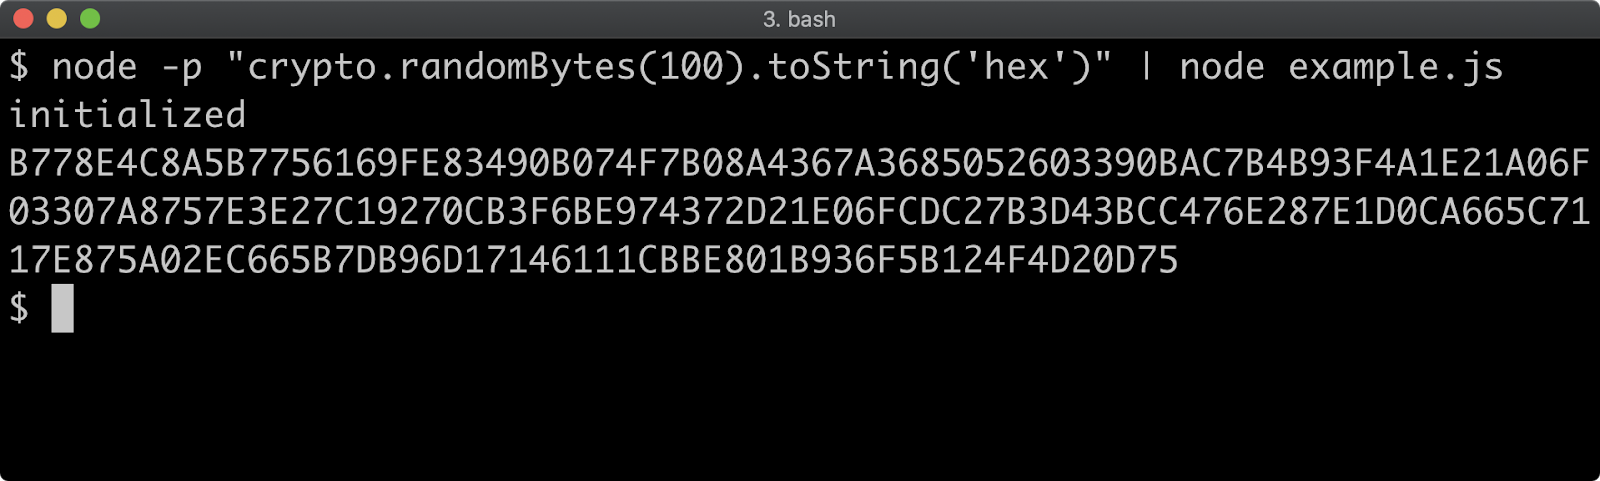
It may have been noted that we did not use the pipeline function, but instead used the pipe method. The process.stdin, process.stdout and process.stderr streams are unique in that they never finish, error or close. That is to say, if one of these streams were to end it would either cause the process to crash or it would end because the process exited. We could use the stream.finished method to check that the uppercase stream doesn't close, but in our case we didn't add error handling to the uppercase stream because any problems that occur in this scenario should cause the process to crash.
The process.stdin.isTTY property can be checked to determine whether our process is being piped to on the command line or whether input is directly connected to the terminal. In the latter case process.stdin.isTTY will be true, otherwise it is undefined (which we can coerce to false).
At the top of our file we currently have a console.log:
console.log('initialized')
Let's alter it to:
console.log(process.stdin.isTTY ? 'terminal' : 'piped to')
If we now pipe our random bytes command to our script the console.log message will indicate that our process is indeed being piped to:
If we execute our code without piping to it, the printed message will indicate that the process is directly connected to the terminal, and we will be able to type input into our process which will be transformed and sent back to us:
We've looked at process.stdin and process.stdout, let's wrap up this section by looking at process.stderr. Typically output sent to stderr is secondary output, it might be error messages, warnings or debug logs.
STDIO (3)
First, on the command line, let's redirect output to a file:
We can see from this that using the greater than character (>) on the command line sends output to a given file, in our case out.txt.
Now, let's alter the following line in our code:
console.log(process.stdin.isTTY ? 'terminal' : 'piped to')
To:
process.stderr.write(process.stdin.isTTY ? 'terminal\n' : 'piped to\n')
Now, let's run the command redirecting to out.txt as before:
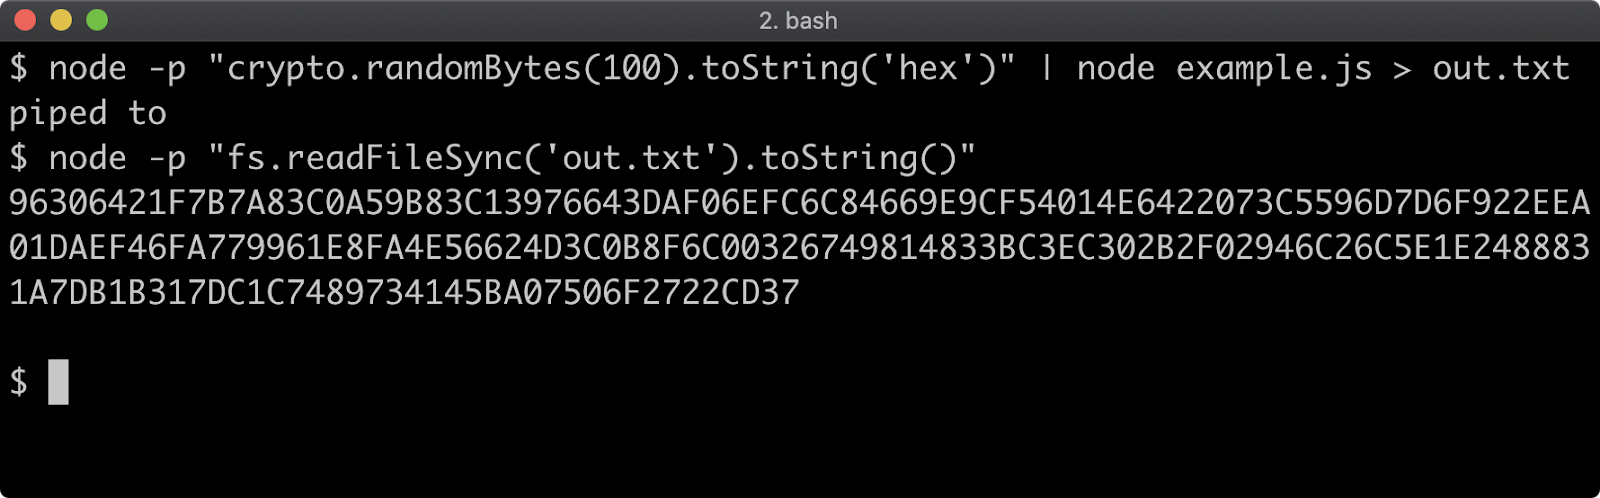
Here we can see that that piped to is printed to the console even though output is sent to out.txt. This is because the console.log function prints to STDOUT and STDERR is a separate output device which also prints to the terminal. So before 'piped to' was written to STDOUT, and therefore redirected to out.txt whereas now it's written to a separate output stream which also writes to the terminal.
Notice that we add a newline (\n) to our strings, this is because the console methods automatically add a newline to inputs. We can also use console.error to write to STDERR. Let's change the log line to:
console.error(process.stdin.isTTY ? 'terminal' : 'piped to')
This will lead to the same result:
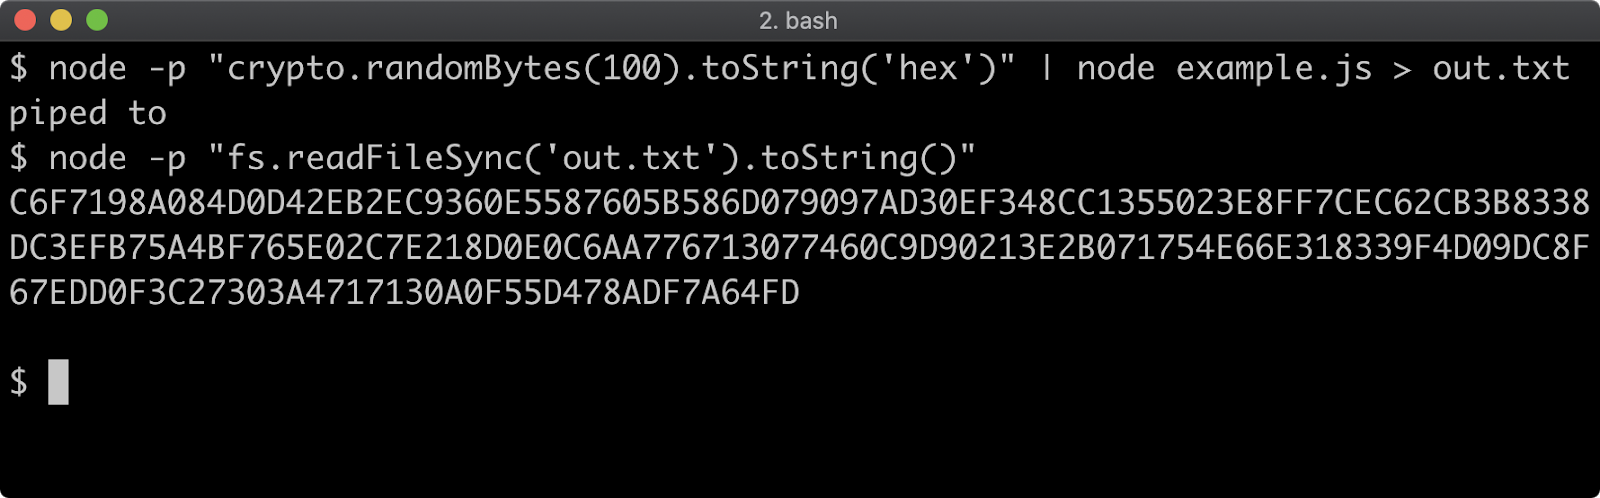
While it's beyond the scope of Node, it's worth knowing that if we wanted to redirect the STDERR output to another file on the command line 2> can be used:
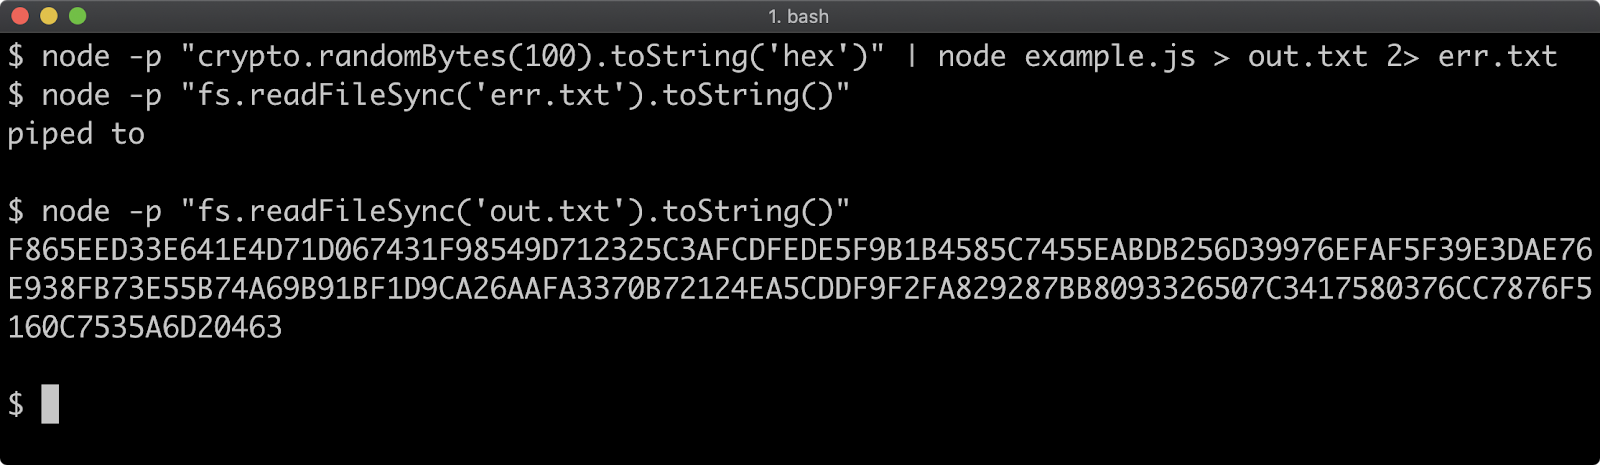
This command wrote STDOUT to out.txt and STDERR to err.txt. On both Windows and POSIX systems (Linux, macOS) the number 2 is a common file handle representing STDERR, this is why the syntax is 2>. In node the process.stderr.fd is 2 and process.stdout.fd is 1 because they are file write streams. It's actually possible to recreate them with the fs module:
'use strict'
const fs = require('fs')
const myStdout = fs.createWriteStream(null, {fd: 1})
const myStderr = fs.createWriteStream(null, {fd: 2})
myStdout.write('stdout stream')
myStderr.write('stderr stream')
The above example is purely for purposes of enhancing understanding, always use process.stdout and process.stderr, do not try to recreate them as they've been enhanced with other characteristics beyond this basic example.
Exiting (1)
When a process has nothing left to do, it exits by itself. For instance, let's look at this code:
console.log('exit after this')
If we execute the code, we'll see this:

Some API's have active handles. An active handle is a reference that keeps the process open. For instance, net.createServer creates a server with an active handle which will stop the process from exiting by itself so that it can wait for incoming requests. Timeouts and intervals also have active handles that keep the process from exiting:
'use strict'
setInterval(() => {
  console.log('this interval is keeping the process open')
}, 500)
If we run the above code the log line will continue to print every 500ms, we can use Ctrl and C to exit:
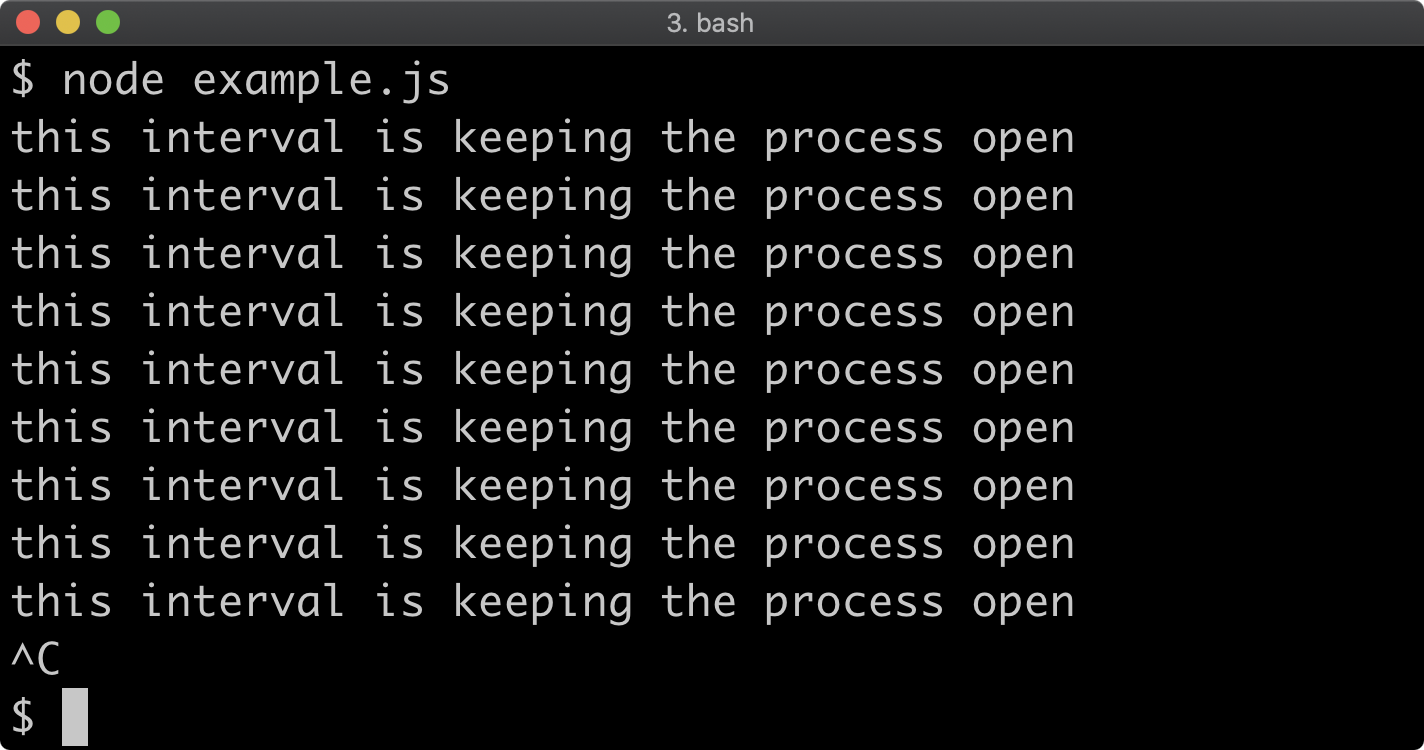
To force a process to exit at any point we can call process.exit.
'use strict'
setInterval(() => {
  console.log('this interval is keeping the process open')
}, 500)
setTimeout(() => {
  console.log('exit after this')
  process.exit()
}, 1750)
This will cause the process to exit after the function passed to setInterval has been called three times:
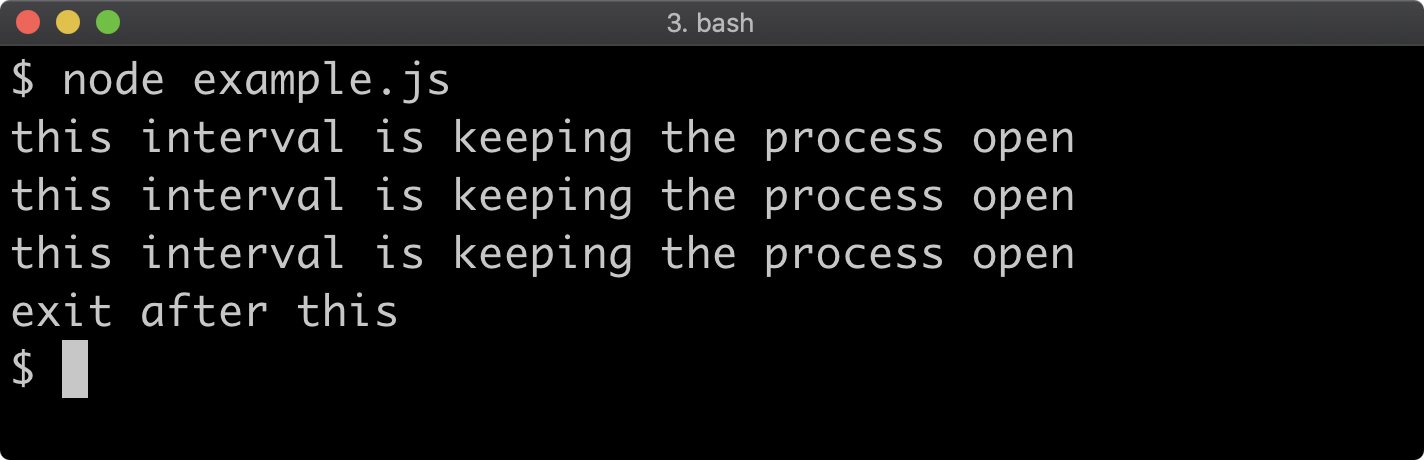
When exiting a process an exit status code can already be set. Status codes are a large subject, and can mean different things on different platforms. The only exit code that has a uniform meaning across platforms is 0. An exit code of 0 means the process executed successfully. On Linux and macOS (or more specifically, Bash, Zsh, Sh, and other *nix shells) we can verify this with the command echo $? which prints a special variable called $?. On a Windows cmd.exe terminal we can use echo %ErrorLevel% instead or in PowerShell the command is $LastExitCode. In the following examples, we'll be using echo $? but substitute with the relevant command as appropriate.
If we run our code again and look up the exit code we'll see that is 0:
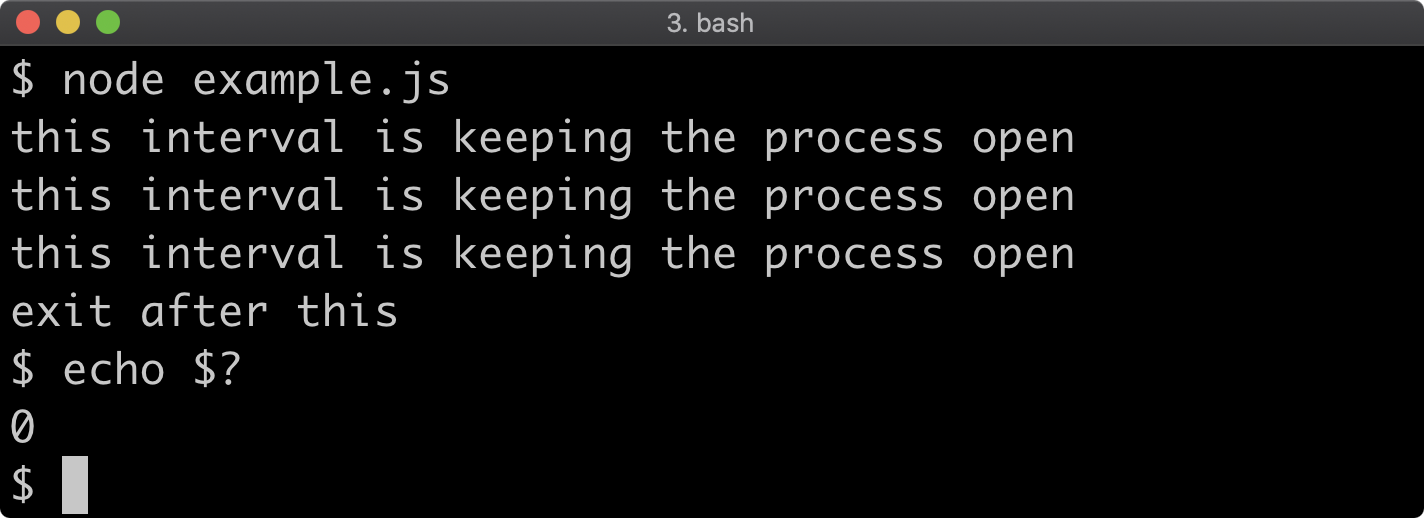
Exiting (2)
We can pass a different exit code to process.exit. Any non-zero code indicates failure, and to indicate general failure we can use an exit code of 1 (technically this means "Incorrect function" on Windows but there's a common understanding that 1 means general failure).
Let's modify our process.exit call to pass 1 to it:
'use strict'
setInterval(() => {
  console.log('this interval is keeping the process open')
}, 500)
setTimeout(() => {
  console.log('exit after this')
  process.exit(1)
}, 1750)
Now, if we check the exit code after running the process it should be 1:
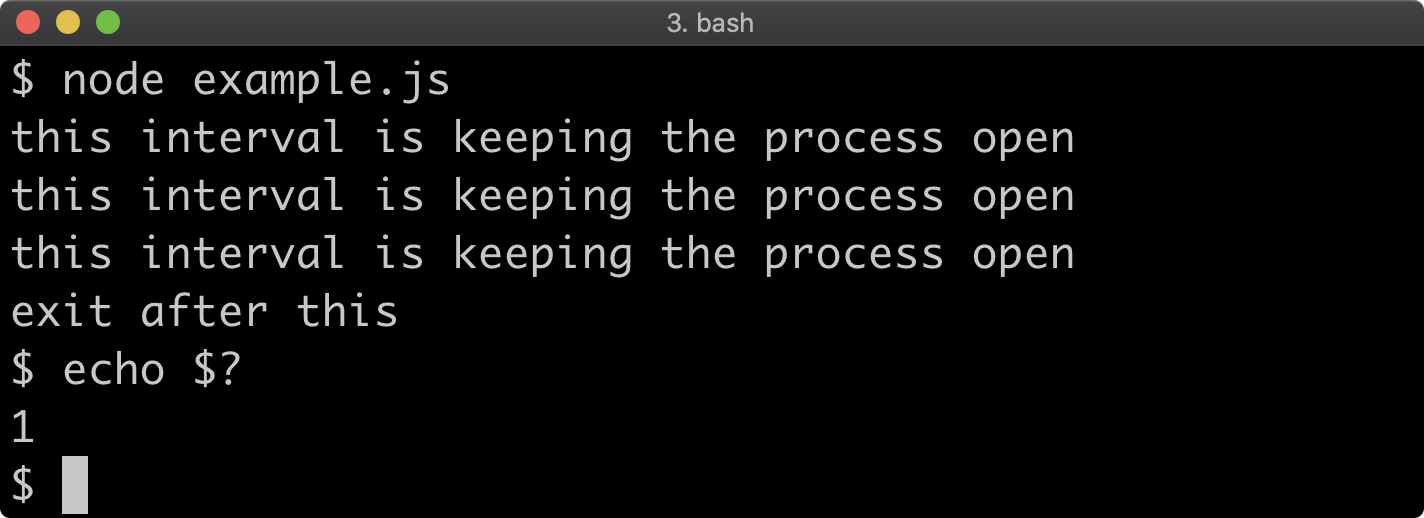
The exit code can also be set independently be assigning process.exitCode:
'use strict'
setInterval(() => {
  console.log('this interval is keeping the process open')
  process.exitCode = 1
}, 500)
setTimeout(() => {
  console.log('exit after this')
  process.exit()
}, 1750)
This will result in the same outcome:

The 'exit' event can also used to detect when a process is closing and perform any final actions, however no asynchronous work can be done in the event handler function because the process is exiting:
'use strict'
setInterval(() => {
  console.log('this interval is keeping the process open')
  process.exitCode = 1
}, 500)
setTimeout(() => {
  console.log('exit after this')
  process.exit()
}, 1750)

process.on('exit', (code) => {
  console.log('exiting with code', code)
  setTimeout(() => {
    console.log('this will never happen')
  }, 1)
})
This will result in the following output:
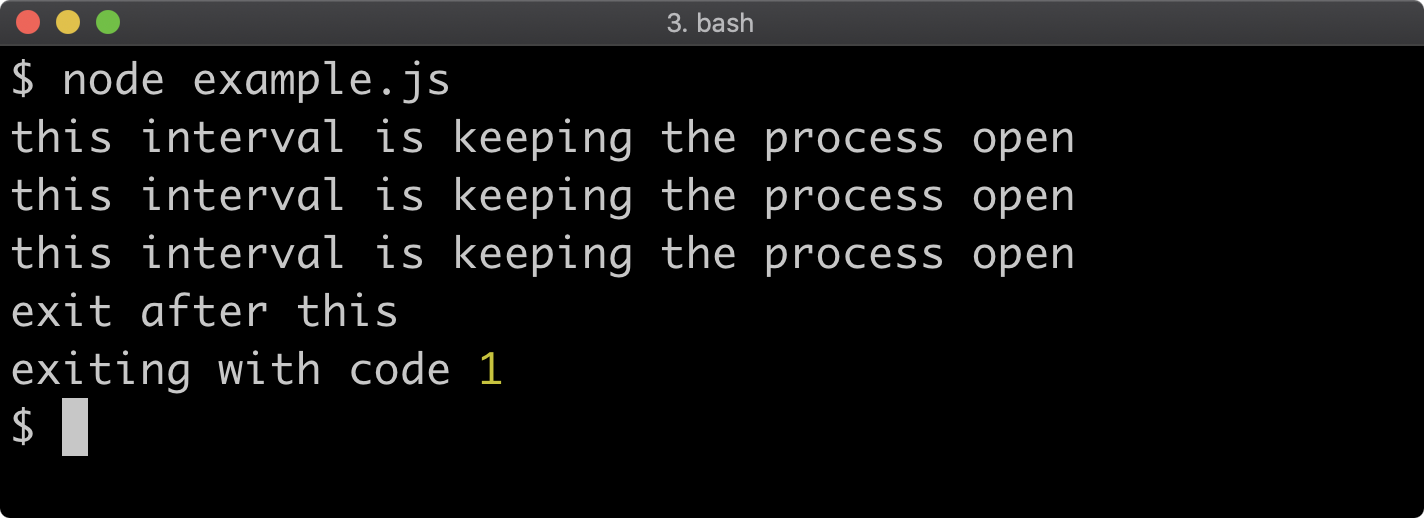
Process Info
Naturally the process object also contains information about the process, we'll look at a few here:
- The current working directory of the process
- The platform on which the process is running
- The Process ID
- The environment variables that apply to the process
There are other more advanced things to explore, but see the Node.js Documentation for a comprehensive overview.
Let's look at the first three bullet points in one code example:
'use strict'
console.log('Current Directory', process.cwd())
console.log('Process Platform', process.platform)
console.log('Process ID', process.pid)
This produces the following output:
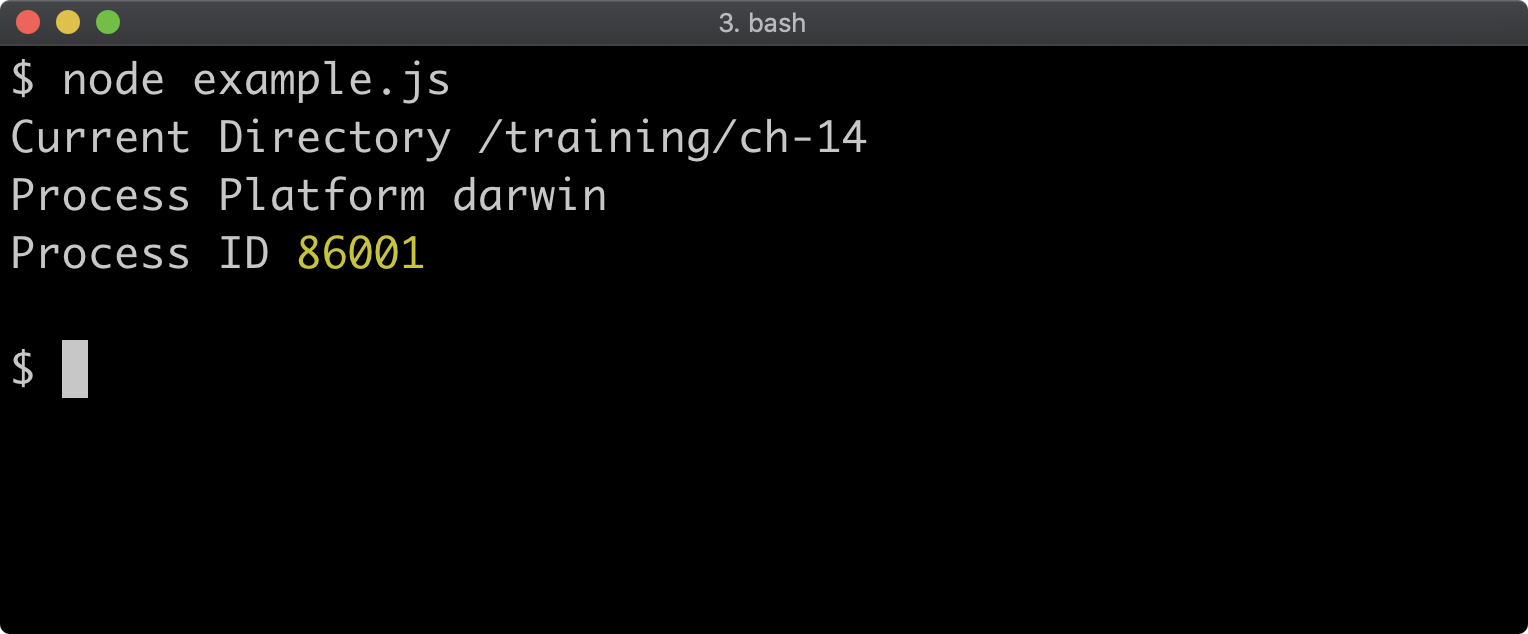
The current working directory is whatever folder the process was executed in. The process.chdir command can also change the current working directory, in which case process.cwd() would output the new directory.
The process platform indicates the host Operating System. Depending on the system it can be one of:
'aix'– IBM AIX'darwin'– macOS'freebsd'– FreeBSD'linux'– Linux'openbsd'– OpenBSD'sunos'– Solaris / Illumos / SmartOS'win32'– Windows'android'– Android, experimental
As we'll see in a future section the os module also has a platform function (rather than property) which will return the same values for the same systems as exist on process.platform.
To get the environment variables we can use process.env:
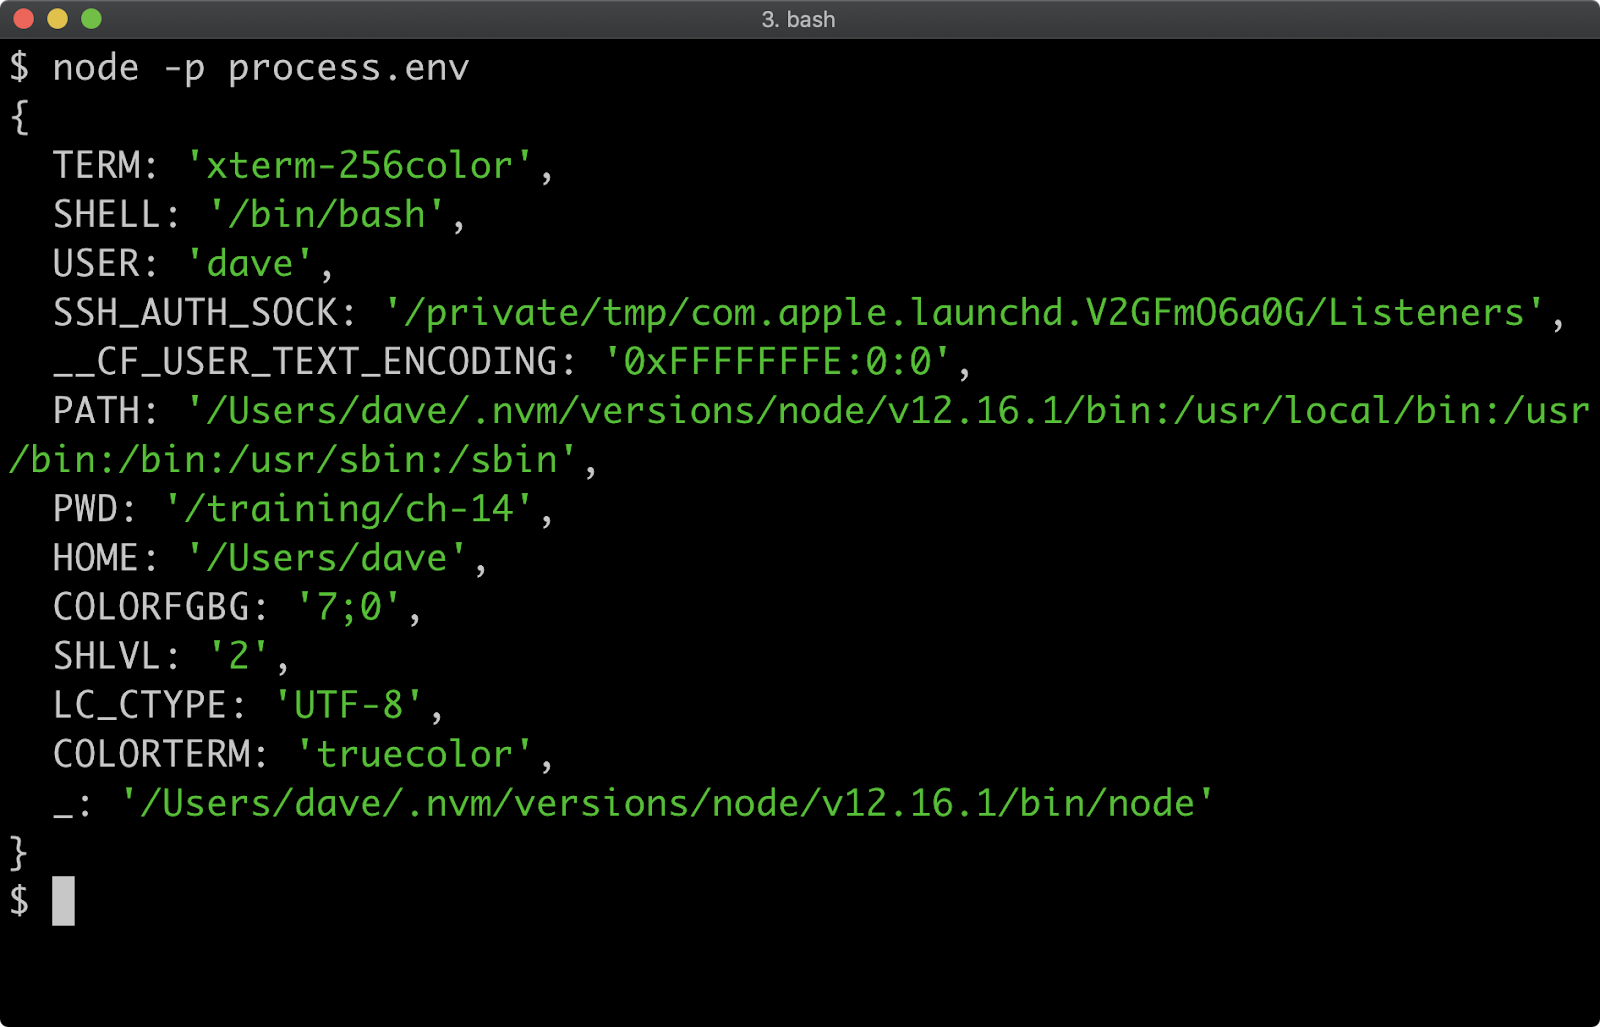
Environment variables are key value pairs, when process.env is accessed, the host environment is dynamically queried and an object is built out of the key value pairs. This means process.env works more like a function, it's a getter. When used to set environment variables, for instance process.env.FOO='my env var' the environment variable is set for the process only, it does not leak into the host operating system.
Note that process.env.PWD also contains the current working directory when the process executes, just like process.cwd() returns. However if the process changes its directory with process.chdir, process.cwd() will return the new directory whereas process.env.PWD continues to store the directory that process was initially executed from.
Process Stats (1)
The process object has methods which allow us to query resource usage. We're going to look at the process.uptime(), process.cpuUsage and process.memoryUsage functions.
Let's take a look at process.uptime:
'use strict'
console.log('Process Uptime', process.uptime())
setTimeout(() => {
  console.log('Process Uptime', process.uptime())
}, 1000)
This produces the following output:
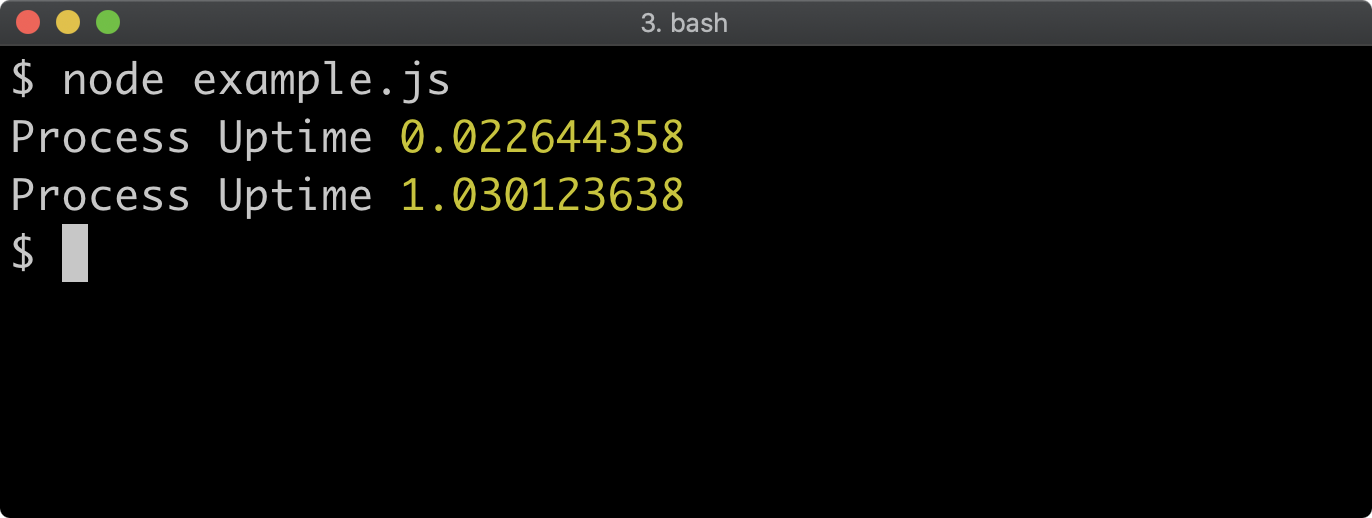
Process uptime is the amount of seconds (with 9 decimal places) that the process has been executing for. This is not to be confused with host machine uptime, which we'll see in a future section can be determined using the os module.
The process.cpuUsage function returns an object with two properties: user and system. The user property represents time that the Node process spent using the CPU. The system property represents time that the kernel spent using the CPU due to activity triggered by the process. Both properties contain microsecond (one millionth of a second) measurements:
'use strict'
const outputStats = () => {
  const uptime = process.uptime()
  const { user, system } = process.cpuUsage()
  console.log(uptime, user, system, (user + system)/1000000)
}

outputStats()

setTimeout(() => {
  outputStats()
  const now = Date.now()
  // make the CPU do some work:
  while (Date.now() - now < 5000) {}
  outputStats()
}, 500)
In this example the outputStats function prints the process uptime in seconds, the user CPU usage in microseconds, the system CPU usage in microseconds, and the total CPU usage in seconds so we can compare it against the uptime. We print the stats when the process starts. After 500 milliseconds we print the stats again. Then we make the CPU do some work for roughly five seconds and print the stats one last time.
Let's look at the output:
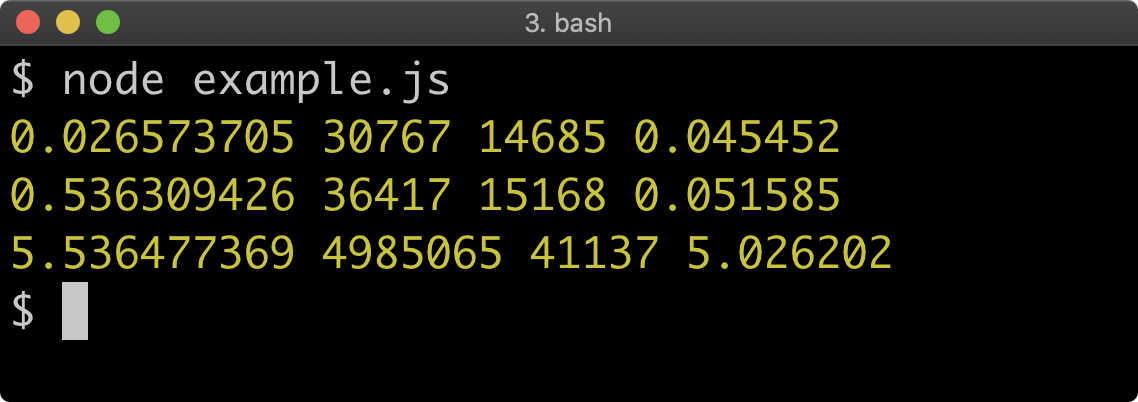
We can see from the output that CPU usage significantly increases on the third call to outputStats. This is because prior to the third call the Date.now function is called repeatedly in a while loop until 5000 milliseconds has passed.
On the second line, we can observe that uptime jumps in the first column from 0.026 to 0.536 because the setTimeout is 500 milliseconds (or 0.5 seconds). The extra 10 millisecond will be additional execution time of outputting stats and setting up the timeout. However, on the same line the CPU usage only increases by 0.006 seconds. This is because the process was idling during that time, whereas the third line records that the process was doing a lot of work. Just over 5 seconds, as intended.
One other observation we can make here is on the first line the total CPU usage is greater than the uptime. This is because Node may use more than one CPU core, which can multiply the CPU time used by however many cores are used during that period.
Process Stats (2)
Finally, let's look at process.memoryUsage:
'use strict'
const stats = [process.memoryUsage()]

let iterations = 5

while (iterations--) {
  const arr = []
  let i = 10000
  // make the CPU do some work:
  while (i--) {
    arr.push({[Math.random()]: Math.random()})
  }
  stats.push(process.memoryUsage())
}

console.table(stats)
The console.table function in this example is taking an array of objects that have the same keys (rss, heapTotal, heapUsed, and external) and printing them out as a table. We assemble the stats array by adding the result process.memoryUsage() at initialization and then five more times after creating 10,000 objects each time. This will output something like the following:
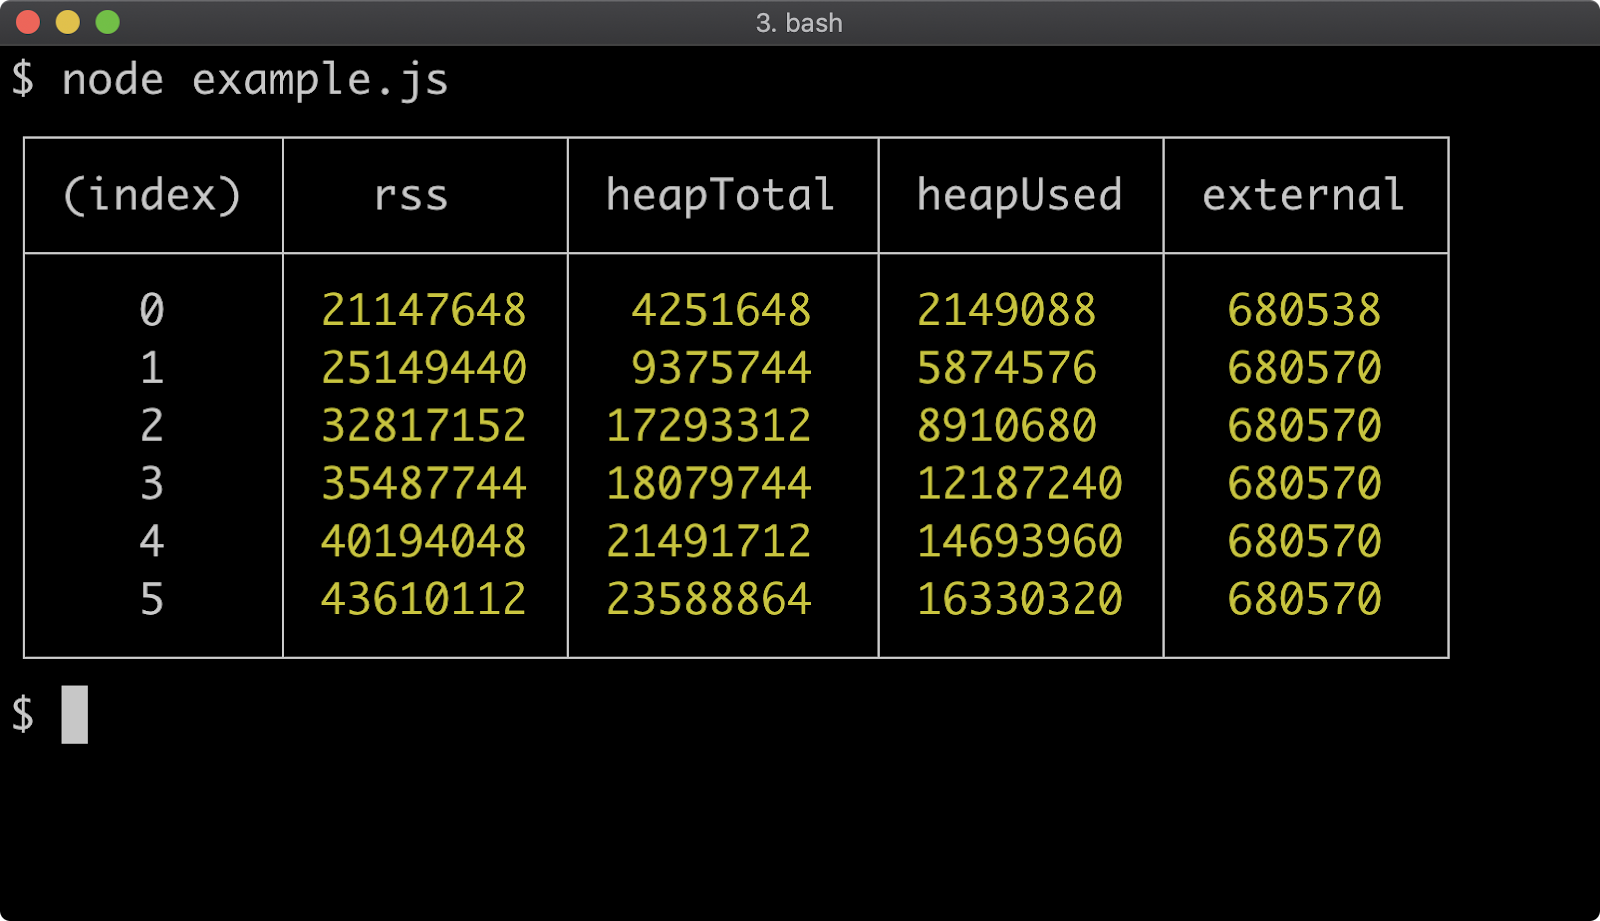
All of the numbers output by process.memoryUsage are in bytes. We can see each of the memory categories growing in each iteration, except external memory which only grows at index 1. The external metric refers to memory usage by the C layer, so once the JavaScript engine has fully initialized in this case there's no more memory requirements from that layer in our case. The heapTotal metric refers to the total memory allocated for a process. That is the process reserves that amount of memory and may grow or shrink that reserved space over time based on how the process behaves. Process memory can be split across RAM and swap space. So the rss metric, which stands for Resident Set Size is the amount of used RAM for the process, whereas the heapUsed metric is the total amount of memory used across both RAM and swap space. As we increasingly put pressure on the process memory by allocating lots of objects, we can see that the heapUsed number grows faster than the rss number, this means that swap space is being relied on more over time in this case.
System Info
The os module can be used to get information about the Operating System.
Let's look at a couple API's we can use to find out useful information:
'use strict'
const os = require('os')
console.log('Hostname', os.hostname())
console.log('Home dir', os.homedir())
console.log('Temp dir', os.tmpdir())
This will display the hostname of the operating system, the logged in users home directory and the location of the Operating System temporary directory. The temporary folder is routinely cleared by the Operating System so it's a great place to store throwaway files without the need to remove them later.
This will output the following:
There are two ways to identify the Operating System with the os module:
- The
os.platformfunction which returns the same asprocess.platformproperty - The
os.typefunction which on non-Windows systems uses theunamecommand and on Windows it uses thevercommand, and to get the Operating System identifier:
'use strict'
const os = require('os')
console.log('platform', os.platform())
console.log('type', os.type())
On macOS this outputs:

If executed on Windows the first line would be platform win32 and the second line would be uname Windows_NT. On Linux the first line would be platform linux and the second line would be uname Linux. However there are many more lesser known systems with a uname command that os.type() would output, too many to list here. See some examples on Wikipedia.
System Stats
Operating System stats can also be gathered, let's look at:
- Uptime
- Free memory
- Total memory
The os.uptime function returns the amount of time the system has been running in seconds. The os.freemem and os.totalmem functions return available system memory and total system memory in bytes:
'use strict'
const os = require('os')
setInterval(() => {
console.log('system uptime', os.uptime())
console.log('freemem', os.freemem())
console.log('totalmem', os.totalmem())
console.log()
}, 1000)
If we execute this code for five seconds and then press Ctrl + C we'll see something like the following:
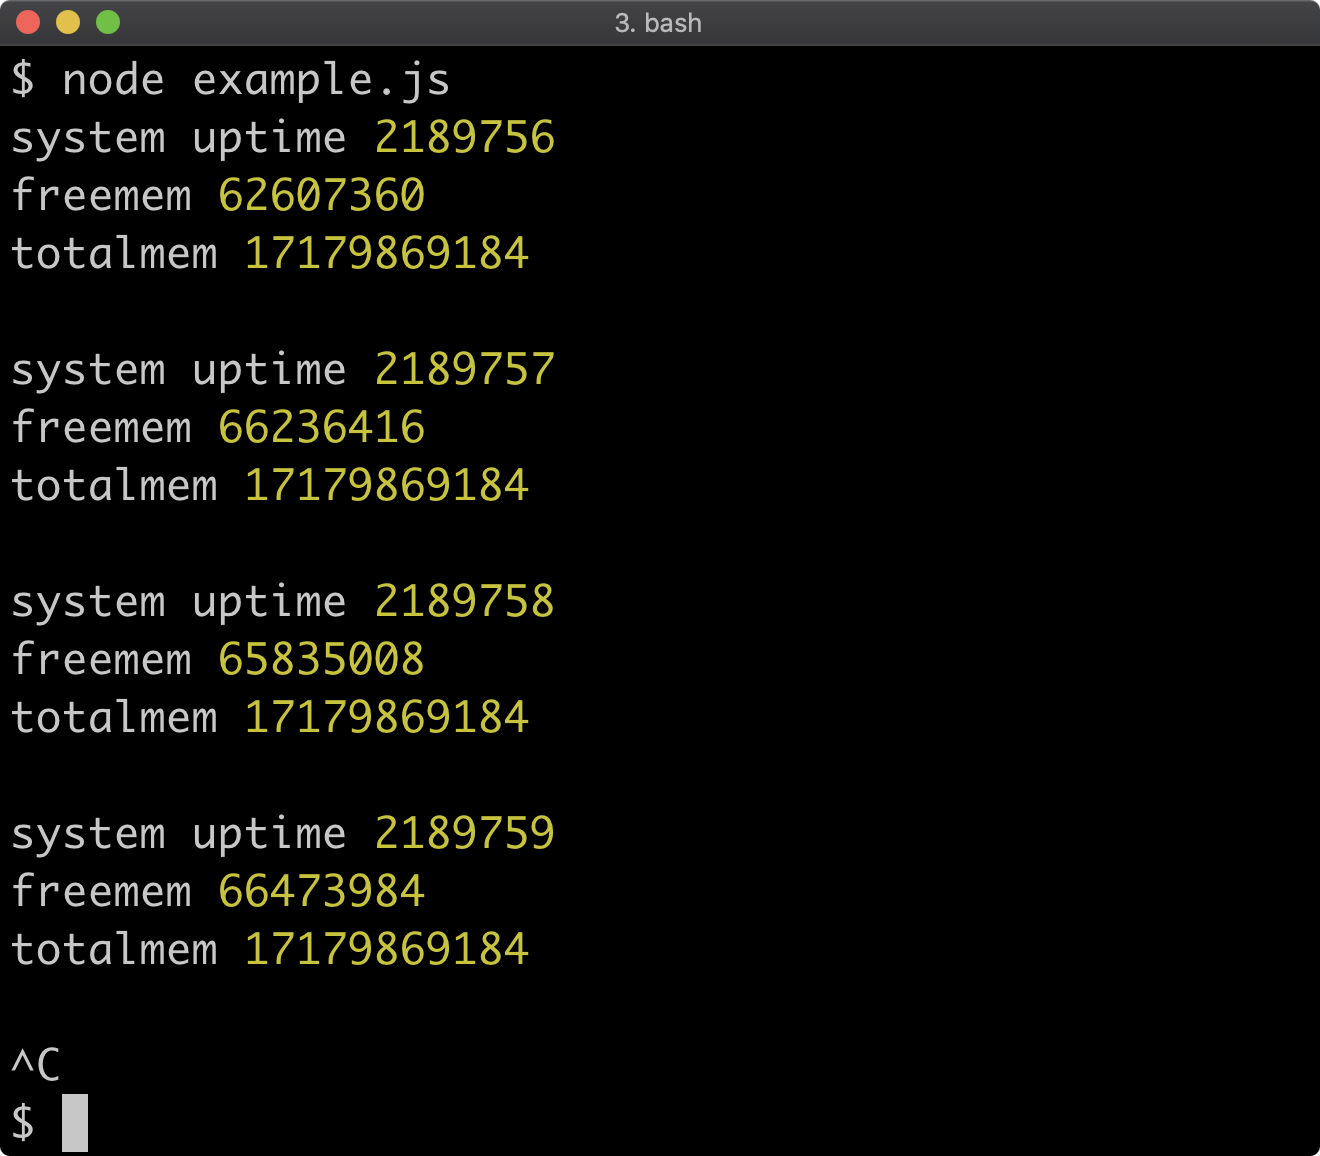
Lab Exercises
Lab 14.1 - Identifying OS and Exiting
The labs-1 folder contains an empty index.js file and a test.js file.
The test.js file contains the following:
'use strict'
const { spawnSync } = require('child_process')
const assert = require('assert')
const { status, stdout } = spawnSync(process.argv[0], [__dirname])
assert.notStrictEqual(status, 0, 'must exit with a non-zero code')
assert.match(
stdout.toString(),
/^(d|w|l|aix|.+bsd|sunos|gnu)/i,
'must output OS identifier'
)
console.log('passed!')
In index.js use console.log to output the operating system identifier. Ensure the process exits with a non-zero exit code.
Run node test.js to verify whether the task was successfully completed, if it was node test.js will output passed!.
Lab 14.2 - OS Uptime and Memory
The labs-2 folder contains an index.js file and a test.js file. The index.js file contains the following:
'use strict'
setTimeout(() => {
console.log() // TODO output uptime of process
console.log() // TODO output uptime of OS
console.log() // TODO output total system memory
console.log() // TODO output total heap memory
}, 1000)
Follow the TODO comments for each of the console.log statements.
To verify the implementation, the test.js file contains the following:
'use strict'
const assert = require('assert')
const os = require('os')
const { runInThisContext } = require('vm')
const run = (s) => runInThisContext(Buffer.from(s, 'base64'))
const { log } = console
const queue = [
(line) => assert.strictEqual(
Math.floor(line),
1,
'first log line should be the uptime of the process'
),
(line) => assert.strictEqual(
line,
run('KG9zKSA9PiBvcy51cHRpbWUoKQ==')(os),
'second log line should be the uptime of the OS'
),
(line) => assert.strictEqual(
line,
run('KG9zKSA9PiBvcy50b3RhbG1lbSgp')(os),
'third line should be total system memory'
),
(line) => assert.strictEqual(
line,
run('cHJvY2Vzcy5tZW1vcnlVc2FnZSgpLmhlYXBUb3RhbA=='),
'fourth line should be total process memory'
)
]
console.log = (line) => {
queue.shift()(line)
if (queue.length === 0) {
console.log = log
console.log('passed!')
}
}
require('.')
Run node test.js to verify whether the task was successfully completed, if it was node test.js will output passed!.
15 - Creating child processes
Introduction
Chapter Overview
In the previous chapter, we discussed the Node.js process object. The Node.js core child_process module allows the creation of new processes with the current process as the parent. A child process can be any executable written in any language, it doesn't have to be a Node.js process. In this chapter, we'll learn different ways to start and control child processes.
Learning Objectives
By the end of this chapter, you should be able to:
- Discuss various ways to create child processes.
- Understand key relevant configuration options when starting child processes.
- Discover different ways to handle child process input and output.
- Communicate with child processes.
Creating Child Processes
Child Process Creation
The child_process module has the following methods, all of which spawn a process some way or another:
exec & execSyncspawn & spawnSyncexecFile & execFileSyncfork
In this section we're going to zoom in on the exec and spawn methods (including their synchronous forms). However, before we do that, let's briefly cover the other listed methods.
execFile & execFileSync Methods
The execFile and execFileSync methods are variations of the exec and execSync methods. Rather than defaulting to executing a provided command in a shell, it attempts to execute the provided path to a binary executable directly. This is slightly more efficient but at the cost of some features. See the execFile Documentation for more information.
fork Method
The fork method is a specialization of the spawn method. By default, it will spawn a new Node process of the currently executing JavaScript file (although a different JavaScript file to execute can be supplied). It also sets up Interprocess Communication (IPC) with the subprocess by default. See fork Documentation to learn more.
exec & execSync Methods (1)
The child_process.execSync method is the simplest way to execute a command:
'use strict'
const { execSync } = require('child_process')
const output = execSync(
`node -e "console.log('subprocess stdio output')"`
)
console.log(output.toString())
This should result in the following outcome:
The execSync method returns a buffer containing the output (from STDOUT) of the command.
If we were to use console.error instead of console.log, the child process would write to STDERR. By default the execSync method redirects its STDERR to the parent STDERR, so a message would print but the output buffer would be empty.
In the example code the command being executed happens to be the node binary. However any command that is available on the host machine can be executed:
'use strict'
const { execSync } = require('child_process')
const cmd = process.platform === 'win32' ? 'dir' : 'ls'
const output = execSync(cmd)
console.log(output.toString())
In this example we used process.platform to determine the platform so that we can execute the equivalent command on Windows and non-Windows Operating Systems:
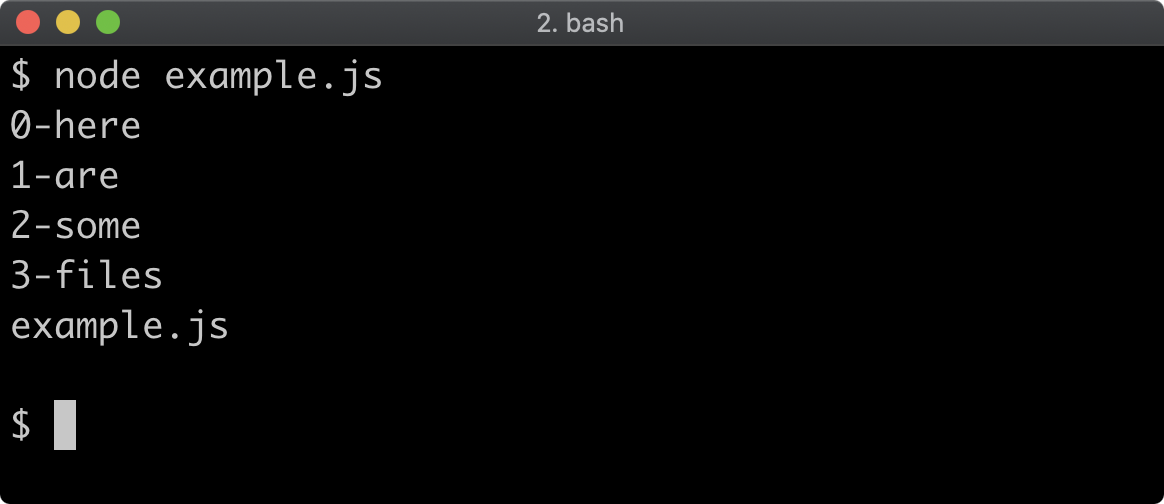
exec & execSync Methods (2)
If we do want to execute the node binary as a child process, it's best to refer to the full path of the node binary of the currently executing Node process. This can be found with process.execPath:
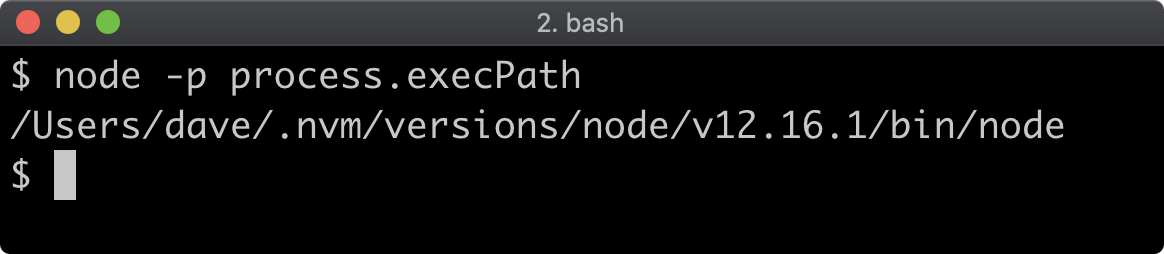
Using process.execPath ensures that no matter what, the subprocess will be executing the same version of Node.
The following is the same example from earlier, but using process.execPath in place of just 'node':
'use strict'
const { execSync } = require('child_process')
const output = execSync(
`"${process.execPath}" -e "console.error('subprocess stdio output')"`
)
console.log(output.toString())
If the subprocess exits with a non-zero exit code, the execSync function will throw:
'use strict'
const { execSync } = require('child_process')
try {
execSync(`"${process.execPath}" -e "process.exit(1)"`)
} catch (err) {
console.error('CAUGHT ERROR:', err)
}
This will result in the following output:
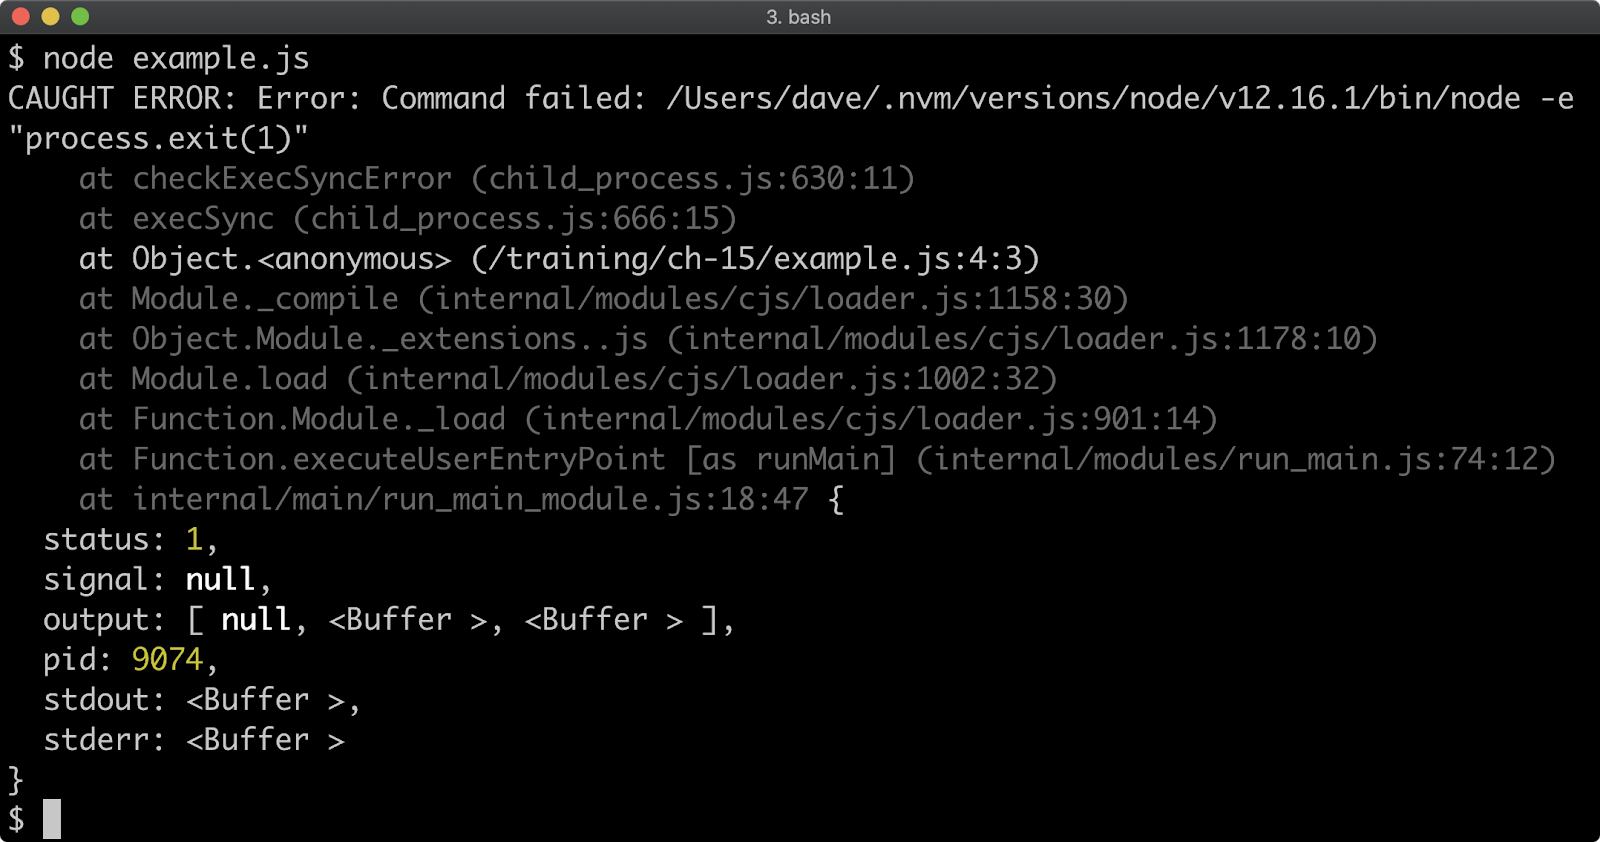
The error object that we log out in the catch block has some additional properties. We can see that status is 1, this is because our subprocess invoked process.exit(1). In a non-zero exit code scenario, the stderr property of the error object can be very useful. The output array indices correspond to the standard I/O file descriptors. Recall from the previous chapter that the file descriptor of STDERR is 2. Ergo the err.stderr property will contain the same buffer as err.output[2], so err.stderr or err.output[2] can be used to discover any error messages written to STDERR by the subprocess. In our case, the STDERR buffer is empty.
Let's modify our code to throw an error instead:
'use strict'
const { execSync } = require('child_process')
try {
execSync(`"${process.execPath}" -e "throw Error('kaboom')"`)
} catch (err) {
console.error('CAUGHT ERROR:', err)
}
This will result in the following output:
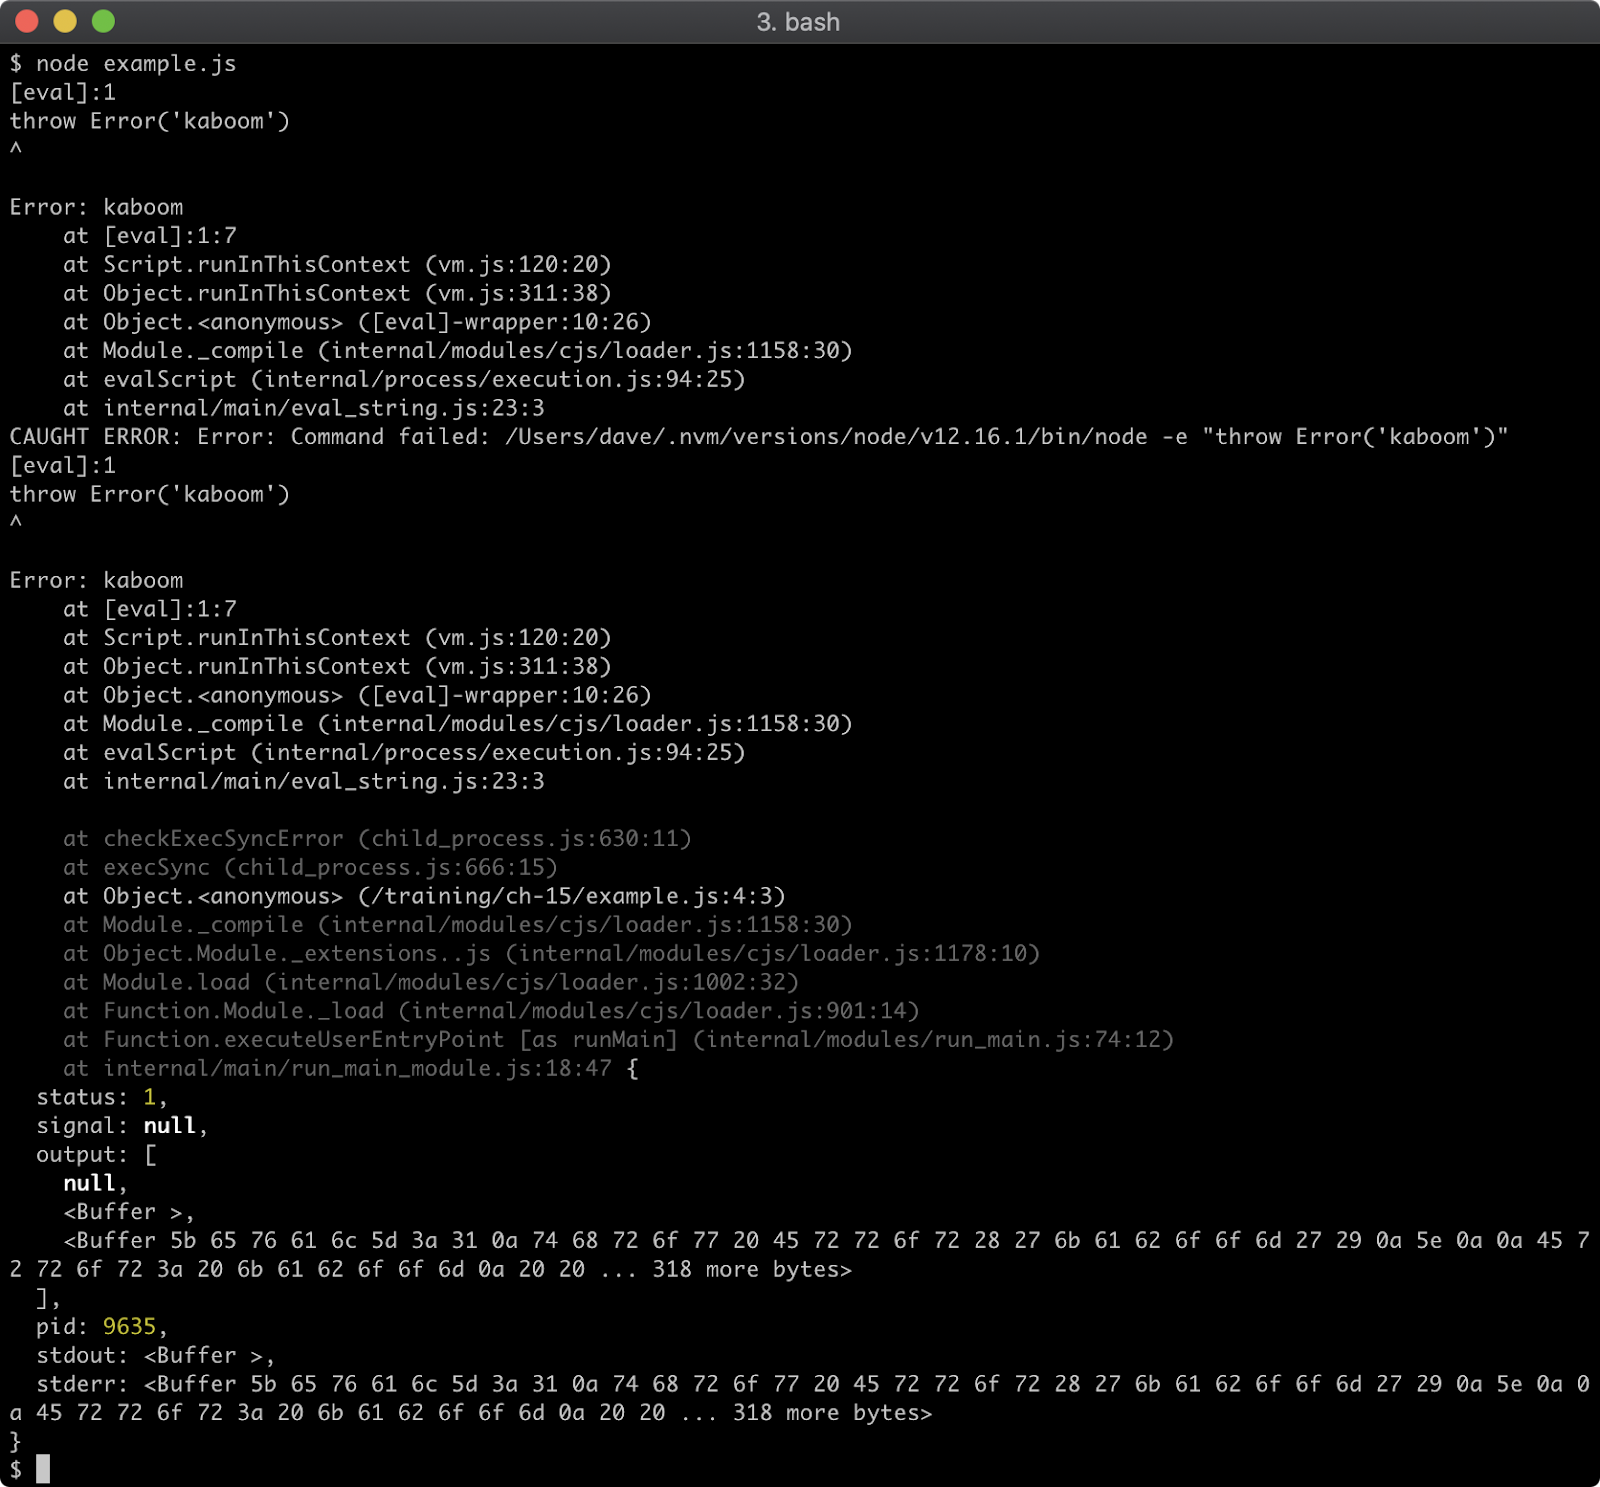
exec & execSync Methods (3)
The first section of output where we have printed CAUGHT ERROR is the error output of the subprocess. This same output is contained in the buffer object of err.stderr and err.output[2].
When we log the error, it's preceded by a message saying that the command failed and prints two stacks with a gap between them. The first stack is the functions called inside the subprocess, the second stack is the functions called in the parent process.
Also notice that an uncaught throw in the subprocess results in an err.status (the exit code) of 1 as well, to indicate generic failure.
The exec method takes a shell command as a string and executes it the same way as execSync. Unlike execSync the asynchronous exec function splits the STDOUT and STDERR output by passing them as separate arguments to the callback function:
'use strict'
const { exec } = require('child_process')
exec(
`"${process.execPath}" -e "console.log('A');console.error('B')"`,
(err, stdout, stderr) => {
console.log('err', err)
console.log('subprocess stdout: ', stdout.toString())
console.log('subprocess stderr: ', stderr.toString())
}
)
The above code example results in the following output:
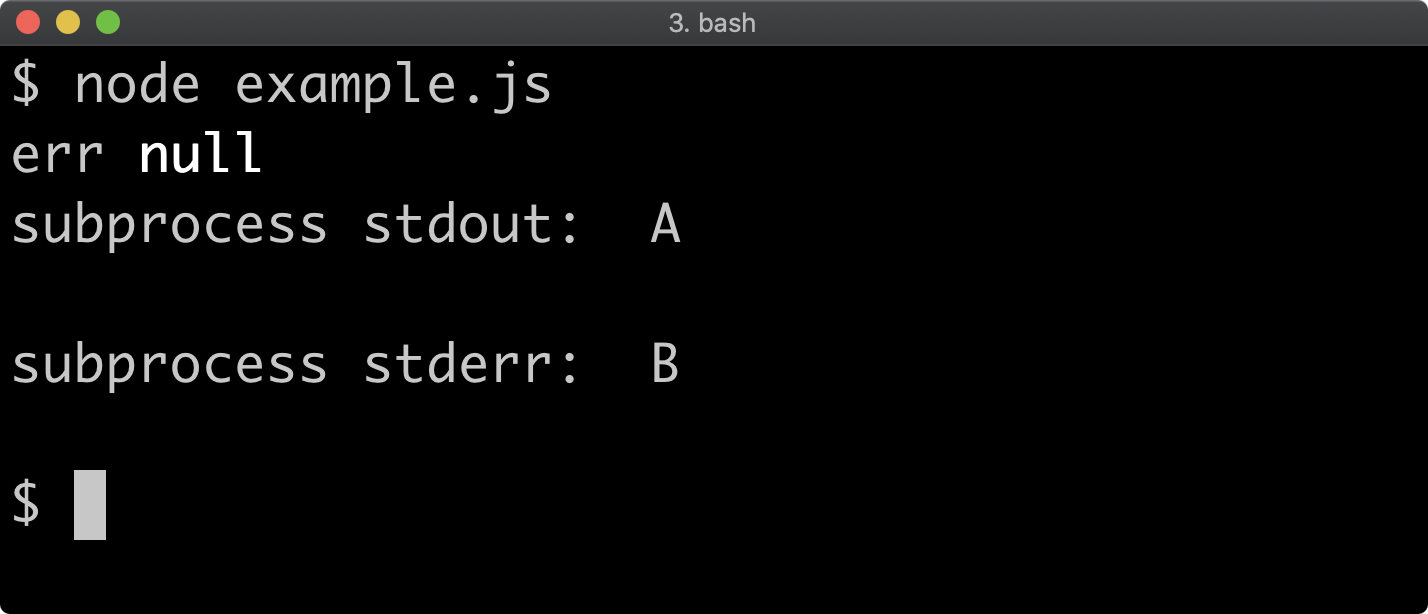
Even though STDERR was written to, the first argument to the callback, err is null. This is because the process ended with zero exit code. Let's try throwing an error without catching it in the subprocess:
'use strict'
const { exec } = require('child_process')
exec(
`"${process.execPath}" -e "console.log('A'); throw Error('B')"`,
(err, stdout, stderr) => {
console.log('err', err)
console.log('subprocess stdout: ', stdout.toString())
console.log('subprocess stderr: ', stderr.toString())
}
)
This will result in the following output:
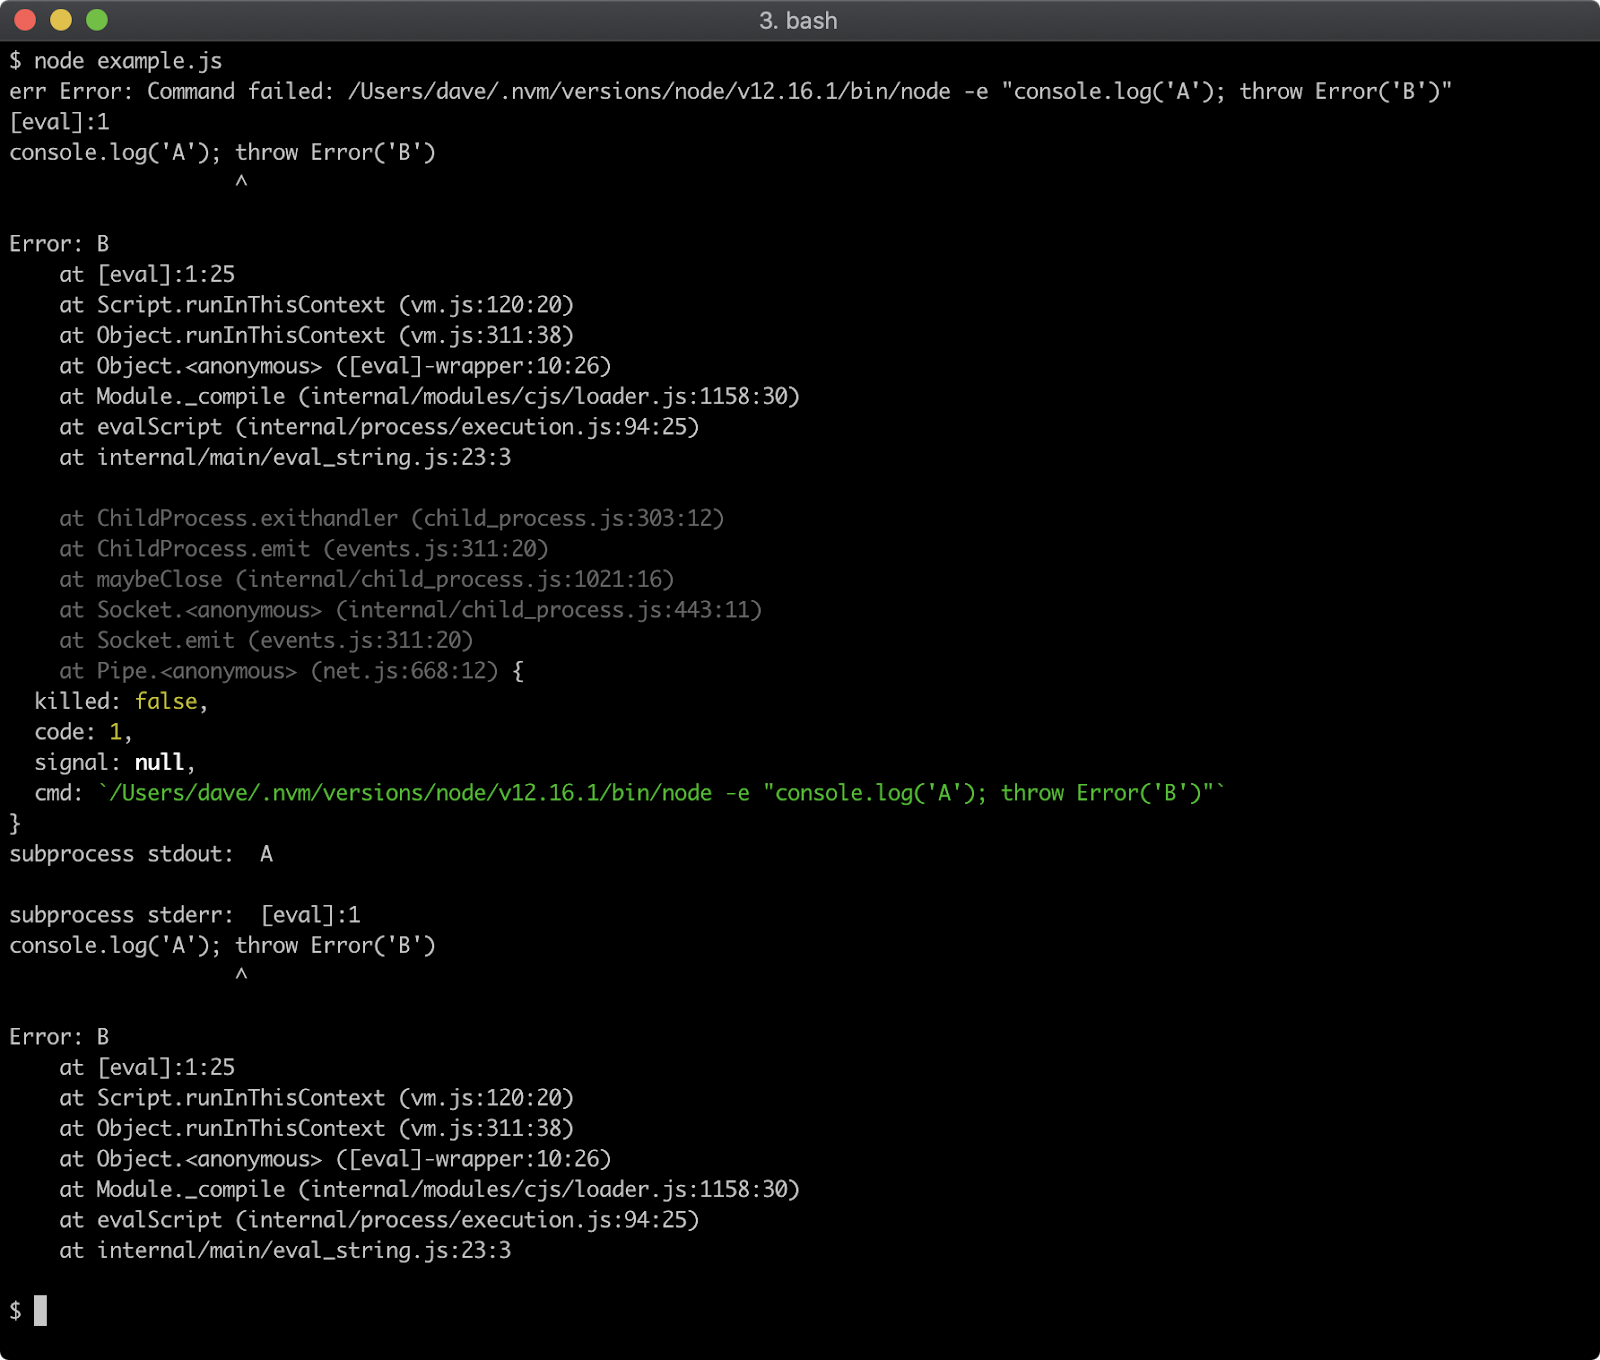
The err argument passed to the callback is no longer null, it's an error object. In the asynchronous exec case err.code contains the exit code instead of err.status, which is an unfortunate API inconsistency. It also doesn't contain the STDOUT or STDERR buffers since they are passed to the callback function independently.
The err object also contains two stacks, one for the subprocess followed by a gap and then the stack of the parent process. The subprocess stderr buffer also contains the error as presented by the subprocess.
spawn & spawnSync Methods (1)
While exec and execSync take a full shell command, spawn takes the executable path as the first argument and then an array of flags that should be passed to the command as second argument:
'use strict'
const { spawnSync } = require('child_process')
const result = spawnSync(
process.execPath,
['-e', `console.log('subprocess stdio output')`]
)
console.log(result)
In this example process.execPath (e.g. the full path to the node binary) is the first argument passed to spawnSync and the second argument is an array. The first element in the array is the first flag: -e. There's a space between the -e flag and the content that the flag instructs the node binary to execute. Therefore that content has to be the second argument of the array. Also notice the outer double quotes are removed. Executing this code results in the following:
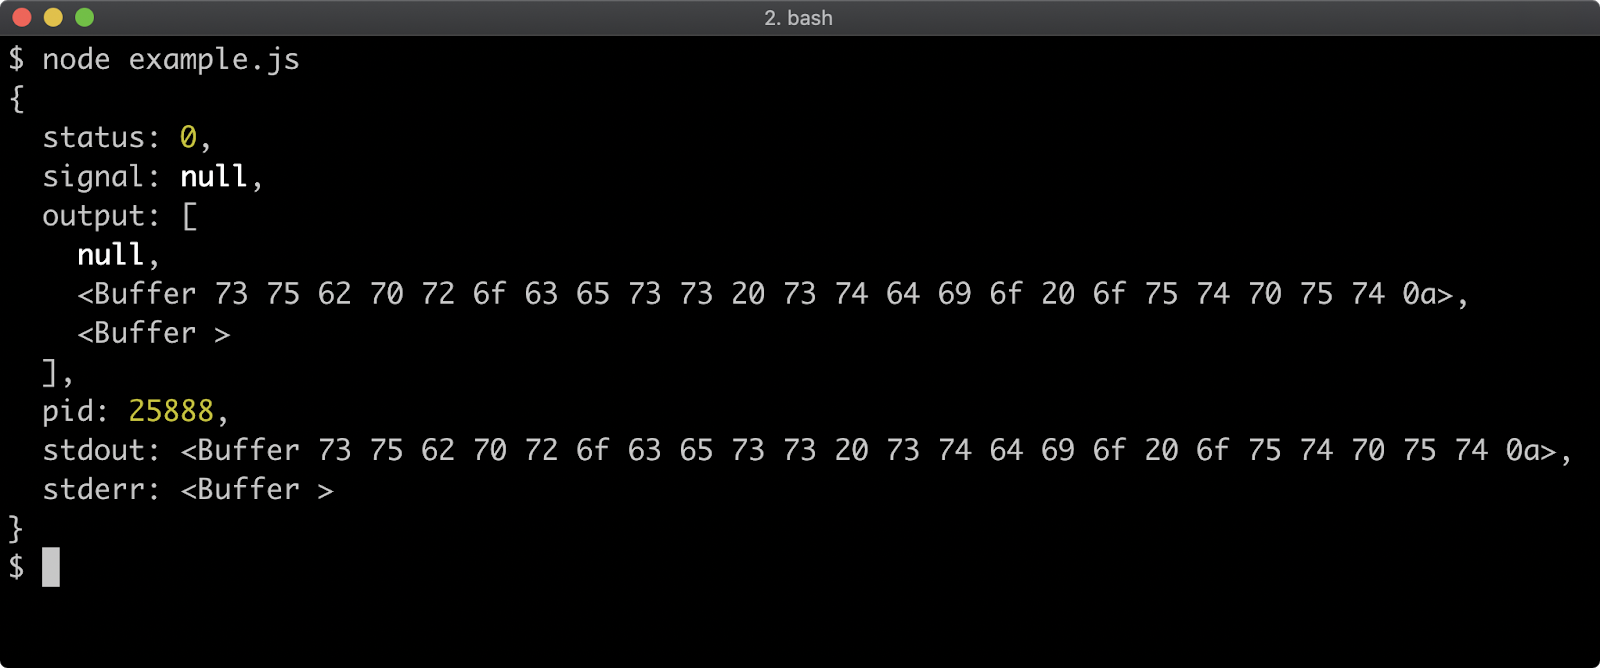
While the execSync function returns a buffer containing the child process output, the spawnSync function returns an object containing information about the process that was spawned. We assigned this to the result constant and logged it out. This object contains the same properties that are attached to the error object when execSync throws. The result.stdout property (and result.output[1]) contains a buffer of our processes STDOUT output, which should be 'subprocess stdio output'. Let's find out by updating the console.log(result) line to:
console.log(result.stdout.toString())
Executing the updated code should verify that the result object contains the expected STDOUT output:
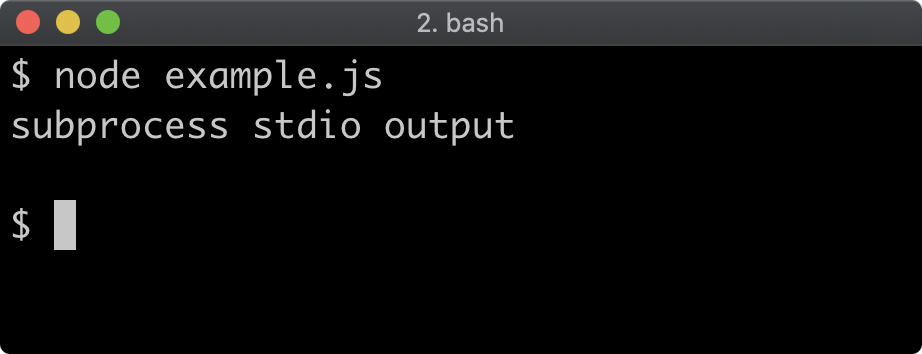
Unlike execSync, the spawnSync method does not need to be wrapped in a try/catch. If a spawnSync process exits with a non-zero exit code, it does not throw:
'use strict'
const { spawnSync } = require('child_process')
const result = spawnSync(process.execPath, [`-e`, `process.exit(1)`])
console.log(result)
The above, when executed, will result in the following:
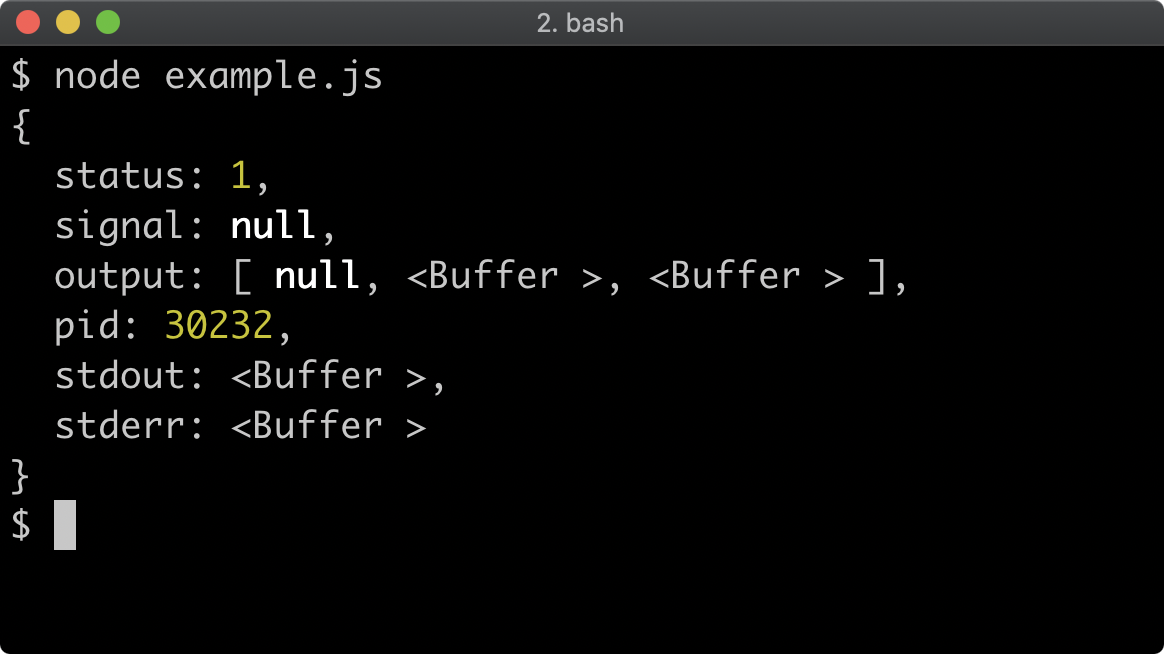
We can see that the status property is set to 1, since we passed an exit code of 1 to process.exit in the child process. If we had thrown an error without catching it in the subprocess the exit code would also be 1, but the result.stderr buffer would contain the subprocess STDERR output displaying the thrown error message and stack.
Just as there are differences between execSync and spawnSync there are differences between exec and spawn.
While exec accepts a callback, spawn does not. Both exec and spawn return a ChildProcess instance however, which has stdin, stdout and stderr streams and inherits from EventEmitter allowing for exit code to be obtained after a close event is emitted. See ChildProcess constructor Documentation for more details.
spawn & spawnSync Methods (2)
Let's take a look at a spawn example:
'use strict'
const { spawn } = require('child_process')
const sp = spawn(
process.execPath,
[`-e`, `console.log('subprocess stdio output')`]
)
console.log('pid is', sp.pid)
sp.stdout.pipe(process.stdout)
sp.on('close', (status) => {
console.log('exit status was', status)
})
This results in the following output:

The spawn method returns a ChildProcess instance which we assigned to the sp constant. The sp.pid (Process ID) is immediately available so we console.log this right away. To get the STDOUT of the child process we pipe sp.stdout to the parent process.stdout. This results in our second line of output which says subprocess stdio output. To get the status code, we listen for a close event. When the child process exits, the event listener function is called, and passes the exit code as the first and only argument. This is where we print our third line of output indicating the exit code of the subprocess.
The spawn invocation in our code, is currently:
const sp = spawn(
process.execPath,
[`-e`, `console.log('subprocess stdio output')`]
)
Let's alter it to the following:
const sp = spawn(
process.execPath,
[`-e`, `process.exit(1)`]
)
Running this altered example code will produce the following outcome:
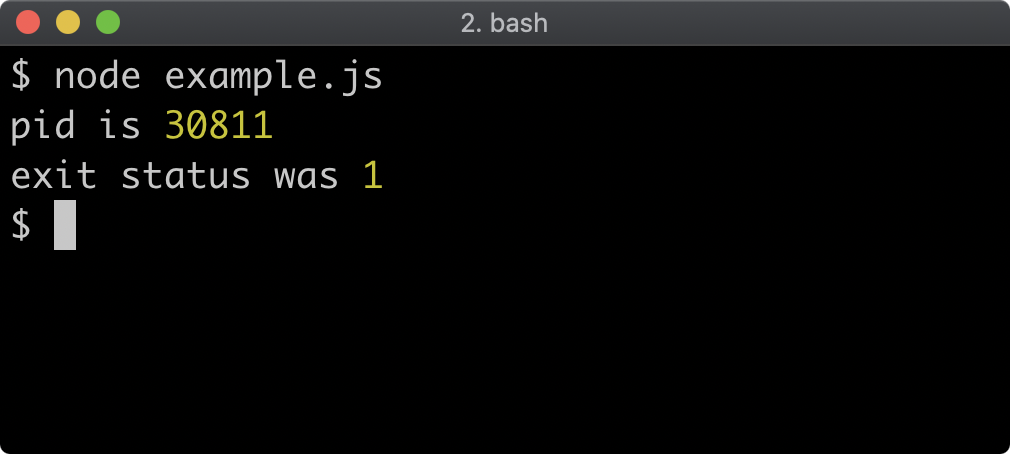
There is no second line of output in our main process in this case as our code change removed any output to STDOUT.
The exec command doesn't have to take a callback, and it also returns a ChildProcess instance:
'use strict'
const { exec } = require('child_process')
const sp = exec(
`"${process.execPath}" -e "console.log('subprocess stdio output')"`
)
console.log('pid is', sp.pid)
sp.stdout.pipe(process.stdout)
sp.on('close', (status) => {
console.log('exit status was', status)
})
This leads to the exact same outcome as the equivalent spawn example:
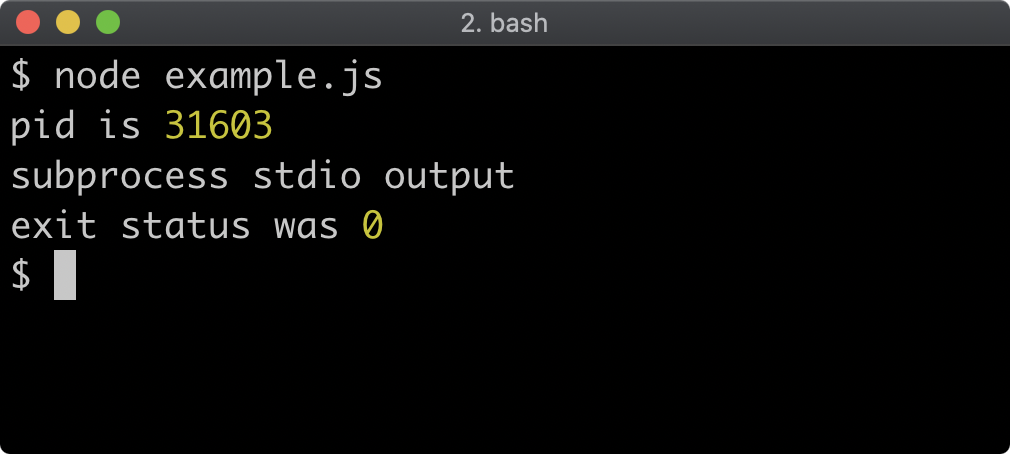
The spawn method and the exec method both returning a ChildProcess instance can be misleading. There is one highly important differentiator between spawn and the other three methods we've been exploring (namely exec, execSync and spawnSync): the spawn method is the only method of the four that doesn't buffer child process output. Even though the exec method has stdout and stderr streams, they will stop streaming once the subprocess output has reached 1 mebibyte (or 1024 * 1024 bytes). This can be configured with a maxBuffer option, but no matter what, the other three methods have an upper limit on the amount of output a child process can generate before it is truncated. Since the spawn method does not buffer at all, it will continue to stream output for the entire lifetime of the subprocess, no matter how much output it generates. Therefore, for long running child processes it's recommended to use the spawn method.
Process Configuration (1)
An options object can be passed as a third argument in the case of spawn and spawnSync or the second argument in the case of exec and execSync.
We'll explore two options that can be passed which control the environment of the child process: cwd and env.
We'll use spawn for our example but these options are universally the same for all the child creation methods.
By default, the child process inherits the environment variables of the parent process:
'use strict'
const { spawn } = require('child_process')
process.env.A_VAR_WE = 'JUST SET'
const sp = spawn(process.execPath, ['-p', 'process.env'])
sp.stdout.pipe(process.stdout)
This example code creates a child process that executes node with the -p flag so that it immediately prints process.env and exits. The stdout stream of the child process is piped to the stdout of the parent process. So when executed this code will output the environment variables of the child process:
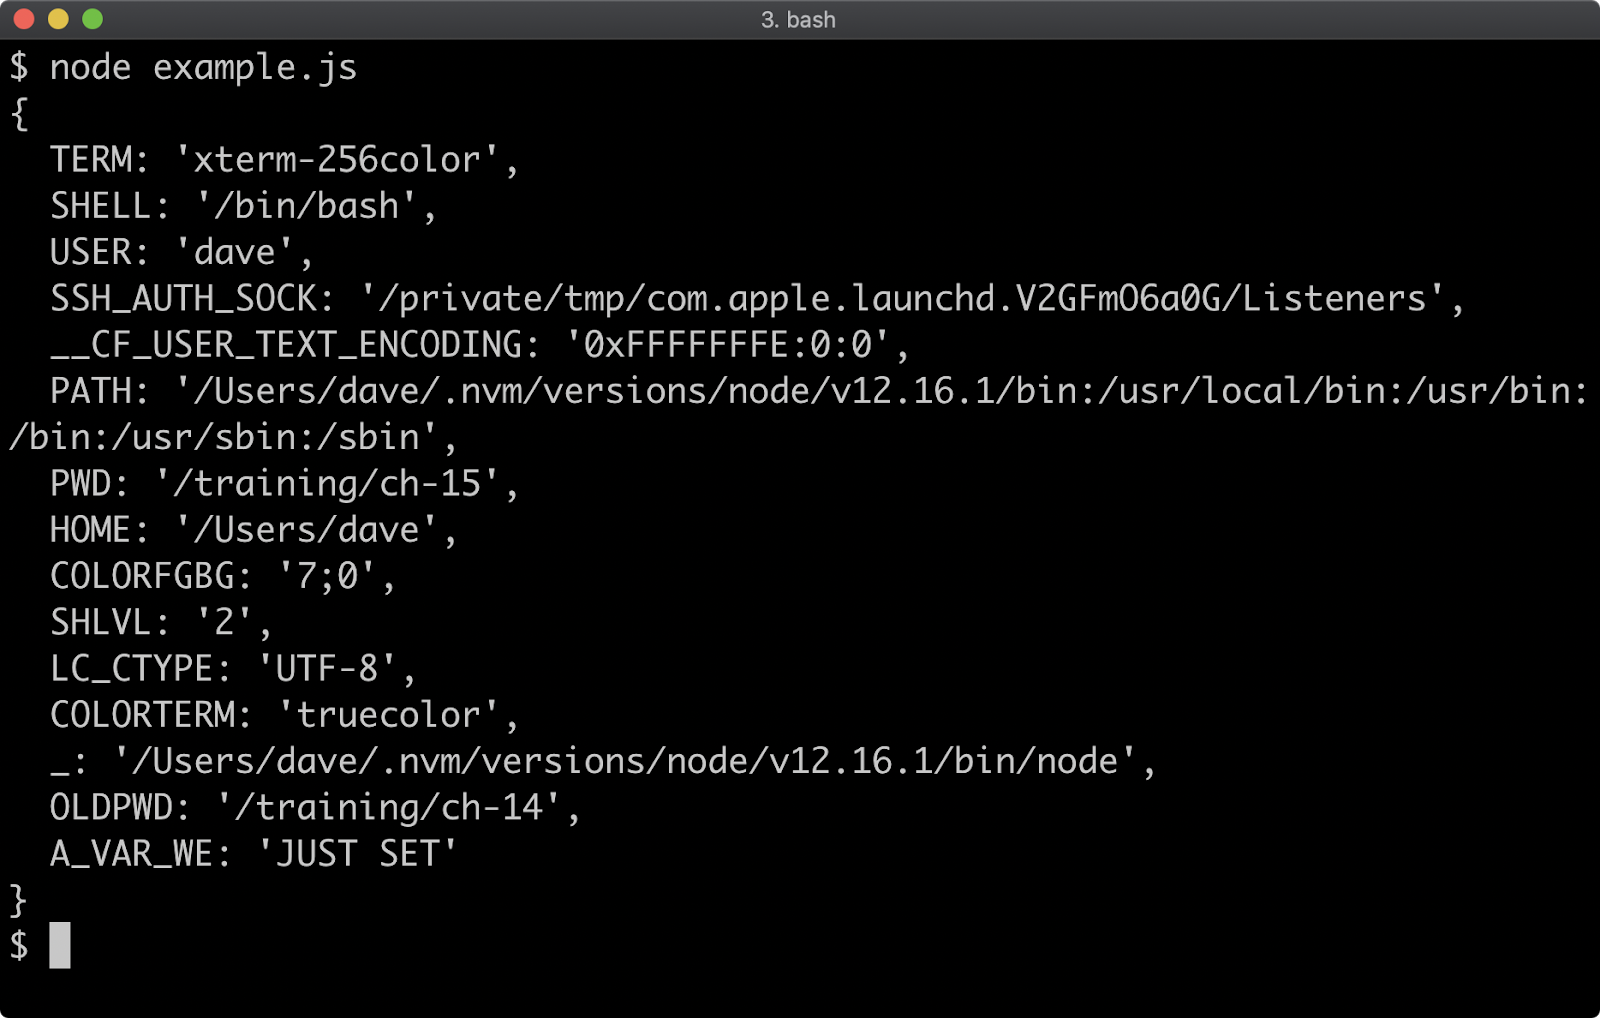
If we pass an options object with an env property the parent environment variables will be overwritten:
'use strict'
const { spawn } = require('child_process')
process.env.A_VAR_WE = 'JUST SET'
const sp = spawn(process.execPath, ['-p', 'process.env'], {
env: {SUBPROCESS_SPECIFIC: 'ENV VAR'}
})
sp.stdout.pipe(process.stdout)
We've modified the code so that an env object is passed via the options object, which contains a single environment variable named SUBPROCESS_SPECIFIC. When executed, the parent process will output the child process' environment variables object, and they'll only contain what we passed via the env option:
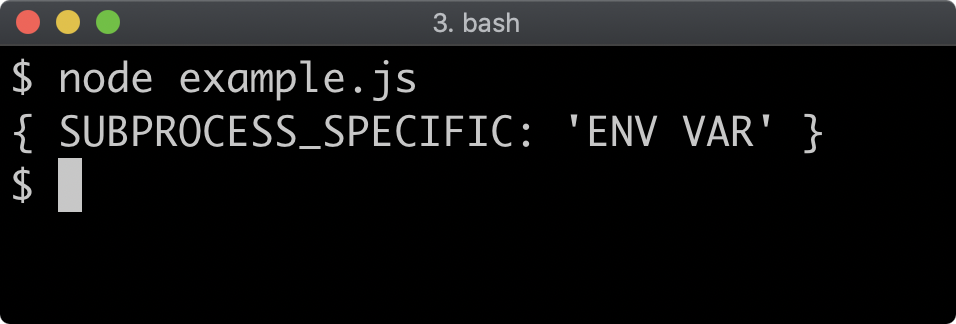
Process Configuration (2)
Another option that can be set when creating a child process is the cwd option:
'use strict'
const { IS_CHILD } = process.env
if (IS_CHILD) {
console.log('Subprocess cwd:', process.cwd())
console.log('env', process.env)
} else {
const { parse } = require('path')
const { root } = parse(process.cwd())
const { spawn } = require('child_process')
const sp = spawn(process.execPath, [__filename], {
cwd: root,
env: {IS_CHILD: '1'}
})
sp.stdout.pipe(process.stdout)
}
In this example, we're executing the same file twice. Once as a parent process and then once as a child process. We spawn the child process by passing __filename, inside the arguments array passed to spawn. This means the child process will run node with the path to the current file.
We pass an env option to spawn, with an IS_CHILD property set to a string ('1'), so that when the subprocess loads, it will enter the if block. Whereas in the parent process, process.env.IS_CHILD is undefined so when the parent process executes it will enter the else block, which is where the child process is spawned.
The root property of the object returned from parse(process.cwd()) will be different depending on platform, and on Windows, depending on the hard drive that the code is executed on. By setting the cwd option to root we're setting the current working directory of the child process to our file systems root directory path.
In the child process, IS_CHILD will be truthy so the if branch will print out the child processes' current working directory and environment variables. Since the parent process pipes the sp.stdout stream to the process.stdout stream executing this code will print out the current working directory and environment variables of the child process, that we set via the configuration options:
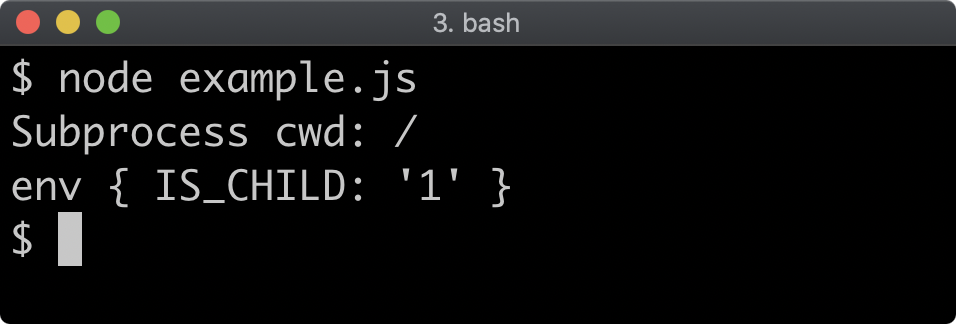
The cwd and env options can be set for any of the child process methods discussed in the prior section, but there are other options that can be set as well. To learn more see spawn options, spawnSync options, exec options and execSync options in the Node.js Documentation.
Child STDIO (1)
So far we've covered that the asynchronous child creation methods (exec and spawn) return a ChildProcess instance which has stdin, stdout, and stderr streams representing the I/O of the subprocess.
This is the default behavior, but it can be altered.
Let's start with an example with the default behavior:
'use strict'
const { spawn } = require('child_process')
const sp = spawn(
process.execPath,
[
'-e',
`console.error('err output'); process.stdin.pipe(process.stdout)`
],
{ stdio: ['pipe', 'pipe', 'pipe'] }
)
sp.stdout.pipe(process.stdout)
sp.stderr.pipe(process.stdout)
sp.stdin.write('this input will become output\n')
sp.stdin.end()
The options object has an stdio property set to ['pipe', 'pipe', 'pipe']. This is the default, but we've set it explicitly as a starting point. In this context pipe means expose a stream for a particular STDIO device.
As with the output property in execSync error objects or spawnSync result objects, the stdio array indices correspond to the file descriptors of each STDIO device. So the first element in the stdio array (index 0) is the setting for the child process STDIN, the second element (index 1) is for STDOUT and the third (index 2) is for STDERR.
The process we are spawning is the node binary with the -e flag set to evaluate code which pipes the child process STDIN to its STDOUT and then outputs 'err output' (plus a newline) to STDERR using console.error.
In the parent process we pipe from the child process' STDOUT to the parent process' STDOUT. We also pipe from the child process' STDERR to the parent process' STDOUT. Note this is not a mistake, we are deliberately piping from child STDERR to parent STDOUT. The subprocess STDIN stream (sp.stdin) is a writable stream since it's for input. We write some input to it and then call sp.stdin.end() which ends the input stream, allowing the child process to exit which in turn allows the parent process to exit.
This results in the following output:
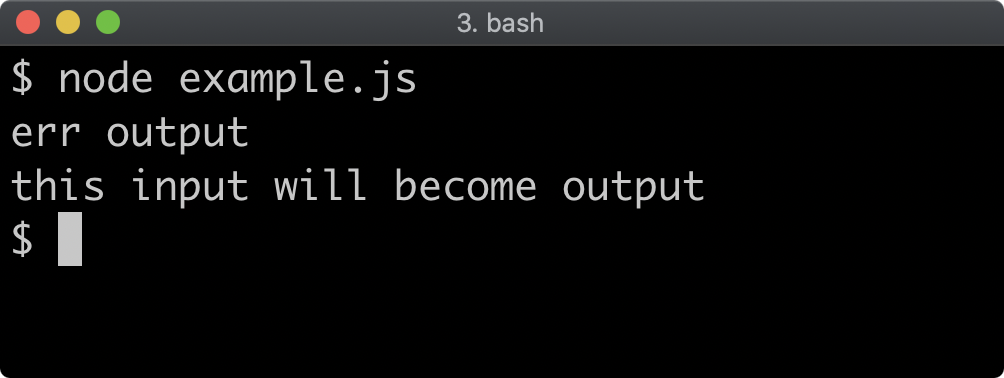
If we're piping the subprocess STDOUT to the parent process STDOUT without transforming the data in any way, we can instead set the second element of the stdio array to 'inherit'. This will cause the child process to inherit the STDOUT of the parent:
'use strict'
const { spawn } = require('child_process')
const sp = spawn(
process.execPath,
[
'-e',
`console.error('err output'); process.stdin.pipe(process.stdout)`
],
{ stdio: ['pipe', 'inherit', 'pipe'] }
)
sp.stderr.pipe(process.stdout)
sp.stdin.write('this input will become output\n')
sp.stdin.end()
We've changed the stdio[1] element from 'pipe' to 'inherit' and removed the sp.stdout.pipe(process.stdout) line (in fact sp.stdout would now be null). This will result in the exact same output:

The stdio option can also be passed a stream directly. In our example, we're still piping the child process STDERR to the parent process STDOUT. Since process.stdout is a stream, we can set stdio[2] to process.stdout to achieve the same effect:
'use strict'
const { spawn } = require('child_process')
const sp = spawn(
process.execPath,
[
'-e',
`console.error('err output'); process.stdin.pipe(process.stdout)`
],
{ stdio: ['pipe', 'inherit', process.stdout] }
)
sp.stdin.write('this input will become output\n')
sp.stdin.end()
Child STDIO (2)
Now both sp.stdout and sp.stderr will be null because neither of them are configured to 'pipe' in the stdio option. However it will result in the same output because the third element in stdio is the process.stdout stream:

In our case we passed the process.stdout stream via stdio but any writable stream could be passed in this situation, for instance a file stream, a network socket or an HTTP response.
Let's imagine we want to filter out the STDERR output of the child process instead of writing it to the parent process.stdout stream we can change stdio[2] to 'ignore'. As the name implies this will ignore output from the STDERR of the child process:
'use strict'
const { spawn } = require('child_process')
const sp = spawn(
process.execPath,
[
'-e',
`console.error('err output'); process.stdin.pipe(process.stdout)`
],
{ stdio: ['pipe', 'inherit', 'ignore'] }
)
sp.stdin.write('this input will become output\n')
sp.stdin.end()
This change will change the output as the child process STDERR output is now ignored:

The stdio option applies the same way to the child_process.exec function.
To send input to a child process created with spawn or exec we can call the write method of the return ChildProcess instance. For the spawnSync and execSync functions an input option be used to achieve the same:
'use strict'
const { spawnSync } = require('child_process')
spawnSync(
process.execPath,
[
'-e',
`console.error('err output'); process.stdin.pipe(process.stdout)`
],
{
input: 'this input will become output\n',
stdio: ['pipe', 'inherit', 'ignore']
}
)
This will create the same output as the previous example because we've also set stdio[2] to 'ignore', thus STDERR output is ignored.
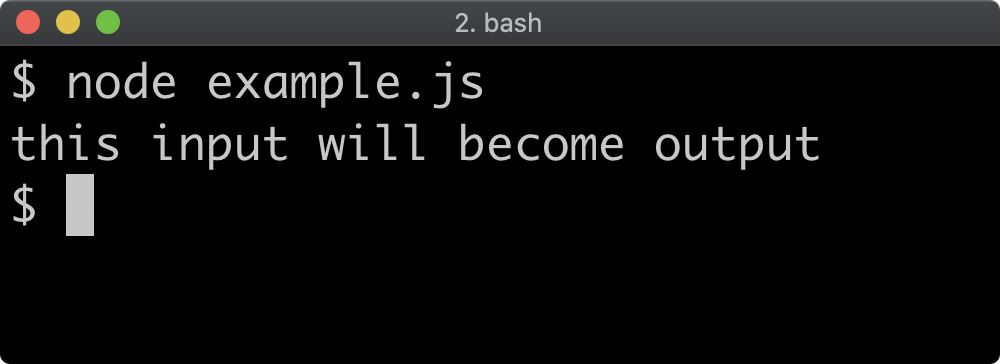
For the input option to work for spawnSync and execSync the stdio[0] option has to be pipe, otherwise the input option is ignored.
For more on child process STDIO see Node.js Documentation.
Lab Exercises
Lab 15.1 - Set Child Process Environment Variable
The labs-1 folder contains an index.js, a child.js file and a test.js file.
The child.js file contains the following:
'use strict'
const assert = require('assert')
const clean = (env) => Object.fromEntries(
Object.entries(env).filter(([k]) => !/^(_.*|pwd|shlvl)/i.test(k))
)
const env = clean(process.env)
assert.strictEqual(env.MY_ENV_VAR, 'is set')
assert.strictEqual(
Object.keys(env).length,
1,
'child process should have only one env var'
)
console.log('passed!')
The code in child.js expects that there will be only one environment variable named MY_ENV_VAR to have the value 'is set'. If this is not the case the assert.strictEqual method will throw an assertion error. In certain scenarios some extra environment variables are added to child processes, these are stripped so that there should only ever be one environment variable set in child.js, which is the MY_ENV_VAR environment variable.
The index.js file has the following contents:
'use strict'
const assert = require('assert')
function exercise(myEnvVar) {
// TODO return a child process with
// a single environment variable set
// named MY_ENV_VAR. The MY_ENV_VAR
// environment variable's value should
// be the value of the myEnvVar parameter
// passed to this exercise function
}
Using any child_process method except execFile and execFileSync, complete the exercise function so that it returns a child process that executes the child.js file with node.
To check the exercise implementation, run node test.js, if successful the process will output: passed!. If unsuccessful, various assertion error messages will be output to help provide hints.
One very useful hint up front is: use process.argv[0] to reference the node executable instead of just passing 'node' as string to the child_process method.
The contents of the test.js file is esoteric, and the need to understand the code is minimal, however the contents of test.js are shown here for completeness:
'use strict'
const assert = require('assert')
const { equal } = assert.strict
const exercise = require('.')
let sp = null
try {
sp = exercise('is set')
assert(sp, 'exercise function should return a child process instance')
if (Buffer.isBuffer(sp)) {
equal(sp.toString().trim(), 'passed!', 'child process misconfigured')
process.stdout.write(sp)
return
}
} catch (err) {
const { status } = err
if (status == null) throw err
equal(status, 0, 'exit code should be 0')
return
}
if (!sp.on) {
const { stdout, stderr } = sp
if (stderr.length > 0) process.stderr.write(stderr)
if (stdout.length > 0) process.stdout.write(stdout)
equal(sp.status, 0, 'exit code should be 0')
equal(stdout.toString().trim(), 'passed!', 'child process misconfigured')
return
}
let out = ''
if (sp.stderr) sp.stderr.pipe(process.stderr)
if (sp.stdout) {
sp.stdout.once('data', (data) => { out = data })
sp.stdout.pipe(process.stdout)
} else {
// stdio may be misconfigured, or fork method may be used,
// allow benefit of the doubt since in either case
// exit code check will still fail:
out = 'passed!'
} const timeout =
setTimeout(() => {
equal(out.toString().trim(), 'passed!', 'child process misconfigured')
}, 1000)
sp.once('exit', (status) => {
equal(status, 0, 'exit code should be 0')
equal(out.toString().trim(), 'passed!', 'child process misconfigured')
clearTimeout(timeout)
})
The test.js file allows for alternative approaches, once the exercise function has been completed with one child_process method, re-attempt the exercise with a different child_process method.
Lab 15.2 - STDIO Redirection
The labs-2 folder index.js file contains the following:
'use strict'
const { spawn } = require('child_process')
function exercise(command, args) {
return spawn(command, args)
}
module.exports = exercise
Complete the exercise function so that the returned child process:
- Has no ability to read STDIN.
- Redirects its STDOUT to the parent process' STDOUT.
- Exposes STDERR as a readable stream.
The labs-2 folder also contains a test.js file.
To verify that the exercise was completed successfully run node test.js, if the implementation is correct the process will output: passed!.
It is unnecessary to understand the contents of the test.js file, but the contents of it are as follows:
'use strict'
const exercise = require('.')
const cp = require('child_process')
const assert = require('assert')
const { equal } = assert.strict
const { SCENARIO } = process.env
const [node] = process.argv
const stdoutCheck = () => { exercise(node, [`-p`, `'test'`]) }
const stderrCheck = () => {
const sp = exercise(node, [`-e`, `console.error('test')`])
if (sp.stderr) sp.stderr.pipe(process.stderr)
}
const stdinCheck = () => {
exercise(node, [`-e`, `
process.stdout.write(Buffer.from([0]))
process.stdin.pipe(process.stdout)
setTimeout(() => {
process.stdout.write(Buffer.from([1]))
}, 100)
`])
}
function test(scenario = 0) {
switch (scenario) {
case 1: return stdoutCheck()
case 2: return stderrCheck()
case 3: return stdinCheck()
}
const s1 = cp.spawnSync(node, [__filename], {
env: { SCENARIO: 1 },
})
equal(s1.stdout.toString().trim(), 'test', 'should inherit stdout')
const s2 = cp.spawnSync(node, [__filename], {
env: { SCENARIO: 2 },
})
equal(s2.stderr.toString().trim(), 'test', 'should expose stderr stream')
const s3 = cp.spawnSync(node, [__filename], {
input: 'some input',
env: { SCENARIO: 3 },
})
equal(s3.stdout.length, 2, 'stdin should be ignored')
console.log('passed!')
}
test(Number(SCENARIO))
16 - Writing unit tests
Introduction
Chapter Overview
Testing an application or service is a key skill for any developer. If an application or service hasn't been thoroughly tested it should not be considered production ready. In this final chapter, we'll discuss various approaches and techniques for testing different kinds of API designs.
Learning Objectives
By the end of this chapter, you should be able to:
- Understand the basic principles of assertions.
- Discover a selection of test runner frameworks.
- Configure a project to run tests in a standardized way.
Writing Unit Tests
Assertions (1)
An assertion checks a value for a given condition and throws if that condition is not met. Assertions are the fundamental building block of unit and integration testing. The core assert module exports a function that will throw an AssertionError when the value passed to it is falsy (meaning that the value can be coerced to false with !!val):
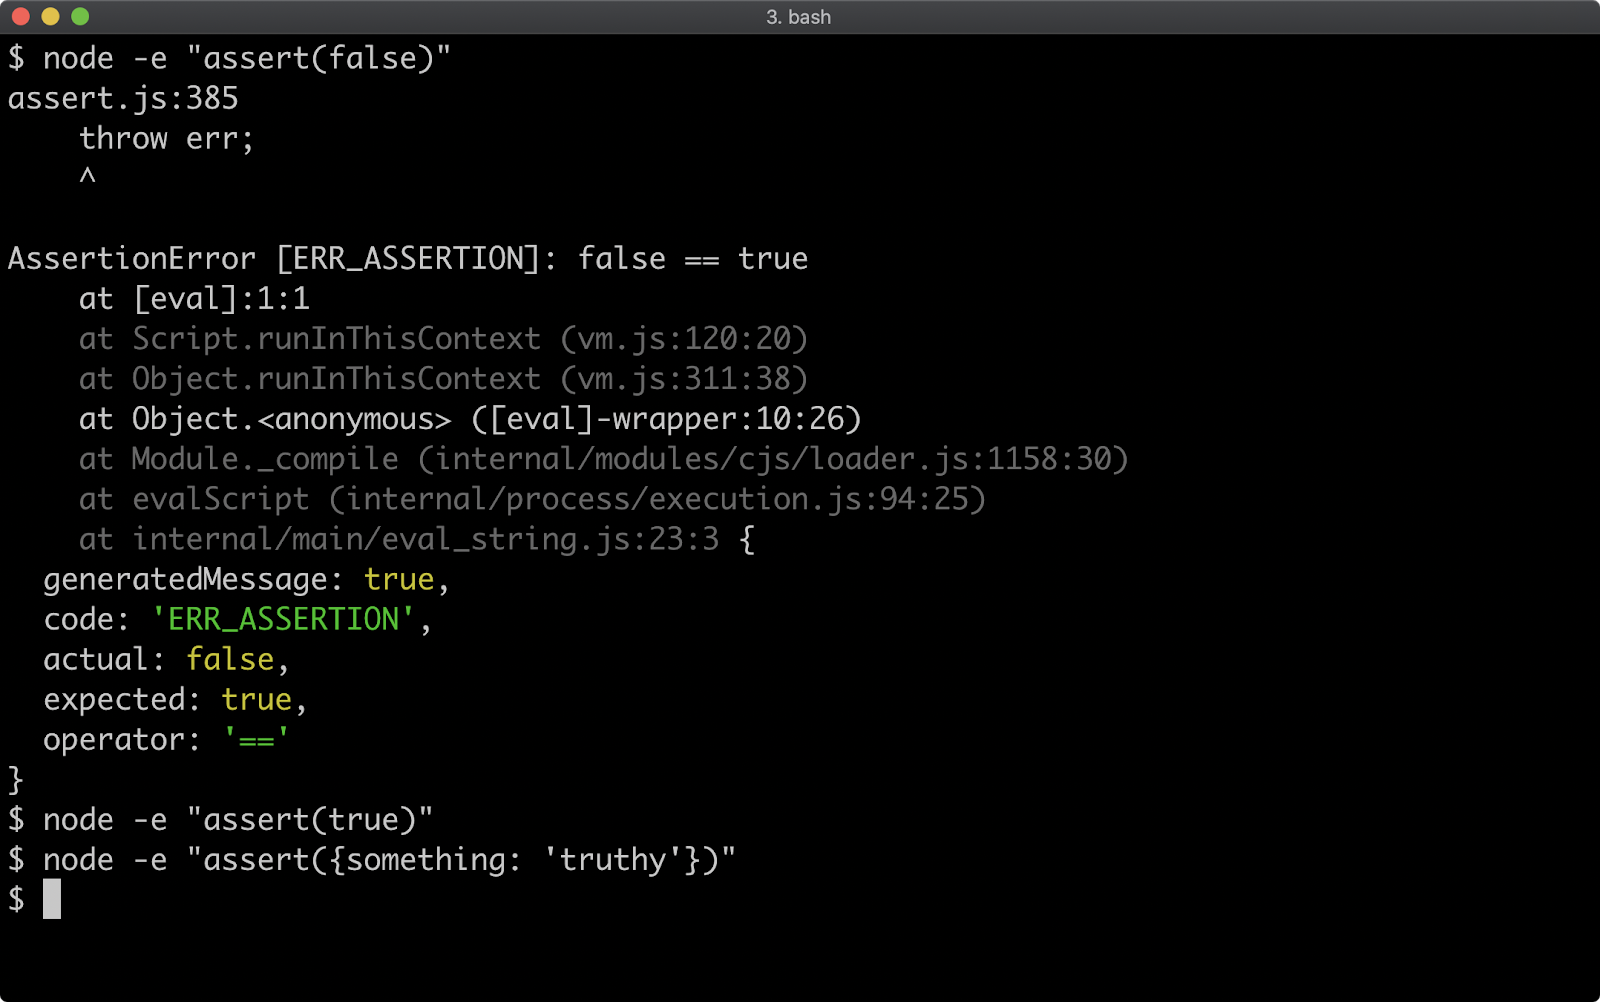
If the value passed to assert is truthy then it will not throw. This is the key behavior of any assertion, if the condition is not met the assertion will throw an error. The error throw is an instance of AssertionError (to learn more see Class: assert.AssertionError).
The core assert module has the following assertion methods:
assert.ok(val)– the same asassert(val)assert.equal(val1, val2)– coercive equal,val1 == val2assert.notEqual(val1, val2)– coercive unequal,val1 != val2assert.strictEqual(val1, val2)– strict equal,val1 === val2assert.notStrictEqual(val1, val2)– strict unequal,val1 !== val2assert.deepEqual(obj1, obj2)– coercive equal for all values in an objectassert.notDeepEqual(obj1, obj2)– coercive unequal for all values in an objectassert.deepStrictEqual(obj1, obj2)– strict equal for all values in an objectassert.notDeepStrictEqual(obj1, obj2)– strict unequal for all values in an objectassert.throws(function)– assert that a function throwsassert.doesNotThrow(function)– assert that a function doesn't throwassert.rejects(promise|async function)– assert promise or returned promise rejectsassert.doesNotReject(promise|async function)– assert promise or returned promise resolvesassert.ifError(err)– check that an error object is falsyassert.match(string, regex)– test a string against a regular expressionassert.doesNotMatch(string, regex)– test that a string fails a regular expressionassert.fail()– force an AssertionError to be thrown
Since the Node core assert module does not output anything for success cases there is no assert.pass method as it would be behaviorally the same as doing nothing.
We can group the assertions into the following categories:
- Truthiness (
assertandassert.ok) - Equality (strict and loose) and Pattern Matching (
match) - Deep equality (strict and loose)
- Errors (
ifErrorplusthrows,rejectsand their antitheses) - Unreachability (
fail)
There are third party libraries that provide alternative APIs and more assertions, which we will explore briefly at the end of this section. However this set of assertions (not the API itself but the actual assertion functionality provided) tends to provide everything we need to write good tests. In fact, the more esoteric the assertion the less useful it is long term. This is because assertions provide a common language of expectations among developers. So inventing or using more complex assertion abstractions that combine basic level assertions reduces the communicability of test code among a team of developers.
Generally when we check a value, we also want to check its type. Let's imagine we're testing a function named add that takes two numbers and adds them together. We can check that add(2, 2) is 4 with:
const assert = require('assert')
const add = require('./get-add-from-somewhere.js')
assert.equal(add(2, 2), 4)
This will pass both if add returns 4, but it will also pass if add returns '4' (as a string). It will even pass if add returns an object with the form { valueOf: () => 4 }. This is because assert.equal is coercive, meaning it will convert whatever the output of add is to the type of the expected value. In this scenario, it probably makes more sense if add only ever returns numbers. One way to address this is to add a type check like so:
const assert = require('assert')
const add = require('./get-add-from-somewhere.js')
const result = add(2, 2)
assert.equal(typeof result, 'number')
assert.equal(result, 4)
Assertions (2)
In this case if add doesn't return the number 4, the typeof check will throw an AssertionError.
The other way to handle this is to use assert.strictEqual:
const assert = require('assert')
const add = require('./get-add-from-somewhere.js')
assert.strictEqual(add(2, 2), 4)
Since assert.strictEqual checks both value and type, using the triple equals operator (===) if add does not return 4 as a number an AssertionError will be thrown.
The assert module also exposes a strict object where namespaces for non-strict methods are strict, so the above code could also be written as:
const assert = require('assert')
const add = require('./get-add-from-somewhere.js')
assert.strict.equal(add(2, 2), 4)
It's worth noting that assert.equal and other non-strict (i.e. coercive) assertion methods are deprecated, which means they may one day be removed from Node core. Therefore if using the Node core assert module, best practice would be always to use assert.strict rather than assert, or at least always use the strict methods (e.g. assert.strictEqual).
There are assertion libraries in the ecosystem which introduce alternative APIs but at a fundamental level, work in the same way. That is, an assertion error will be thrown if a defined condition is not met.
Let's take a look at an equivalent example using the fluid API provided by the expect library.
const expect = require('expect')
const add = require('./get-add-from-somewhere.js')
expect(add(2, 2)).toStrictEqual(4)
With the expect assertion library, the value that we are asserting against is passed to the expect function, which returns an object with assertion methods that we can call to validate that value. In this case, we call toStrictEqual to apply a strict equality check. For a coercive equality check we could use expect(add(2, 2).toBe(4).
If an assertion fails, the expect library will throw a JestAssertionError, which contains extra information and prettier output than the core AssertionError instances:
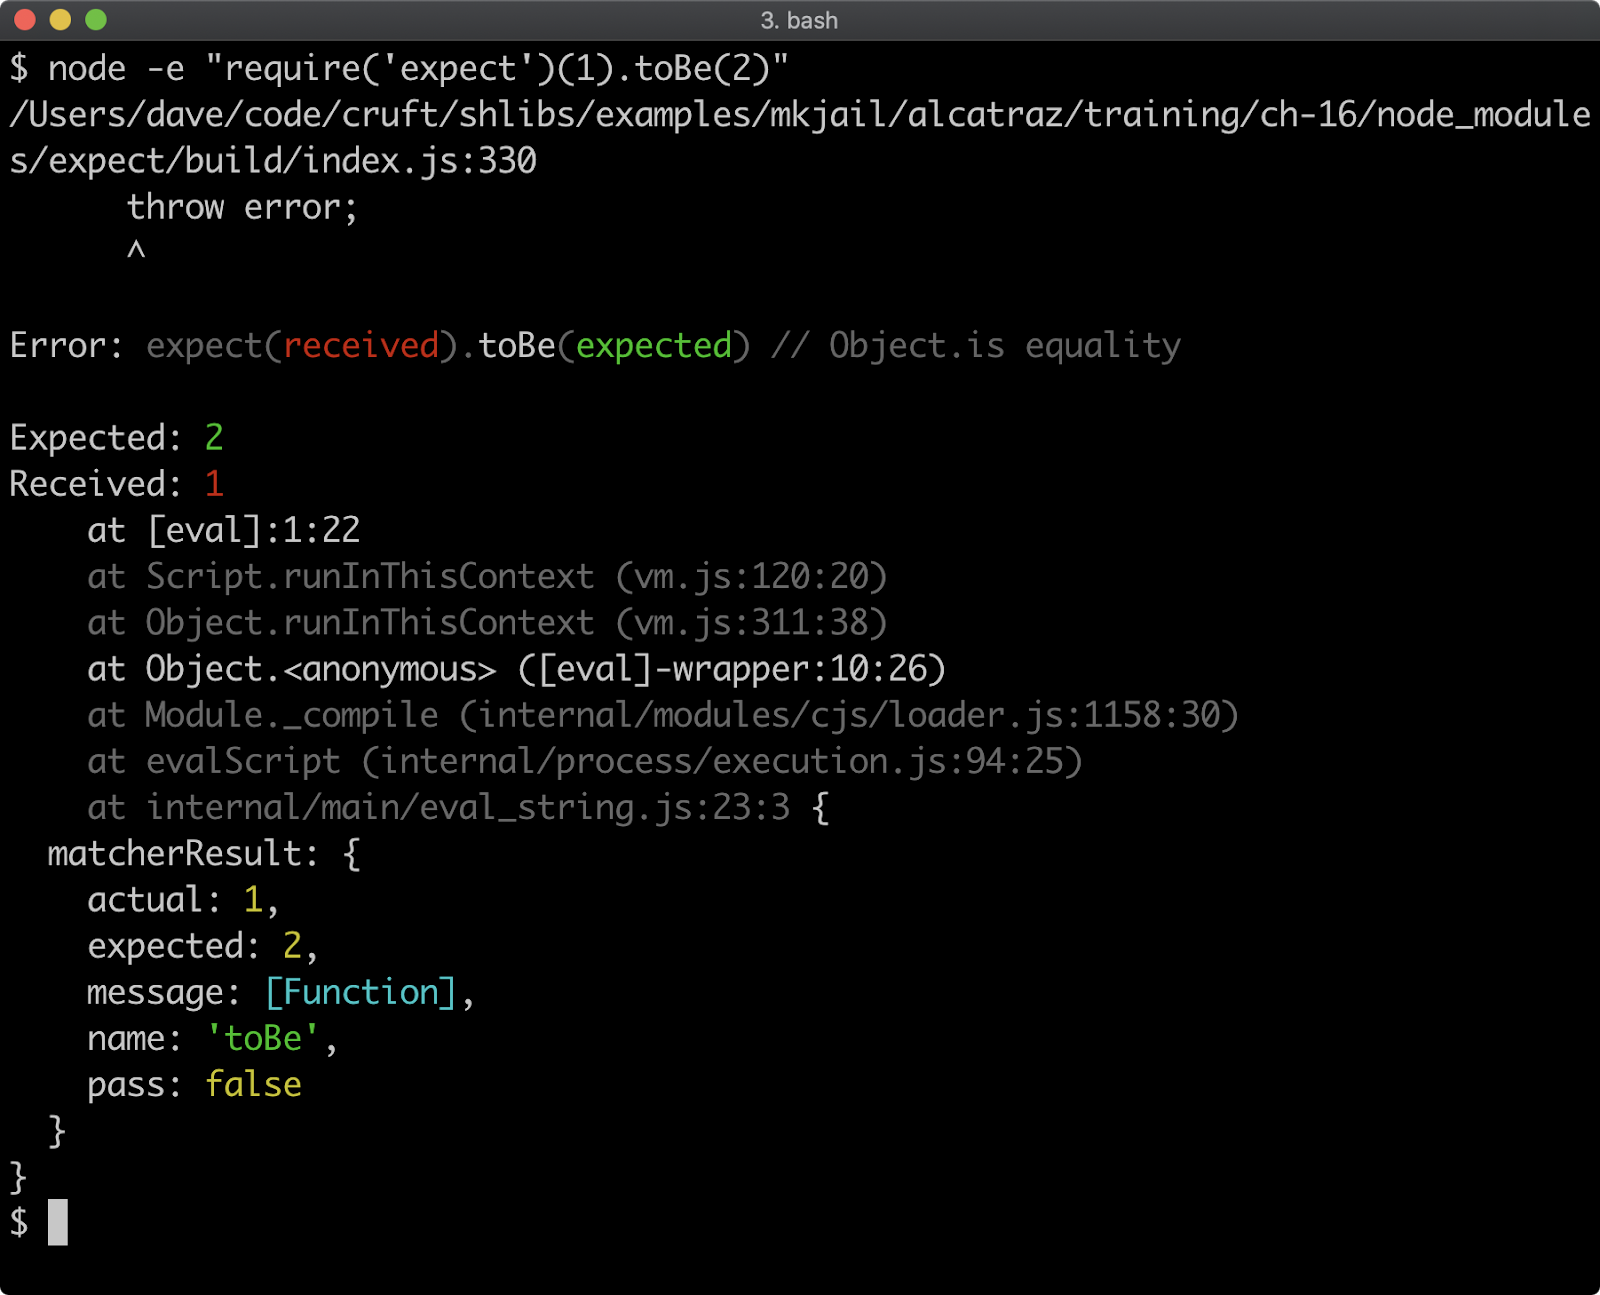
The expect library is part of the Jest test runner framework, which we'll explore in more depth later in this section. For now, we'll continue to discuss Node's assert module, but it's useful to point out that the core concepts are the same across all commonly used assertion libraries.
Deep equality methods, such as assert.deepEqual traverse object structures and then perform equality checks on any primitives in those objects. Let's consider the following object:
const obj = { id: 1, name: { first: 'David', second: 'Clements' } }
To compare this object to another object, a simple equality check won't do because equality in JavaScript is by reference for objects:
const assert = require('assert')
const obj = {
id: 1,
name: { first: 'David', second: 'Clements' }
}
// this assert will fail because they are different objects:
assert.equal(obj, {
id: 1,
name: { first: 'David', second: 'Clements' }
})
Assertions (3)
To compare object structure we need a deep equality check:
const assert = require('assert')
const obj = {
id: 1,
name: { first: 'David', second: 'Clements' }
}
assert.deepEqual(obj, {
id: 1,
name: { first: 'David', second: 'Clements' }
})
The difference between assert.deepEqual and assert.deepStrictEqual (and assert.strict.deepEqual) is that the equality checks of primitive values (in this case the id property value and the name.first and name.second strings) are coercive, which means the following will also pass:
const assert = require('assert')
const obj = {
id: 1,
name: { first: 'David', second: 'Clements' }
}
// id is a string but this will pass because it's not strict
assert.deepEqual(obj, {
id: '1',
name: { first: 'David', second: 'Clements' }
})
It's recommended to use strict equality checking for most cases:
const assert = require('assert')
const obj = {
id: 1,
name: { first: 'David', second: 'Clements' }
}
// this will fail because id is a string instead of a number
assert.strict.deepEqual(obj, {
id: '1',
name: { first: 'David', second: 'Clements' }
})
The error handling assertions (throws, ifError, rejects) are useful for asserting that error situations occur for synchronous, callback-based and promise-based APIs.
Let's start with an error case from an API that is synchronous:
const assert = require('assert')
const add = (a, b) => {
if (typeof a !== 'number' || typeof b !== 'number') {
throw Error('inputs must be numbers')
}
return a + b
}
assert.throws(() => add('5', '5'), Error('inputs must be numbers'))
assert.doesNotThrow(() => add(5, 5))
Notice that the invocation of add is wrapped inside another function. This is because the assert.throws and assert.doesNotThrow methods have to be passed a function, which they can then wrap and call to see if a throw occurs or not. When executed the above code will pass, which is to say, no output will occur and the process will exit.
Assertions (4)
For callback-based APIs, the assert.ifError will only pass if the value passed to it is either null or undefined. Typically the err param is passed to it, to ensure no errors occurred:
const assert = require('assert')
const pseudoReq = (url, cb) => {
setTimeout(() => {
if (url === 'http://error.com') cb(Error('network error'))
else cb(null, Buffer.from('some data'))
}, 300)
}
pseudoReq('http://example.com', (err, data) => {
assert.ifError(err)
})
pseudoReq('http://error.com', (err, data) => {
assert.deepStrictEqual(err, Error('network error'))
})
We create a function called pseudoReq which is a very approximated emulation of a URL fetching API. The first time we call it with a string and a callback function we pass the err parameter to assert.ifError. Since err is null in this scenario, assert.ifError does not throw an AssertionError. The second time we call pseudoReq we trigger an error. To test an error case with a callback API we can check the err param against the expected error object using assert.deepStrictEqual.
Finally for this section, let's consider asserting error or success states on a promise-based API:
const assert = require('assert')
const { promisify } = require('util')
const timeout = promisify(setTimeout)
const pseudoReq = async (url) => {
await timeout(300)
if (url === 'http://error.com') throw Error('network error')
return Buffer.from('some data')
}
assert.doesNotReject(pseudoReq('http://example.com'))
assert.rejects(pseudoReq('http://error.com'), Error('network error'))
Recall that async functions always return promises. So we converted our previously callback-based faux-request API to an async function. We can then use assert.reject and assert.doesNotReject to test the success case and the error case. One caveat with these assertions is that they also return promises, so in the case of an assertion error a promise will reject with an AssertionError rather than AssertionError being thrown as an exception.
Notice that in all three cases we didn't actually check output. In the next section, we'll use different test runners, with their own assertion APIs to fully test the APIs we defined here.
Test Harnesses (1)
While assertions on their own are a powerful tool, if one of the asserted values fails to meet a condition an AssertionError is thrown, which causes the process to crash. This means the results of any assertions after that point are unknown, but any additional assertion failures might be important information.
It would be great if we could group assertions together so that if one in a group fails, the failure is output to the terminal but the remaining groups of assertions still run.
This is what test harnesses do. Broadly speaking we can group test harnesses into two categories: pure libraries vs framework environments.
- Pure Library: Pure library test harnesses provide a module, which is loaded into a file and then used to group tests together. As we will see, pure libraries can be executed directly with Node like any other code. This has the benefit of easier debuggability and a shallower learning curve. We'll be looking at tap. Alternative test libraries include tape and brittle.
- Framework Environment: A test framework environment may provide a module or modules, but it will also introduce implicit globals into the environment and requires another CLI tool to execute tests so that these implicit globals can be injected. For an example of a test framework environment we'll be looking at jest. Alternative test frameworks include jasmine and mocha.
Test Harnesses (2)
In this section, we're going to look at one pure library test harness and one framework test runner. Let's define the APIs we'll be testing. Let's imagine we have three files in the same folder: add.js, req.js and req-prom.js.
The following code is the add.js file:
'use strict'
module.exports = (a, b) => {
if (typeof a !== 'number' || typeof b !== 'number') {
throw Error('inputs must be numbers')
}
return a + b
}
Next we have the req.js file:
'use strict'
module.exports = (url, cb) => {
setTimeout(() => {
if (url === 'http://error.com') cb(Error('network error'))
else cb(null, Buffer.from('some data'))
}, 300)
}
Then the req-prom.js file:
'use strict'
const { promisify } = require('util')
const timeout = promisify(setTimeout)
module.exports = async (url) => {
await timeout(300)
if (url === 'http://error.com') throw Error('network error')
return Buffer.from('some data')
}
In the folder with these files, if we run npm init -y, we'll be able to quickly generate a package.json file which we'll need for installing test libraries:
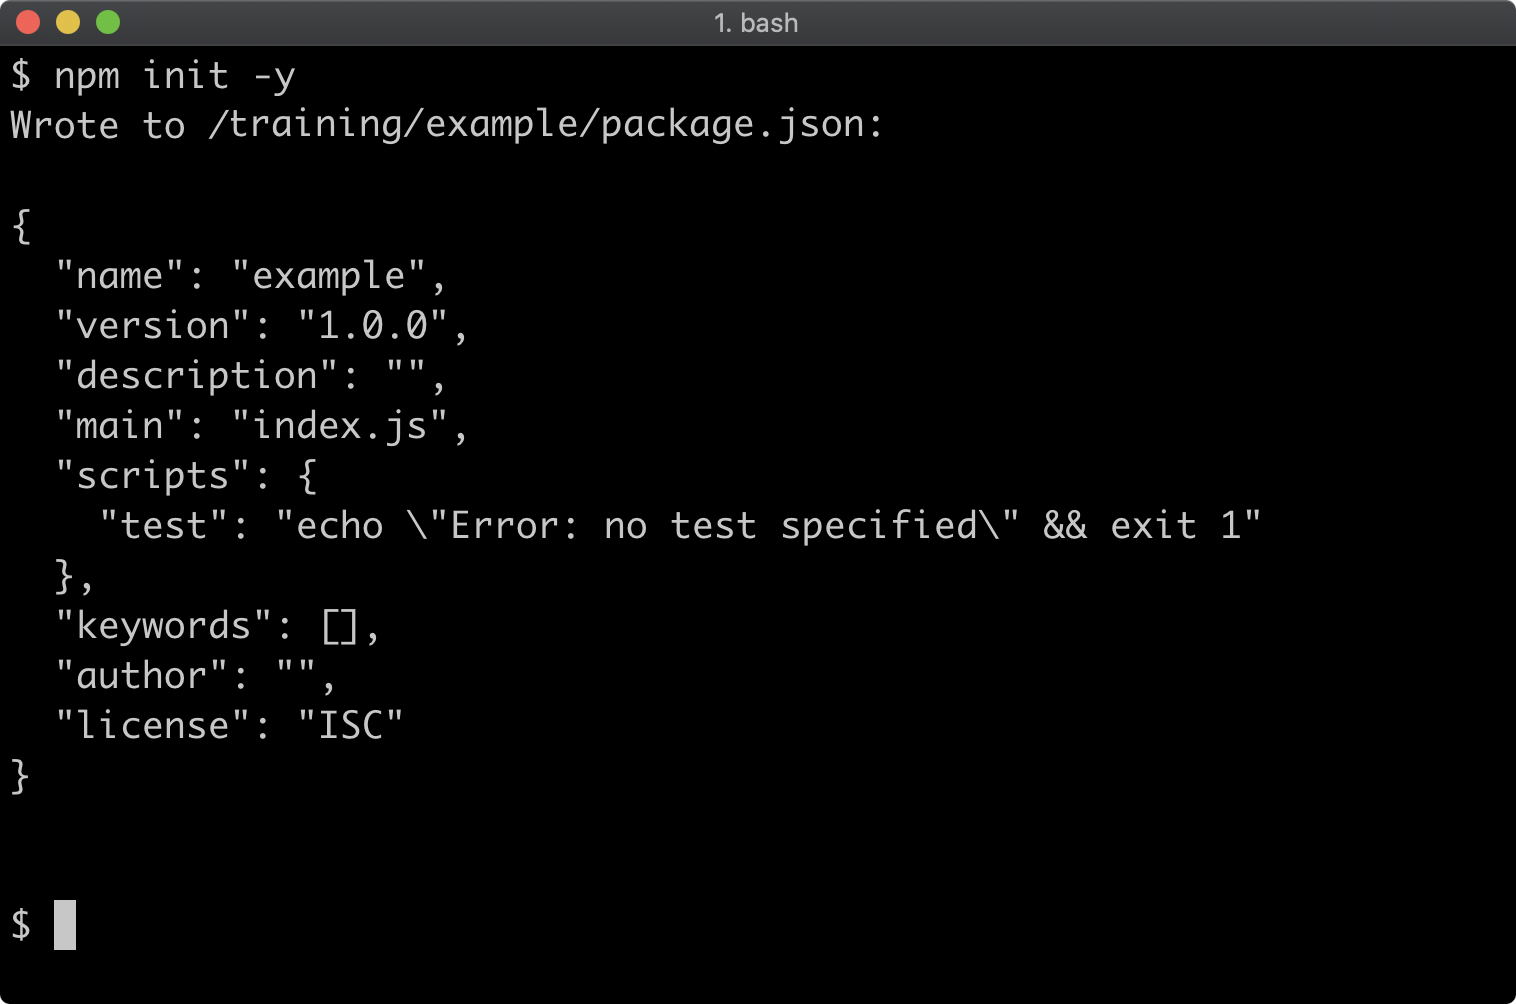
We'll write tests for these three files with the tap library and later on we'll convert over to the jest library for comparison.
tap Test Library
The tap test library should be installed with npm install --save-dev tap because a test runner is a development dependency:
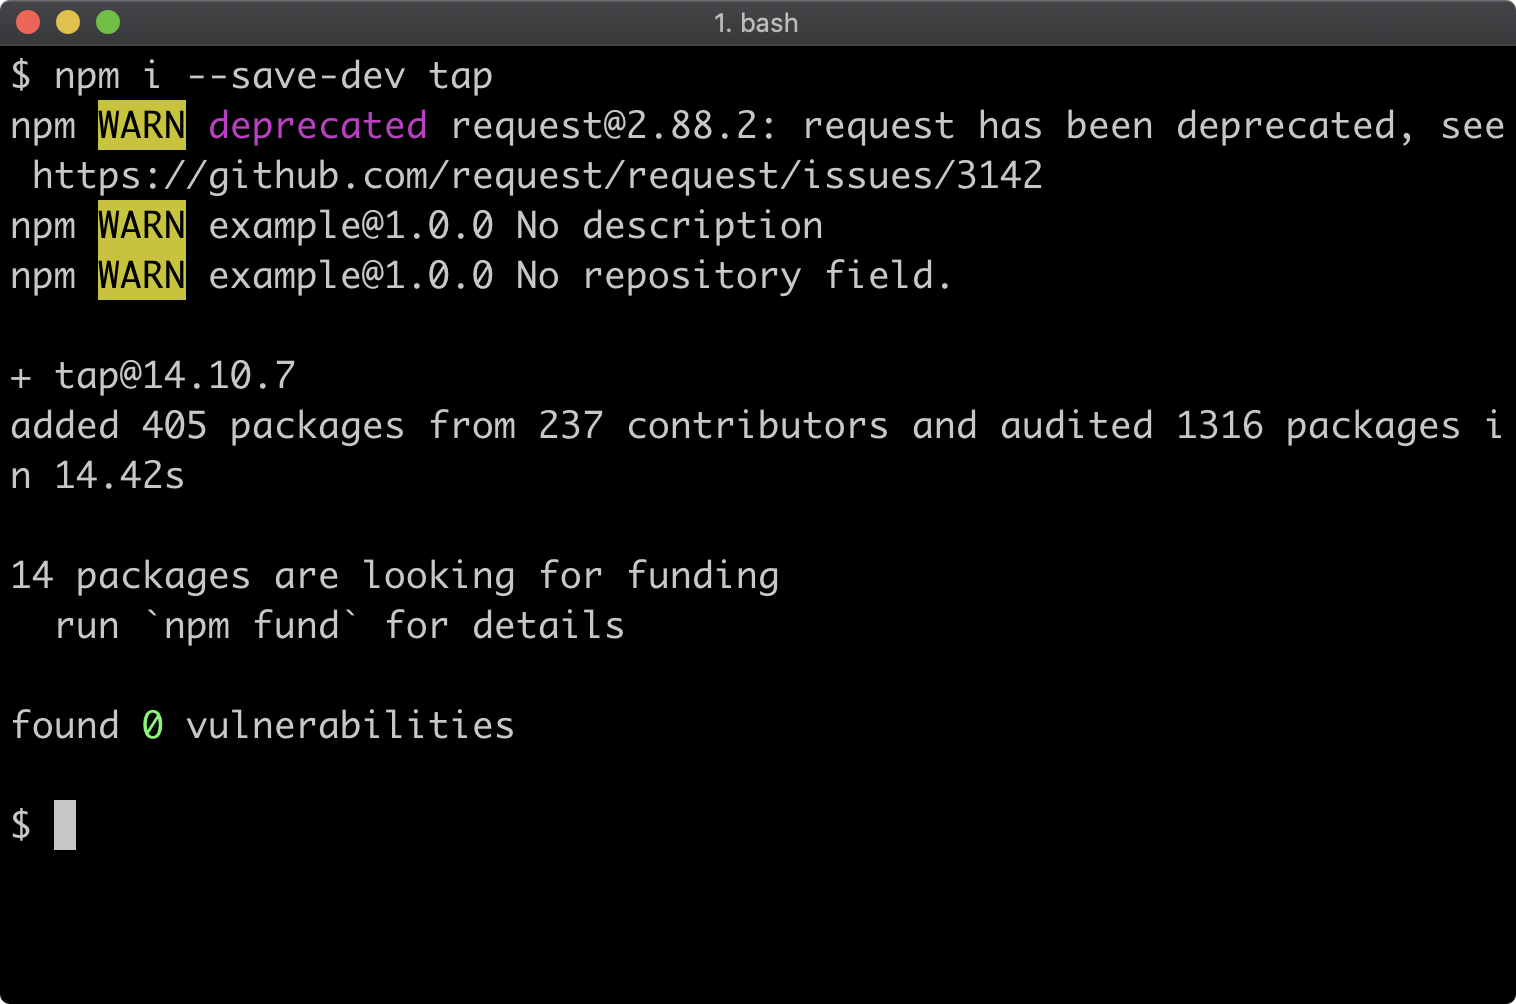
Now we need to create a test folder in the same directory as our newly created package.json. A quick cross-platform way to do this would be with the command node -e "fs.mkdirSync('test')".
tap Test Library: add.js
In the test folder, we'll create a file called add.test.js. This will be our set of tests for the add.js file:
const { test } = require('tap')
const add = require('../add')
test('throw when inputs are not numbers', async ({ throws }) => {
throws(() => add('5', '5'), Error('inputs must be numbers'))
throws(() => add(5, '5'), Error('inputs must be numbers'))
throws(() => add('5', 5), Error('inputs must be numbers'))
throws(() => add({}, null), Error('inputs must be numbers'))
})
test('adds two numbers', async ({ equal }) => {
equal(add(5, 5), 10)
equal(add(-5, 5), 0)
})
On the first line the tap testing library is required, on the second we load the add.js file from the directory above the test folder. We deconstruct the test function from the tap library--this test function provides the ability to describe and group a set of assertions together. We call the test function twice, so we have two groups of assertions: one for testing input validation and the other for testing expected output. The first argument passed to test is a string describing that group of assertions, the second argument is an async function. We use an async function because it returns a promise and the test function will use the promise returned from the async function to determine when the test has finished for that group of assertions. So when the returned promise resolves, the test is done. Since we don't do anything asynchronous, the promise essentially resolves at the end of the function, which is perfect for our purposes here.
Notably, we do not load the assert module in test/add.test.js. This is because the tap library provides its own assertions API, passing in a contextualized assertions object for each test group, as the first argument of the function we supply to test. So we can see in the first test group, that we destructure the throws assertion function in the async function signature. From there we use the throws assertion to check that each of our cases throws as expected. In the second test group, we deconstruct the equal function to check outputs. It's important to understand that the assertion functions passed by tap to our supplied functions do not necessarily behave exactly the same as the functions provided by the assert module. For instance, use of equal here as supplied by tap, applies a strict equality check whereas assert.equal is coercive as discussed in the previous section.
See Node Tap's Documentation to learn more about the tap libraries assertion and to see where they differ from the Nodes assert module functions.
Our new test can be run directly with node:
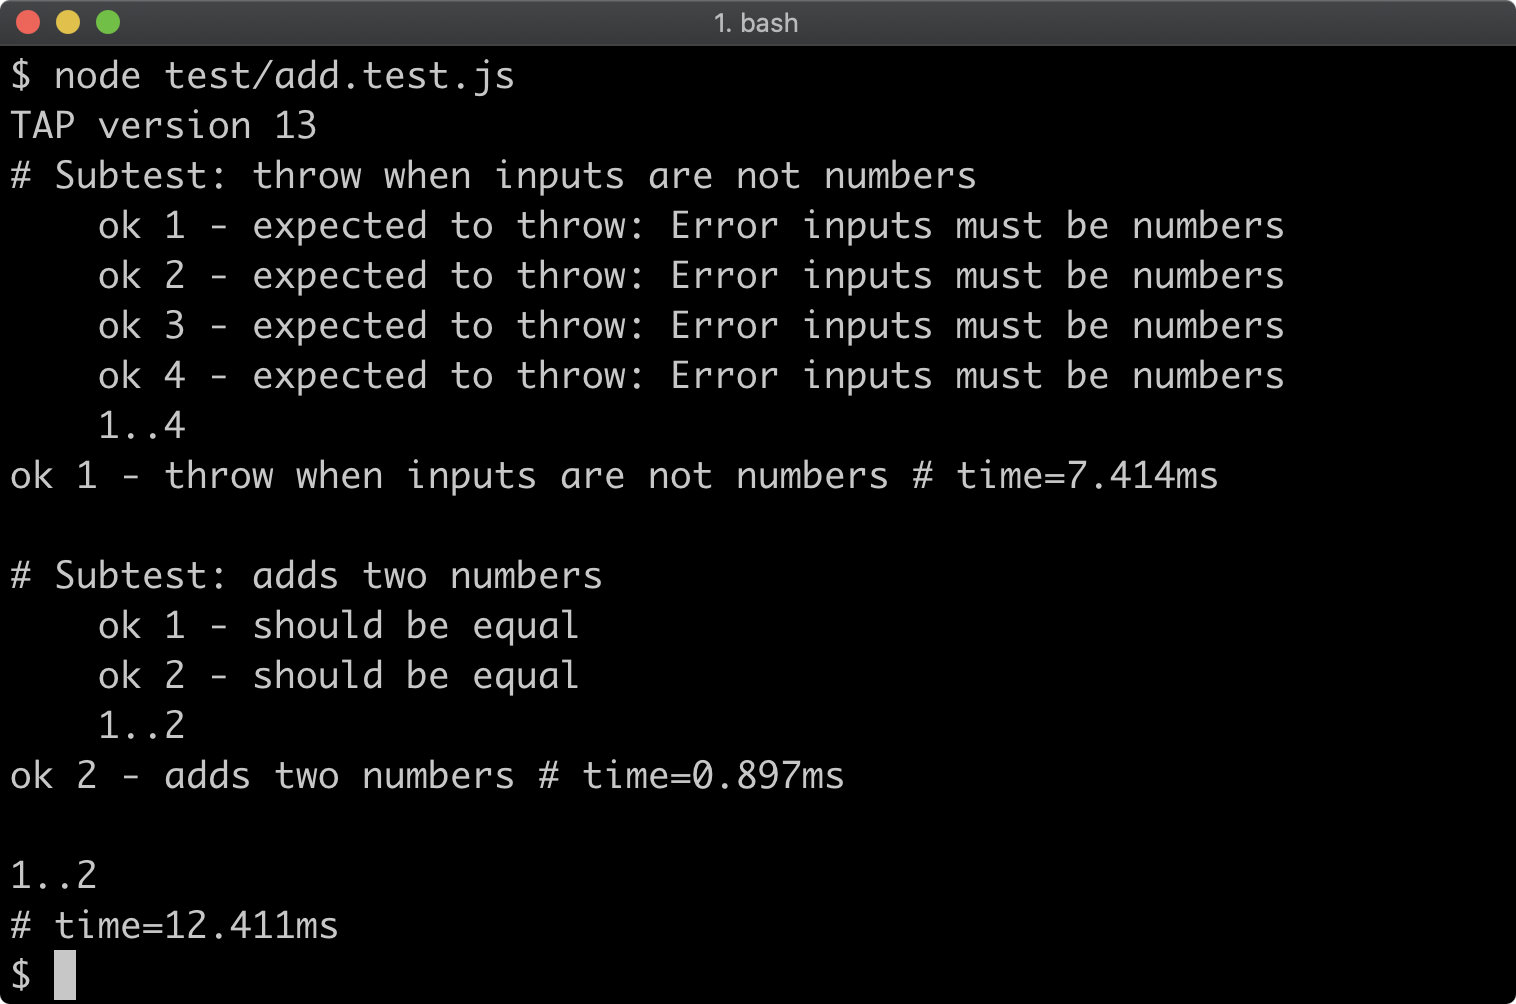
The output format here is known as the Test Anything Protocol (TAP). It is a platform and language-independent test output format (and it is also why the test library is called tap).
When tap is installed, it includes a test runner executable which can be accessed locally from node_modules/.bin/tap:

In the next section, we'll see a better way of triggering the test runner executable using the package.json "scripts" field. However, for now, we can see that the executable runs the code and then outputs a report of both assertions passing (or failing) and code coverage.
tap Test Library: req.js
Code coverage represents which logic paths were executed by tests. Having tests execute as many code paths is important for confidence that the code has been tested. In a loosely-typed language like JavaScript it can also be a good indicator that tests have covered a variety of input types (or even object shapes). However, it's also important to balance this with the understanding that code coverage is not the same as case coverage, so 100% code coverage doesn't necessarily indicate perfectly complete testing either.
We've run some tests for a synchronous API, so now let's test a callback-based API. In a new file, test/req.test.js let's write the following:
'use strict'
const { test } = require('tap')
const req = require('../req')
test('handles network errors', ({ strictDeepEqual, end }) => {
req('http://error.com', (err) => {
strictDeepEqual(err, Error('network error'))
end()
})
})
test('responds with data', ({ ok, strictDeepEqual, ifError, end }) => {
req('http://example.com', (err, data) => {
ifError(err)
ok(Buffer.isBuffer(data))
strictDeepEqual(data, Buffer.from('some data'))
end()
})
})
Again, we use the test function from tap to group assertions for different scenarios. Here we're testing our faux network error scenario and then in the second test group we're testing faux output. This time we don't use an async function. Since we're using callbacks, it's much easier to call a final callback to signify to the test function that we have finished testing. In tap this comes in the form of the end function which is supplied via the same assertions object passed to each function.
We can see that in both cases the end function is called within the callback function supplied to the req function. If we don't call end when appropriate the test will fail with a timeout error, but if we tried to use an async function (without creating a promise that is in some way tied to the callback mechanism) the returned promise would resolve before the callbacks complete and so assertions would be attempting to run after that test group has finished.
In terms of assertion functions, we used strictDeepEqual, ok and ifError. The ok assertion checks for truthiness. We use Buffer.isBuffer to check that the data argument passed to the callback is a buffer, and it will return true if it is. We could have used equal(Buffer.isBuffer, true) instead but ok was slightly less noisy for this case. In the output checking test, we're not expecting an error so we use ifError, passing it the err argument, to ensure that the operation was successful. The strictDeepEqual assertion function works in the same way as assert.deepStrictEqual. We use it to check both the expected error object in the first test group and the buffer instance in the second. Recall that buffers are array-like, so a deep equality check will loop through every element in the array (which means every byte in the buffer) and check them against each other.
If we run ./node_modules/.bin/tap without any arguments it will execute both of our tests files in the test folder:
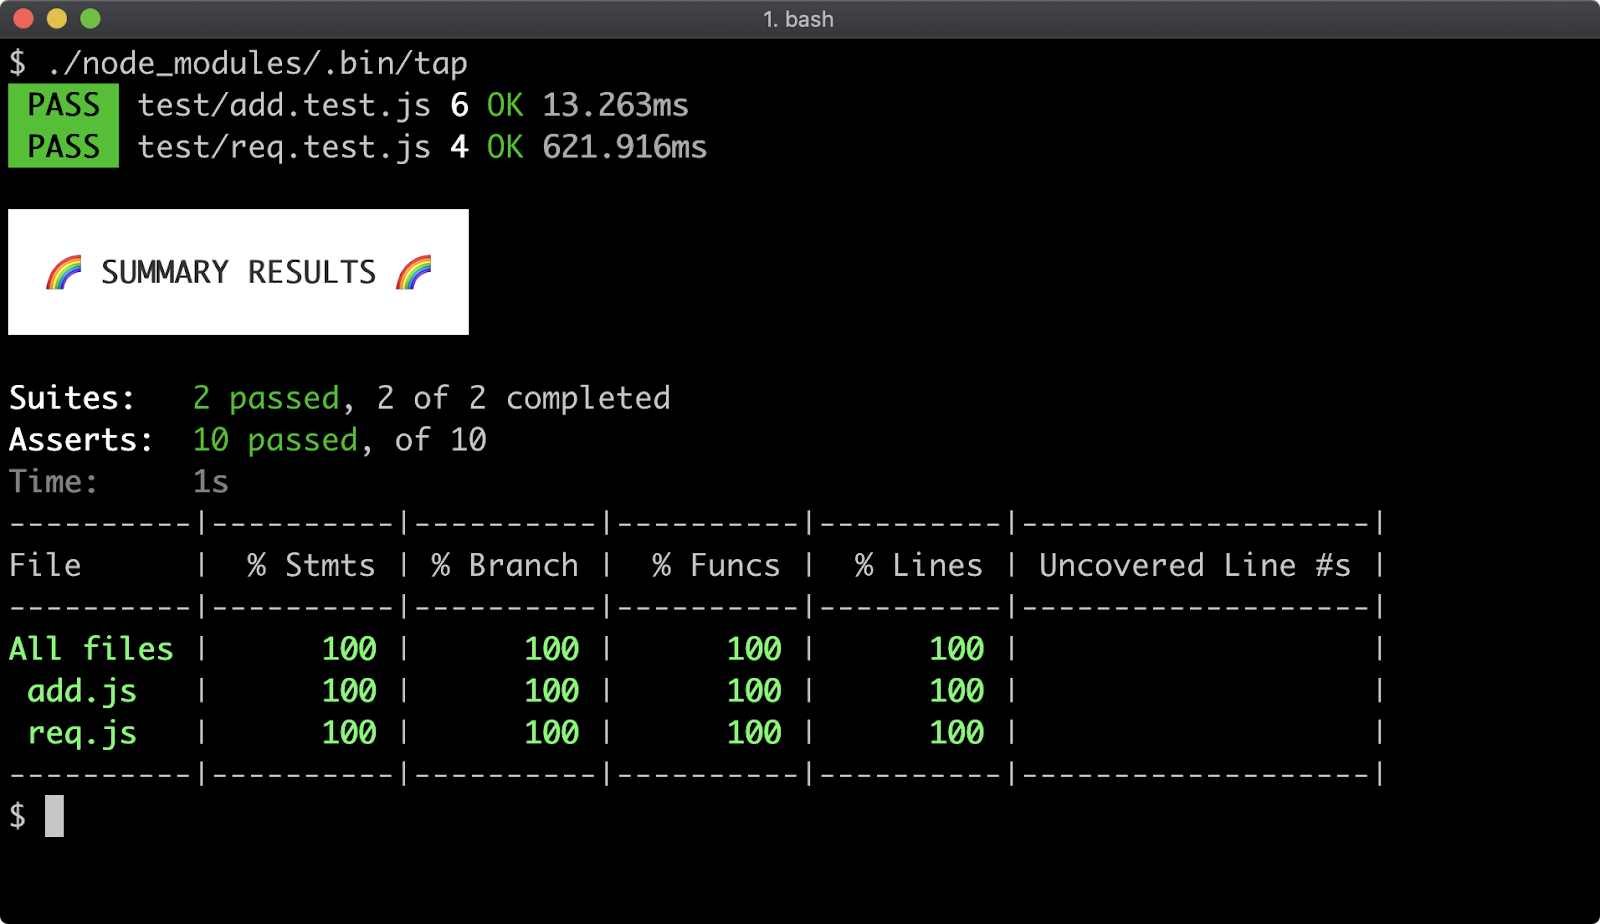
tap Test Library: req-prom.js
Now let's test our req-prom.js file. Let's create test/req-prom.test.js with the following content:
'use strict'
const { test } = require('tap')
const req = require('../req-prom')
test('handles network errors', async ({ rejects }) => {
await rejects(req('http://error.com'), Error('network error'))
})
test('responds with data', async ({ ok, strictDeepEqual }) => {
const data = await req('http://example.com')
ok(Buffer.isBuffer(data))
strictDeepEqual(data, Buffer.from('some data'))
})
Our test cases here remain the same as the callback-based tests, because we're testing the same functionality but using promises instead. In the first test group, instead of checking an err object passed via a callback with strictDeepEqual we use the rejects assertion. We pass a promise to the first argument of rejects and the expected error instance as the second argument.
We're using async functions again because we're dealing with promises, the rejects assertion returns a promise (the resolution of which is dependent on the promise passed to it), so we are sure to await that promise. This makes sure that the async function passed to test does not resolve (thus ending the test) before the promise passed to rejects has rejected.
In the second test group we await the result of calling req and then apply the same assertions to the result as we do in the callback-based tests. There's no need for an ifError equivalent here, because if the promise unexpectedly rejects, that will propagate to the async function passed to the test function and the test harness will register that as an assertion failure.
We can now run all tests again with the tap executable:
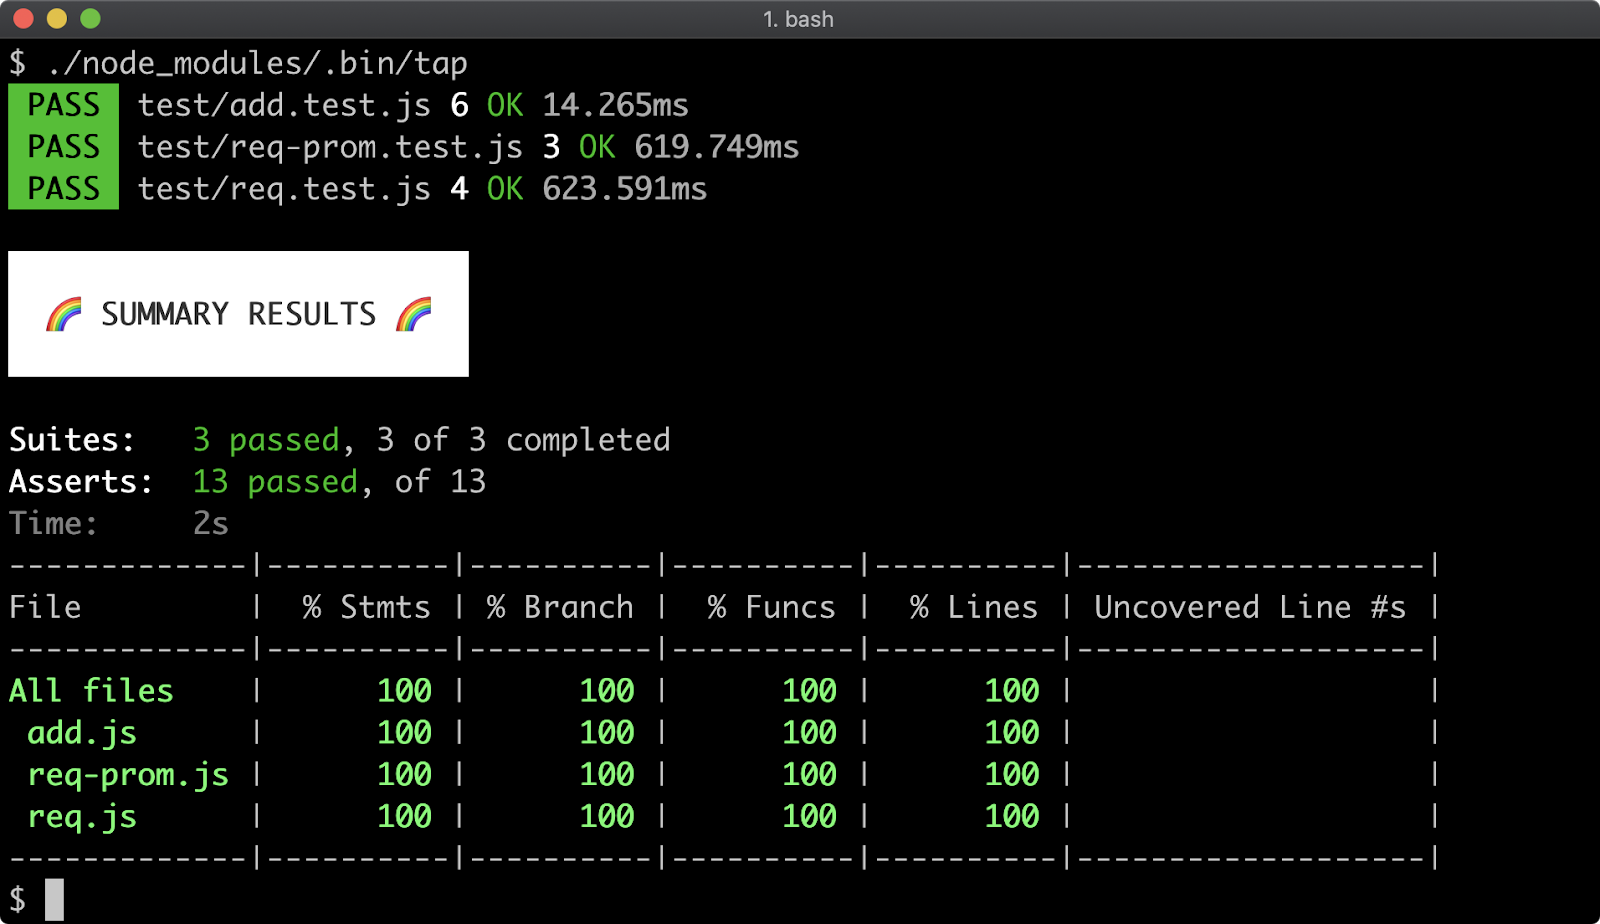
jest Framework: test/add.test.js
To round this section off we will convert the tests to use jest.
We can modify test/add.test.js to the following:
'use strict'
const add = require('../add')
test('throw when inputs are not numbers', async () => {
expect(() => add('5', '5')).toThrowError(
Error('inputs must be numbers')
)
expect(() => add(5, '5')).toThrowError(
Error('inputs must be numbers')
)
expect(() => add('5', 5)).toThrowError(
Error('inputs must be numbers')
)
expect(() => add({}, null)).toThrowError(
Error('inputs must be numbers')
)
})
test('adds two numbers', async () => {
expect(add(5, 5)).toStrictEqual(10)
expect(add(-5, 5)).toStrictEqual(0)
})
Notice that we still have a test function but it is not loaded from any module. This function is made available implicitly by jest at execution time. The same applies to expect, which we discussed as a module in the previous section. However here it is injected as an implicitly available function, just like the test function. This means that, unlike tap, we cannot run our tests directly with node:

Instead we always have to use the jest executable to run tests:
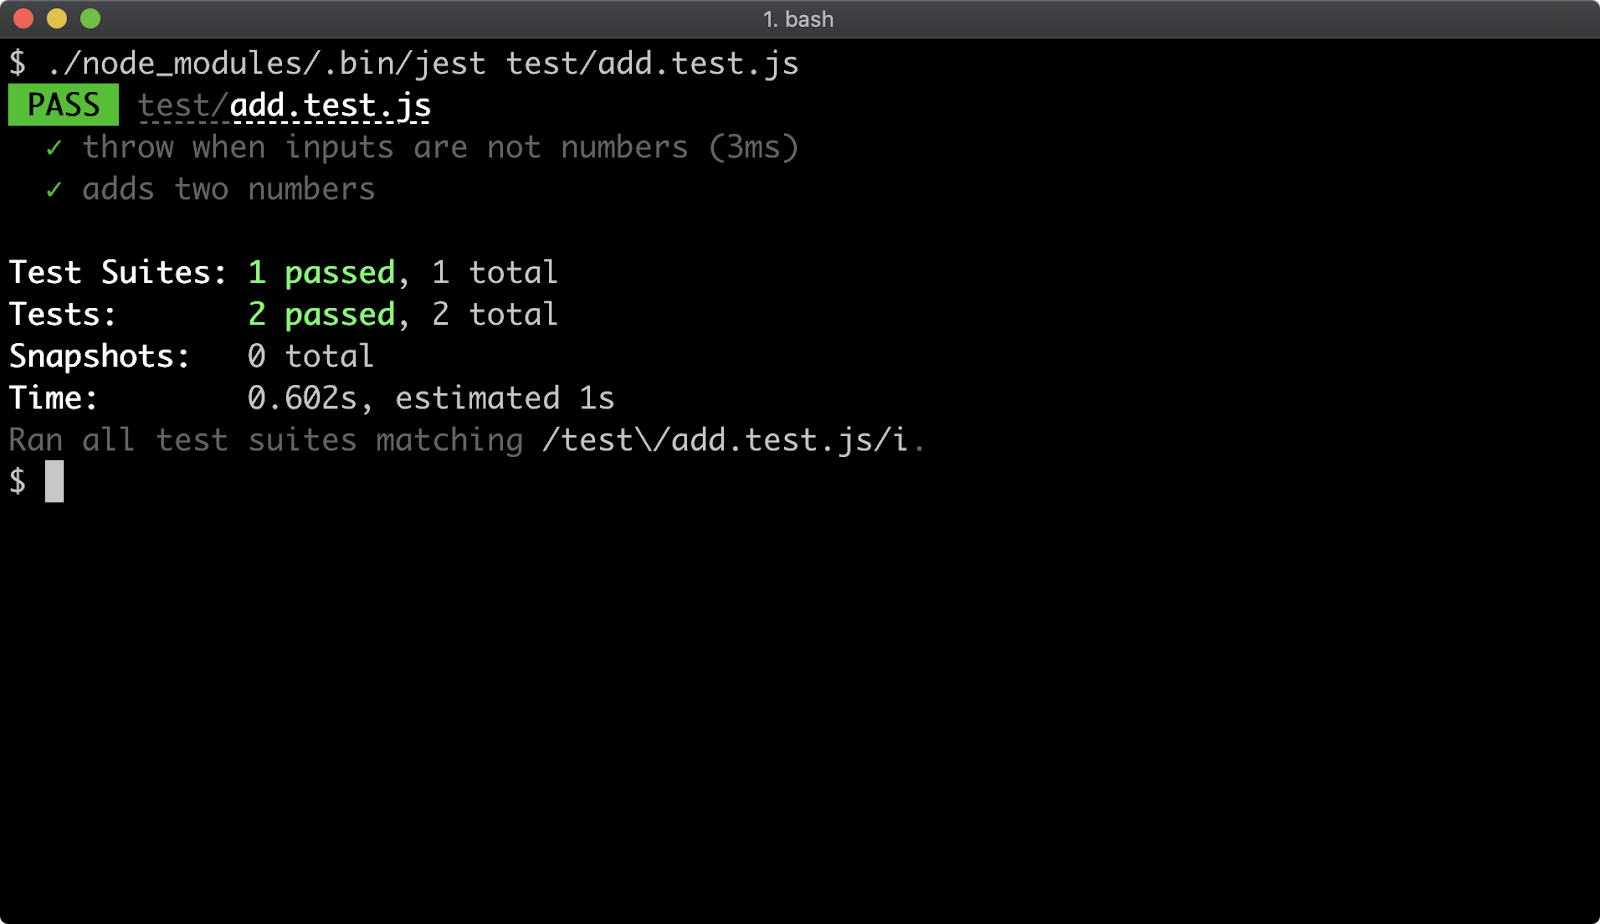
The ability to run individual tests with node directly can help with debuggability because there is nothing in between the developer and the code. By default jest does not output code coverage but can be passed the --coverage flag to do so.
jest Framework: test/req.test.js
Let's convert the test/req.test.js:
'use strict'
const req = require('../req')
test('handles network errors', (done) => {
req('http://error.com', (err) => {
expect(err).toStrictEqual(Error('network error'))
done()
})
})
test('responds with data', (done) => {
req('http://example.com', (err, data) => {
expect(err == null).toBe(true)
expect(Buffer.isBuffer(data)).toBeTruthy()
expect(data).toStrictEqual(Buffer.from('some data'))
done()
})
})
As in the previous example, test and expect are explicit. The expect assertions here broadly match the assertions from the tap-based equivalent except that expect has no equivalent of ifError. So to achieve the same effect we use expect(err == null).toBe(true). Using a coercive equality check (==) will result in the conditional being true if err is null or undefined. While Buffer.isBuffer will only return true or false we use the toBeTruthy method to demonstrate how to achieve the same behavior as ok. As with the tap equivalent we don't use async functions here, but use a callback (done) passed to the functions that are passed to test to signal that the test group is complete.
Let's check out our converted tests with jest:
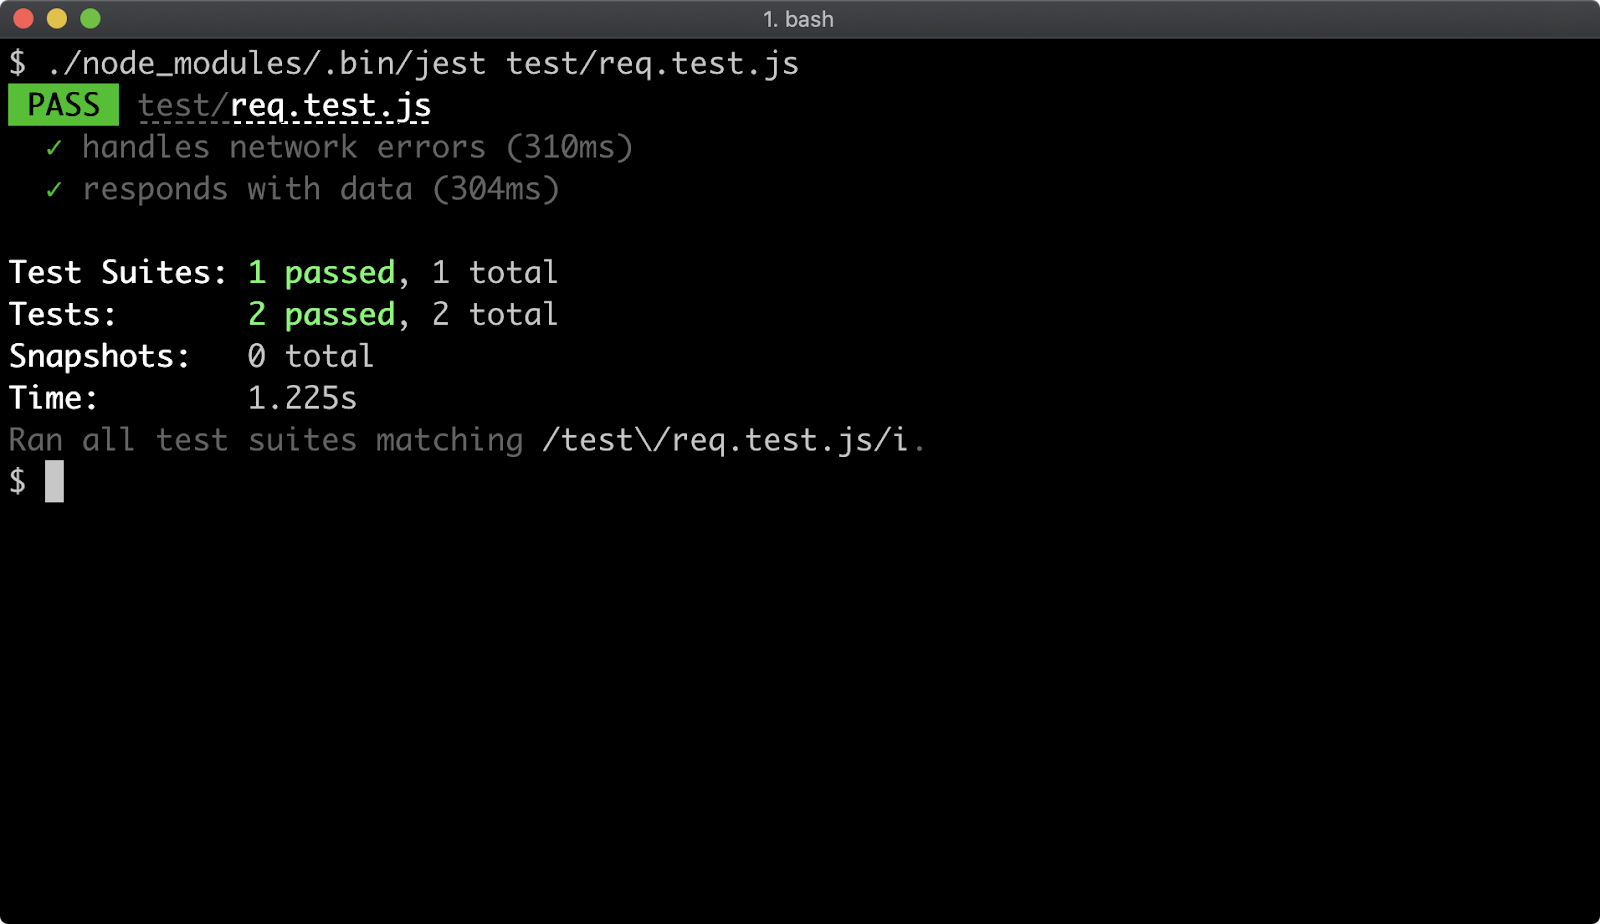
jest Framework: test/req-prom.test.js
Finally, we'll convert test/req-prom.test.js:
'use strict'
// make Jest work with nodes setTimeout instead of overriding it
global.setTimeout = require('timers').setTimeout
const req = require('../req-prom')
test('handles network errors', async () => {
await expect(req('http://error.com'))
.rejects
.toStrictEqual(Error('network error'))
})
test('responds with data', async () => {
const data = await req('http://example.com')
expect(Buffer.isBuffer(data)).toBeTruthy()
expect(data).toStrictEqual(Buffer.from('some data'))
})
Unfortunately, jest overrides the setTimeout function, which means when we use util.promisify in req-prom.js the promise returned from the promisified function (which we named timeout) never resolves, which causes all the tests to freeze. This is true for version 27.4.7 but may not be an issue for later versions if later versions are available.
Now that all tests are converted we can run jest without any file names and all the files in test folder will be executed with jest:
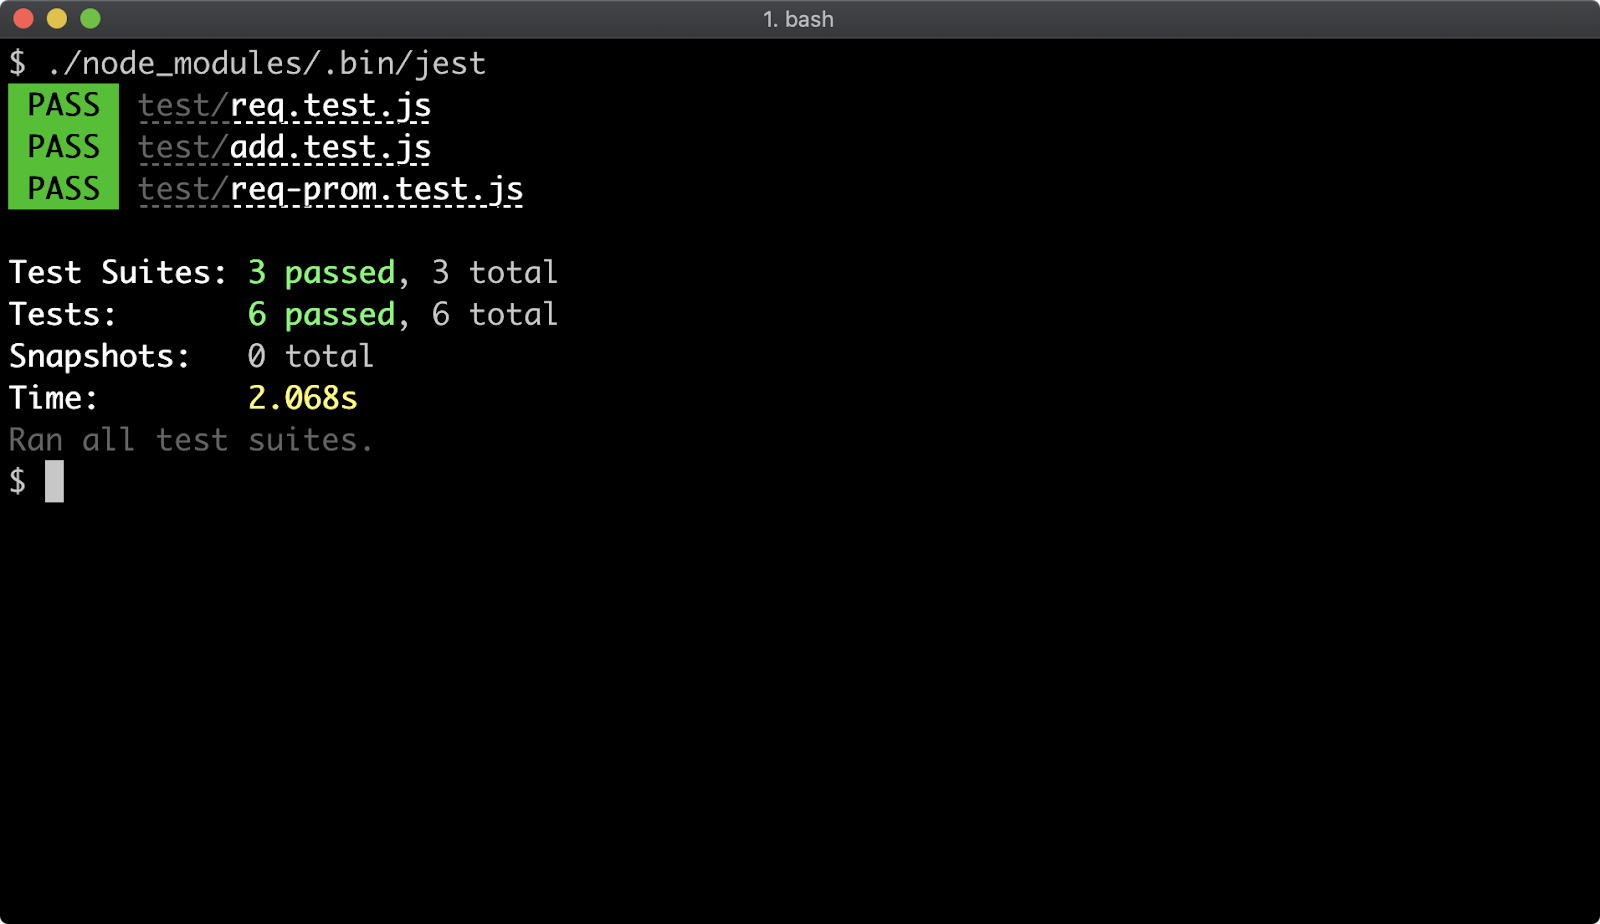
Configuring package.json (1)
A final key piece when writing tests for a module, application or service is making absolutely certain that the test field of the package.json file for that project runs the correct command.
This is (observably and measurably) a very commonly made mistake, so bear this in mind.
Typically a fresh package.json file looks similar to the following:
{
"name": "my-project",
"version": "1.0.0",
"description": "",
"main": "index.js",
"scripts": {
"test": "echo \"Error: no test specified\" && exit 1"
},
"keywords": [],
"author": "",
"license": "ISC"
}
In the middle of the above JSON, we can see a "scripts" field. This contains a JSON object, which contains a "test" field. By default the "test" field is set up to generate an exit code of 1, to indicate failure. This is to indicate that not having tests, or not configuring the "test" to a command that will run tests is in fact a test failure.
Running the npm test command in the same folder as the package.json will execute the shell command in the "test" field.
If npm test was executed against this package.json the following output would occur:
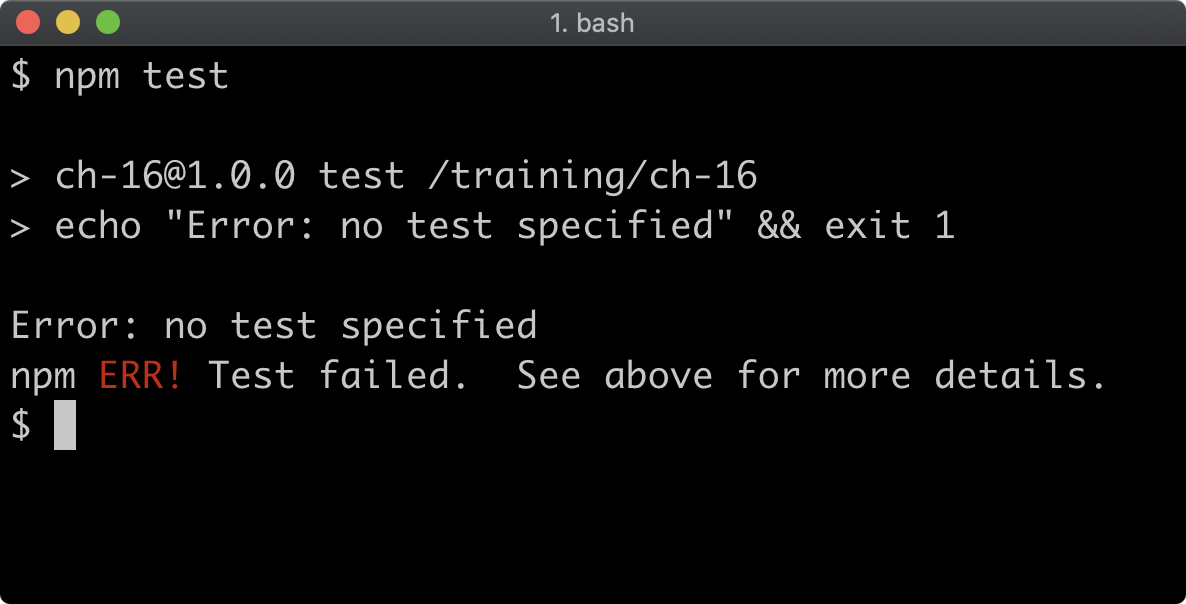
Any field in the "scripts" field of package.json is expected to be a shell command, and these shell commands have their PATH enhanced with the path to node_modules/.bin in the same project as the package.json file. This means to run our tests we don't have to reference ./node_modules/.bin/jest (or ./node_modules/.bin/tap) we can instead write jest (or tap) knowing that the execution environment will look in ./node_modules/.bin for that executable.
In the last section our tests were converted to jest so let's modify the "test" field of package.json like so:
{
"name": "my-project",
"version": "1.0.0",
"description": "",
"main": "index.js",
"scripts": {
"test": "jest --coverage"
},
"keywords": [],
"author": "",
"license": "ISC"
}
Configuring package.json (2)
Now, let's run npm test:
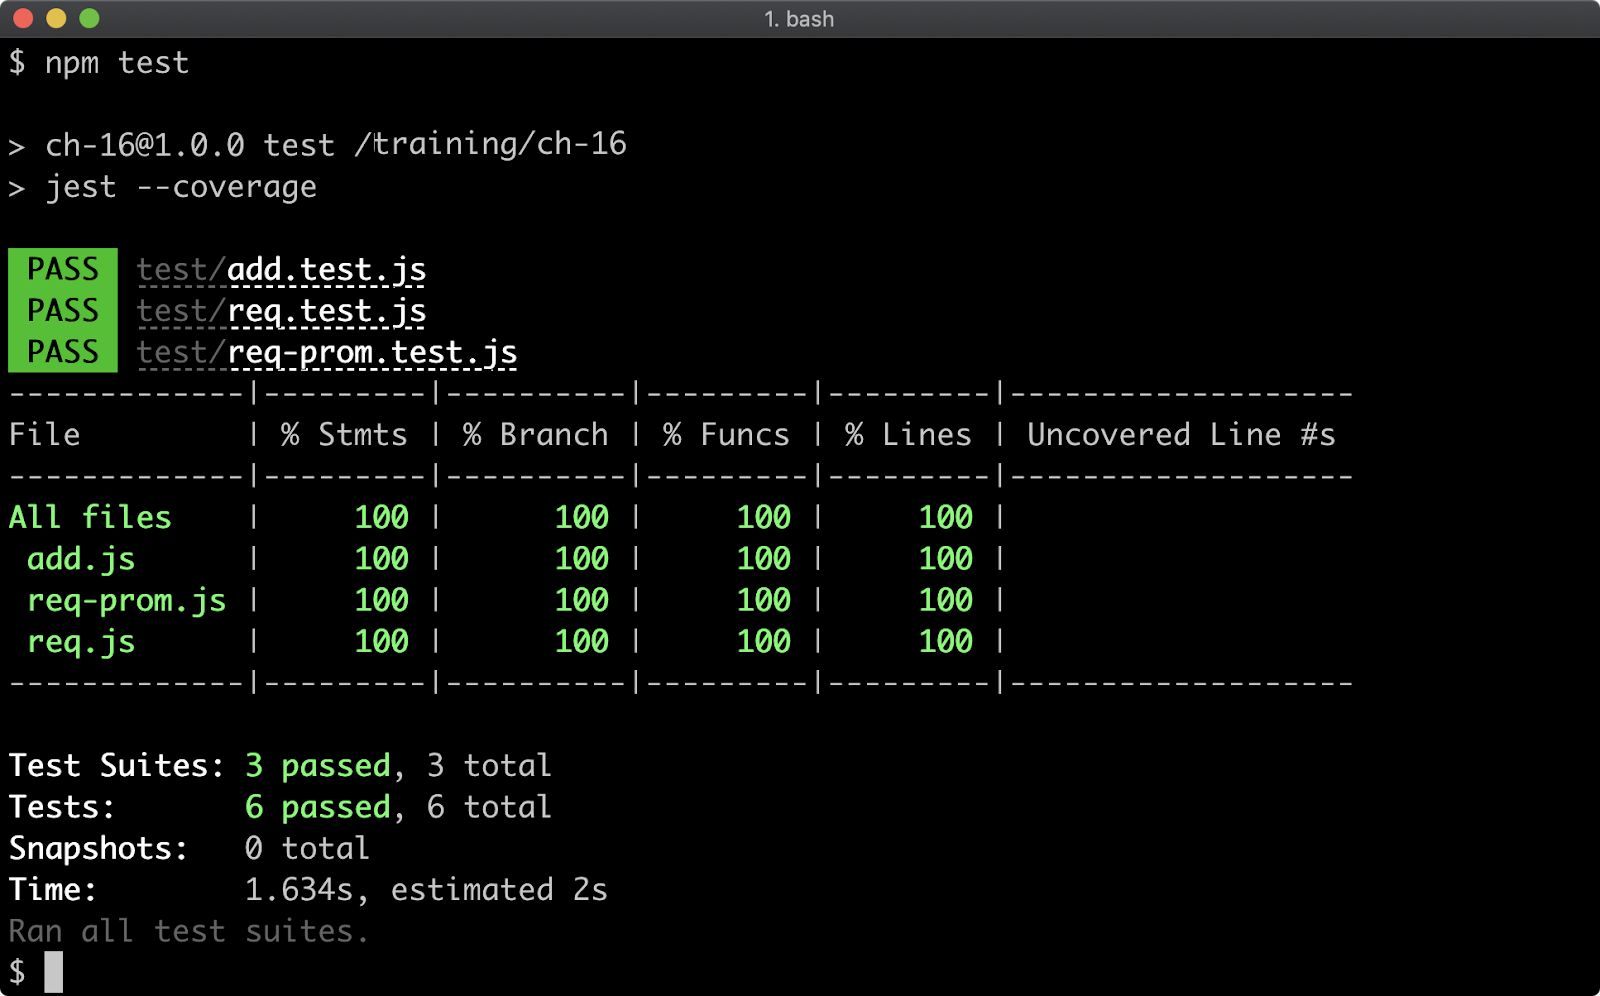
If we were to convert our tests back to tap, the package.json test field could then be:
{
"name": "my-project",
"version": "1.0.0",
"description": "",
"main": "index.js",
"scripts": {
"test": "tap"
},
"keywords": [],
"author": "",
"license": "ISC"
}
Once tests were converted back to their tap versions, if we run npm test with this package.json we should get output similar to the following:
Lab Exercises
Lab 16.1 - Test a Sync API
The labs-1 folder contains a package.json file and an uppercase.js file.
The package.json file contains the following:
{
"name": "labs-1",
"version": "1.0.0",
"description": "",
"main": "index.js",
"scripts": {
"test": "echo \"Error: no test specified\" && exit 1"
},
"keywords": [],
"author": "",
"license": "UNLICENSED"
}
The uppercase.js file contains the following:
'use strict'
function uppercase (str) {
if (typeof str !== 'string') throw Error('input must be a string')
return str.toUpperCase()
}
module.exports = uppercase
Write tests for the uppercase.js file. Ensure that when npm test is executed with the labs-1 folder as the current working directory the uppercase.js file is fully tested.
Any additional dependencies, such as a test harness, may be additionally installed.
Also in the labs-1 folder is a validate.js file. The implementation can be checked with node validate.js. The implementation is successful if the final output of node validate.js is passed!.
For completeness the following is the validate.js file contains the following, but it is not necessary to understand it for the purposes of this exercise:
'use strict'
const assert = require('assert').strict
const { spawnSync } = require('child_process')
const { writeFileSync } = require('fs')
const uppercase = require.resolve('./uppercase')
const uppercaseCode = Buffer.from('2775736520737472696374270a66756e6374696f6e20757070657263617365202873747229207b0a202069662028747970656f662073747220213d3d2027737472696e672729207468726f77204572726f722827696e707574206d757374206265206120737472696e6727290a202072657475726e207374722e746f55707065724361736528290a7d0a0a6d6f64756c652e6578706f727473203d20757070657263617365', 'hex')
try {
{
writeFileSync(uppercase, uppercaseCode)
const sp = spawnSync(process.platform === 'win32' ? 'npm.cmd' : 'npm', ['test'], {
stdio: 'ignore'
})
assert.equal(sp.status, 0, 'tests should be successful (is package.json test script configured?)')
}
{
const badOutput = `'use strict'
function uppercase (str) {
if (typeof str !== 'string') throw Error('input must be a string')
return 'bad output'
}
module.exports = uppercase
`
writeFileSync(uppercase, badOutput)
const sp = spawnSync(process.platform === 'win32' ? 'npm.cmd' : 'npm', ['test'], {
stdio: 'ignore'
})
assert.equal(sp.status, 1, 'output should be tested')
}
{
const badValidation = `'use strict'
function uppercase (str) {
return str.toUpperCase()
}
module.exports = uppercase
`
writeFileSync(uppercase, badValidation)
const sp = spawnSync(process.platform === 'win32' ? 'npm.cmd' : 'npm', ['test'], {
stdio: 'ignore'
})
assert.equal(sp.status, 1, 'error case should be tested')
}
console.log('passed!')
} finally {
writeFileSync(uppercase, uppercaseCode)
}
Lab 16.2 - Test a Callback-Based API
The labs-2 folder contains a package.json file and a store.js file.
The package.json file contains the following:
{
"name": "labs-2",
"version": "1.0.0",
"description": "",
"main": "index.js",
"scripts": {
"test": "echo \"Error: no test specified\" && exit 1"
},
"keywords": [],
"author": "",
"license": "UNLICENSED"
}
The store.js file contains the following:
'use strict'
module.exports = (value, cb) => {
if (Buffer.isBuffer(value) === false) {
cb(Error('input must be a buffer'))
return
}
setTimeout(() => {
const id = Math.random().toString(36).split('.')[1].slice(0, 4)
cb(null, { id })
}, 300)
}
This API mimics some kind of async storage mechanism, such as to a database. In some circumstances it is infeasible to check for a specific value (for instance an ID returned from a database). For those cases, we can check for the presence of an ID, or apply some validation. In our case we can at least check that the length of the ID is 4.
Write tests for the store.js file. Ensure that when npm test is executed with the labs-2 folder as the current working directory the store.js file is fully tested.
Any additional dependencies, such as a test harness, may be additionally installed.
Also in the labs-2 folder is a validate.js file. The implementation can be checked with node validate.js. The implementation is successful if the final output of node validate.js is passed!.
For completeness the following is the validate.js file contains the following, but it is not necessary to understand it for the purposes of this exercise:
'use strict'
const assert = require('assert').strict
const { spawnSync } = require('child_process')
const { writeFileSync } = require('fs')
const store = require.resolve('./store')
const storeCode = Buffer.from('2775736520737472696374270a6d6f64756c652e6578706f727473203d202876616c75652c20636229203d3e207b0a2020696620284275666665722e69734275666665722876616c756529203d3d3d2066616c736529207b0a202020206362284572726f722827696e707574206d7573742062652061206275666665722729290a2020202072657475726e0a20207d0a202073657454696d656f7574282829203d3e207b0a20202020636f6e7374206964203d204d6174682e72616e646f6d28292e746f537472696e67283336292e73706c697428272e27295b315d2e736c69636528302c2034290a202020206362286e756c6c2c207b206964207d290a20207d2c20333030290a7d0a', 'hex')
try {
{
writeFileSync(store, storeCode)
const sp = spawnSync(process.platform === 'win32' ? 'npm.cmd' : 'npm', ['test'], {
stdio: 'ignore'
})
assert.equal(sp.status, 0, 'tests should be successful (is package.json test script configured?)')
}
{
const badOutput = `'use strict'
module.exports = (value, cb) => {
if (Buffer.isBuffer(value) === false) {
cb(Error('input must be a buffer'))
return
}
setTimeout(() => {
const id = Math.random().toString(36).split('.')[1].slice(0, 2)
cb(null, { id })
}, 300)
}
`
writeFileSync(store, badOutput)
const sp = spawnSync(process.platform === 'win32' ? 'npm.cmd' : 'npm', ['test'], {
stdio: 'ignore'
})
assert.equal(sp.status, 1, 'output should be tested (id length)')
}
{
const badValidation = `'use strict'
module.exports = (value, cb) => {
if (Buffer.isBuffer(value) === true) {
cb(Error('input must be a buffer'))
return
}
setTimeout(() => {
const id = Math.random().toString(36).split('.')[1].slice(0, 4)
cb(null, { id })
}, 300)
}
`
writeFileSync(store, badValidation)
const sp = spawnSync(process.platform === 'win32' ? 'npm.cmd' : 'npm', ['test'], {
stdio: 'ignore'
})
assert.equal(sp.status, 1, 'error case should be tested')
}
{
const unexpectedError = `'use strict'
module.exports = (value, cb) => {
cb(Error('input must be a buffer'), {id: '1234'})
}
`
writeFileSync(store, unexpectedError)
const sp = spawnSync(process.platform === 'win32' ? 'npm.cmd' : 'npm', ['test'], {
stdio: 'ignore'
})
assert.equal(sp.status, 1, 'unexpected errors should be guarded - e.g. ifError')
}
console.log('passed!')
} finally {
writeFileSync(store, storeCode)
}
Lab 16.3 - Test a Promise-Based async/await API
The labs-3 folder contains a package.json file and a store.js file.
The package.json file contains the following:
{
"name": "labs-3",
"version": "1.0.0",
"description": "",
"main": "index.js",
"scripts": {
"test": "echo \"Error: no test specified\" && exit 1"
},
"keywords": [],
"author": "",
"license": "UNLICENSED"
}
The store.js file contains the following:
'use strict'
const { promisify } = require('util')
const timeout = promisify(setTimeout)
module.exports = async (value) => {
if (Buffer.isBuffer(value) === false) {
throw Error('input must be a buffer')
}
await timeout(300)
const id = Math.random().toString(36).split('.')[1].slice(0, 4)
return { id }
}
This API mimics some kind of async storage mechanism, such as to a database. In some circumstances it is infeasible to check for a specific value (for instance an ID returned from a database). For those cases, we can check for the presence of an ID, or apply some validation. In our case we can at least check that the length of the ID is 4.
Write tests for the store.js file. Ensure that when npm test is executed with the labs-2 folder as the current working directory the store.js file is fully tested.
Any additional dependencies, such as a test harness, may be additionally installed.
Also in the labs-3 folder is a validate.js file. The implementation can be checked with node validate.js. The implementation is successful if the final output of node validate.js is passed!.
For completeness the following is the validate.js file contains the following, but it is not
necessary to understand it for the purposes of this exercise:
'use strict'
const assert = require('assert').strict
const { spawnSync } = require('child_process')
const { writeFileSync } = require('fs')
const store = require.resolve('./store')
const storeCode = Buffer.from('2775736520737472696374270a636f6e7374207b2070726f6d6973696679207d203d207265717569726528277574696c27290a636f6e73742074696d656f7574203d2070726f6d69736966792873657454696d656f7574290a6d6f64756c652e6578706f727473203d206173796e63202876616c756529203d3e207b0a2020696620284275666665722e69734275666665722876616c756529203d3d3d2066616c736529207b0a202020207468726f77204572726f722827696e707574206d75737420626520612062756666657227290a20207d0a202061776169742074696d656f757428333030290a2020636f6e7374206964203d204d6174682e72616e646f6d28292e746f537472696e67283336292e73706c697428272e27295b315d2e736c69636528302c2034290a202072657475726e207b206964207d0a7d0a', 'hex')
try {
{
writeFileSync(store, storeCode)
const sp = spawnSync(process.platform === 'win32' ? 'npm.cmd' : 'npm', ['test'], {
env: { ...process.env, NODE_OPTIONS: '--unhandled-rejections=strict' },
stdio: 'ignore'
})
assert.equal(sp.status, 0, 'tests should be successful (is package.json test script configured?)')
}
{
const badOutput = `'use strict'
const { promisify } = require('util')
const timeout = promisify(setTimeout)
module.exports = async (value) => {
if (Buffer.isBuffer(value) === false) {
throw Error('input must be a buffer')
}
await timeout(300)
const id = Math.random().toString(36).split('.')[1].slice(0, 2)
return { id }
}
`
writeFileSync(store, badOutput)
const sp = spawnSync(process.platform === 'win32' ? 'npm.cmd' : 'npm', ['test'], {
env: { ...process.env, NODE_OPTIONS: '--unhandled-rejections=strict' },
stdio: 'ignore'
})
assert.equal(sp.status, 1, 'output should be tested (id length)')
}
{
const badValidation = `'use strict'
const { promisify } = require('util')
const timeout = promisify(setTimeout)
module.exports = async (value) => {
await timeout(300)
const id = Math.random().toString(36).split('.')[1].slice(0, 4)
return { id }
}
`
writeFileSync(store, badValidation)
const sp = spawnSync(process.platform === 'win32' ? 'npm.cmd' : 'npm', ['test'], {
env: { ...process.env, NODE_OPTIONS: '--unhandled-rejections=strict' },
stdio: 'ignore'
})
assert.equal(sp.status, 1, 'error case should be tested')
}
console.log('passed!')
} finally {
writeFileSync(store, storeCode)
}
Quizzes
2 - Setting up
2.1
- Question
- Answer
- Additional Details
What is the recommended approach to installing Node?
- (A) From the website
- (B) With an OS package manager
- (C) With a version manager
C
None
2.2
- Question
- Answer
- Additional Details
Which of the following commands displays the currently installed Node.js version?
- (A)
node -v - (B)
node -V - (C)
node --ver
A
None
2.3
- Question
- Answer
- Additional Details
Aside from the Node binary, what else does a Node installation provide?
- (A) A module package manager
- (B) Build tools
- (C) An IDE
A
None
3 - The Node binary
3.1
- Question
- Answer
- Additional Details
Which flag allows a module to be preloaded?
- (A)
--loader - (B)
-ror--require - (C)
-por--preload
B
None
3.2
- Question
- Answer
- Additional Details
How can the syntax of a program be checked without running it?
- (A)
node -s app.jsornode --syntax app.js - (B)
node -c app.jsornode --check app.js - (C)
node --parse-only app.js
B
None
4 - Debugging and diagnostics
4.1
- Question
- Answer
- Additional Details
What keyword can be used within the code of a program to cause the process to pause on a specific line when in debug mode?
- (A)
break - (B)
pause - (C)
debugger - (D)
debug
C
None
4.2
- Question
- Answer
- Additional Details
In order to set a breakpoint on the first line of execution when entering debug mode, which flag should be used?
- (A)
--inspect - (B)
--debug - (C)
--inspect-brk
C
None
5 - Key JavaScript concepts
5.1
- Question
- Answer
- Additional Details
When a function is on an object which is the prototype of another object (the "instance"), and the function is called on the instance object what does this (usually) refer to?
- (A) The prototype object
- (B) The instance object
- (C) The global object
B
None
5.2
- Question
- Answer
- Additional Details
What does the extend keyword do?
- (A) Inherits from an abstract class
- (B) Copies properties from one object to another
- (C) Sets up part of a prototype chain
C
None
5.3
- Question
- Answer
- Additional Details
From where can closure scope be accessed?
- (A) Inside a function and any functions within that function
- (B) From the outside of a function
- (C) Anywhere
A
None
6 - Packages and dependencies
6.1
- Question
- Answer
- Additional Details
Which of the following cases would all be covered in a Semver range of ^2.1.2?
- (A) 2.14.2, 2.1.1, 2.11.14
- (B) 2.14.2, 2.16.1, 2.14.4
- (C) 2.18.6, 3.13.3, 2.1.3
B
None
6.2
- Question
- Answer
- Additional Details
Given two "scripts" fields in the package.json file named "test" and "lint", which of the following commands would execute both scripts?
- (A)
npm test && npm lint - (B)
npm run test lint - (C)
npm run lint && npm test
C
None
6.3
- Question
- Answer
- Additional Details
If a package dependency has a development dependency, in what scenario, if any, will the development dependency be installed?
- (A) When running
npm installinside the package folder - (B) Never
- (C) When running
npm install --productioninside the package folder
B
None
7 - Node's module systems
7.1
- Question
- Answer
- Additional Details
A package folder has a package installed named foo, but there is also a foo.js file in the package folder. Another file called bar.js is in the package folder, bar.js is a sibling to foo.js. The bar.js file contains a require('foo') statement. Which module does bar.js load?
- (A) The
index.jsfile of thefoopackage - (B) The main file of the
foopackage - (C) The
foo.jsfile
B
None
7.2
- Question
- Answer
- Additional Details
Given a function named func, how can func be exposed from a CJS module such that when the file that func is in is loaded by another module, the result of the require statement is func?
- (A)
module.exports = func - (B)
export func - (C)
module.exports = { func }
A
None
7.3
- Question
- Answer
- Additional Details
Given a function named func, how can func be exposed from an ESM module such that when the file that func is in is loaded by another module, the myModule reference of the statement import myModule from './path/to/func/file.js' statement is func?
- (A)
module.exports = func - (B)
export const func = 0 => { ... } - (C)
export default function func () {...}
C
None
8 - Asynchronous control flow
8.1
- Question
- Answer
- Additional Details
What is a callback?
- (A) A function that is called when an asynchronous operation completes
- (B) A function that is called before an asynchronous operation completes
- (C) An object that is returned when an asynchronous operation completes
A
None
8.2
- Question
- Answer
- Additional Details
What method can be used to handle a promise rejection?
- (A)
reject - (B)
error - (C)
catch
C
None
8.3
- Question
- Answer
- Additional Details
What does an async function always return?
- (A) Whatever value is returned from the function
- (B) Nothing
- (C) A promise of the returned value
C
None
9 - Node's event system
9.1
- Question
- Answer
- Additional Details
What EventEmitter method can be used to listen for an event and then immediately remove the listener after the event fires?
- (A)
off - (B)
once - (C)
when
B
None
9.2
- Question
- Answer
- Additional Details
Is the emit method synchronous or asynchronous?
- (A) Synchronous event is emitted in current tick
- (B) Asynchronous event is emitted in future tick
- (C) Neither/Both, it uses a queue
A
None
9.3
- Question
- Answer
- Additional Details
Which event name, when emitted, has a special behavior?
- (A)
end - (B)
error - (C)
exception
B
None
10 - Handling errors
10.1
- Question
- Answer
- Additional Details
If there is a chance that a function that is synchronous may throw, what can be used to handle the error?
- (A) An
ifstatement - (B) A
try/catchblock - (C) An error first callback
B
None
10.2
- Question
- Answer
- Additional Details
If a throw occurs inside a Promises then handler function, what sort of error will this generate?
- (A) An exception
- (B) A rejection
- (C) An exit code
B
None
10.3
- Question
- Answer
- Additional Details
What is a reliable way to identify different kinds of errors in a catch block or handler?
- (A) Check the instance of the errors
- (B) Only throw strings
- (C) Apply duck-typing to error checks
C
None
11 - Using buffers
11.1
- Question
- Answer
- Additional Details
What does Buffer inherit from?
- (A)
Int8Array - (B)
Uint8Array - (C)
Float64Array
B
None
11.2
- Question
- Answer
- Additional Details
What is the difference between Buffer.alloc and Buffer.allocUnsafe?
- (A)
Buffer.allocUnsafewill cause memory leaks whereasBuffer.allocwill not - (B)
Buffer.allocUnsafedoes not clean input whileBuffer.allocdoes - (C)
Buffer.allocUnsafedoes not zero-fill the buffer whereasBuffer.allocdoes
C
None
11.3
- Question
- Answer
- Additional Details
When calling toString or concatenating a Buffer instance with another string, what is the default encoding used to perform the conversion from binary data to a string?
- (A)
HEX - (B)
UTF8 - (C)
UCS
B
None
12 - Working with streams
12.1
- Question
- Answer
- Additional Details
What method is used to automatically transfer data from a readable stream to a writable stream?
- (A)
send - (B)
pipe - (C)
connect
B
None
12.2
- Question
- Answer
- Additional Details
What utility function should be used for connecting multiple streams together?
- (A)
pipeline - (B)
pipe - (C)
compose
A
None
12.3
- Question
- Answer
- Additional Details
What's the difference between a Duplex stream and a Transform stream?
- (A) Duplex streams establishes a causal relationship between read and write, Transform streams do not
- (B) Transform streams establishes a causal relationship between read and write, Duplex streams do not
- (C) Nothing, they are aliases of the same thing
B
None
13 - Interacting with the file system
13.1
- Question
- Answer
- Additional Details
When an fs module function name ends with the word Sync, what does this signify?
- (A) That the operation will block the process from executing any more code until the operation has completed
- (B) That the process will synchronize with the file system while code continues to execute
- (C) That the operation will return a promise the resolves synchronously
A
None
13.2
- Question
- Answer
- Additional Details
What file stats must be used to verify that a file has been freshly created?
- (A)
birthtime,atime,ctime - (B)
ctime - (C)
birthtime,ctime,mtime
C
None
13.3
- Question
- Answer
- Additional Details
Given a stats object named stat how can you check if the path that the stat object represents is a directory?
- (A)
stat.isDir - (B)
stat.isDirectory() - (C)
stat.ino
B
None
14 - Process and operating system
14.1
- Question
- Answer
- Additional Details
What exit code is used to indicate success?
- (A)
1 - (B)
-1 - (C)
0
C
None
14.2
- Question
- Answer
- Additional Details
When checking system uptime, what method should be used?
- (A)
process.uptime() - (B)
os.uptime() - (C)
process.hrtime
B
None
14.3
- Question
- Answer
- Additional Details
Process.memoryUsage() returns an object with rss, heapTotal, heapUsed and external properties. The rss property is an acronym that stands for Resident Set Size. What's the difference between heap used and Resident Set Size?
- (A) Heap used amount of memory dedicated in RAM, Resident Set Size in the swap space
- (B) Heap used is total memory used within the JavaScript engine, Resident Set Size is total used memory in RAM for the process
- (C) Resident Set Size is a percentage of heap used memory stored in RAM
B
None
15 - Creating child processes
15.1
- Question
- Answer
- Additional Details
What option sets the folder that a child process should execute in?
- (A)
dir - (B)
pwd - (C)
cwd
C
None
15.2
- Question
- Answer
- Additional Details
Which child_process method can start any executable and has no limit on child process output?
- (A)
exec - (B)
spawn - (C)
fork
B
None
15.3
- Question
- Answer
- Additional Details
If a child process is started with the stdio option set to ['pipe', 'ignore', 'inherit'], how will the I/O of the child process behave?
- (A) The child process stdout property will be a readable stream, it will not be possible to write to the STDIN of the process, and any output written to STDERR will be written to the parent STDERR
- (B) The child process stdin property will be a writable stream, STDERR output will be ignored but STDOUT output will be written to the parent STDOUT
- (C) The child process stdin property will be a writable stream, STDOUT output will be ignored but STDERR output will be written to the parent STDERR
C
None
16 - Writing unit tests
16.1
- Question
- Answer
- Additional Details
Using the Node core assert module and given the expression assert.equal('1', 1) what will be the outcome?
- (A) Nothing, the assertion will pass
- (B) An assertion error will throw because of incompatible types
- (C) A warning will be printed
A
None
16.2
- Question
- Answer
- Additional Details
Which is a major difference between pure library test harnesses (like tap) and framework environment test harnesses (like jest)?
- (A) Both can be run directly with Node but only framework environment test harnesses have a test runner
- (B) Pure library test harnesses have programmatic APIs whereas framework environment test harnesses have implicit APIs
- (C) Pure library test harnesses are smaller whereas framework environment test harnesses are more comprehensive
B
None
16.3
- Question
- Answer
- Additional Details
Why is code coverage important?
- (A) It isn't important
- (B) Ensuring high test coverage can help tease out bugs by covering as many logic paths as possible, this is especially important in a loosely typed language
- (C) Bragging rights
B
None